Page 97 of 174

REFERENCEAT A GLANCE CONTROLS DRIVING TIPS MOBILITY
95
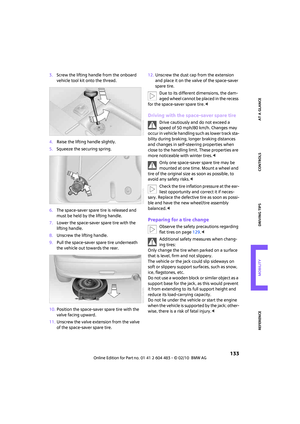
Loading aid
When the convertible top is closed, you can load
the vehicle more easily by releasing the convert-
ible top and folding it up.
1.Release the convertible top using the han-
dles, see arrows 1.
2.Lift the convertible top, see arrow 2.
3.Fold back the handles and place them on
holders3.
Expanding the luggage compartment
volume
You can enlarge the luggage compartment vol-
ume when the convertible top is closed.
1.Fold the convertible top upwards, refer to
Loading aid.
2.Pull luggage compartment roller cover rear-
ward out of the lower brackets and pivot
upward, see arrows1,
3.Push cover into the upper storage areas, see
arrows 2 and place down horizontally.
To operate the convertible top, move the
cargo bay cover back to its lower posi-
tion.<
Through-loading system
To be able to transport larger objects, the rear
backrest can be folded down.
1.If necessary, use the integrated key and
open the backrest lock 1.
2.Press button2 and fold down backrest
together with the belt strap.
3.Fold the backrest forward.
When folding the backrest back into its
original position, always ensure that the
catch engages securely. A loose backrest might
fail to prevent cargo from entering the passen-
ger compartment during sudden braking or eva-
sive maneuvers, posing a potential hazard to
occupants.
The belt guide loop, refer to page38, must be
closed.<
Determining cargo limit
1.Locate the following statement on your
vehicle's placard
*:
The combined weight of occupants
and cargo should never exceed
XXX kg or YYY lbs. Otherwise, the vehicle
may be damaged and unstable driving con-
ditions may result.<
Page 98 of 174

Things to remember when driving
96
2.Determine the combined weight of the
driver and passengers that will be riding in
your vehicle.
3.Subtract the combined weight of the driver
and passengers from XXX kilograms or YYY
pounds.
4.The resulting figure equals the available
amount of cargo and luggage load capacity.
For example, if the XXX amount equals
1,400 lbs and there will be four 150 lbs pas-
sengers in your vehicle, the amount of avail-
able cargo and luggage load capacity is
650 lbs:
1,400 lbs minus 750 lbs = 650 lbs.
5.Determine the combined weight of luggage
and cargo being loaded on the vehicle. That
weight may not safely exceed the available
cargo and luggage load capacity calculated
in step 4.
6.I f y o u r v e h icl e w i ll be t o w i n g a t r a il e r , pa r t o f
the load from your trailer will be transferred
to your vehicle. Consult the manual for
transporting a trailer to determine how this
may reduce the available cargo and luggage
load capacity of your vehicle.
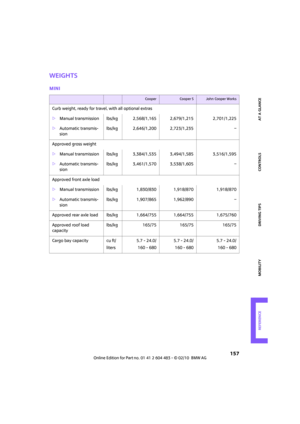
Load
The permissible load is the sum of the occu-
pants' weights and the weight of the cargo. The
greater the weight of the occupants, the less
cargo/luggage can be transported.
Stowing cargo
>Position heavy objects as low and as far for-
ward as possible, ideally directly behind the
rear seat backrests.
>Cover sharp edges and corners.>For very heavy cargo when the rear seat is
not occupied, secure each safety belt in the
respective opposite buckle.
>Do not stack higher than the top edge of the
backrests.
MINI
MINI Convertible
Securing cargo
>Secure smaller and lighter items using
retaining or draw straps
*.
>Heavy-duty cargo straps
* for securing larger
and heavier objects are available at your
MINI dealer. Four lashing eyes are provided
for attaching the cargo straps. Two of them
are located on the forward wall of the cargo
bay.
Comply with the information enclosed with
the load-securing devices.
Page 99 of 174

REFERENCEAT A GLANCE CONTROLS DRIVING TIPS MOBILITY
97
Always position and secure the cargo as
described above, so that it cannot endan-
ger the car's occupants, for example if sudden
braking or swerves are necessary.
Do not exceed the approved gross weight and
axle loads, page157; otherwise, the vehicle's
operating safety is no longer assured and the
vehicle will not be in compliance with the certifi-
cation regulations.
Heavy or hard objects should not be carried
loose inside the car, since they could be thrown
around, for example as a result of heavy braking,
sudden swerves, etc., and endanger the occu-
pants. Do not secure cargo using the fastening
points for the tether strap, page42; they may
become damaged.<
MINI: Roof-mounted
luggage rack*
A special rack system is available as an option for
your MINI. Your MINI dealer will be glad to
advise you. Comply with the installation instruc-
tions supplied with the rack system.
Mounting points
Remove the cover panel.
Loading roof-mounted luggage rack
Because roof racks raise the vehicle's center of
gravity when loaded, they have a major effect
on vehicle handling and steering response.
You should therefore always remember not to
exceed the approved roof load capacity, the
approved gross vehicle weight or the axle loads
when loading the rack.You can find the applicable data under Weights
on page 157.
The roof load must be distributed uniformly and
should not be too large in area. Heavy items
should always be placed at the bottom.
When loading, make sure that there is sufficient
space for the movement of the glass sunroof
and that no objects protrude into the swiveling
area of the liftgate; otherwise, damage can
occur.
Fasten roof-mounted cargo correctly and
securely to prevent it from shifting or falling off
during the trip.
Drive smoothly. Avoid sudden acceleration and
braking maneuvers, and take corners gently.
Rear luggage rack*
A specially designed rear luggage rack is avail-
able for your MINI Convertible as optional acces-
sory. Please read the in information provided in
the assembly instructions.
Mounting points
The mounting points can be found under the
covers inside the bumper.
Push out the covers from the respective
recesses.
Loading the rear luggage rack
When loading the rack, please ensure not to
exceed the permissible roof load, the permissi-
ble gross vehicle weight, and the axle weight.
You can find the applicable data under Weights
on page 157.
Page 100 of 174

Things to remember when driving
98
Saving fuel
Fuel consumption depends on a number of dif-
ferent factors. The implementation of certain
measures, your driving style and regular mainte-
nance can have an influence on fuel consump-
tion and on the environmental impact.
Remove unnecessary cargo
Additional weight increases fuel consumption.
Remove attached parts no longer in use
Remove auxiliary mirrors, roof- or rear-mounted
luggage racks whenever you are not using
them.
Attached parts on the vehicle affect its aerody-
namics and increase fuel consumption.
Check tire inflation pressure regularly
Check and, if necessary, correct tire inflation
pressure at least twice a month and before start-
ing on a long trip.
Low inflation pressure increases rolling resis-
tance and thus leads to greater fuel consump-
tion and tire wear.
Drive off immediately
Do no t wa it for t he eng ine to warm u p wh ile the
vehicle remains stationary. Start driving right
away, but at moderate engine speeds. This is the
fastest way for the cold engine to reach its oper-
ating temperature.
Think ahead while driving
Avoid unnecessary acceleration and braking by
maintaining a suitable distance to the vehicle
driving ahead.
Driving smoothly and anticipating impending
traffic situations reduces fuel consumption.
Avoid high engine speeds
Use first gear only for driving off. In second and
higher gears, accelerate smoothly to a suitable
engine and road speed. In doing so, avoid high
engine speeds and shift up early.When you reach your desired traveling speed,
shift to the highest suitable gear and drive at
constant speed.
As a rule: driving at low engine speeds lowers
fuel consumption and reduces wear.
Coasting
When approaching a red traffic light, take your
foot off the accelerator and let the vehicle coast
to a halt in the highest suitable gear.
On a downhill gradient, take your foot off the
accelerator and let the vehicle coast in a suitable
gear.
Fuel supply is shut off automatically when the
vehicle is coasting.
Switch off the engine during lengthy
stops
Switch off the engine when stopping for lengthy
periods, e.g. at traffic lights, railroad crossings or
in traffic jams.
Have the vehicle serviced
Have your vehicle serviced regularly to achieve
good economy and a long vehicle life. The man-
ufacturer of your MINI recommends having the
vehicle serviced by a MINI dealer. Also note the
MINI Maintenance System, page119.
Page 101 of 174
REFERENCEAT A GLANCE CONTROLS DRIVING TIPS MOBILITY
99
Page 102 of 174
Page 103 of 174
MOBILITY CONTROLS
DRIVING TIPS AT A GLANCE
REFERENCE
MOBILITY
Page 104 of 174

Refueling
102
Refueling
Switch off the engine before refueling;
otherwise, fuel cannot be added to the
tank and a message will be displayed.<
Take all precautionary measures and
observe all applicable regulations when
handling fuel. Do not carry any spare fuel con-
tainers in your vehicle. They can develop a leak
and cause an explosion or cause a fire in the
event of an accident.<
Fuel filler flap
Opening
1.Open the fuel filler flap.
2.Turn the gas cap counterclockwise.
3.Place the gas cap in the bracket attached to
the fuel filler flap.
Closing
Fit the cap and turn it clockwise until you clearly
hear a click.
Do not pinch the band attached to the
cap; otherwise, the cap cannot be closed
properly and fuel vapors can escape. A message
will be displayed if the gas cap is loose or miss-
ing.<
Manually releasing the fuel filler flap
In the event of an electrical malfunction, you can
manually unlock the fuel filler flap:
1.Remove the cover from the left-hand side-
wall of the cargo bay.
MINI:
MINI Convertible:
2.Pull on the green knob with the fuel pump
symbol. The fuel filler flap is released.
By way of example, the illustration shows the
sidewall of the cargo compartment in the MINI.