2010 MERCEDES-BENZ SLS COUPE window
[x] Cancel search: windowPage 41 of 361
G
Risk of injury
The airbag's functionality can only be assured
if the following parts are not covered and no
badges or stickers are attached to them:
R padded steering wheel boss
R kneebag covers under the steering column
and glove compartment
R front-passenger front airbag cover
R outer sea tcushions (no tonbucket seats*)
R the top of the door frame in the area of the
side window G
Risk of injury
When an airbag deploys, a small amoun tof
powder is released. The powder may cause
short-term breathing difficulties to persons
suffering from asthma or other pulmonary
conditions.
In order to prevent potential breathing diffi-
culties, you should leave the vehicle as soon
as it is safe to do so. You can also open the
window to allow fresh air to enter the vehicle
interior. The powder generally does not con-
stitute a health hazard and does not indicate
that there is a fire in the vehicle. G
Risk of injury
The airbag parts are hot after the airbag has
been deployed. Do not touch them as you
could burn yourself.
Have the airbags replaced at a qualified spe-
cialist workshop. Otherwise, occupants are
not protected by the airbags in the event of
another accident.
Features specific to bucket seats*
Vehicles with bucket seats have no sidebags.
The additional passive safety offered by the
sidebag is not available as aresult. Therefore,
there is an increased risk of injury during side
impacts and if the vehicle overturns. In par-
ticular, the chest area may be affected. Direct
contact with the vehicle's interior compo-
nents and possibly external objects is more likely. Thus, there is an increased risk of
injury.
Front airbags
Fron
tairbags are designed to increase pro-
tection for the driver's and front-passenger's
head and chest. Driver's airbag
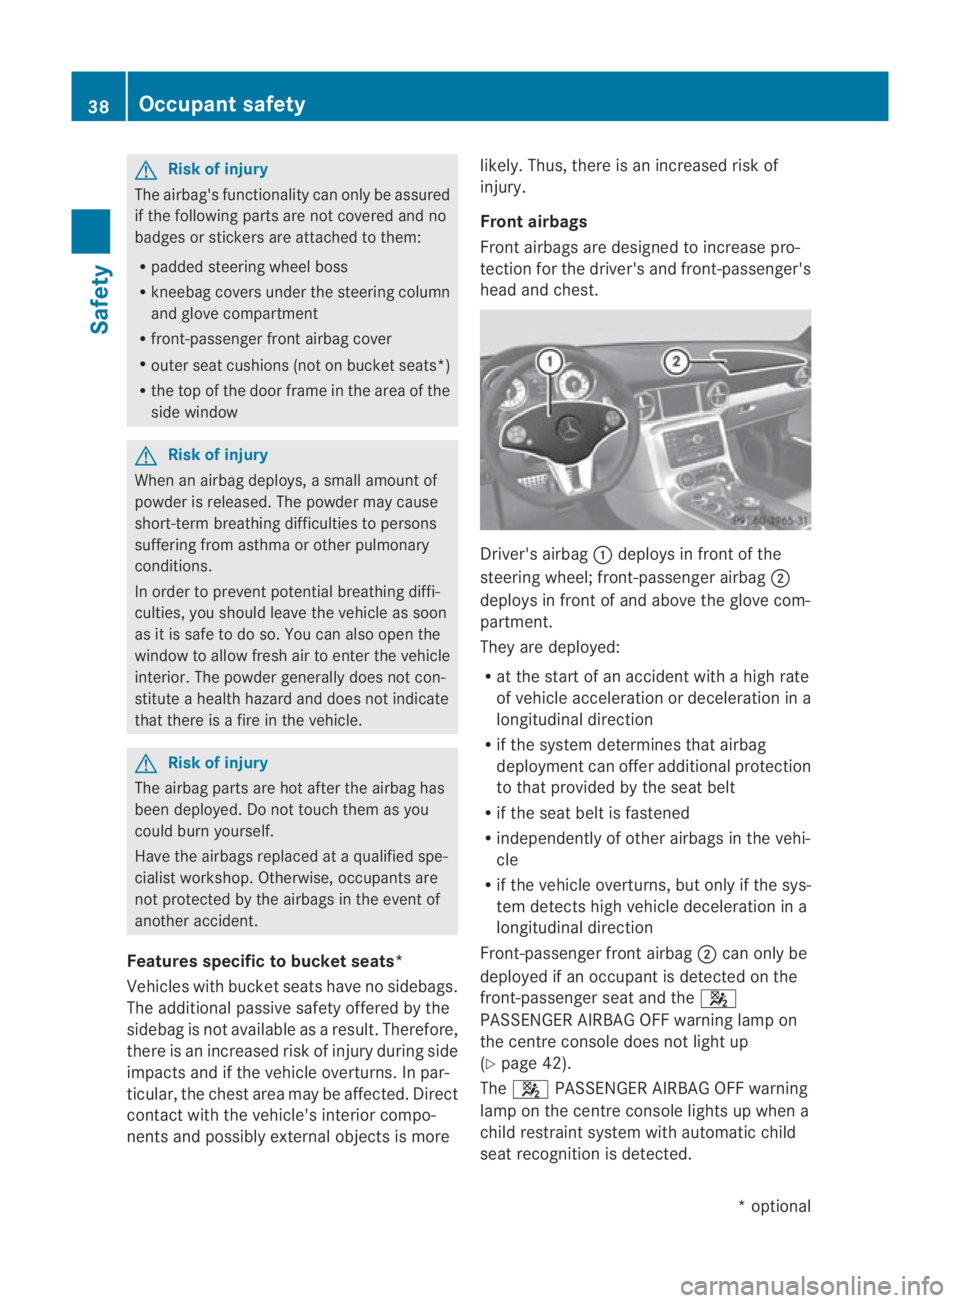
0001deploys in front of the
steering wheel; front-passenger airbag 0002
deploys in front of and above the glove com-
partment.
They are deployed:
R at the start of an accident with a high rate
of vehicle acceleration or deceleration in a
longitudinal direction
R if the system determines that airbag
deploymen tcan offer additional protection
to that provided by the seat belt
R if the seat belt is fastened
R independently of other airbag sinthe vehi-
cle
R if the vehicle overturns,b ut only if the sys-
te md etects high vehicle deceleration in a
longitudinal direction
Front-passenger fron tairbag 0002can only be
deployed if an occupant is detected on the
front-passenger seat and the 000A
PASSENGER AIRBAG OFF warning lamp on
the centre console does not light up
(Y page 42).
The 000A PASSENGER AIRBAG OFF warning
lamp on the centre console lights up when a
child restraint system with automatic child
seat recognition is detected. 38
Occupant safetySafety
*o
ptional
BA 197 ECE RE 2010/6a; 1; 2, en-GB
sabbaeu
Version: 3.0.3.6 2010-05-07T14:19:43+02:00 - Seite 38
Page 53 of 361
the vehicle is jacked up on one side, for exam-
ple.
Priming tow-away protection X
Loc kthe vehicle using the key.
Tow-away protection is primed after
approximately 30 seconds.
Deactivating tow-away protection Tow-away protection is automatically deacti-
vated when you unlock your vehicle using the
key.
To prevent a false alarm, deactivate tow-away
protection manually if your vehicle:
R is being transported
R is being loaded, e.g. onto a ferry or car
transporter
R is parked on a movable surface, e.g. in a
split-level garage X
Using the Start/Stop button, set to key
position 0.
or
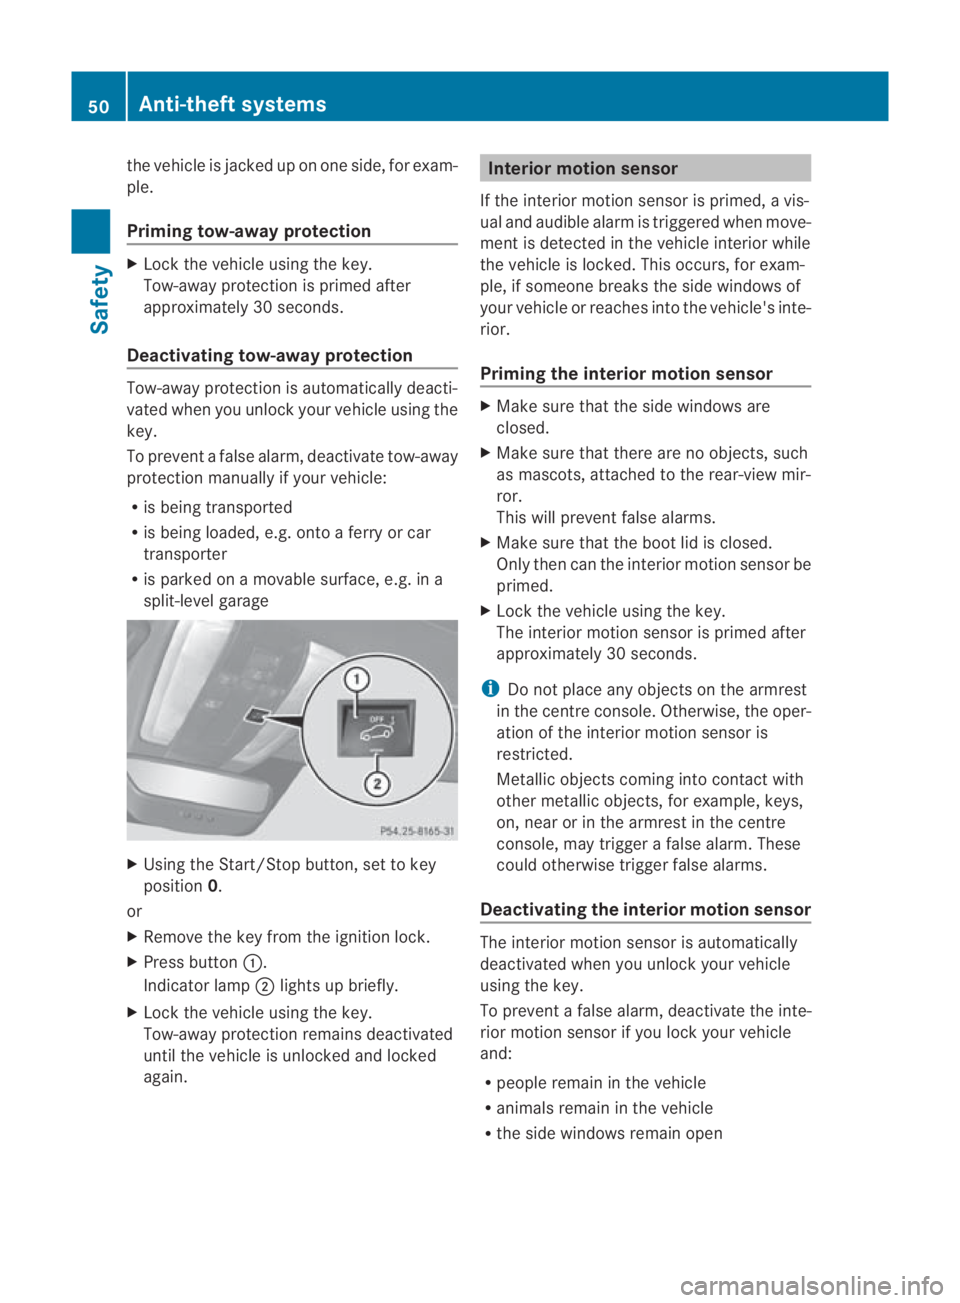
X Remove the key from the ignition lock.
X Press button 0001.
Indicator lamp 0002lights up briefly.
X Lock the vehicle using the key.
Tow-away protection remains deactivated
until the vehicle is unlocked and locked
again. Interior motion sensor
If the interior motion sensor is primed, a vis-
ual and audible alarm is triggered when move-
ment is detected in the vehicle interior while
the vehicle is locked. This occurs, for exam-
ple, if someone breaks the side windows of
your vehicle or reaches into the vehicle's inte-
rior.
Priming the interior motion sensor X
Make sure that the side windows are
closed.
X Make sure that there are no objects, such
as mascots, attached to the rear-view mir-
ror.
This will prevent false alarms.
X Make sure that the boot lid is closed.
Only then can the interior motion sensor be
primed.
X Lock the vehicle using the key.
The interior motion sensor is primed after
approximately 30 seconds.
i Do not place any objects on the armrest
in the centre console. Otherwise, the oper-
ation of the interior motion sensor is
restricted.
Metallic objects coming into contact with
other metallic objects, for example, keys,
on, near or in the armrest in the centre
console, may trigger a false alarm. These
could otherwise trigger false alarms.
Deactivating the interior motion sensor The interior motion sensor is automatically
deactivated when you unlock your vehicle
using the key.
To prevent a false alarm, deactivate the inte-
rior motion sensor if you lock your vehicle
and:
R people remain in the vehicle
R animals remain in the vehicle
R the side windows remain open 50
Anti-theft systemsSafety
BA 197 ECE RE 2010/6a; 1; 2, en-GB
sabbaeu
Version: 3.0.3.6 2010-05-07T14:19:43+02:00 - Seite 50
Page 58 of 361
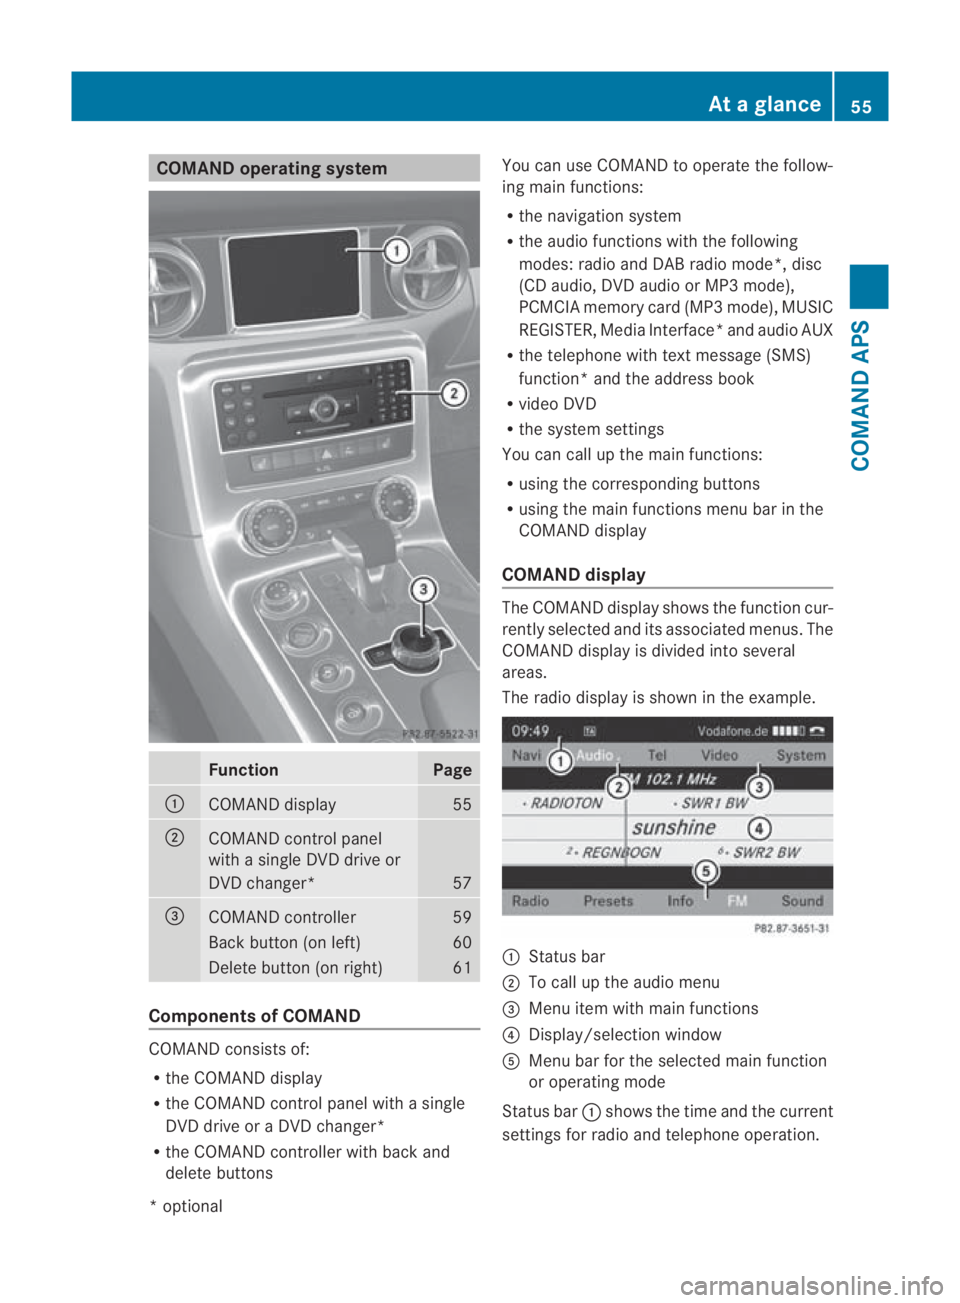
COMAND operating system
Function Page
0001
COMAND display 55
0002
COMAND control panel
with a single DV
Ddrive or
DVD changer* 57
0015
COMAND controller 59
Back button (on left) 60
Delete button (on right) 61
Components of COMAND
COMAND consists of:
R
the COMAND display
R the COMAND control panel with a single
DVD drive or a DVD changer*
R the COMAND controller with back and
delete buttons You can use COMAND to operate the follow-
ing main functions:
R the navigation system
R the audio functions with the following
modes :radio and DA Bradio mode*, disc
(CD audio, DV Daudio or MP3 mode),
PCMCI Amemory card (MP3 mode), MUSIC
REGISTER, Media Interface* and audio AUX
R the telephone with textm essage (SMS)
function *and the address book
R video DVD
R the system settings
You can call up the main functions:
R using the corresponding buttons
R using the main functions menu bar in the
COMAND display
COMAND display The COMAND display shows the functio
ncur-
rently selected and its associated menus. The
COMAND display is divided int oseveral
areas.
The radio display is shown in the example. 0001
Status bar
0002 To call up the audio menu
0015 Menu item with main functions
0014 Display/selection window
0012 Menu bar for the selected main function
or operating mode
Status bar 0001shows the time and the current
settings for radio and telephone operation. At
ag lance
55COMAND APS
*optional
BA 197 ECE RE 2010/6a; 1; 2, en-GB
sabbaeu Version: 3.0.3.6 2010-05-07T14:19:43+02:00 - Seite 55 Z
Page 69 of 361
Example of operation
Switching to radio mode and calling up
the station list
Initial situation:
You want, for example, to switch from the
telephone function to radio mode and select
a radio statio nfrom the station list.
Switching to the current audio operating
mode
i You can also call up the current audio
operating mode directly by pressing the
0006 or000E function button.
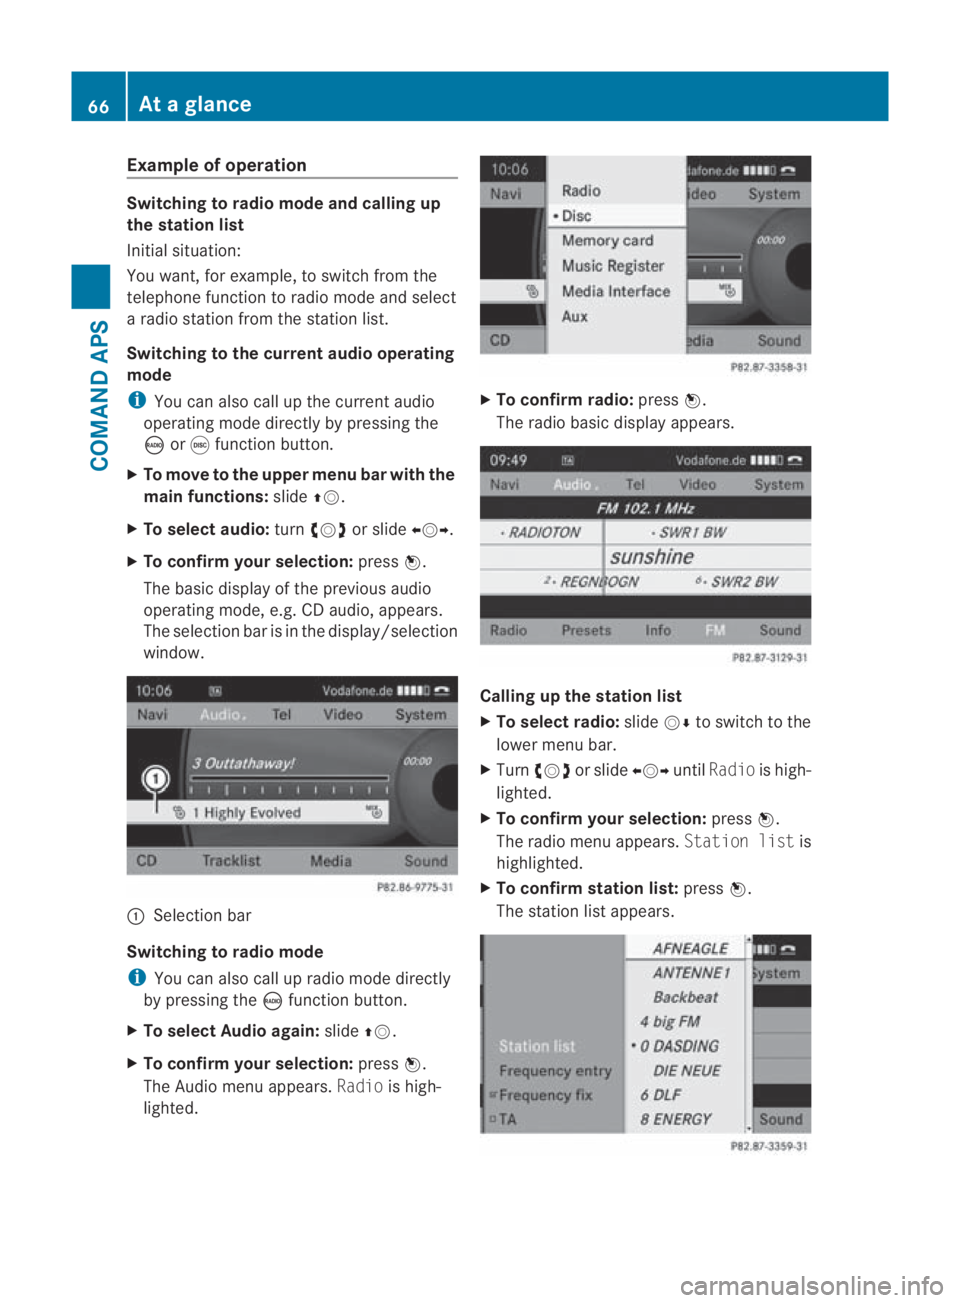
X To move to the upper menu bar with the
main functions: slide001F0013.
X To selecta udio:turn002800130029 or slide 002B0013002C.
X To confirm your selection: press0017.
The basic display of the previous audio
operating mode, e.g. CD audio, appears.
The selection bar is in the display/selection
window. 0001
Selectio nbar
Switching to radio mode
i You can also call up radio mode directly
by pressing the 0006function button.
X To select Audio again: slide001F0013.
X To confir myour selection: press0017.
The Audio menu appears. Radiois high-
lighted. X
To confirm radio: press0017.
The radio basic display appears. Calling up the station list
X
To select radio: slide0013000Dto switch to the
lower menu bar.
X Turn 002800130029 or slide 002B0013002CuntilRadio is high-
lighted.
X To confir myour selection: press0017.
The radio menu appears. Station listis
highlighted.
X To confir mstation list: press0017.
The statio nlist appears. 66
At
ag lanceCOMAND APS
BA 197 ECE RE 2010/6a; 1; 2, en-GB
sabbaeu Version: 3.0.3.6 2010-05-07T14:19:43+02:00 - Seite66
Page 76 of 361
Clock format:
R
HH -hour
R MM - minute
This setting applies for both the 24-hour
and the AM/PM format.
X To change the format: turn002800130029 or slide
001F0013000D.
X To confirm the change: press0017.
Setting the time zone and switching
between summer and standard time i
The correct time zone and summer/
standard time must be set for the following
navigation system functions to operate cor-
rectly:
R route guidance on routes with time-
dependent traffic guidance
R calculation of expected time of arrival
X To set the time zone: Sys‐
tem0004Time0004Time zone.
The country list appears. The 0023dot indi-
cates the current setting.
X Select the country in which you are cur-
rently driving.
Depending on the country you select, a
time zone list may also appear.
X Select the desired time zone.
Subsequent operation depends on:
R whether your navigation system has GPS
reception
R the country you have previously selected
You may either:
R switch between Summer timeandStand‐
ard time manually in a list
or
R switch automatic summer to standard time
changeover (and vice versa) on or off
X To switch manually: selectSummer
time orStandard time.
The 0023dot indicates the current setting. X
To switch automatic changeover on/
off: select Autom. Summer / Winter
time on orAutom. Summer / Winter
time off.
The 0023dot indicates the current setting.
X To store the setting and exit the menu:
press 0017.
X To exit the menu without saving: press
the 0001 back button next to the COMAND
controller or slide 002B0013002C.
i If you have switched off the automatic
changeover function, you must change
from summer to standard time and vice
versa manually using the "Set time" func-
tion (Y page 72). Read-aloud settings
Setting the read-aloud speed X
Select System0004Settings0004Text
reader speed.
The list of possible settings appears. The
0023 dot indicates the current setting.
X To select asetting: turn002800130029 or slide
001F0013000D .
X To confir myour selection: press0017. LINGUATRONIC settings
Activating/deactivating the help win-
dow X
Select System 0004Settings 0004Lingua‐
tronic .
X Select Help window .
You have switched the help window on
0019 or off 0004. System settings
73COMAND APS
BA 197 ECE RE 2010/6a; 1; 2, en-GB
sabbaeuV ersion: 3.0.3.6
2010-05-07T14:19:43+02:00 - Seite 73 Z
Page 77 of 361
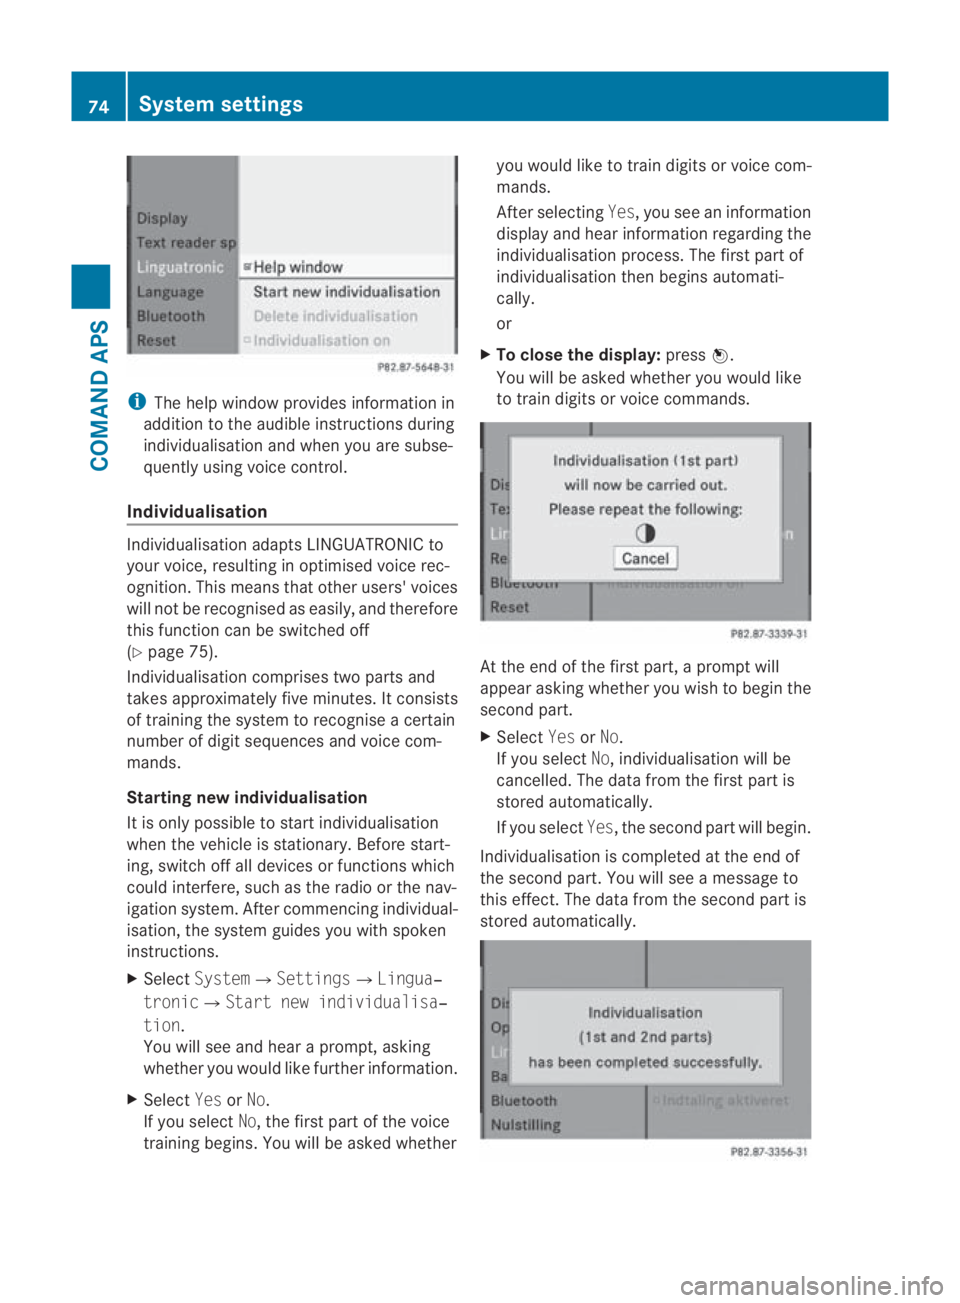
i
The help window provides information in
addition to the audible instructions during
individualisation and when you are subse-
quently using voice control.
Individualisation Individualisation adapts LINGUATRONIC to
your voice, resulting in optimised voice rec-
ognition .This means that other users' voices
will not be recognised as easily, and therefore
this function can be switched off
(Y page 75).
Individualisation comprises two parts and
takes approximately five minutes. It consists
of training the system to recognise a certain
number of digit sequences and voice com-
mands.
Starting new individualisation
It is only possible to start individualisation
when the vehicle is stationary. Before start-
ing, switch off all devices or functions which
could interfere, such as the radio or the nav-
igation system. After commencing individual-
isation, the system guides you with spoken
instructions.
X Select System0004Settings0004Lingua‐
tronic0004Start new individualisa‐
tion.
You will see and hear a prompt, asking
whether you would like further information.
X Select YesorNo.
If you select No, the first part of the voice
training begins. You will be asked whether you would like to train digits or voice com-
mands.
After selecting
Yes, you see an information
display and hear information regarding the
individualisation process. The first part of
individualisation then begins automati-
cally.
or
X To close the display: press0017.
You will be asked whether you would like
to train digits or voice commands. At the end of the first part, a prompt will
appeara
sking whether you wish to begin the
second part.
X Select YesorNo.
If you select No, individualisation will be
cancelled. The data from the first part is
stored automatically.
If you select Yes, the second part will begin.
Individualisation is completed at the end of
the second part. You will see a message to
this effect. The data from the second part is
stored automatically. 74
System settingsCOMAND APS
BA 197 ECE RE 2010/6a; 1; 2, en-GB
sabbaeu
Version: 3.0.3.6 2010-05-07T14:19:43+02:00 - Seite 74
Page 87 of 361
Storing the crosshair position as
adesti-
nation in the list of previous destinations
X To display the menu system: press0017.
X To store: selectPosition0004 Save
crosshair position.
COMAND stores the crosshair position as
a destination in the list of previous desti-
nations (Y page 126). You see a window
with a message to this effect.
Hiding the crosshair
X Press the 0001back button next to the
COMAND controller twice.
The crosshair disappears and th emap is
set to the vehicle position.
or
X Set the map to the vehicle position; see the
explanatio nbelow.
Centring the map on the vehicle or des-
tination position i
If you have moved the map, you can use
this function to rapidly return the map to
the position of the vehicle or destination.
You can only centre the map on the desti-
nation position when route guidance is
active.
X To display the menu system: press0017.
X To set the map to the vehicle position:
select Position0004Vehicle position
map.
or
X Press the 0001back button next to the
COMAND controller when the crosshair is
displayed.
This hides the crosshair.
X To centre the map on the destination
position: selectPosition0004Destina‐
tion position map.
The crosshair is centred on the destination. Basic settings
i You can make the following settings
regardless of whether route guidance is
active or inactive.
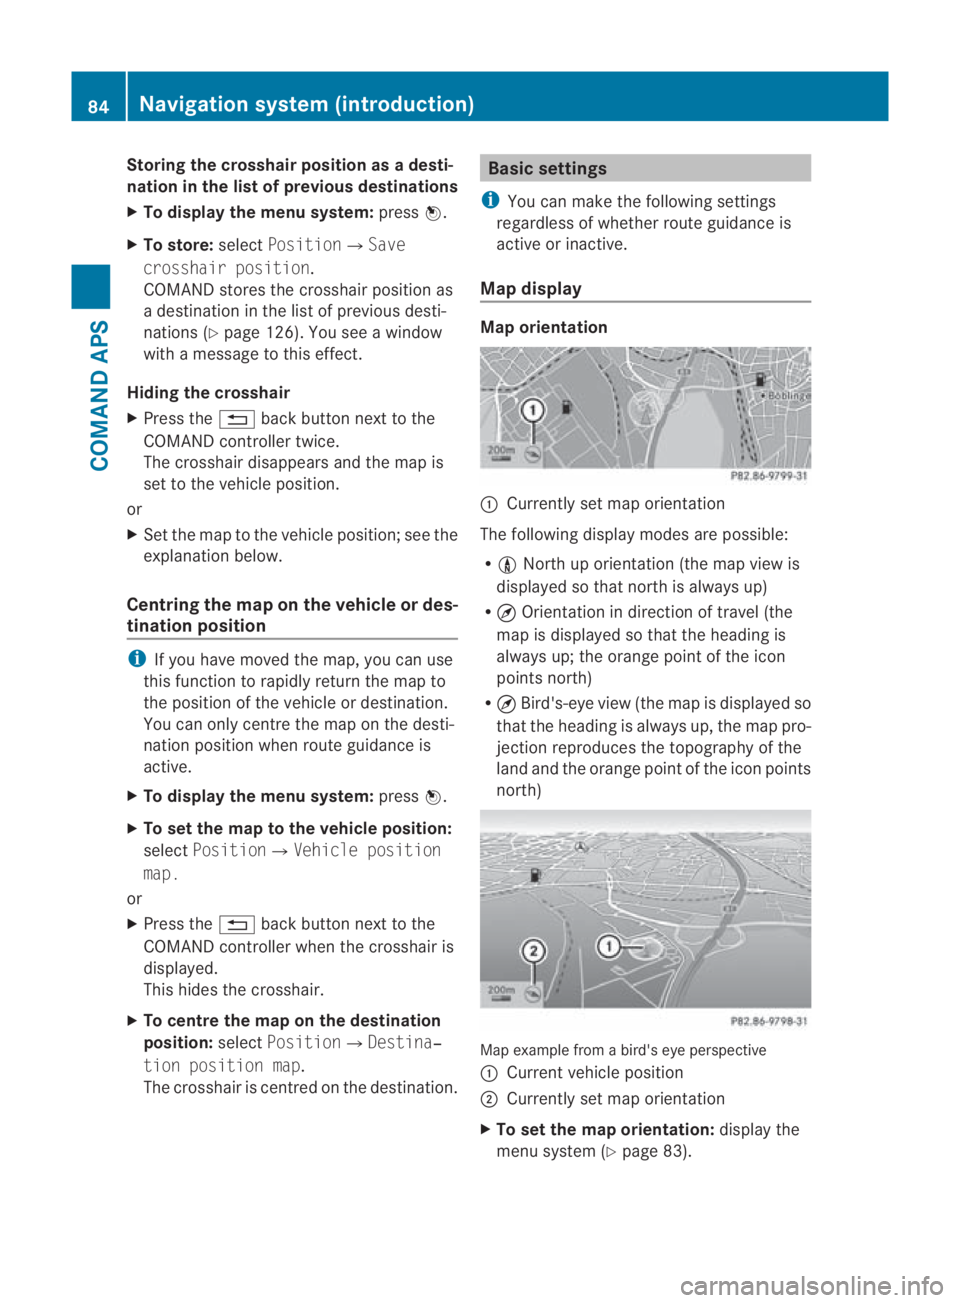
Map display Map orientation
0001
Currently set map orientation
The following display modes are possible:
R 0016 North up orientation (the map view is
displayed so that north is always up)
R ¤ Orientation in direction of travel (the
map is displayed so that the heading is
always up; the orange point of the icon
points north)
R ¤ Bird's-eye view (the map is displayed so
that the heading is always up, the map pro-
jection reproduces the topography of the
land and the orange point of the icon points
north) Map example from a bird's eye perspective
0001
Current vehicle position
0002 Currently set map orientation
X To set the map orientation: display the
menu system (Y page 83).84
Navigation system (introduction)COMAND APS
BA 197 ECE RE 2010/6a; 1; 2, en-GB
sabbaeu Version: 3.0.3.6 2010-05-07T14:19:43+02:00 - Seite 84
Page 147 of 361
Adding
atelephone number to an existing
phone book entry
X Select the list entry.
X Select Options 0004Save 0004Add tele‐
phone no.
i Save has no function if the selected list
entry is already stored.
X Select a number category, e.g. Home.
X Select a telephone category, e.g. Mobile.
X Select Save.
The search menu for addres sbook entries
appears.
X Search for the desired entry.
i There is a detailed description of how to
search for an address book entry in the
"Searching for an address book entry” sec-
tion (Y page 152).
X Press 0017when you have finished searching.
COMAND stores the data if there are fewer
than five numbers assigned to the entry you
are searching for in the selected number
category.
You will see a message to this effect.
If five numbers are stored for the entry you
are searching for, a prompt will appear ask-
ing whether you wish to overwrite one of
the existing numbers.
X Select YesorNo.
If you select Yes, a selection list with the
five existing numbers is displayed.
X Select the number to be overwritten.
COMAND overwrites the selected number
with the new data. Telephone operation
Incoming call Rejecting or accepting
acall
When there is an incoming call, you see a
window in the display. X
To reject: selectReject .
or
X Press the 0014button on the COMAND con-
trol panel or the 0015button on the multi-
function steering wheel.
X To accept: selectAccept .
or
X Press the 0016button on the COMAND con-
trol panel or the 001Cbutton on the multi-
function steering wheel.
Once you have accepted the call, you can
conduct you rtelephone call using the hands-
free system. The call volume can be adjusted
(Y page 67). For more information, see the
"Functions during a single call connection"
section (Y page 145).
i Either the phone number, the phone num-
ber and name (if there is an entry for the
number in the address book) or Unknown(if
the telephone number is withheld) appears
in the display.
i You can also accept a call as described
above when COMAND is showing the dis-
play of a differen tmain application. The
display switches to the telephone display
after you accept the call. After the call is
finished, you see the display of the previous
main applicatio nagain.
Making an outgoing call Entering
atelephone number using the
number keypad
X Call up the telephone basic menu.
X Select the required digits in sequence on
the number keypad.
X To delete an individual digit: press001F.
X To delete an entire phone number: press
and hold the 001Fbutton until the number is
deleted.
X To place acall: press the 0016button on the
COMAND control panel or press the 001C
button on the multifunctio nsteering wheel. 144
TelephoneCOMAND
APS
BA 197 ECE RE 2010/6a; 1; 2, en-GB
sabbaeuV ersion: 3.0.3.6
2010-05-07T14:19:43+02:00 - Seite 144