2010 MERCEDES-BENZ SLS COUPE key battery
[x] Cancel search: key batteryPage 267 of 361
Deleting the remote control memory
X
Selec tkey position 2with the Start/Stop
button (Y page 202).
X Press and hold transmitter buttons 0002
and 0014for approximately 20 seconds until
indicator lamp 0001flashes rapidly.
The memory is cleared.
i You should clear the remot econtrol mem-
ory before selling the vehicle. Charge maintenance socket*
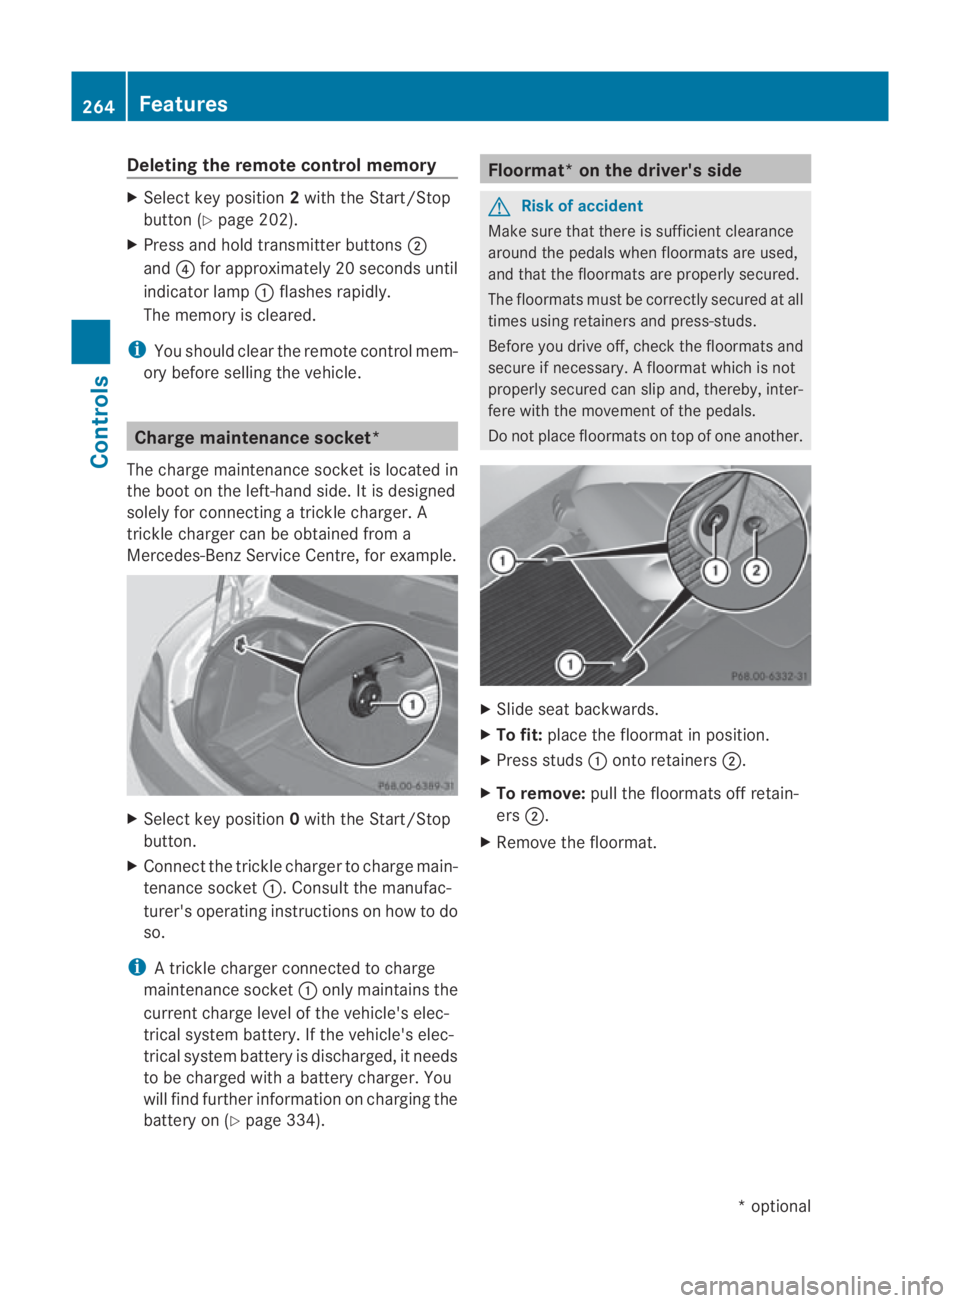
The charge maintenance socket is located in
the boot on the left-hand side. It is designed
solely for connecting a trickle charger. A
trickle charger can be obtained from a
Mercedes-Benz Service Centre, for example. X
Select key position 0with the Start/Stop
button.
X Connect the trickle charger to charge main-
tenance socket 0001. Consult the manufac-
turer's operating instructions on how to do
so.
i A trickle charger connected to charge
maintenance socket 0001only maintains the
current charge level of the vehicle's elec-
trical system battery. If the vehicle's elec-
trical system battery is discharged, it needs
to be charged with a battery charger. You
will find further information on charging the
battery on (Y page 334). Floormat* on the driver's side
G
Risk of accident
Make sure that there is sufficient clearance
around the pedals when floormats are used,
and that the floormats are properly secured.
The floormats must be correctly secured at all
times using retainers and press-studs.
Before you drive off, check the floormats and
secure if necessary. Afloormat which is not
properly secured can slip and, thereby, inter-
fere with the movemen tofthe pedals.
Do not place floormats on top of one another. X
Slide seat backwards.
X To fit: place the floormat in position.
X Press studs 0001onto retainers 0002.
X To remove: pull the floormats off retain-
ers 0002.
X Remove the floormat. 264
FeaturesControls
*o
ptional
BA 197 ECE RE 2010/6a; 1; 2, en-GB
sabbaeu
Version: 3.0.3.6 2010-05-07T14:19:43+02:00 - Seite 264
Page 290 of 361
Where will I find...?
...........................288
Display messages ............................. 289
Troubleshooting ................................ 306
Locking/unlocking in an emer-
gency ................................................. 321
Changing batteries (key) ..................323
Changing bulbs ................................. 323
Replacing the wiper blades ..............325
Flat tyre ............................................. 325
Battery ............................................... 334
Jump-starting .................................... 338
Towing and tow-starting ..................339
Fuses .................................................. 342 287Practical advice
BA 197 ECE RE 2010/6a; 1; 2, en-GB
sabbaeu
Version: 3.0.3.6 2010-05-07T14:19:43+02:00 - Seite 287
Page 322 of 361
Rear spoiler
Problem Possible causes/consequences and
0003 Solutions
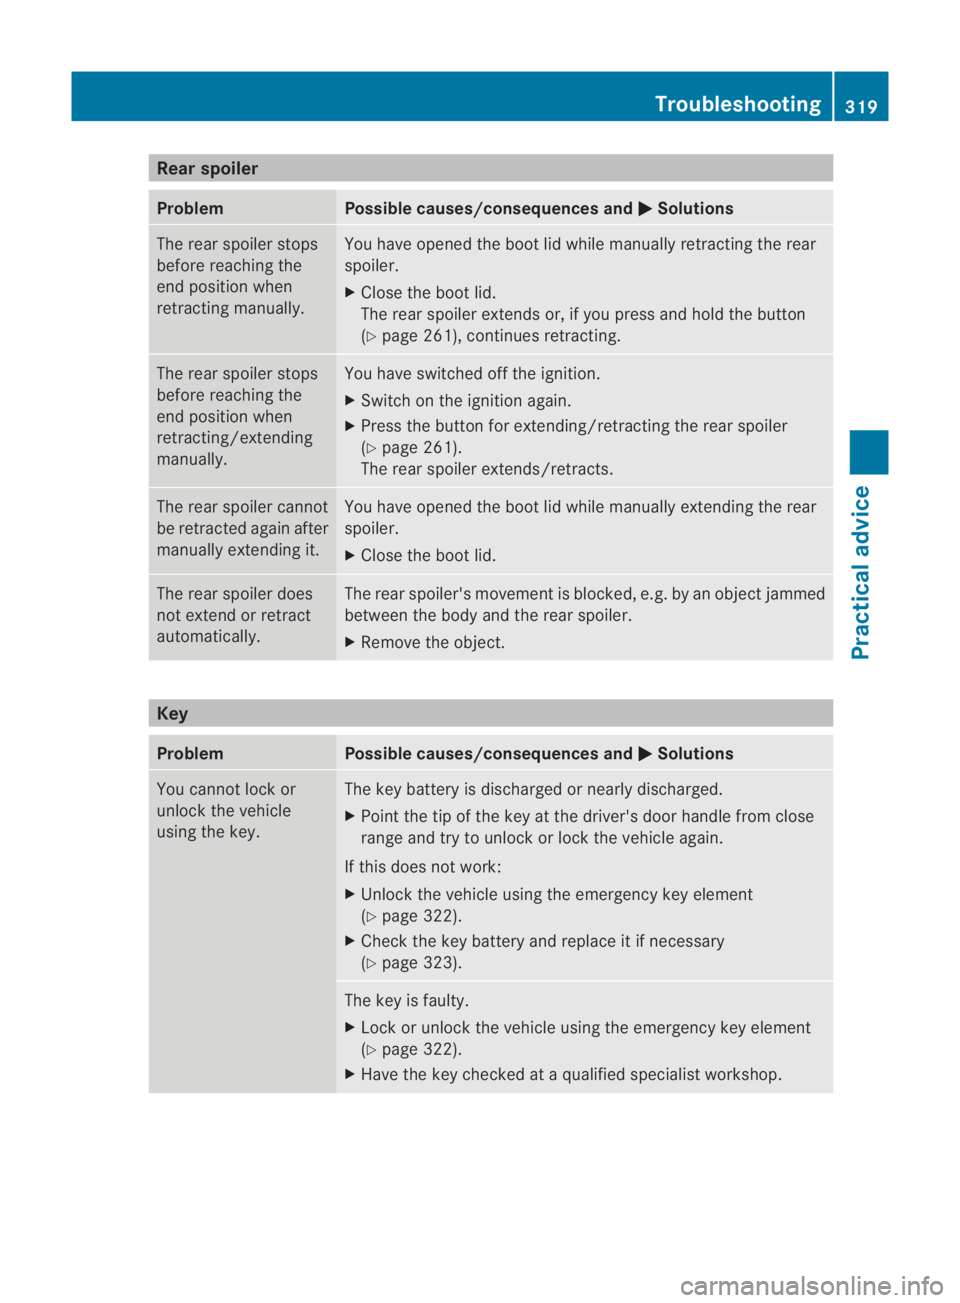
The rea
rspoiler stops
before reaching the
end position when
retracting manually. You have opened the boot lid while manually retracting the rear
spoiler.
X
Close the boot lid.
The rear spoiler extends or, if you press and hold the button
(Y page 261), continues retracting. The rear spoiler stops
before reaching the
end position when
retracting/extending
manually. You have switched off the ignition.
X
Switch on the ignition again.
X Press the button for extending/retracting the rear spoiler
(Y page 261).
The rear spoiler extends/retracts. The rear spoiler cannot
be retracted again after
manually extending it. You have opened the boot lid while manually extending the rear
spoiler.
X
Close the boot lid. The rear spoiler does
not extend or retract
automatically. The rear spoiler's movement is blocked, e.g. by an objec
tjammed
between the body and the rear spoiler.
X Remove the object. Key
Problem Possible causes/consequences and
0003 Solutions
You cannot lock or
unlock the vehicle
using the key. The key battery is discharged or nearly discharged.
X
Poin tthe tip of the key at the driver's door handle from close
range and try to unlock or lock the vehicle again.
If this does not work:
X Unlock the vehicle using the emergency key element
(Y page 322).
X Check the key battery and replace it if necessary
(Y page 323). The key is faulty.
X
Lock or unlock the vehicle using the emergency key element
(Y page 322).
X Have the key checked at a qualified specialist workshop. Troubleshooting
319Practical advice
BA 197 ECE RE 2010/6a; 1; 2, en-GB
sabbaeu Version: 3.0.3.6 2010-05-07T14:19:43+02:00 - Seite 319 Z
Page 323 of 361
Problem Possible causes/consequences and
0003 Solutions
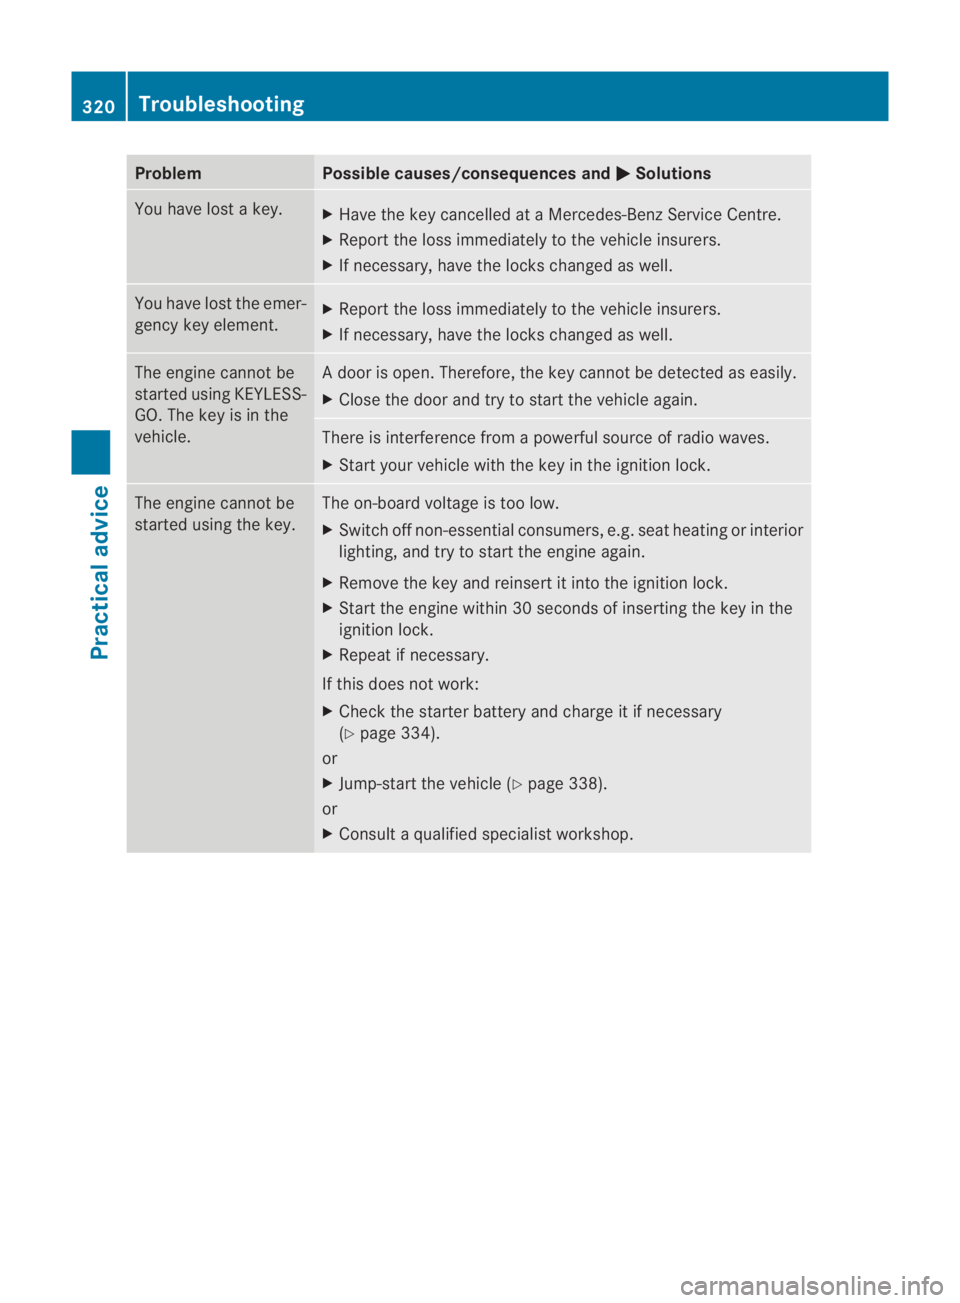
You have lost a key.
X
Have the key cancelled at a Mercedes-Benz Service Centre.
X Report the loss immediately to the vehicle insurers.
X If necessary, have the locks changed as well. You have lost the emer-
gency key element.
X
Report the loss immediately to the vehicle insurers.
X If necessary, have the locks changed as well. The engine cannot be
started using KEYLESS-
GO. The key is in the
vehicle. Ad
oor is open. Therefore, the key cannot be detected as easily.
X Close the door and try to start the vehicle again. There is interference from a powerful source of radio waves.
X
Start your vehicle with the key in the ignition lock. The engine cannot be
started using the key. The on-board voltage is too low.
X
Switch off non-essential consumers, e.g. seat heating or interior
lighting, and try to start the engine again.
X Remove the key and reinsert it into the ignition lock.
X Start the engine within 30 seconds of inserting the key in the
ignition lock.
X Repeat if necessary.
If this does not work:
X Check the starter battery and charge it if necessary
(Y page 334).
or
X Jump-start the vehicle (Y page 338).
or
X Consult a qualified specialist workshop. 320
TroubleshootingPractical advice
BA 197 ECE RE 2010/6a; 1; 2, en-GB
sabbaeu
Version: 3.0.3.6 2010-05-07T14:19:43+02:00 - Seite 320
Page 324 of 361
Problem Possible causes/consequences and
0003 Solutions
The key cannot be
turned in the ignition
lock. The key has been in position
0for a considerable time.
X Remove the key and reinsert it into the ignition lock.
X Check the starter battery and charge it if necessary
(Y page 334).
X Start the engine. The on-board voltage is too low.
X
Switch off non-essential consumers, e.g. seat heating or interior
lighting, and try to turn the key again.
If this does not work:
X Check the starter battery and charge it if necessary
(Y page 334).
or
X Jump-start the vehicle (Y page 338).
or
X Consult a qualified specialist workshop. Parking up the vehicle
Problem Possible causes/consequences and
0003 Solutions
The vehicle is to be left
parked up for longer
than six weeks. Damage resulting from non-use may occur if the vehicle is parked
up for long periods.
X
Visit a qualified specialist workshop and seek advice.
X Disconnect the battery (Y page 336).Locking/unlocking in an emergency
Emergency key element
If the vehicle can no longer be locked or
unlocked with the key, use the emergency
key element.
If you use the emergency key element to
unlock and open the driver's door, the anti-
theft alarm system will be triggered
(Y page 49).
There are several ways to turn off the alarm:
X Press the 000Bor0009 button on the key.
or
X Insert the key into the ignition lock. If you unlock the vehicle using the emergency
key element, the fuel filler flap will not be
unlocked automatically.
X
To unlock the fuel filler flap: insert the
key in the ignition lock. Locking/unlocking in an emergency
321Practical advice
BA 197 ECE RE 2010/6a; 1; 2, en-GB
sabbaeu Version: 3.0.3.6 2010-05-07T14:19:43+02:00 - Seite 321 Z
Page 326 of 361
Changing batteries (key)
Notes
It is advisable to have th ebatteries replaced
at a qualified specialist workshop, e.g .ata
Mercedes-Benz Service Centre. G
Risk of poisoning
Batteries contain toxic and caustic substan-
ces. For this reason, keep batteries away from
children.
If a battery is swallowed, consult a doctor
immediately. H
Environmental note
Do not dispose of batteries with the house-
hold rubbish. They contain highly toxic sub-
stances.
Take discharged batteries to aqualified spe-
cialist workshop, e.g .aMercedes-Benz
Service Centre, or to a special collection point
for old batteries. Key
Checking the batteries X
Press the 0009or000B button.
The battery is working properly, if the bat-
tery charge indicator lamp lights up briefly.
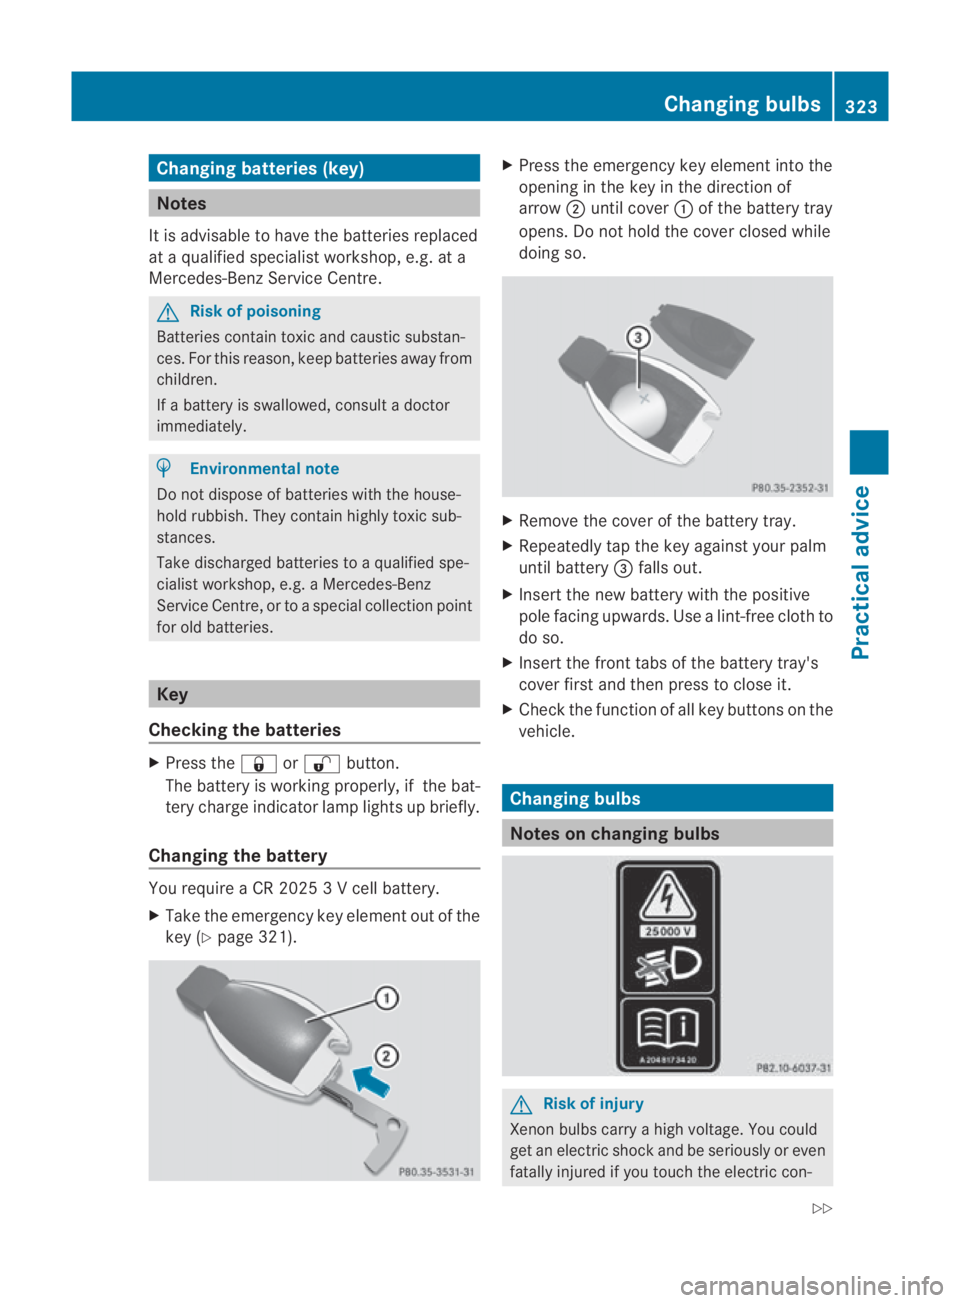
Changing the battery You require a CR 2025 3 V cell battery.
X
Take the emergency key element out of the
key (Y page 321). X
Press the emergency key element into the
opening in the key in the direction of
arrow 0002until cover 0001of the battery tray
opens. Do not hold the cover closed while
doing so. X
Remove the cover of the battery tray.
X Repeatedly tap the key against your palm
until battery 0015falls out.
X Insert the new battery with the positive
pole facing upwards. Use alint-free cloth to
do so.
X Insert the front tabs of the battery tray's
cover first and then press to close it.
X Check the function of all key buttons on the
vehicle. Changing bulbs
Notes on changing bulbs
G
Risk of injury
Xenon bulbs carry a high voltage. You could
get an electric shoc kand be seriously or even
fatally injured if you touch the electri ccon- Changing bulbs
323Practical advice
BA 197 ECE RE 2010/6a; 1; 2, en-GB
sabbaeu Version: 3.0.3.6 2010-05-07T14:19:43+02:00 - Seite 323 Z
Page 330 of 361
Comply with the manufacturer's safety
instructions on the tyr
einflatio ncompressor
label and on the TIREFIT filler bottle.
i You will also find operating instructions
0015 in the lid of the TIREFIT kit.
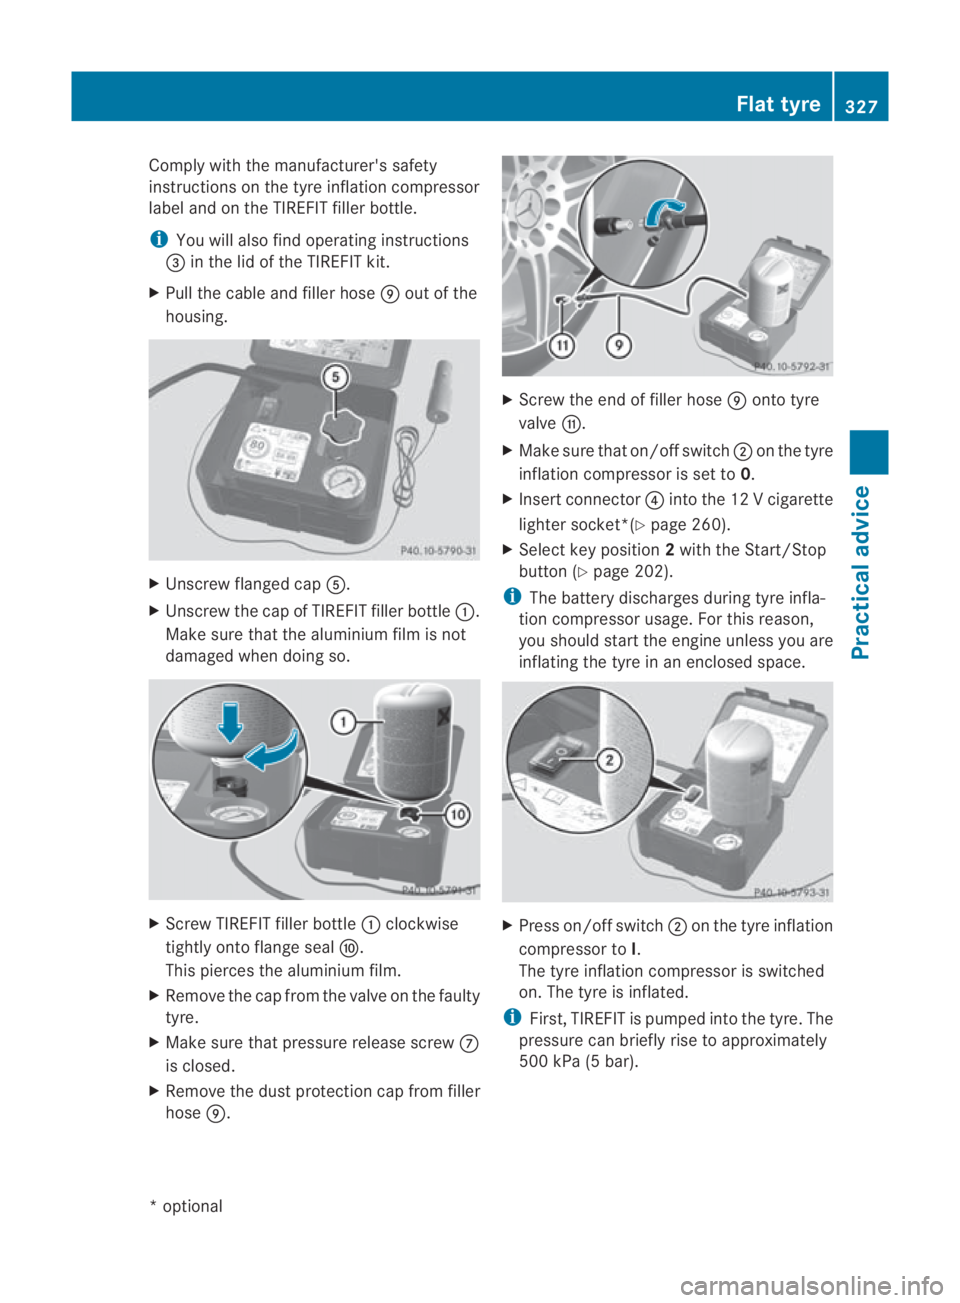
X Pull the cable and filler hose 000Cout of the
housing. X
Unscrew flanged cap 0012.
X Unscrew the cap of TIREFIT filler bottle 0001.
Make sure that the aluminium film is not
damaged when doing so. X
Screw TIREFIT filler bottle 0001clockwise
tightly onto flange seal 000D.
This pierces the aluminium film.
X Remove the cap from the valve on the faulty
tyre.
X Make sure that pressure release screw 000A
is closed.
X Remove the dust protection cap from filler
hose 000C. X
Screw the end of filler hose 000Conto tyre
valve 000E.
X Make sure that on/offs witch0002on the tyre
inflatio ncompressor is set to 0.
X Insert connector 0014into the 12 V cigarette
lighter socket*(Y page 260).
X Select key position 2with the Start/Stop
button (Y page 202).
i The battery discharges during tyre infla-
tion compressor usage. For this reason,
you should start the engine unless you are
inflating the tyre in an enclosed space. X
Press on/offs witch0002on the tyre inflation
compressor to I.
The tyre inflatio ncompressor is switched
on. The tyre is inflated.
i First, TIREFIT is pumped into the tyre. The
pressure can briefly rise to approximately
500 kPa (5 bar). Flat tyre
327Practical advice
*optional
BA 197 ECE RE 2010/6a; 1; 2, en-GB
sabbaeu
Version: 3.0.3.6 2010-05-07T14:19:43+02:00 - Seite 327 Z
Page 337 of 361
X
Select key position 2with the Start/Stop
button (Y page 202).
X Press on/of fswitch 0002on the electric air
pump to I.
The electric air pump is switched on. The
tyre is inflated.
X When the specified tyre pressure (see
Emergency spare wheel (Y page 355)) has
been reached, press on/off switch 0002on
the electric air pump to 0.
The electric air pump is switched off.
! Do not operate the electric air pump for
longer than ten minutes at a time without
a break .Itmay otherwise overheat.
The air pump can be operated again once
it has cooled down.
If the tyre pressure is higher than the value
specified:
X Open pressure release screw 000Auntil the
tyre pressure is correct.
X Remove fille rhose 000Bfrom the tyre valve.
X Stow the electric air pump in a safe and
accessible place in the vehicle.
Stowing aused collapsible emergency
spare wheel 25 If you want to store a collapsible emergency
spare wheel in the vehicle again, follow the
procedure described below. Otherwise, it will
not be possible to store it. We recommend
that this work is carried out at a specialist
workshop.
! Only place the collapsible emergency
spare wheel in the vehicle when it is dry.
Otherwise, moisture may remain in the
vehicle interior.
X Unscrew the valve cap with integrated
valve extractor from the valve.
X Unscrew the valve insert from the valve and
release the air. i
Fully deflating the tyres can take a few
minutes.
X Screw the valve insert back into the valve.
X Screw the valve cap back on.
X Put the tyre cover provided over the col-
lapsible emergency spare wheel.
X Store the collapsible emergency spare
wheel behind the front-passenger seat. Battery
Notes on the vehicle battery
In order for the battery to achieve the maxi-
mum possible service life, it must always be
sufficiently charged.
Have the battery charge checked more fre-
quently if you use the vehicle mainly for short
trips or if you leave it standing idle for a
lengthy period.
To preven tdamage from corrosion, only
replace the battery with one that has a central
ventilation cover.
Consult a Mercedes-Ben zService Centre if
you wish to leave your vehicle parked up for
a long period of time. G
Risk of injury
Comply with safety precautions and take pro-
tective measures when handling batteries. Risk of explosion
Fire, naked flames and
smoking are prohibited
when handling the battery.
Avoid creating sparks.
Battery acid is caustic.
Avoid contact with the skin,
eyes or clothing.
Wear suitable protective
clothing, in particular
25 Only for certain countries. 334
BatteryPractical advice
BA 197 ECE RE 2010/6a; 1; 2, en-GB
sabbaeu Version: 3.0.3.6 2010-05-07T14:19:43+02:00 - Seite 334