2010 MERCEDES-BENZ S65AMG audio
[x] Cancel search: audioPage 196 of 548
XPause playback: Select II.
In the display, II changes to M.XContinue playback: Select M.
Play is continued from the point at which it
was stopped.
Selecting scene/chapter
Entering scene/chapter using the
COMAND controller
XMake sure that the control menu is shown
( Y page 192).XSkipping forwards or back: Slide XV Y or
turn cV d.
or
XPress button 9 or : on the
multifunction steering wheel 28
.
i Vehicles with rear multicontour seats:
Rear occupants can also select a scene/
chapter using the buttons on the rear
armrest ( Y page 80).
Entering the scene/chapter using the
telephone keypad
XPress button à on the telephone
keypad ( Y page 79).XEnter scene/chapter using buttons j -
x .
COMAND tunes in to the scene/chapter
entered.
Selecting film/track
i This function is only available if the DVD
is comprised of several films/tracks.
XSelect Video Q Video DVD .XShow the menu system, if necessary
( Y page 193).XSelect DVD-V Q DVD Functions Q
Title Selection .
A selection list appears.XSelect a film/track.
Screen settings
Setting brightness, contrast and color
XSelect Video Q Video DVD .XShow the menu system, if necessary
( Y page 193).XSelect DVD-V Q Brightness Q
Contrast or Color .XChanging settings: Slide ZV Æ or turn
c V d until you reach the desired setting.XSaving settings: Press W.
Changing the picture format
XSelect Video Q Video DVD .XShow the menu system, if necessary
( Y page 193).XSelect DVD-V.
The DVD-V menu appears. The dot # in
front of a menu item - 16:9 Optimized,
4:3 or Widescreen indicates the current
format.XChanging the format: Slide ZV Æ or turn
c V d, until you reach the desired setting.XSaving the format: Press W.
DVD menu
The DVD menu is the menu stored on the DVD
itself. It is structured in various ways
according to the individual DVD and permits
certain actions and settings.
28 Function is only available if the Audio menu is selected in the instrument cluster.194COMAND video DVDControl systems
221_AKB; 6; 20, en-USd2ugruen,Version: 2.11.8.12009-09-24T13:28:17+02:00 - Seite 194
Page 198 of 548
Back to the movieXPress back button % until you can see
the movie.
or
XSelect the corresponding menu item in the
DVD menu.
or
XSelect a menu item of your choice from the
DVD menu.XSelect the menu item Back (to the
movie) in the selection menu.
i
Depending on the DVD, the menu item
Back (to the movie) or the back button
% may be without function.
Setting the language
i This function is not available for all DVDs.
If it is available, you can set the language
for the DVD menu and the audio language.
The number of settings you can make is
determined by the content of the DVD. It
may also be possible to make the settings
in the DVD menu ( Y page 194).
XSelect Video Q Video DVD .XShow the menu system, if necessary
( Y page 193).XSelect DVD-V Q DVD Functions .XSelect Audio Language .
In both cases a selection list will appear.
The dot # in front of an entry indicates the
current language.XChanging the setting: Slide ZV Æ or turn
c V d, until you reach the desired setting.XSaving a setting: Press W.XExiting the menu: Slide XV Y.
Subtitles and camera angles
i This function is not available for all DVDs.
The number of settings you can make is
determined by the content of the DVD. It
may also be possible to make the settings
in the DVD menu ( Y page 194).XSelect Video Q Video DVD .XShow the menu system, if necessary
( Y page 193).XSelect DVD-V Q DVD Functions .XSelect Subtitles or Camera Angle .
In both cases a selection list will appear.
The dot # in front of an entry indicates the
current language.XChanging the setting: Slide ZV Æ or turn
c V d, until you reach the desired setting.XSaving a setting: Press W.XExiting the menu: Slide XV Y.
Interactive content
i DVDs may include interactive content
(e.g. a video game). In a video game you can
control the play by selecting and initiating
actions. The type and number of actions
depends on the DVD.
XSelecting an action: Slide ZV Æ or XV Y,
or turn cV d, until you reach the desired
setting.XInitiating an action: Press W.
A menu appears, the first entry Select is
highlighted.XPress W.
Music Register
GObserve Safety notes, see page 76.
You can save MP3 or WMA audio files in the
Music Register. The storage capacity is
approximately 7 gigabyte.
! Keep your original music files in a safe
place. A fault with the COMAND may cause
the music files stored in the Music Register
196Music RegisterControl systems
221_AKB; 6; 20, en-USd2ugruen,Version: 2.11.8.12009-09-24T13:28:17+02:00 - Seite 196
Page 199 of 548
to be lost. Mercedes-Benz USA, LLC is not
liable for any loss of data.
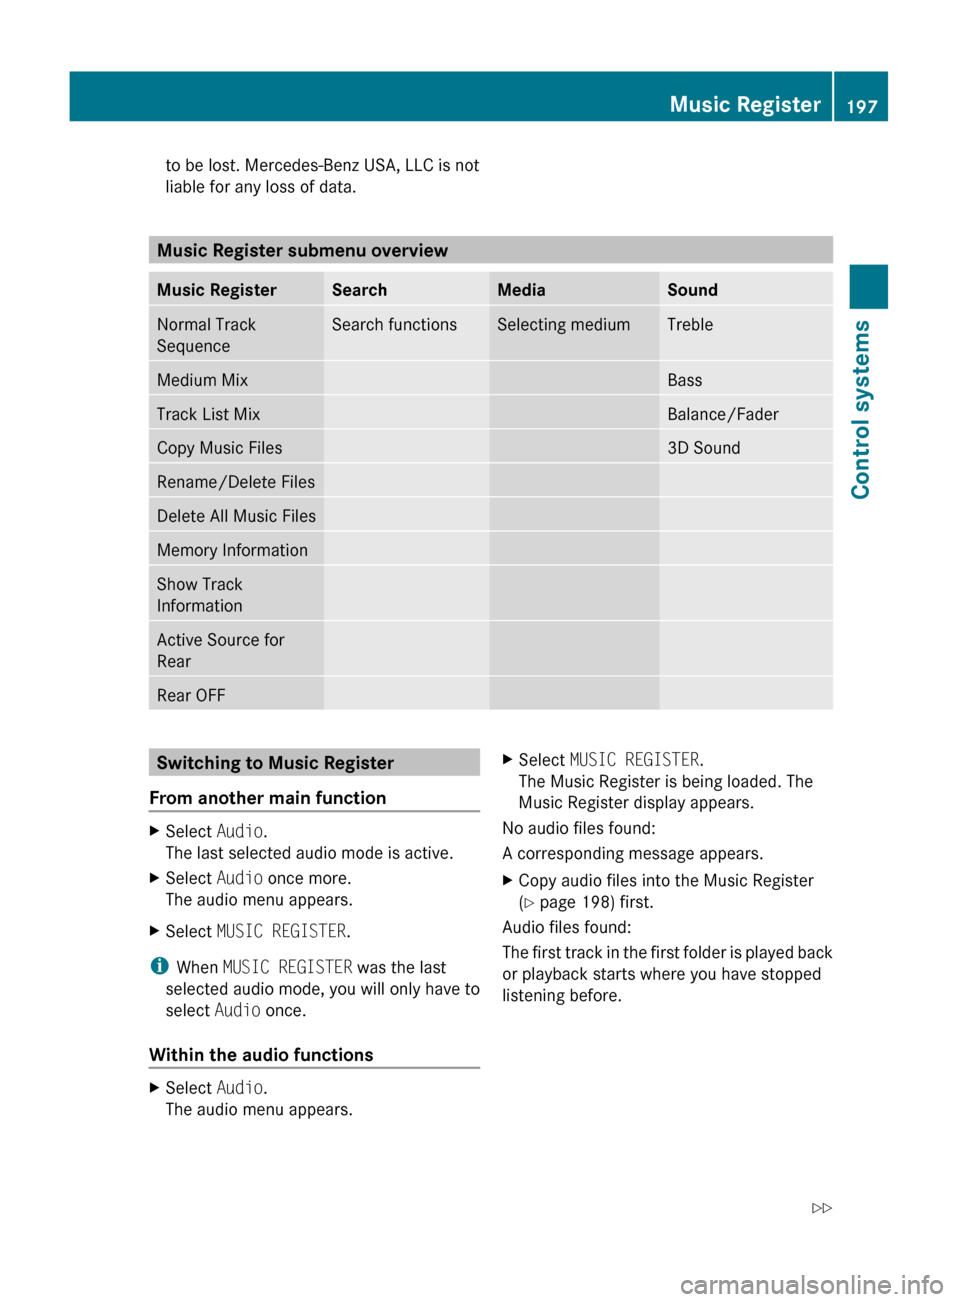
Music Register submenu overview
Music RegisterSearchMediaSoundNormal Track
SequenceSearch functionsSelecting mediumTrebleMedium MixBassTrack List MixBalance/FaderCopy Music Files3D SoundRename/Delete FilesDelete All Music FilesMemory InformationShow Track
InformationActive Source for
RearRear OFFSwitching to Music Register
From another main functionXSelect Audio.
The last selected audio mode is active.XSelect Audio once more.
The audio menu appears.XSelect MUSIC REGISTER .
i
When MUSIC REGISTER was the last
selected audio mode, you will only have to
select Audio once.
Within the audio functions
XSelect Audio.
The audio menu appears.XSelect MUSIC REGISTER .
The Music Register is being loaded. The
Music Register display appears.
No audio files found:
A corresponding message appears.
XCopy audio files into the Music Register
( Y page 198) first.
Audio files found:
The first track in the first folder is played back
or playback starts where you have stopped
listening before.
Music Register197Control systems221_AKB; 6; 20, en-USd2ugruen,Version: 2.11.8.12009-09-24T13:28:17+02:00 - Seite 197Z
Page 200 of 548
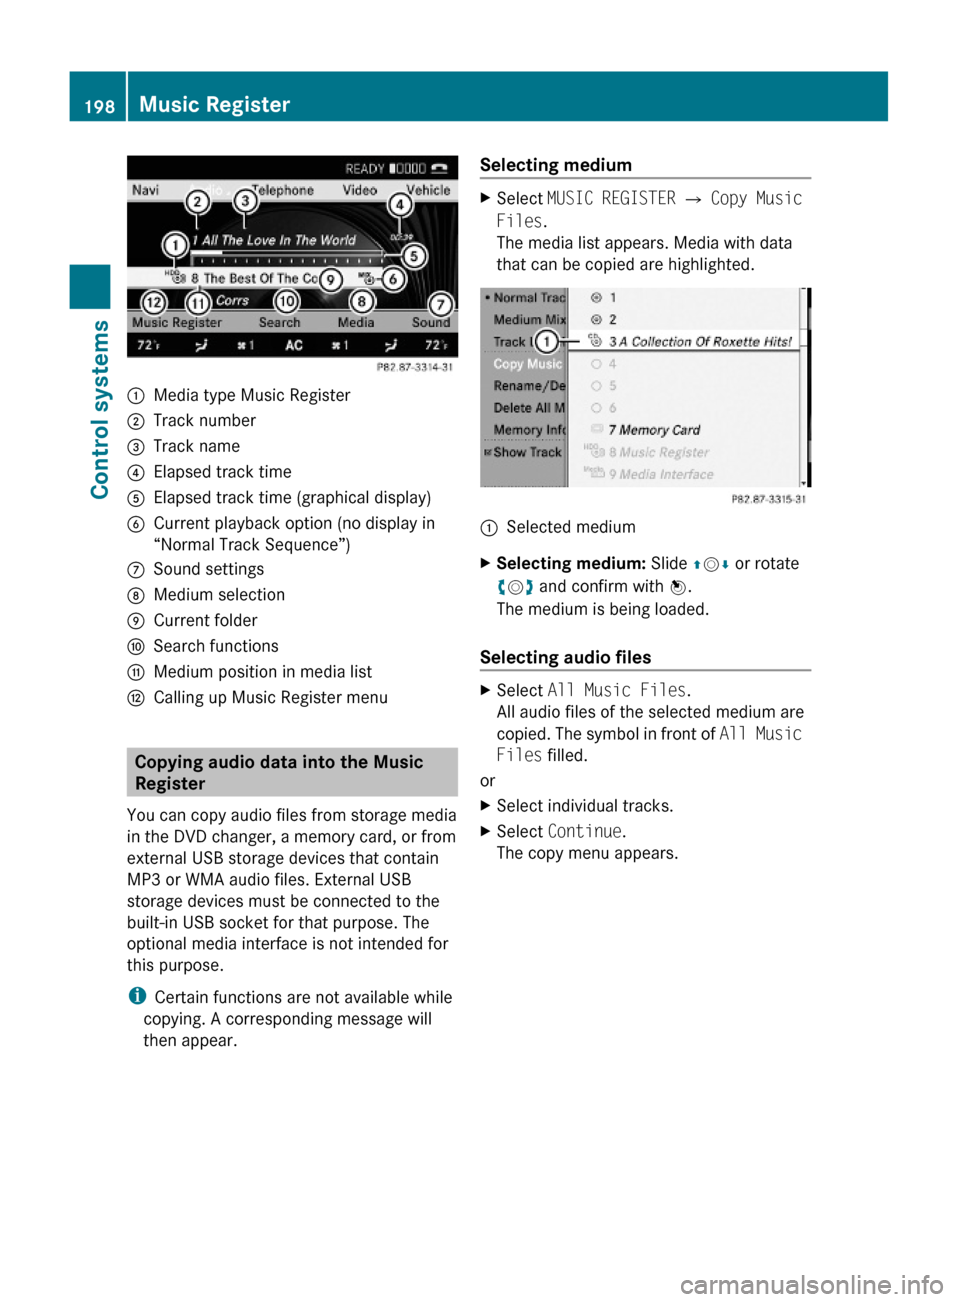
:Media type Music Register;Track number=Track name?Elapsed track timeAElapsed track time (graphical display)BCurrent playback option (no display in
“Normal Track Sequence”)
CSound settingsDMedium selectionECurrent folderFSearch functionsGMedium position in media listHCalling up Music Register menu
Copying audio data into the Music
Register
You can copy audio files from storage media
in the DVD changer, a memory card, or from
external USB storage devices that contain
MP3 or WMA audio files. External USB
storage devices must be connected to the
built-in USB socket for that purpose. The
optional media interface is not intended for
this purpose.
iCertain functions are not available while
copying. A corresponding message will
then appear.
Selecting mediumXSelect MUSIC REGISTER Q Copy Music
Files.
The media list appears. Media with data
that can be copied are highlighted.
:Selected mediumXSelecting medium: Slide ZVÆ or rotate
cVd and confirm with W.
The medium is being loaded.
Selecting audio files
XSelect All Music Files.
All audio files of the selected medium are
copied. The symbol in front of All Music
Files filled.
or
XSelect individual tracks.XSelect Continue.
The copy menu appears.
198Music RegisterControl systems
221_AKB; 6; 20, en-USd2ugruen,Version: 2.11.8.12009-09-24T13:28:17+02:00 - Seite 198
Page 201 of 548
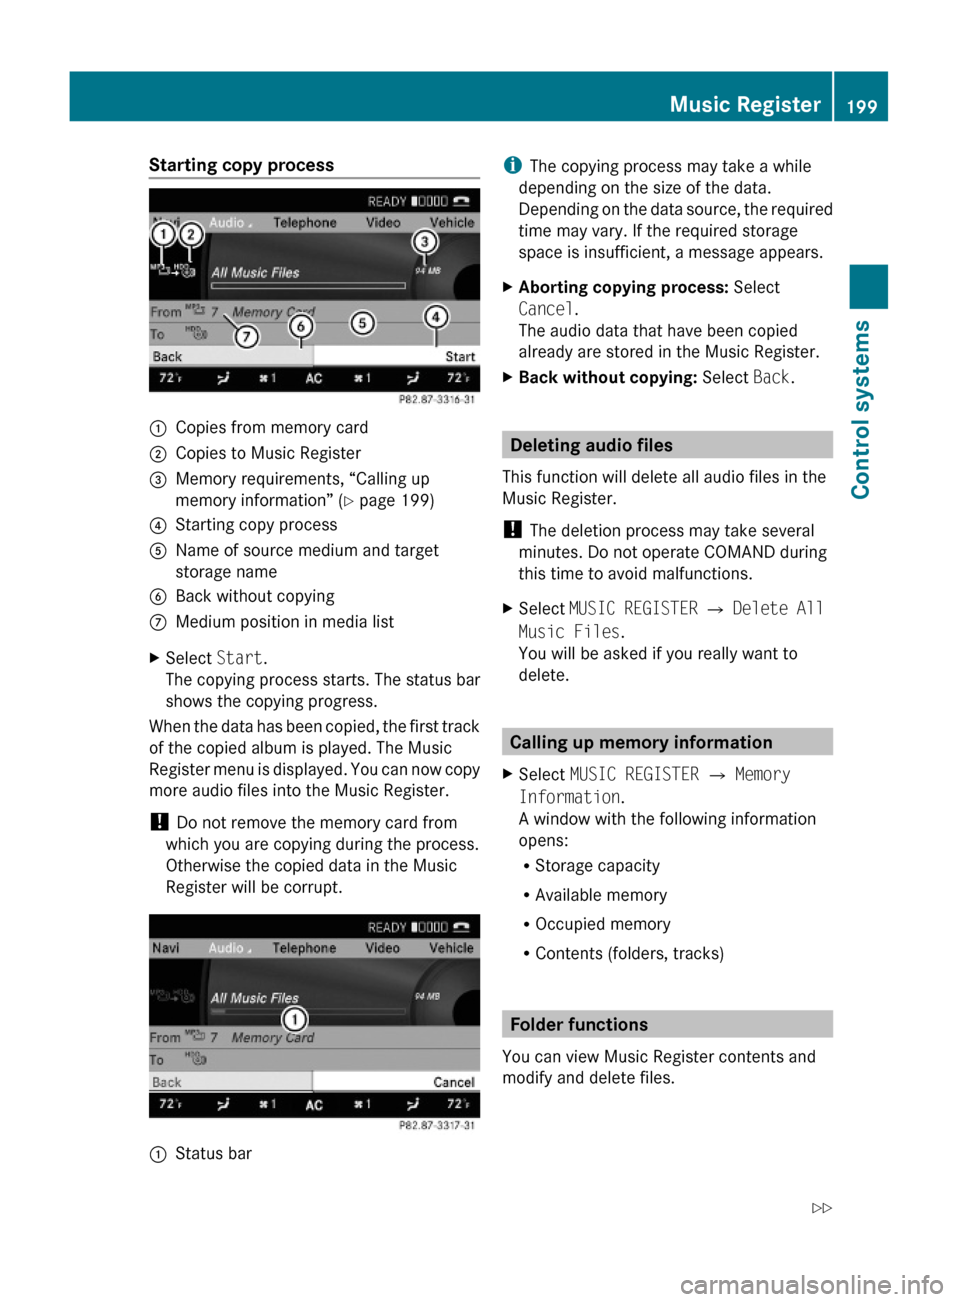
Starting copy process:Copies from memory card;Copies to Music Register=Memory requirements, “Calling up
memory information” (Y page 199)
?Starting copy processAName of source medium and target
storage name
BBack without copyingCMedium position in media listXSelect Start.
The copying process starts. The status bar
shows the copying progress.
When the data has been copied, the first track
of the copied album is played. The Music
Register menu is displayed. You can now copy
more audio files into the Music Register.
! Do not remove the memory card from
which you are copying during the process.
Otherwise the copied data in the Music
Register will be corrupt.
:Status bariThe copying process may take a while
depending on the size of the data.
Depending on the data source, the required
time may vary. If the required storage
space is insufficient, a message appears.
XAborting copying process: Select
Cancel.
The audio data that have been copied
already are stored in the Music Register.
XBack without copying: Select Back.
Deleting audio files
This function will delete all audio files in the
Music Register.
! The deletion process may take several
minutes. Do not operate COMAND during
this time to avoid malfunctions.
XSelect MUSIC REGISTER Q Delete All
Music Files.
You will be asked if you really want to
delete.
Calling up memory information
XSelect MUSIC REGISTER Q Memory
Information.
A window with the following information
opens:
RStorage capacity
RAvailable memory
ROccupied memory
RContents (folders, tracks)
Folder functions
You can view Music Register contents and
modify and delete files.
Music Register199Control systems221_AKB; 6; 20, en-USd2ugruen,Version: 2.11.8.12009-09-24T13:28:17+02:00 - Seite 199Z
Page 202 of 548
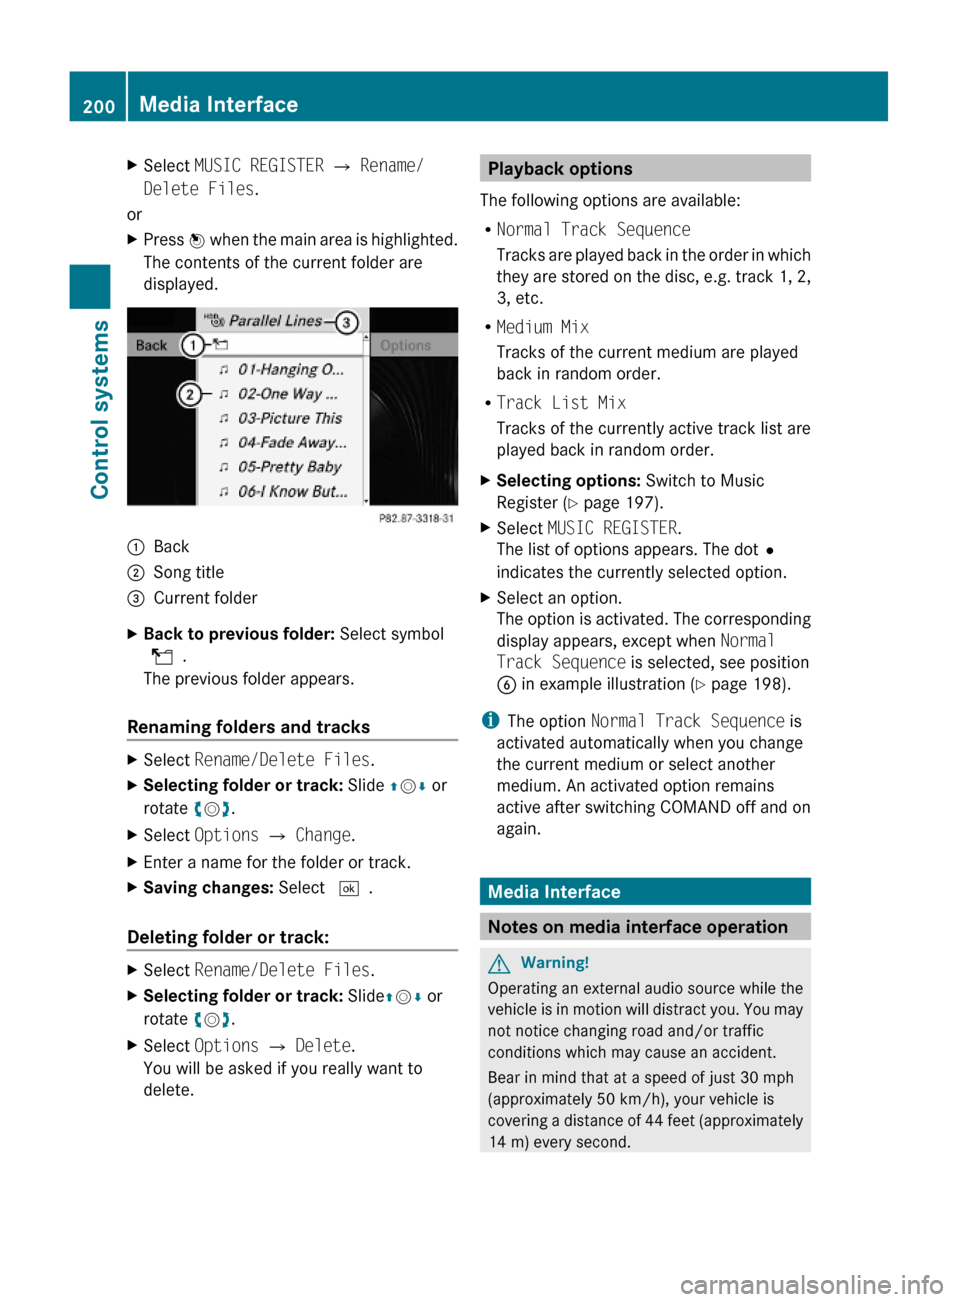
XSelect MUSIC REGISTER Q Rename/
Delete Files.
or
XPress W when the main area is highlighted.
The contents of the current folder are
displayed.
:Back;Song title=Current folderXBack to previous folder: Select symbol
U.
The previous folder appears.
Renaming folders and tracks
XSelect Rename/Delete Files.XSelecting folder or track: Slide ZVÆ or
rotate cVd.
XSelect Options Q Change.XEnter a name for the folder or track.XSaving changes: Select ¬.
Deleting folder or track:
XSelect Rename/Delete Files.XSelecting folder or track: SlideZVÆ or
rotate cVd.
XSelect Options Q Delete.
You will be asked if you really want to
delete.
Playback options
The following options are available:
RNormal Track Sequence
Tracks are played back in the order in which
they are stored on the disc, e.g. track 1, 2,
3, etc.
RMedium Mix
Tracks of the current medium are played
back in random order.
RTrack List Mix
Tracks of the currently active track list are
played back in random order.
XSelecting options: Switch to Music
Register (Y page 197).
XSelect MUSIC REGISTER.
The list of options appears. The dot#
indicates the currently selected option.
XSelect an option.
The option is activated. The corresponding
display appears, except when Normal
Track Sequence is selected, see position
B in example illustration (Y page 198).
iThe option Normal Track Sequence is
activated automatically when you change
the current medium or select another
medium. An activated option remains
active after switching COMAND off and on
again.
Media Interface
Notes on media interface operation
GWarning!
Operating an external audio source while the
vehicle is in motion will distract you. You may
not notice changing road and/or traffic
conditions which may cause an accident.
Bear in mind that at a speed of just 30 mph
(approximately 50 km/h), your vehicle is
covering a distance of 44 feet (approximately
14 m) every second.
200Media InterfaceControl systems
221_AKB; 6; 20, en-USd2ugruen,Version: 2.11.8.12009-09-24T13:28:17+02:00 - Seite 200
Page 203 of 548
For your safety and the safety of others, pull
over to a safe location and stop before
operating an external audio source.
Connections
iAlways store the devices in a safe place.
Only use genuine Mercedes-Benz
connector cables.
Suitable connector cables are located in
the vehicle or can be purchased at any
authorized Mercedes-Benz Center.
The media interface allows for connection of
the following media to the COMAND:
RiPod®
RUSB devices
RMP3 player
iFor further information on compatible
multimedia devices
Rvisit www.mbusa-mobile.com
Rcall the Mercedes-Benz Customer
Assistance Center at
1-800-FOR-MERCedes
(1-800-367-6372) (in the USA)
Rcall Customer Service at
1-800-387-0100 (in Canada)
Supported USB devices
The following USB devices are supported:
RUSB flash drives
RUSB hard drives (1", 1.8", and 2.5") with a
starting/steady current not to exceed
800 mA (separate power supply may be
necessary)
Rselected MP3 players
iThe media interface supports USB
storage devices of “USB Device
Subclass 6”. Information on “USB Device
Subclass 6” is available from the
manufacturer of the respective device.
Supported file formats on USB devices
The following file formats are supported:
RMP3: CBR, VBR (up to 320 kbit/s)
RWMA: CBR, VBR (up to 320 kbit/s)
Special characteristics of USB devices
RDo not store data other than audio data on
a USB device. Doing so will increase the
time required to initialize the USB device.
RA maximum of 8 directory levels with up to
1000 tracks each are supported.
RDo not use USB extensions or adapters.
They could impair functionality.
RPlaylists on the USB device will be searched
for in the background. Playlists that were
found will be available in separate
categories among the folders. The
initialization of large USB storage devices
that contain a large number of files may
take several minutes.
iFiles that are protected via DRM
(Digital Rights Management) are not
supported by the media interface.
Connecting external devices
The media interface is located in the glove
box.
Only connect one device at a time. Otherwise
you will not be able to operate the external
device. For more information contact an
authorized Mercedes-Benz Center.
Media Interface201Control systems221_AKB; 6; 20, en-USd2ugruen,Version: 2.11.8.12009-09-24T13:28:17+02:00 - Seite 201Z
Page 204 of 548
iDo not leave external devices in the
vehicle. Proper function of the device could
be impaired due to excessive
temperatures, for example when exposing
to direct sunlight or when the outside
temperature is extremely low. Mercedes-
Benz does not assume liability for damage
to external devices.
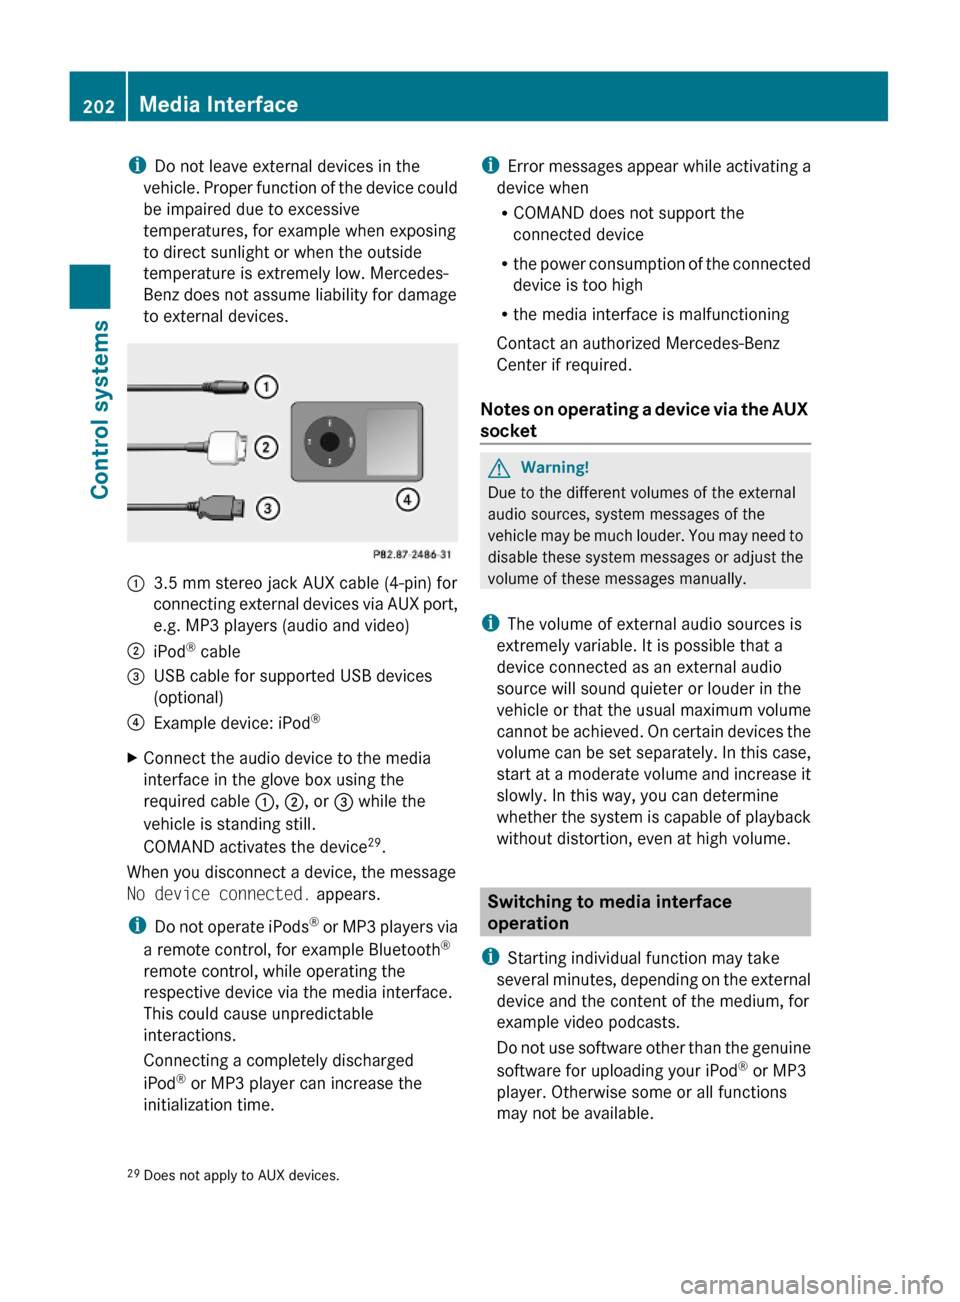
:3.5 mm stereo jack AUX cable (4-pin) for
connecting external devices via AUX port,
e.g. MP3 players (audio and video)
;iPod® cable=USB cable for supported USB devices
(optional)
?Example device: iPod®XConnect the audio device to the media
interface in the glove box using the
required cable :, ;, or = while the
vehicle is standing still.
COMAND activates the device29.
When you disconnect a device, the message
No device connected. appears.
iDo not operate iPods® or MP3 players via
a remote control, for example Bluetooth®
remote control, while operating the
respective device via the media interface.
This could cause unpredictable
interactions.
Connecting a completely discharged
iPod® or MP3 player can increase the
initialization time.
iError messages appear while activating a
device when
RCOMAND does not support the
connected device
Rthe power consumption of the connected
device is too high
Rthe media interface is malfunctioning
Contact an authorized Mercedes-Benz
Center if required.
Notes on operating a device via the AUX
socket
GWarning!
Due to the different volumes of the external
audio sources, system messages of the
vehicle may be much louder. You may need to
disable these system messages or adjust the
volume of these messages manually.
iThe volume of external audio sources is
extremely variable. It is possible that a
device connected as an external audio
source will sound quieter or louder in the
vehicle or that the usual maximum volume
cannot be achieved. On certain devices the
volume can be set separately. In this case,
start at a moderate volume and increase it
slowly. In this way, you can determine
whether the system is capable of playback
without distortion, even at high volume.
Switching to media interface
operation
iStarting individual function may take
several minutes, depending on the external
device and the content of the medium, for
example video podcasts.
Do not use software other than the genuine
software for uploading your iPod® or MP3
player. Otherwise some or all functions
may not be available.
29Does not apply to AUX devices.202Media InterfaceControl systems
221_AKB; 6; 20, en-USd2ugruen,Version: 2.11.8.12009-09-24T13:28:17+02:00 - Seite 202