2010 MERCEDES-BENZ S65AMG audio
[x] Cancel search: audioPage 92 of 548
R3-D sound does not work for mono-signal
sources, such as on analog AM radio or
in Weather Band.
R In the event of poor radio reception
quality, e.g. inside a tunnel, you should
switch off Logic 7 ®
, as a dynamic switch
from Stereo to Mono could occur,
resulting in temporary sound distortion.
R With some stereo recordings, the
resulting sound may deviate from
conventional stereo playback.
Switching the audio/video source off/
on
i When you load a CD or DVD, the audio or
video source is activated automatically.
Active audio source
XSwitching off: Select Audio Q Audio
OFF .
Playback is paused and the audio source is
switched off; Audio OFF appears in the
COMAND display.XSwitching on: Select Audio, then the
desired audio source.
or
XLoad a CD/DVD ( Y page 179) or an SD
card ( Y page 180).
or
XConnect a USB storage device
( Y page 80) or media interface device
( Y page 200) to COMAND.
Active video source
XSwitching off: Select Video Q Video
OFF .
The audio source is switched off; Video
OFF appears in the COMAND display.XSwitching on: Select Video, then the
desired video source.
or
XLoad a DVD ( Y page 179).SPLITVIEW
SPLITVIEW enables the driver and front
passenger to use separate COMAND
functions at the same time. Two different
displays appear in the COMAND screen. For
example, a Navigation display is only viewable
form the driver’s seat while a DVD Video
display is only viewable from the front
passenger’s seat.
COMAND is operated via SPLITVIEW from the
front passenger seat using the SPLITVIEW
remote control and the special wireless,
infrared headphone. You may also use a wired
headphone via the 3.5 mm socket in the front
passenger footwell.
For information about using the remote
control, see ( Y page 81).
For information about using the headphone,
see ( Y page 82).
Depending on the production date of your
vehicle, it may be equipped with SPLITVIEW.
At the time of this printing, the use of
SPLITVIEW is NOT allowed in the following US
states (AL, AZ, CO, IL, LA, MA, MD, NH, PA,
VA, VT, WA, WI, and WV) or Canadian
provinces (Manitoba, Newfoundland, New
Brunswick, and Prince Edward Island).
SPLITVIEW must NOT be operated in these
states or provinces. The driver is responsible
for observing ALL local statutory provisions.
If your vehicle is registered in a non-approved
state or province, then the feature will need
to be deactivated. Contact your authorized
Mercedes-Benz dealer to verify if SPLITVIEW
is allowed in your state or province.
Notes
R The audio volume of the wireless
headphone for the front passenger side
must be adjusted on the headphone
directly. The audio volume of a wired
headphone can be adjusted via the remote
90COMAND introductionControl systems
221_AKB; 6; 20, en-USd2ugruen,Version: 2.11.8.12009-09-24T13:28:17+02:00 - Seite 90
Page 93 of 548

control. Make sure the volume is not set
too high before putting on a headphone.
RThe DVD changer can playback only one
media source at a time. Example: if the
driver is playing an audio CD, the front
passenger can not play a different medium
(e.g. DVD video) from the DVD changer.
However, it is possible for the front
passenger to play media from radio,
memory card, MUSIC REGISTER, media
interface, USB, AUX or Rear Seat
Entertainment System.
RWhen driver and front passenger are using
the same medium, each can select
individual settings for that medium.
RCOMAND transmits music and voice to the
wireless headphone for the front passenger
side via infrared signal. The headphone and
the display must have visual contact. This
provides best possible transmission of the
infrared signal to the headphone. Please
note that the headphone has a left and right
side and must be used accordingly.
RWhen SPLITVIEW is on, the front passenger
can operate audio or video functions only.
RThe multifunction steering wheel lets you
operate functions for the driver’s side only.
Switching SPLITVIEW on/off
XSwitching on: Select Vehicle Q
SplitView ON.
or
XPress the SPLITVIEW remote control ON
button.
The SPLITVIEW symbol : appears and
status ; changes to SplitView OFF.
XSwitching off: Select Vehicle Q
SplitView OFF.
or
XPress the SPLITVIEW remote control ON
button.
Status ; changes to SplitView ON.
The SPLITVIEW screen remains on for
approximately 30 minutes after switching off
the ignition. After these 30 minutes or once
the SmartKey is removed from the starter
switch, the settings for the front passenger
side remain stored for approximately another
30 minutes.
COMAND system settings
System settings submenu overview
iThe components and operating principles
of COMAND can be found on (Y page 76).
System settings can be made in the following
submenus:
RDisplay Q Day Mode, Night Mode,
Automatic
RTime Q Time, Date, Format, Time Zone
RText Reader Q Speed Q Fast,
Medium or Slow:
Adjusts the reading speed of the Voice
Control System.
RVoice Control Q Help Window, Start
New Individualization, Delete
Individualization
RLanguage: Selecting system language
RFavorites Button *: Assigning the
favorite button
COMAND system settings 91Control systems221_AKB; 6; 20, en-USd2ugruen,Version: 2.11.8.12009-09-24T13:28:17+02:00 - Seite 91Z
Page 95 of 548
XSelect Daylight Savings Time
(Summer) or Standard Time .
The dot # in front of a list entry indicates
the current setting.XSaving setting and exit the menu: Slide
X V Y.
Adjusting time lags
i
In some exceptional cases, e.g. where
time zones border, the displayed time and
the local time may show a time lag.
This time lag can be adjusted in steps of 30
minutes.
XSelect Vehicle Q System Q Time Q
Time .XSelecting hour or minutes: Slide XV Y.XSetting value: Rotate cV d or slide ZV Æ.XSaving setting: Press W.
Setting the date
XSelect Vehicle Q System Q Time Q
Date .XSelecting month, day, or year: Slide
X V Y.XSetting value: Rotate cV d or slide ZV Æ.XSaving setting: Press W.
i
Setting the date is only necessary or even
possible if the COMAND system does not
receive a GPS signal.
Setting the time/date format
XSelect Vehicle Q System Q Time Q
Format .
The format list appears. The dots # in
front of the list entries indicate the current
setting.XChanging format setting: Select desired
format.XSaving setting and exit the menu: Slide
X V Y.Voice Control System settings
Switching help window on or offXSelect Vehicle Q System Q Voice
Control .XSelect Help Window .
A checkmark appears when the help
window is switched on.
Individualization
Using individualization, you can fine-tune the
Voice Control System to your own voice and
thus improve voice recognition. The ability of
the system to recognize the commands of
other users does not deteriorate as a result.
Individualization consists of two parts. You
train the system to recognize digits in the first
part and specific commands in the second
part.
Starting new individualization
i The vehicle must be stationary to start
individualization. After starting the session,
acoustic instructions will guide you through
the individualization.
XSelect Vehicle Q System Q Voice
Control Q Start New
Individualization .
A prompt appears asking whether you
would like further information.XSelect Yes or No.
If you select No, the first part of
individualization begins.
If you select Yes, an information display will
be shown with audio instruction.XClosing display: Select OK.
The first part of individualization begins.
At the end of the first part, you will see a
prompt asking whether you want to begin
the second part.XSelect Yes or No.
If you select No, individualization will be
canceled. The data from the first part is
saved automatically.COMAND system settings 93Control systems221_AKB; 6; 20, en-USd2ugruen,Version: 2.11.8.12009-09-24T13:28:17+02:00 - Seite 93Z
Page 97 of 548
Upload/Download of Data
This function lets you transfer COMAND data
to a memory card or a USB storage device and
vice versa.
The following COMAND data can be
transferred:
R Navigation destination memory and last
destination
R Address book entries
R Audio/Video presets memory
R System settings
i You can use this function, for example, to
save your COMAND data and transfer them
to another vehicle.XInsert an SD card into the SD card slot
( Y page 180) or connect a USB storage
device to the built-in USB socket in the
glove box (Y page 80). The USB jack of the
optional media interface is not intended for
this purpose.XSelect Vehicle Q System Q Upload/
Download Data .XDownload: Select Copy Data to
Storage Medium Q On the Memory
Card or On USB .XSelect Start Copying .XUpload: Select Import Data from
Storage Medium Q From Memory Card
or From USB .XSelect Start Data Import .XExiting menu without data transfer:
Select Back.
Reset
i You can reset COMAND back to its
factory settings.
Among other things, all personal data are
deleted, for example
R the address book entries
R the entries in the destination memory
R the list of last destinations of the
navigation systemXSelect Vehicle Q System Q Reset .
A prompt appears asking whether you
really want to reset.XSelect Yes or No.
If you select Yes another prompt will
appear asking whether you really want to
reset.XSelect Yes or No.
If you select Yes, COMAND will be reset
and restarted.
COMAND navigation (introduction)
Safety notes
GWarning!
For safety reasons, only enter a destination
when the vehicle is stationary. When the
vehicle is in motion, a passenger should enter
the destination. Study manual and select
route before driving.
Bear in mind that at a speed of just 30 mph
(approximately 50 km/h), your vehicle is
covering a distance of 44 feet (approximately
14 m) every second.
COMAND calculates the route to the
destination without taking account of the
following, for example:
R Traffic lights
R Stop and right-of-way signs
R Parking or stopping in prohibited areas
R Lane merging
R Other road and traffic rules and regulations
R Narrow bridges
COMAND navigation (introduction)95Control systems221_AKB; 6; 20, en-USd2ugruen,Version: 2.11.8.12009-09-24T13:28:17+02:00 - Seite 95Z
Page 108 of 548
XSelect Navi.XCheck the check box for menu item City
(3D) .
Setting route type
You can set the following route types:
R Fast Route : COMAND calculates a route
with minimized driving time.
R Dynamic Route : COMAND calculates a
route with minimized driving time and takes
into account traffic messages received
along the route. Thus, the navigation
system can dynamically recalculate the
route. Roads that are blocked will be
avoided whenever possible. For
information on traffic messages see
( Y page 138).
R Short Route : COMAND calculates a route
with minimized route length.
XSelect Navi Q Mode .
The list of available rote types appears. The
dot # indicates the currently selected
setting.XSelect route type: Fast Route , Dynamic
Route or Short Route .XExit menu: Slide XV Y.
i
If you change the route type setting during
active route guidance, COMAND calculates
a new route. If you change the setting when
route guidance is inactive, COMAND uses
the new setting for the next route guidance.
Setting route mode
With this function you can select the following
options for route calculation:
R Minimize Highways
R Minimize Toll Roads
R Minimize Tunnels
R Minimize Ferries
R Minimize Motorail Trains
XSelect Navi Q Mode .
The mode list appears.XSwitching mode on or off: Select desired
modes.
Depending on the previous status, the
mode is switched on or off. A checkmark
indicates that the mode is switched on. It
is possible to switch on more than one
mode.XExiting menu: Slide XV Y or press back
button % in the center console
( Y page 87).
COMAND will verify whether it can
incorporate the modes if you select them
with route guidance active.
If possible, COMAND calculates a new
route considering the selected options.
If the route cannot be recalculated with the
selected options, a message appears and
an announcement is made. COMAND
calculates a new route. Only options that
are possible will be considered.
Displaying highway information
When this function is enabled, highway
information ahead will display automatically
( Y page 137).
Audio fadeout
XSelect Navi Q Audio Fadeout .
When the check box is checked U the
volume of the current audio source fades
during a navigation announcement.
COMAND navigation system
(entering a destination)
Introduction
GWarning!
For safety reasons, only enter a new
destination when the vehicle is stationary.
106COMAND navigation system (entering a destination)Control systems
221_AKB; 6; 20, en-USd2ugruen,Version: 2.11.8.12009-09-24T13:28:17+02:00 - Seite 106
Page 137 of 548
The Off Road message and an arrow showing
the compass heading to the destination
appear on the display.
As soon as the system can allocate the
vehicle position to the map again, route
guidance continues in the usual way.
Navigation announcements
GWarning!
Navigation announcements are intended to
direct you while driving without diverting your
attention from the road and driving.
Please always use navigation announcements
instead of consulting the map display for
directions. Consulting the symbols or map
display for directions may cause you to divert
your attention from driving and increase your
risk of an accident.
i If Chinese is set as the system language,
the navigation announcements are in
English. For information on how to set the
system language see ( Y page 94).
Navigation announcements are muted
during telephone calls. You can, however,
call up a current announcement at any
time. You can also call up a current
announcement at any time if you have
missed an announcement.
Route guidance is active already.
XCalling up a current announcement:
Select Navi Q RPT .
or
XPress favorite button h if the button has
been programmed with this function
( Y page 94).XSwitching off navigation messages:
Press button 8 during an
announcement.
You will see the message The driving
instructions have been muted. for a
short while.
i The announcements remain switched off
even if you start a new route guidance or if
COMAND is switched off/on with button
u .
If you switch COMAND off by removing the
SmartKey from the starter switch and then
switch the ignition back on after more than
3 minutes, the announcements are
automatically switched back on.
XSwitching navigation announcements
back on manually: Select Navi Q RPT .XAdjusting volume of the messages:
Adjust the volume during an automatic
announcement ( Y page 87).
or
XCall up an announcement manually using
Navi Q RPT and adjust the volume
( Y page 87).
i
You can use the function Audio
Fadeout (Y page 106) to reduce the
volume of audio sources during navigation
announcements.
COMAND navigation system (during
route guidance)
Cancel route guidance
XSelect Destination Q Cancel Route
Guidance in map view with the menu
system displayed ( Y page 102).
Continuing canceled route guidance
XSelect Destination Q Continue
Route Guidance in map view with the
menu system displayed ( Y page 102).
COMAND calculates the route.COMAND navigation system (during route guidance)135Control systems221_AKB; 6; 20, en-USd2ugruen,Version: 2.11.8.12009-09-24T13:28:17+02:00 - Seite 135Z
Page 168 of 548
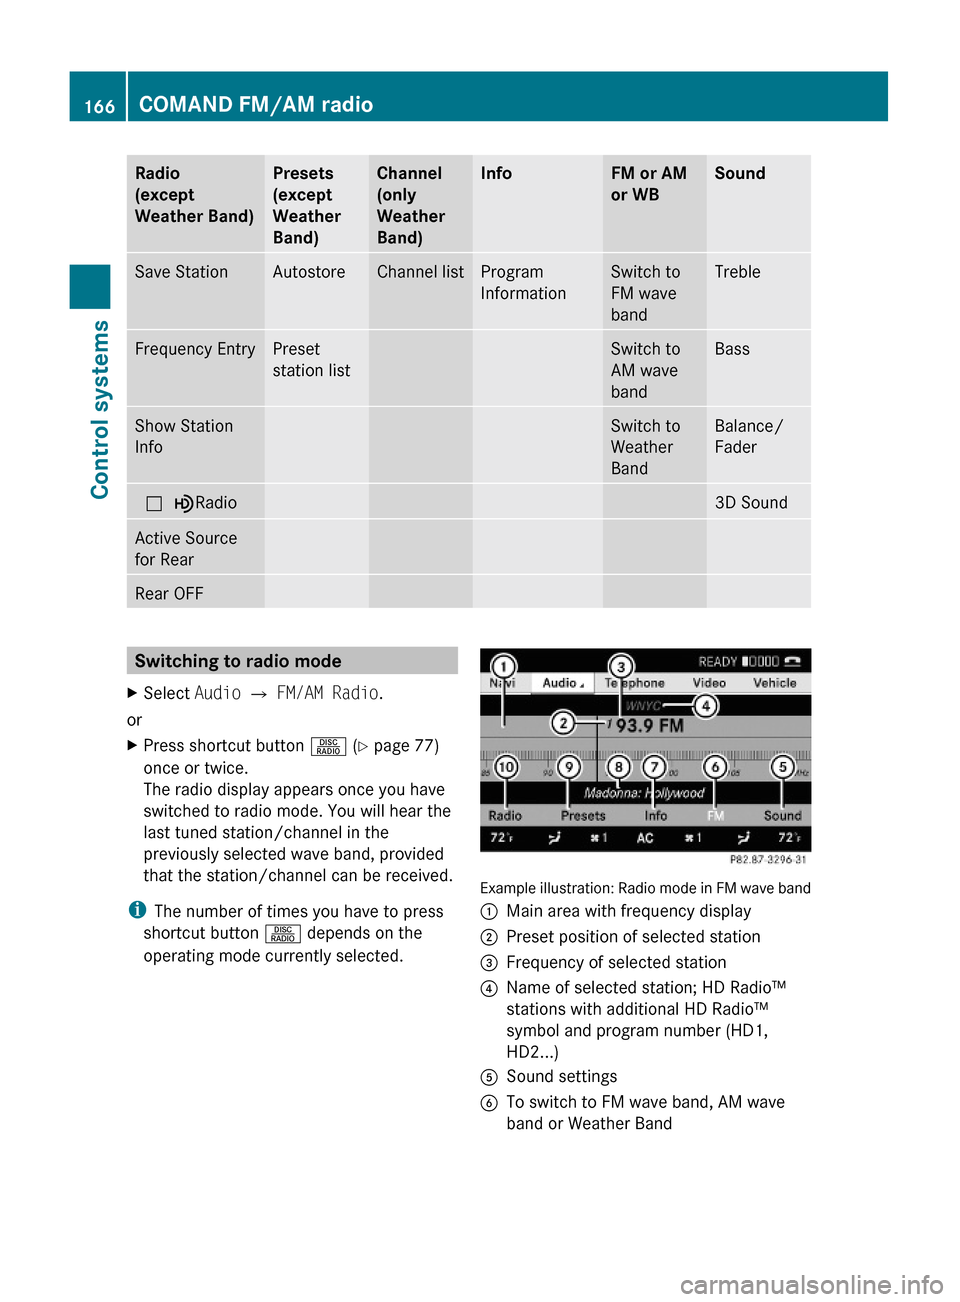
Radio
(except
Weather Band)
Presets
(except
Weather
Band)
Channel
(only
Weather
Band)
InfoFM or AM
or WB
SoundSave StationAutostoreChannel listProgram
Information
Switch to
FM wave
band
TrebleFrequency EntryPreset
station list
Switch to
AM wave
band
BassShow Station
Info
Switch to
Weather
Band
Balance/
Fader
ª¥Radio3D SoundActive Source
for Rear
Rear OFFSwitching to radio modeXSelect Audio Q FM/AM Radio.
or
XPress shortcut button R (Y page 77)
once or twice.
The radio display appears once you have
switched to radio mode. You will hear the
last tuned station/channel in the
previously selected wave band, provided
that the station/channel can be received.
iThe number of times you have to press
shortcut button R depends on the
operating mode currently selected.
Example illustration: Radio mode in FM wave band
:Main area with frequency display;Preset position of selected station=Frequency of selected station?Name of selected station; HD Radio™
stations with additional HD Radio™
symbol and program number (HD1,
HD2...)
ASound settingsBTo switch to FM wave band, AM wave
band or Weather Band
166COMAND FM/AM radioControl systems
221_AKB; 6; 20, en-USd2ugruen,Version: 2.11.8.12009-09-24T13:28:17+02:00 - Seite 166
Page 169 of 548
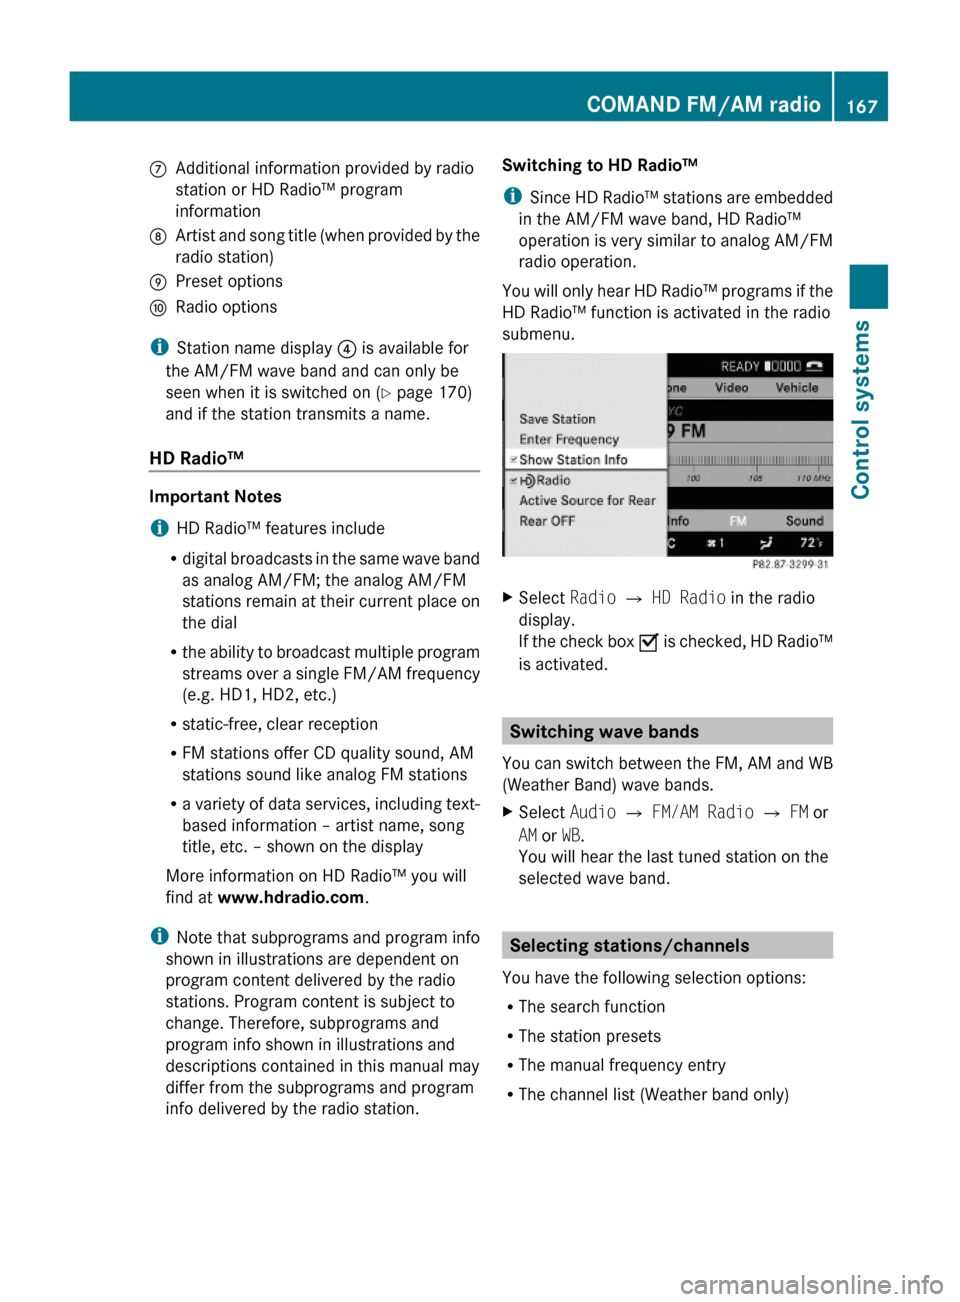
CAdditional information provided by radio
station or HD Radio™ program
information
DArtist and song title (when provided by the
radio station)
EPreset optionsFRadio options
iStation name display ? is available for
the AM/FM wave band and can only be
seen when it is switched on (Y page 170)
and if the station transmits a name.
HD Radio™
Important Notes
iHD Radio™ features include
Rdigital broadcasts in the same wave band
as analog AM/FM; the analog AM/FM
stations remain at their current place on
the dial
Rthe ability to broadcast multiple program
streams over a single FM/AM frequency
(e.g. HD1, HD2, etc.)
Rstatic-free, clear reception
RFM stations offer CD quality sound, AM
stations sound like analog FM stations
Ra variety of data services, including text-
based information – artist name, song
title, etc. – shown on the display
More information on HD Radio™ you will
find at www.hdradio.com.
iNote that subprograms and program info
shown in illustrations are dependent on
program content delivered by the radio
stations. Program content is subject to
change. Therefore, subprograms and
program info shown in illustrations and
descriptions contained in this manual may
differ from the subprograms and program
info delivered by the radio station.
Switching to HD Radio™
iSince HD Radio™ stations are embedded
in the AM/FM wave band, HD Radio™
operation is very similar to analog AM/FM
radio operation.
You will only hear HD Radio™ programs if the
HD Radio™ function is activated in the radio
submenu.
XSelect Radio £ HD Radio in the radio
display.
If the check box Ç is checked, HD Radio™
is activated.
Switching wave bands
You can switch between the FM, AM and WB
(Weather Band) wave bands.
XSelect Audio Q FM/AM Radio Q FM or
AM or WB.
You will hear the last tuned station on the
selected wave band.
Selecting stations/channels
You have the following selection options:
RThe search function
RThe station presets
RThe manual frequency entry
RThe channel list (Weather band only)
COMAND FM/AM radio167Control systems221_AKB; 6; 20, en-USd2ugruen,Version: 2.11.8.12009-09-24T13:28:17+02:00 - Seite 167Z