2010 MERCEDES-BENZ S600 warning light
[x] Cancel search: warning lightPage 289 of 548
or the child is not properly secured in the child
restraint.
GWarning!
For your protection, drive only with properly
positioned head restraints.
Adjust the head restraint so that it is as close
to the head as possible and the center of the
head restraint supports the back of the head
at eye level. This will reduce the potential for
injury to the head and neck in the event of an
accident or similar situation.
Do not drive the vehicle without the seat head
restraints. Head restraints are intended to
help reduce injuries during an accident.
Seat adjustment
You can adjust the lumbar support,
multicontour seats for driver and front
passenger, as well as drive-dynamic
multicontour seats using COMAND
(Y page 216).
! When moving the seats, make sure there
are no items in the footwell or behind the
seats. Otherwise, you could damage the
seats and/or the items.
Power seats
Front power seats
iIf PRE-SAFE® has been activated, the
front passenger’s seat and/or rear power
seats will be moved to a more favorable
seat position.
iYou can store the settings for the seat
position with the memory function
(Y page 297).
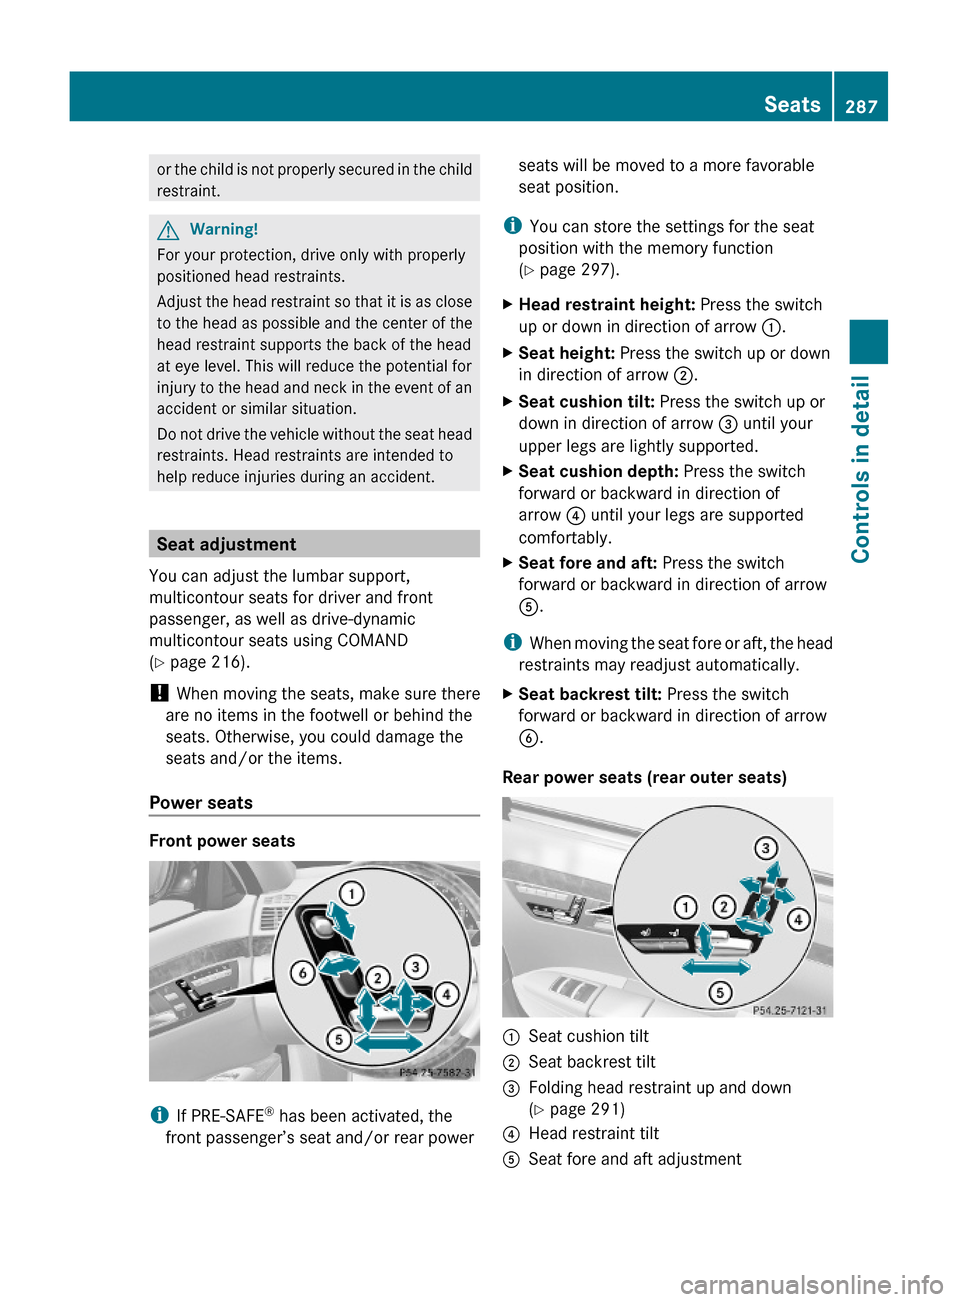
XHead restraint height: Press the switch
up or down in direction of arrow :.
XSeat height: Press the switch up or down
in direction of arrow ;.
XSeat cushion tilt: Press the switch up or
down in direction of arrow = until your
upper legs are lightly supported.
XSeat cushion depth: Press the switch
forward or backward in direction of
arrow ? until your legs are supported
comfortably.
XSeat fore and aft: Press the switch
forward or backward in direction of arrow
A.
iWhen moving the seat fore or aft, the head
restraints may readjust automatically.
XSeat backrest tilt: Press the switch
forward or backward in direction of arrow
B.
Rear power seats (rear outer seats)
:Seat cushion tilt;Seat backrest tilt=Folding head restraint up and down
(Y page 291)
?Head restraint tiltASeat fore and aft adjustmentSeats287Controls in detail221_AKB; 6; 20, en-USd2ugruen,Version: 2.11.8.12009-09-24T13:28:17+02:00 - Seite 287Z
Page 295 of 548
Multicontour seats, rear
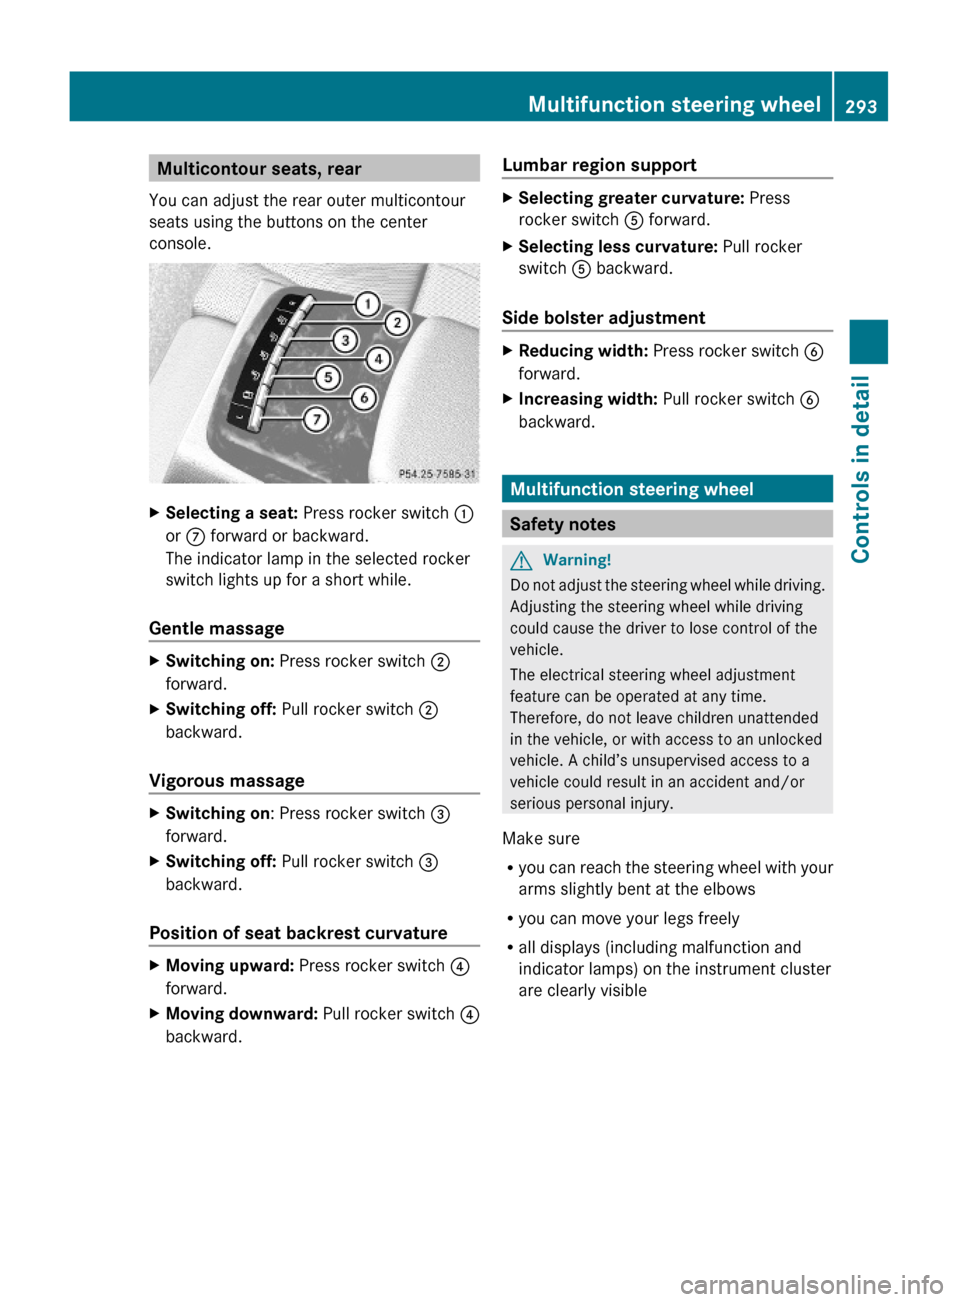
You can adjust the rear outer multicontour
seats using the buttons on the center
console.
XSelecting a seat: Press rocker switch :
or C forward or backward.
The indicator lamp in the selected rocker
switch lights up for a short while.
Gentle massage
XSwitching on: Press rocker switch ;
forward.
XSwitching off: Pull rocker switch ;
backward.
Vigorous massage
XSwitching on: Press rocker switch =
forward.
XSwitching off: Pull rocker switch =
backward.
Position of seat backrest curvature
XMoving upward: Press rocker switch ?
forward.
XMoving downward: Pull rocker switch ?
backward.
Lumbar region supportXSelecting greater curvature: Press
rocker switch A forward.
XSelecting less curvature: Pull rocker
switch A backward.
Side bolster adjustment
XReducing width: Press rocker switch B
forward.
XIncreasing width: Pull rocker switch B
backward.
Multifunction steering wheel
Safety notes
GWarning!
Do not adjust the steering wheel while driving.
Adjusting the steering wheel while driving
could cause the driver to lose control of the
vehicle.
The electrical steering wheel adjustment
feature can be operated at any time.
Therefore, do not leave children unattended
in the vehicle, or with access to an unlocked
vehicle. A child’s unsupervised access to a
vehicle could result in an accident and/or
serious personal injury.
Make sure
Ryou can reach the steering wheel with your
arms slightly bent at the elbows
Ryou can move your legs freely
Rall displays (including malfunction and
indicator lamps) on the instrument cluster
are clearly visible
Multifunction steering wheel293Controls in detail221_AKB; 6; 20, en-USd2ugruen,Version: 2.11.8.12009-09-24T13:28:17+02:00 - Seite 293Z
Page 297 of 548
Exterior rear view mirrorsGWarning!
Exercise care when using the passenger-side
exterior rear view mirror. The mirror surface
is convex (outwardly curved surface for a
wider field of view). Objects in mirror are
closer than they appear. Check your interior
rear view mirror and glance over your
shoulder before changing lanes.
iYou can store the settings for the exterior
rear view mirror position with the memory
function (Y page 297).
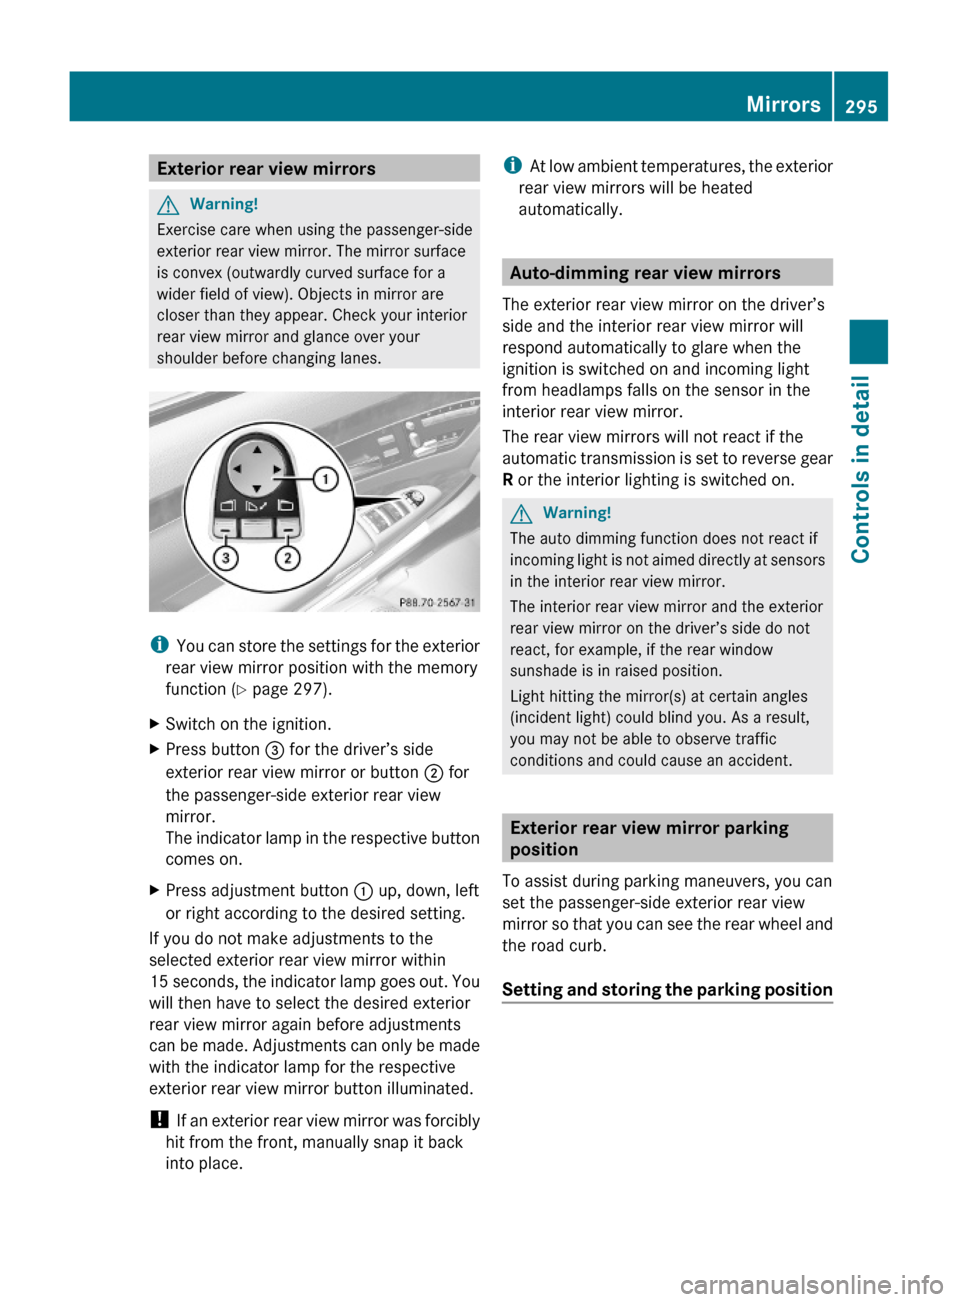
XSwitch on the ignition.XPress button = for the driver’s side
exterior rear view mirror or button ; for
the passenger-side exterior rear view
mirror.
The indicator lamp in the respective button
comes on.
XPress adjustment button : up, down, left
or right according to the desired setting.
If you do not make adjustments to the
selected exterior rear view mirror within
15 seconds, the indicator lamp goes out. You
will then have to select the desired exterior
rear view mirror again before adjustments
can be made. Adjustments can only be made
with the indicator lamp for the respective
exterior rear view mirror button illuminated.
! If an exterior rear view mirror was forcibly
hit from the front, manually snap it back
into place.
iAt low ambient temperatures, the exterior
rear view mirrors will be heated
automatically.
Auto-dimming rear view mirrors
The exterior rear view mirror on the driver’s
side and the interior rear view mirror will
respond automatically to glare when the
ignition is switched on and incoming light
from headlamps falls on the sensor in the
interior rear view mirror.
The rear view mirrors will not react if the
automatic transmission is set to reverse gear
R or the interior lighting is switched on.
GWarning!
The auto dimming function does not react if
incoming light is not aimed directly at sensors
in the interior rear view mirror.
The interior rear view mirror and the exterior
rear view mirror on the driver’s side do not
react, for example, if the rear window
sunshade is in raised position.
Light hitting the mirror(s) at certain angles
(incident light) could blind you. As a result,
you may not be able to observe traffic
conditions and could cause an accident.
Exterior rear view mirror parking
position
To assist during parking maneuvers, you can
set the passenger-side exterior rear view
mirror so that you can see the rear wheel and
the road curb.
Setting and storing the parking position
Mirrors295Controls in detail221_AKB; 6; 20, en-USd2ugruen,Version: 2.11.8.12009-09-24T13:28:17+02:00 - Seite 295Z
Page 301 of 548
Switch off the parking lamps or the rear fog
lamp manually.
! Failure to switch off the parking lamps
when leaving the vehicle may result in a
discharged battery.
i Vehicles without front fog lamps: For
better detection of the vehicle, the LED
daytime running lamps are dimmed to
parking lamp level when the low-beam
headlamps are switched on.
Low-beam headlamps
The low-beam headlamps can be switched on
and off with the exterior lamp switch.
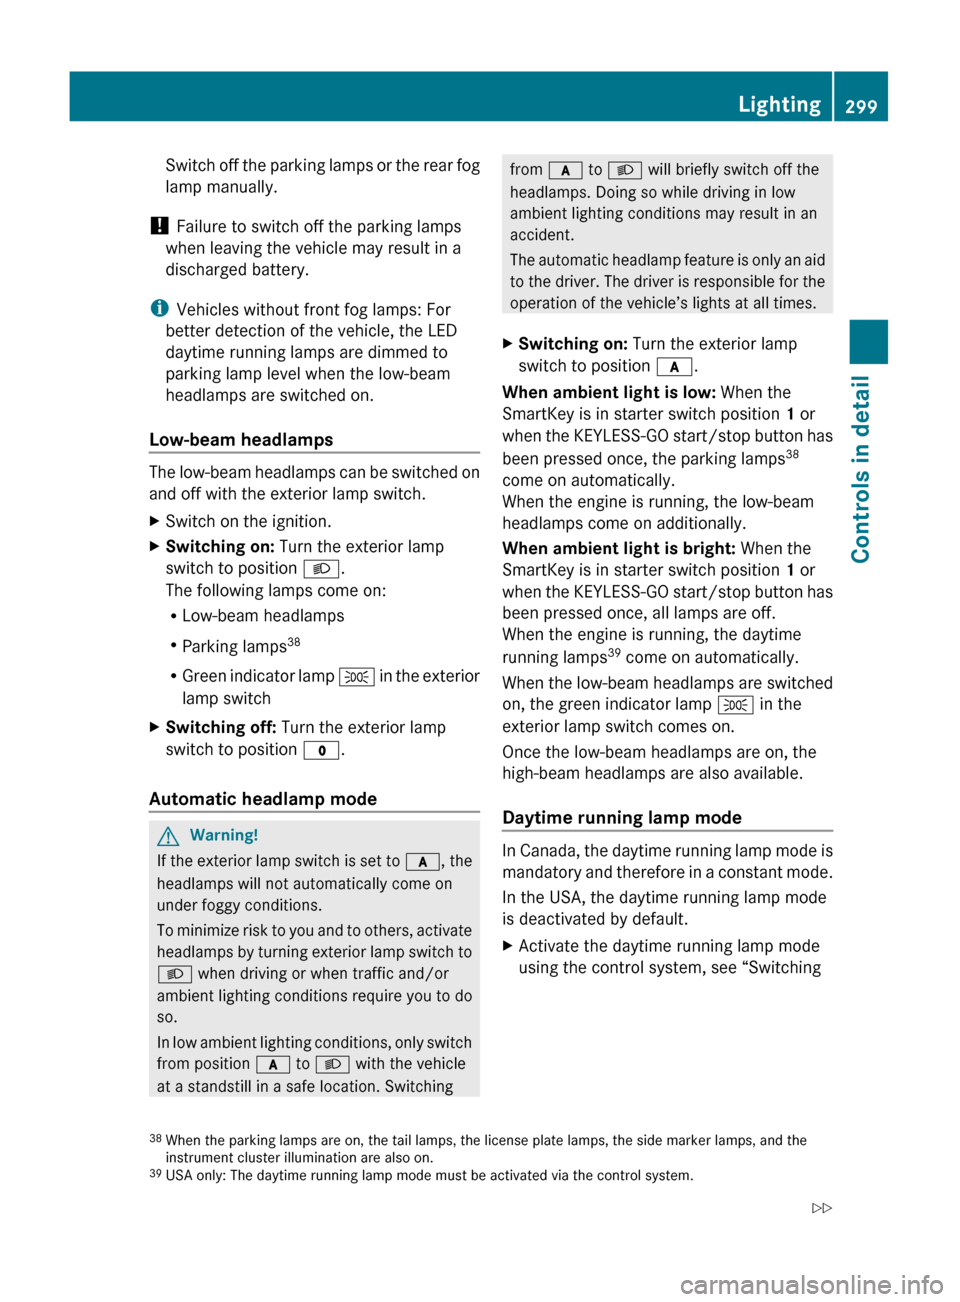
XSwitch on the ignition.XSwitching on: Turn the exterior lamp
switch to position L.
The following lamps come on:
R Low-beam headlamps
R Parking lamps 38
R Green indicator lamp T in the exterior
lamp switchXSwitching off: Turn the exterior lamp
switch to position $.
Automatic headlamp mode
GWarning!
If the exterior lamp switch is set to c, the
headlamps will not automatically come on
under foggy conditions.
To minimize risk to you and to others, activate
headlamps by turning exterior lamp switch to
L when driving or when traffic and/or
ambient lighting conditions require you to do
so.
In low ambient lighting conditions, only switch
from position c to L with the vehicle
at a standstill in a safe location. Switching
from c to L will briefly switch off the
headlamps. Doing so while driving in low
ambient lighting conditions may result in an
accident.
The automatic headlamp feature is only an aid
to the driver. The driver is responsible for the
operation of the vehicle’s lights at all times.XSwitching on: Turn the exterior lamp
switch to position c.
When ambient light is low: When the
SmartKey is in starter switch position 1 or
when the KEYLESS-GO start/stop button has
been pressed once, the parking lamps 38
come on automatically.
When the engine is running, the low-beam
headlamps come on additionally.
When ambient light is bright: When the
SmartKey is in starter switch position 1 or
when the KEYLESS-GO start/stop button has
been pressed once, all lamps are off.
When the engine is running, the daytime
running lamps 39
come on automatically.
When the low-beam headlamps are switched
on, the green indicator lamp T in the
exterior lamp switch comes on.
Once the low-beam headlamps are on, the
high-beam headlamps are also available.
Daytime running lamp mode
In Canada, the daytime running lamp mode is
mandatory and therefore in a constant mode.
In the USA, the daytime running lamp mode
is deactivated by default.
XActivate the daytime running lamp mode
using the control system, see “Switching38 When the parking lamps are on, the tail lamps, the license plate lamps, the side marker lamps, and the
instrument cluster illumination are also on.
39 USA only: The daytime running lamp mode must be activated via the control system.Lighting299Controls in detail221_AKB; 6; 20, en-USd2ugruen,Version: 2.11.8.12009-09-24T13:28:17+02:00 - Seite 299Z
Page 302 of 548
daytime running lamp mode on or off (USA
only)” ( Y page 234).XTurn the exterior lamp switch to position
$ or c .
When the engine is running and the
ambient light is bright, the daytime running
lamps come on.
In low ambient lighting conditions, the
following lamps will come on additionally:
R Low-beam headlamps
R Parking lamps 38
R green indicator lamp T in the exterior
lamp switch
You can only switch on the high-beam
headlamps when the low-beam headlamps
are on.
The high-beam flasher is available at all times.
Canada only
When the engine is running, and you
R shift from a driving position to park
position P with the vehicle at a standstill or
the electronic parking brake is engaged,
the daytime running lamps or the low-beam
headlamps will go out with a delay of
3 minutes
R turn the exterior lamp switch to position
T , the daytime running lamps and the
parking lamps 38
come on in bright ambient
lighting conditions.
R turn the exterior lamp switch to position
L , the manual headlamp mode has
priority over the daytime running lamp
mode
The corresponding exterior lamps come on
( Y page 298).
USA only
When the engine is running, and you turn the
exterior lamp switch to position T or
L , the manual headlamp mode has
priority over the daytime running lamp mode.
The corresponding exterior lamps come on
( Y page 298).
Fog lamps
Fog lamps cannot be switched on with the
exterior lamp switch in position c or
$ .
GWarning!
In low ambient lighting or foggy conditions,
only switch from position c to L with
the vehicle at a standstill in a safe location.
Switching from c to L will briefly
switch off the headlamps. Doing so while
driving in low ambient lighting conditions may
result in an accident.
Front fog lamps will operate with the parking
lamps and/or the low-beam headlamps on.
The rear fog lamp can only be switched on
with the exterior lamp switch in position
L . Fog lamps should only be used in
conjunction with low-beam headlamps.
Consult your State or Province Motor Vehicle
Regulations regarding permissible lamp
operation.
XSwitch on the ignition.XTurn the exterior lamp switch to position
T or L (Y page 298).
Vehicles with front fog lamps
XSwitching on front fog lamps: Pull out the
exterior lamp switch to first stop
( Y page 298).
The green indicator lamp N in the
exterior lamp switch comes on.XSwitching on rear fog lamp: Pull out the
exterior lamp switch to second stop.
The rear fog lamp, the front fog lamps, the
green N and the yellow indicator lamp
R in the exterior lamp switch come on.XSwitching off front fog lamps/rear fog
lamp: Push in the exterior lamp switch to
its stop.38 When the parking lamps are on, the tail lamps, the license plate lamps, the side marker lamps, and the
instrument cluster illumination are also on.300LightingControls in detail
221_AKB; 6; 20, en-USd2ugruen,Version: 2.11.8.12009-09-24T13:28:17+02:00 - Seite 300
Page 303 of 548
Vehicles without front fog lampsXSwitching on rear fog lamp: Pull out the
exterior lamp switch to its stop
(Y page 298).
The rear fog lamp and the yellow indicator
lamp R in the exterior lamp switch
come on.
XSwitching off rear fog lamp: Push in the
exterior lamp switch to its stop.
Locator lighting and night security
illumination
The locator lighting and night security
illumination are described in the COMAND
vehicle menu section under (Y page 208).
Combination switch
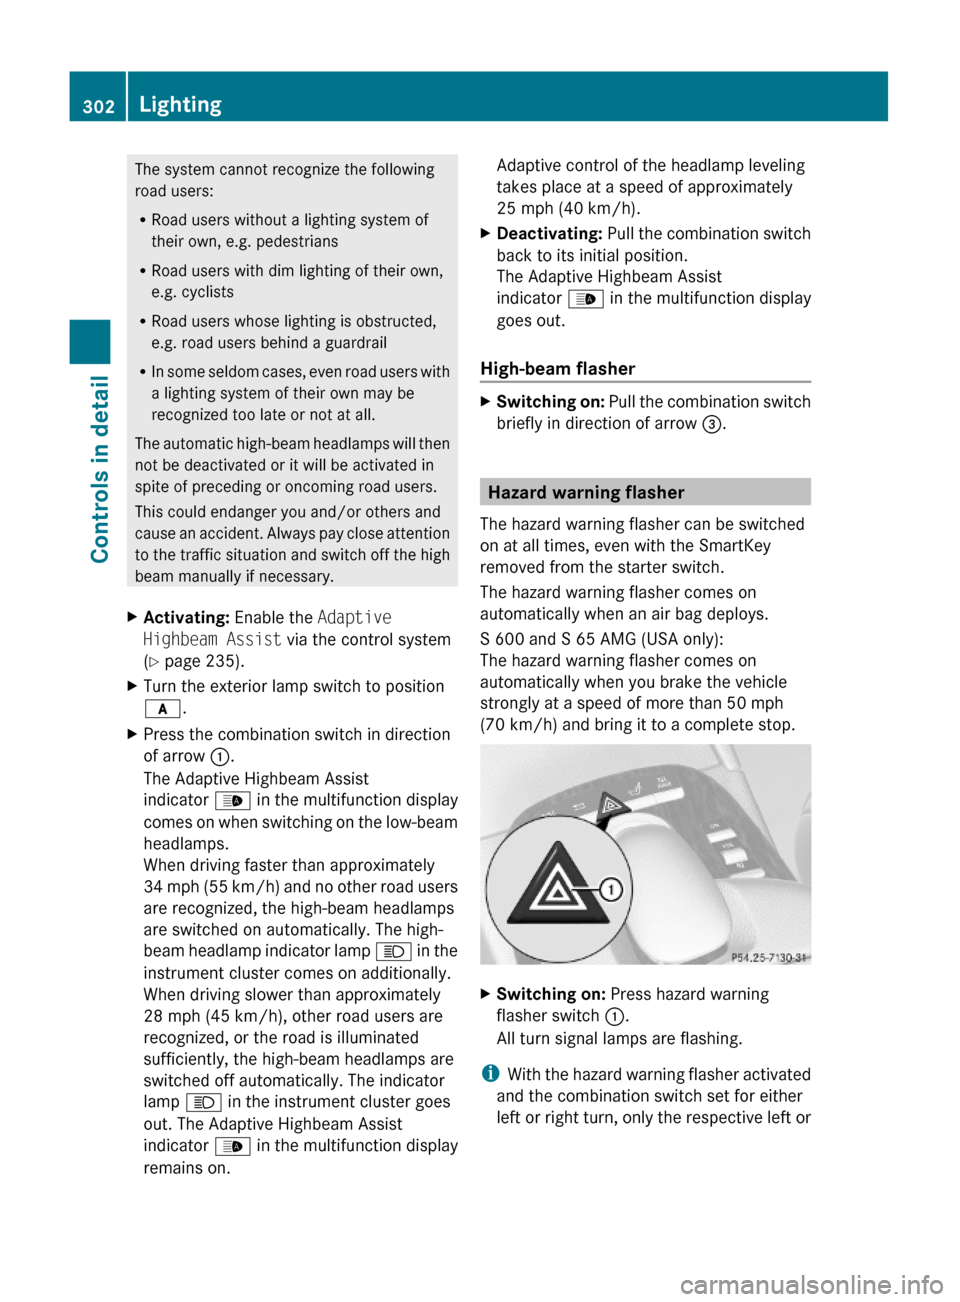
Turn signals
XPress the combination switch in direction
of arrow ; or ?.
The corresponding turn signal indicator
lamp ! or # in the instrument
cluster flashes.
The combination switch resets automatically
after major steering wheel movements.
To signal minor directional changes:
XPress the combination switch only to the
point of resistance in direction of
arrow ; or ? and release.
The corresponding turn signal lamps will
flash three times.
High beam XTurn the exterior lamp switch to position
L (Y page 298).
XSwitching on: Push the combination
switch in direction of arrow :.
The high-beam headlamp indicator lamp
K in the instrument cluster comes on.
XSwitching off: Pull the combination switch
in direction of arrow = to its original
position.
iAlso note the information on high-beam
headlamps with activated automatic
headlamp mode (Y page 299) or the
daytime running lamp mode (Y page 299).
Adaptive Highbeam Assist
Depending on the driving and traffic situation,
low-beam leveling and the high-beam
headlamps are controlled via an optical
sensor. The sensor is located on the front of
the overhead control panel. Glare for other
road users is reduced and the illumination of
road ahead is improved. The transitions
between low-beam and high-beam
headlamps take place without a sudden
change of light.
GWarning!
The Adaptive Highbeam Assist is only an aid
intended to support you while driving. The
driver is and remains responsible for proper
vehicle lighting in accordance with the
prevailing light, sight and traffic conditions.
The system may be impaired or unavailable
when
Rvisibility is poor, e.g. due to snow, rain, fog,
or heavy spray
Rthe optical sensor area of the windshield is
dirty, fogged up, or covered by a sticker for
example
Lighting301Controls in detail221_AKB; 6; 20, en-USd2ugruen,Version: 2.11.8.12009-09-24T13:28:17+02:00 - Seite 301Z
Page 304 of 548
The system cannot recognize the following
road users:
RRoad users without a lighting system of
their own, e.g. pedestrians
RRoad users with dim lighting of their own,
e.g. cyclists
RRoad users whose lighting is obstructed,
e.g. road users behind a guardrail
RIn some seldom cases, even road users with
a lighting system of their own may be
recognized too late or not at all.
The automatic high-beam headlamps will then
not be deactivated or it will be activated in
spite of preceding or oncoming road users.
This could endanger you and/or others and
cause an accident. Always pay close attention
to the traffic situation and switch off the high
beam manually if necessary.
XActivating: Enable the Adaptive
Highbeam Assist via the control system
(Y page 235).
XTurn the exterior lamp switch to position
c.
XPress the combination switch in direction
of arrow :.
The Adaptive Highbeam Assist
indicator _ in the multifunction display
comes on when switching on the low-beam
headlamps.
When driving faster than approximately
34 mph (55 km/h) and no other road users
are recognized, the high-beam headlamps
are switched on automatically. The high-
beam headlamp indicator lamp K in the
instrument cluster comes on additionally.
When driving slower than approximately
28 mph (45 km/h), other road users are
recognized, or the road is illuminated
sufficiently, the high-beam headlamps are
switched off automatically. The indicator
lamp K in the instrument cluster goes
out. The Adaptive Highbeam Assist
indicator _ in the multifunction display
remains on.
Adaptive control of the headlamp leveling
takes place at a speed of approximately
25 mph (40 km/h).
XDeactivating: Pull the combination switch
back to its initial position.
The Adaptive Highbeam Assist
indicator _ in the multifunction display
goes out.
High-beam flasher
XSwitching on: Pull the combination switch
briefly in direction of arrow =.
Hazard warning flasher
The hazard warning flasher can be switched
on at all times, even with the SmartKey
removed from the starter switch.
The hazard warning flasher comes on
automatically when an air bag deploys.
S 600 and S 65 AMG (USA only):
The hazard warning flasher comes on
automatically when you brake the vehicle
strongly at a speed of more than 50 mph
(70 km/h) and bring it to a complete stop.
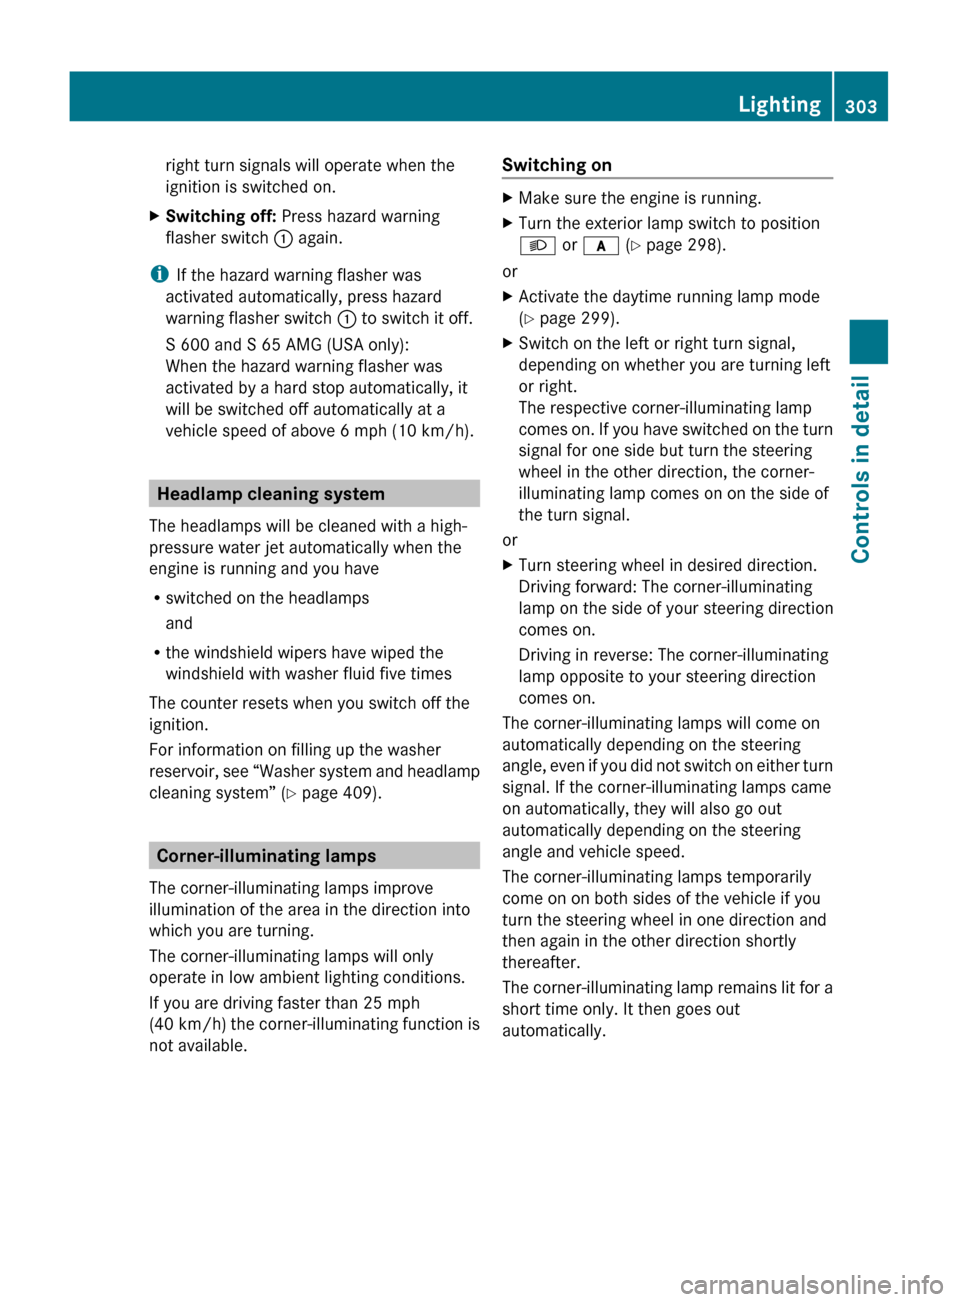
XSwitching on: Press hazard warning
flasher switch :.
All turn signal lamps are flashing.
iWith the hazard warning flasher activated
and the combination switch set for either
left or right turn, only the respective left or
302LightingControls in detail
221_AKB; 6; 20, en-USd2ugruen,Version: 2.11.8.12009-09-24T13:28:17+02:00 - Seite 302
Page 305 of 548
right turn signals will operate when the
ignition is switched on.XSwitching off: Press hazard warning
flasher switch : again.
i
If the hazard warning flasher was
activated automatically, press hazard
warning flasher switch : to switch it off.
S 600 and S 65 AMG (USA only):
When the hazard warning flasher was
activated by a hard stop automatically, it
will be switched off automatically at a
vehicle speed of above 6 mph (10 km/h).
Headlamp cleaning system
The headlamps will be cleaned with a high-
pressure water jet automatically when the
engine is running and you have
R switched on the headlamps
and
R the windshield wipers have wiped the
windshield with washer fluid five times
The counter resets when you switch off the
ignition.
For information on filling up the washer
reservoir, see “Washer system and headlamp
cleaning system” ( Y page 409).
Corner-illuminating lamps
The corner-illuminating lamps improve
illumination of the area in the direction into
which you are turning.
The corner-illuminating lamps will only
operate in low ambient lighting conditions.
If you are driving faster than 25 mph
(40 km/h) the corner-illuminating function is
not available.
Switching onXMake sure the engine is running.XTurn the exterior lamp switch to position
L or c (Y page 298).
or
XActivate the daytime running lamp mode
( Y page 299).XSwitch on the left or right turn signal,
depending on whether you are turning left
or right.
The respective corner-illuminating lamp
comes on. If you have switched on the turn
signal for one side but turn the steering
wheel in the other direction, the corner-
illuminating lamp comes on on the side of
the turn signal.
or
XTurn steering wheel in desired direction.
Driving forward: The corner-illuminating
lamp on the side of your steering direction
comes on.
Driving in reverse: The corner-illuminating
lamp opposite to your steering direction
comes on.
The corner-illuminating lamps will come on
automatically depending on the steering
angle, even if you did not switch on either turn
signal. If the corner-illuminating lamps came
on automatically, they will also go out
automatically depending on the steering
angle and vehicle speed.
The corner-illuminating lamps temporarily
come on on both sides of the vehicle if you
turn the steering wheel in one direction and
then again in the other direction shortly
thereafter.
The corner-illuminating lamp remains lit for a
short time only. It then goes out
automatically.
Lighting303Controls in detail221_AKB; 6; 20, en-USd2ugruen,Version: 2.11.8.12009-09-24T13:28:17+02:00 - Seite 303Z