2010 MERCEDES-BENZ S600 warning light
[x] Cancel search: warning lightPage 506 of 548
The positive terminal (+) must face
downwards.
XPut the cover with engagement hooks ?
first onto the battery compartment and let
the snap-fit hook 2 snap in.
Wireless headphone
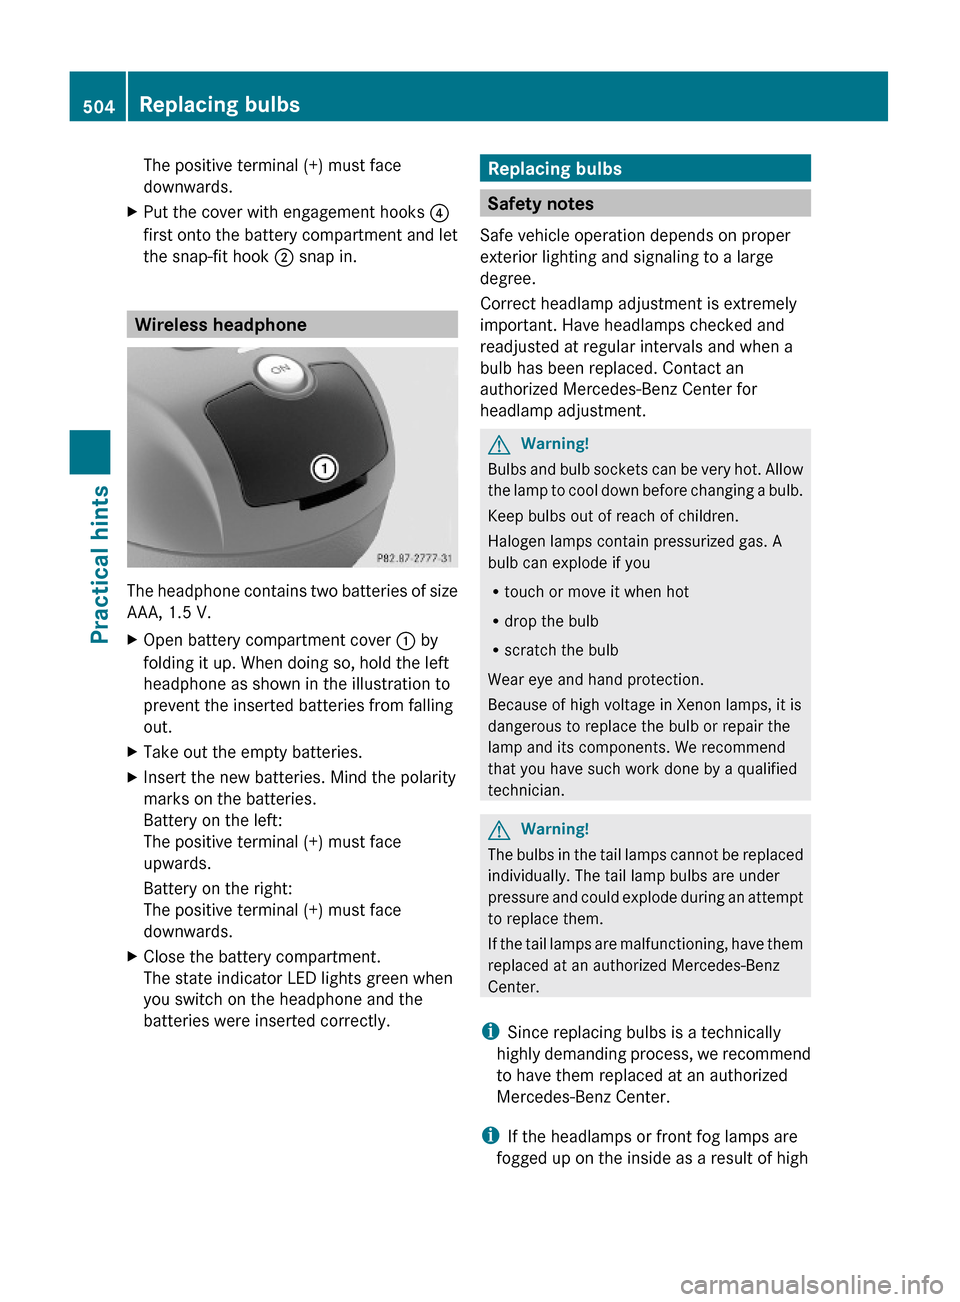
The headphone contains two batteries of size
AAA, 1.5 V.
XOpen battery compartment cover : by
folding it up. When doing so, hold the left
headphone as shown in the illustration to
prevent the inserted batteries from falling
out.
XTake out the empty batteries.XInsert the new batteries. Mind the polarity
marks on the batteries.
Battery on the left:
The positive terminal (+) must face
upwards.
Battery on the right:
The positive terminal (+) must face
downwards.
XClose the battery compartment.
The state indicator LED lights green when
you switch on the headphone and the
batteries were inserted correctly.
Replacing bulbs
Safety notes
Safe vehicle operation depends on proper
exterior lighting and signaling to a large
degree.
Correct headlamp adjustment is extremely
important. Have headlamps checked and
readjusted at regular intervals and when a
bulb has been replaced. Contact an
authorized Mercedes-Benz Center for
headlamp adjustment.
GWarning!
Bulbs and bulb sockets can be very hot. Allow
the lamp to cool down before changing a bulb.
Keep bulbs out of reach of children.
Halogen lamps contain pressurized gas. A
bulb can explode if you
Rtouch or move it when hot
Rdrop the bulb
Rscratch the bulb
Wear eye and hand protection.
Because of high voltage in Xenon lamps, it is
dangerous to replace the bulb or repair the
lamp and its components. We recommend
that you have such work done by a qualified
technician.
GWarning!
The bulbs in the tail lamps cannot be replaced
individually. The tail lamp bulbs are under
pressure and could explode during an attempt
to replace them.
If the tail lamps are malfunctioning, have them
replaced at an authorized Mercedes-Benz
Center.
iSince replacing bulbs is a technically
highly demanding process, we recommend
to have them replaced at an authorized
Mercedes-Benz Center.
iIf the headlamps or front fog lamps are
fogged up on the inside as a result of high
504Replacing bulbsPractical hints
221_AKB; 6; 20, en-USd2ugruen,Version: 2.11.8.12009-09-24T13:28:17+02:00 - Seite 504
Page 508 of 548
RYour hands should be dry and free of oil and
grease.
RIf the newly installed bulb does not come
on, contact an authorized Mercedes-Benz
Center.
iMercedes-Benz recommends using
Longlife (LL) bulbs.
Replacing bulbs for front lamps
GWarning!
Do not remove the cover for the Bi-Xenon
headlamp. Because of high voltage in Xenon
lamps, it is dangerous to replace the bulb or
repair the lamp and its components. It is
recommended to have such work done by a
qualified technician.
Before you start to replace a bulb for a front
lamp, do the following:
XSwitch off the ignition.XTurn the exterior lamp switch to position
$.
XOpen the hood (Y page 404).
High-beam spot (vehicles with halogen
daytime running lamps)
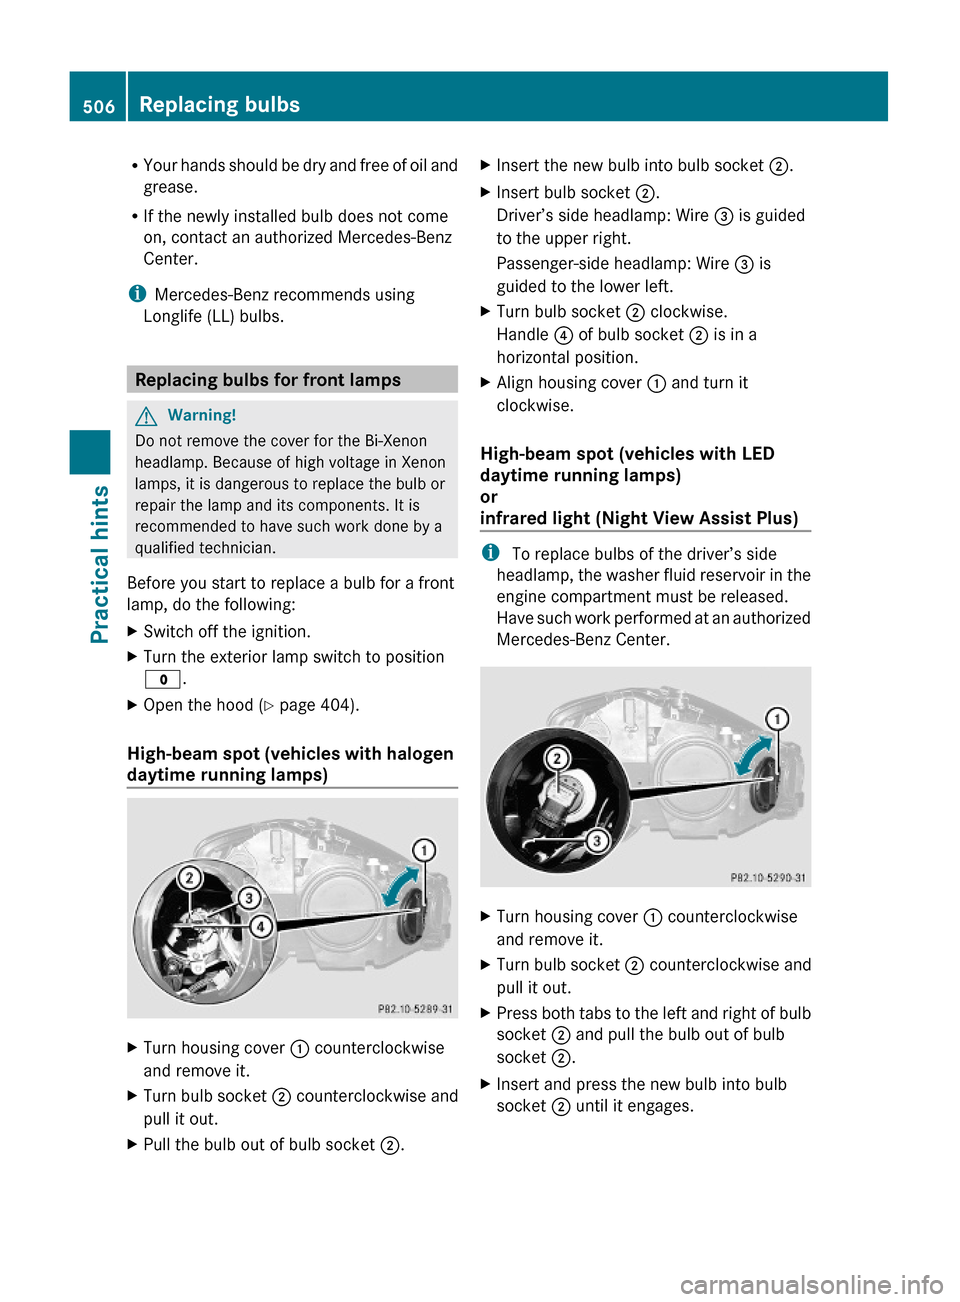
XTurn housing cover : counterclockwise
and remove it.
XTurn bulb socket ; counterclockwise and
pull it out.
XPull the bulb out of bulb socket ;.XInsert the new bulb into bulb socket ;.XInsert bulb socket ;.
Driver’s side headlamp: Wire = is guided
to the upper right.
Passenger-side headlamp: Wire = is
guided to the lower left.
XTurn bulb socket ; clockwise.
Handle ? of bulb socket ; is in a
horizontal position.
XAlign housing cover : and turn it
clockwise.
High-beam spot (vehicles with LED
daytime running lamps)
or
infrared light (Night View Assist Plus)
i To replace bulbs of the driver’s side
headlamp, the washer fluid reservoir in the
engine compartment must be released.
Have such work performed at an authorized
Mercedes-Benz Center.
XTurn housing cover : counterclockwise
and remove it.
XTurn bulb socket ; counterclockwise and
pull it out.
XPress both tabs to the left and right of bulb
socket ; and pull the bulb out of bulb
socket ;.
XInsert and press the new bulb into bulb
socket ; until it engages.
506Replacing bulbsPractical hints
221_AKB; 6; 20, en-USd2ugruen,Version: 2.11.8.12009-09-24T13:28:17+02:00 - Seite 506
Page 512 of 548
When changing a wheel on a level surface:XPlace a wheel chock or other sizeable
object in front of and another wheel chock
or other sizeable object behind the wheel
that is diagonally opposite to the wheel
being changed.
Always try lifting the vehicle using the jack on
a level surface. However, should
circumstances require you to do so on a hill:
XPlace wheel chocks or other sizeable
objects on the downhill side in front of both
wheels on the side opposite to the side on
which the wheel is to be changed.
GWarning!
Only jack up the vehicle on level ground or on
slight inclines/declines. Otherwise, the
vehicle could fall off the jack and injure you or
others.
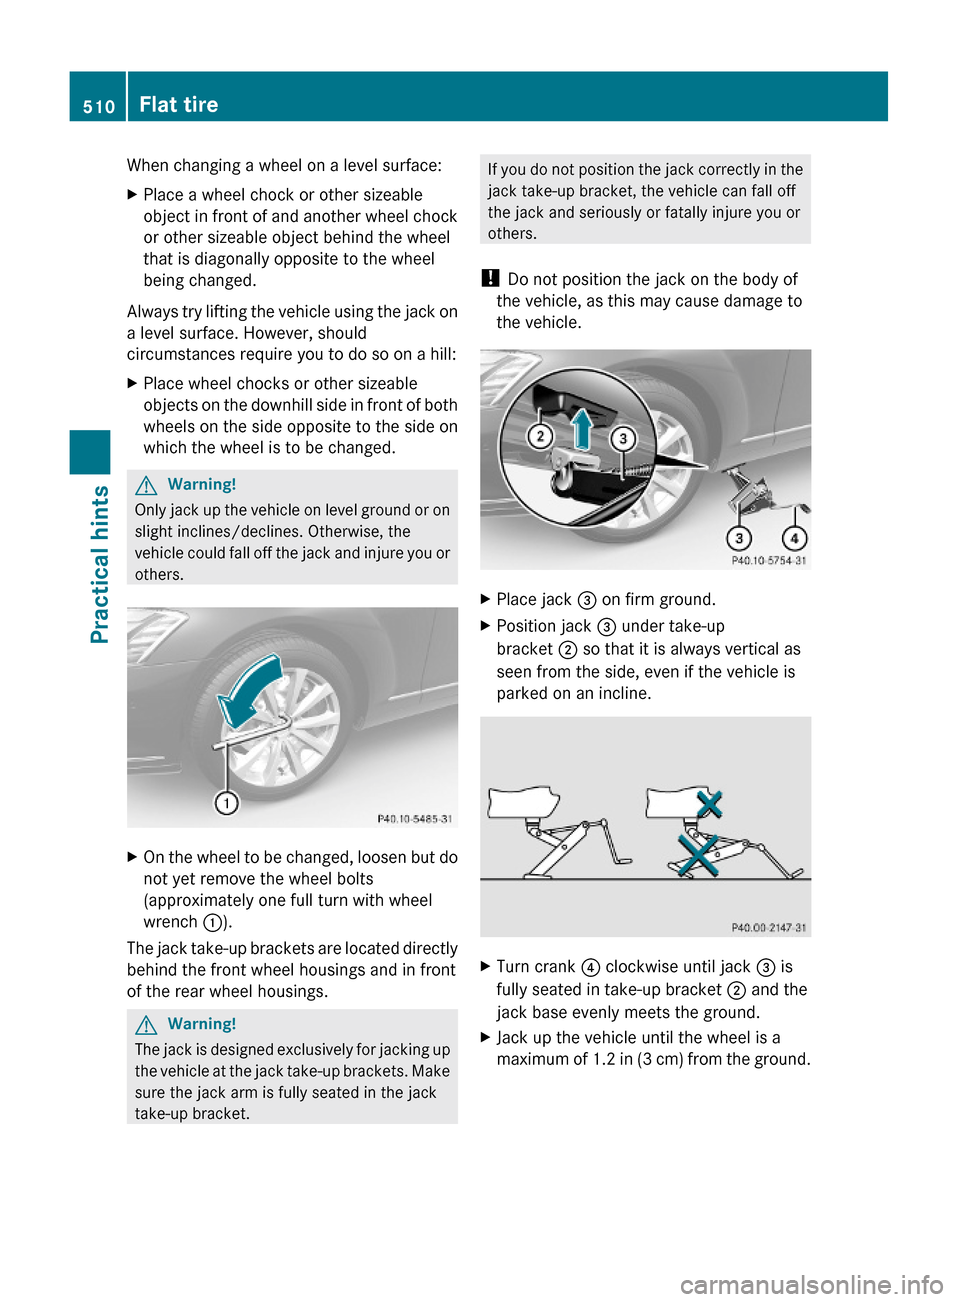
XOn the wheel to be changed, loosen but do
not yet remove the wheel bolts
(approximately one full turn with wheel
wrench :).
The jack take-up brackets are located directly
behind the front wheel housings and in front
of the rear wheel housings.
GWarning!
The jack is designed exclusively for jacking up
the vehicle at the jack take-up brackets. Make
sure the jack arm is fully seated in the jack
take-up bracket.
If you do not position the jack correctly in the
jack take-up bracket, the vehicle can fall off
the jack and seriously or fatally injure you or
others.
! Do not position the jack on the body of
the vehicle, as this may cause damage to
the vehicle.
XPlace jack = on firm ground.XPosition jack = under take-up
bracket ; so that it is always vertical as
seen from the side, even if the vehicle is
parked on an incline.
XTurn crank ? clockwise until jack = is
fully seated in take-up bracket ; and the
jack base evenly meets the ground.
XJack up the vehicle until the wheel is a
maximum of 1.2 in (3 cm) from the ground.
510Flat tirePractical hints
221_AKB; 6; 20, en-USd2ugruen,Version: 2.11.8.12009-09-24T13:28:17+02:00 - Seite 510
Page 513 of 548
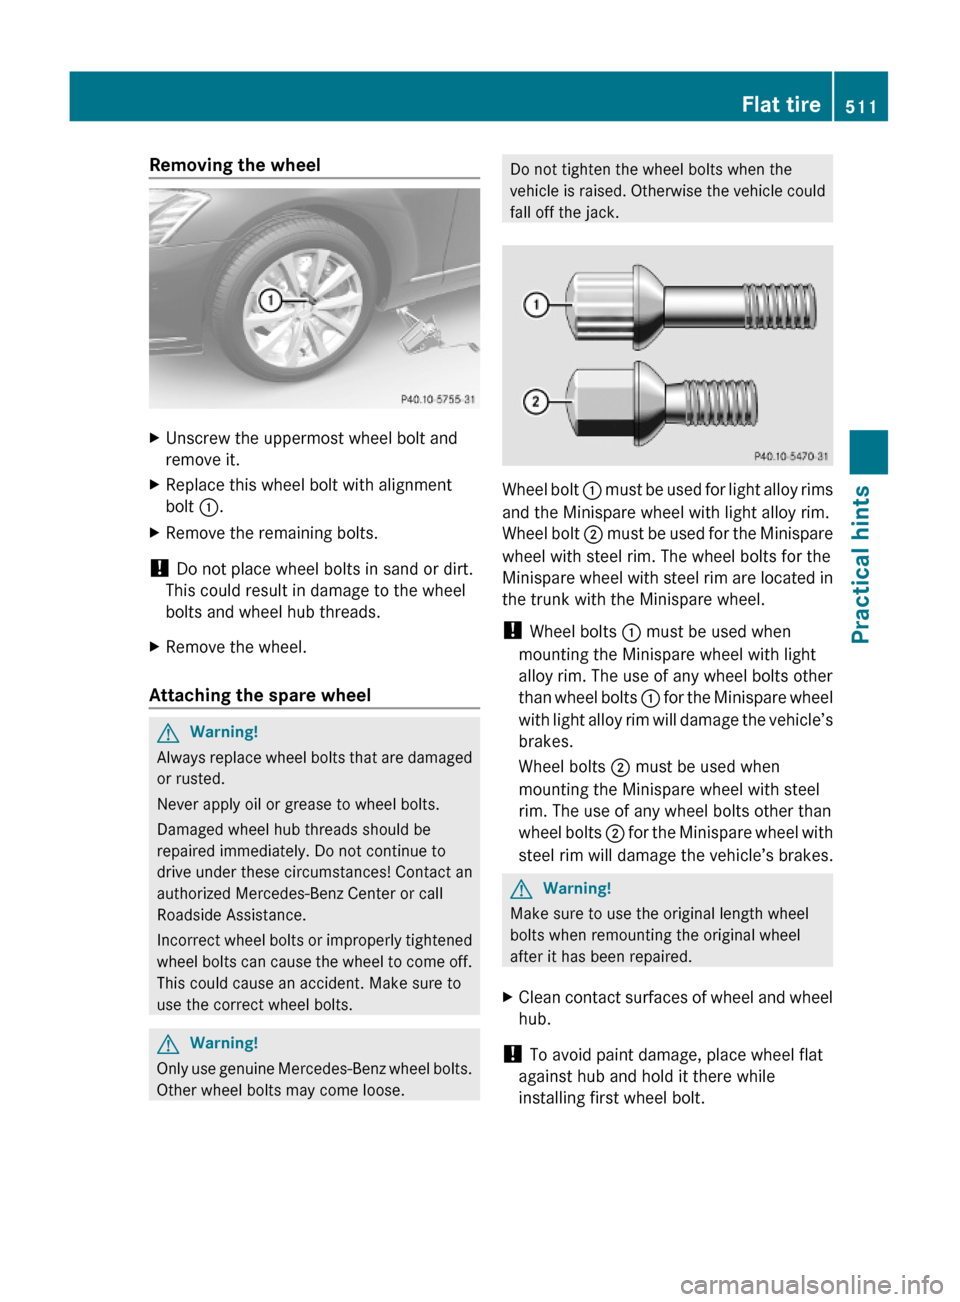
Removing the wheelXUnscrew the uppermost wheel bolt and
remove it.
XReplace this wheel bolt with alignment
bolt :.
XRemove the remaining bolts.
! Do not place wheel bolts in sand or dirt.
This could result in damage to the wheel
bolts and wheel hub threads.
XRemove the wheel.
Attaching the spare wheel
GWarning!
Always replace wheel bolts that are damaged
or rusted.
Never apply oil or grease to wheel bolts.
Damaged wheel hub threads should be
repaired immediately. Do not continue to
drive under these circumstances! Contact an
authorized Mercedes-Benz Center or call
Roadside Assistance.
Incorrect wheel bolts or improperly tightened
wheel bolts can cause the wheel to come off.
This could cause an accident. Make sure to
use the correct wheel bolts.
GWarning!
Only use genuine Mercedes-Benz wheel bolts.
Other wheel bolts may come loose.
Do not tighten the wheel bolts when the
vehicle is raised. Otherwise the vehicle could
fall off the jack.
Wheel bolt : must be used for light alloy rims
and the Minispare wheel with light alloy rim.
Wheel bolt ; must be used for the Minispare
wheel with steel rim. The wheel bolts for the
Minispare wheel with steel rim are located in
the trunk with the Minispare wheel.
! Wheel bolts : must be used when
mounting the Minispare wheel with light
alloy rim. The use of any wheel bolts other
than wheel bolts : for the Minispare wheel
with light alloy rim will damage the vehicle’s
brakes.
Wheel bolts ; must be used when
mounting the Minispare wheel with steel
rim. The use of any wheel bolts other than
wheel bolts ; for the Minispare wheel with
steel rim will damage the vehicle’s brakes.
GWarning!
Make sure to use the original length wheel
bolts when remounting the original wheel
after it has been repaired.
XClean contact surfaces of wheel and wheel
hub.
! To avoid paint damage, place wheel flat
against hub and hold it there while
installing first wheel bolt.
Flat tire511Practical hints221_AKB; 6; 20, en-USd2ugruen,Version: 2.11.8.12009-09-24T13:28:17+02:00 - Seite 511Z
Page 514 of 548
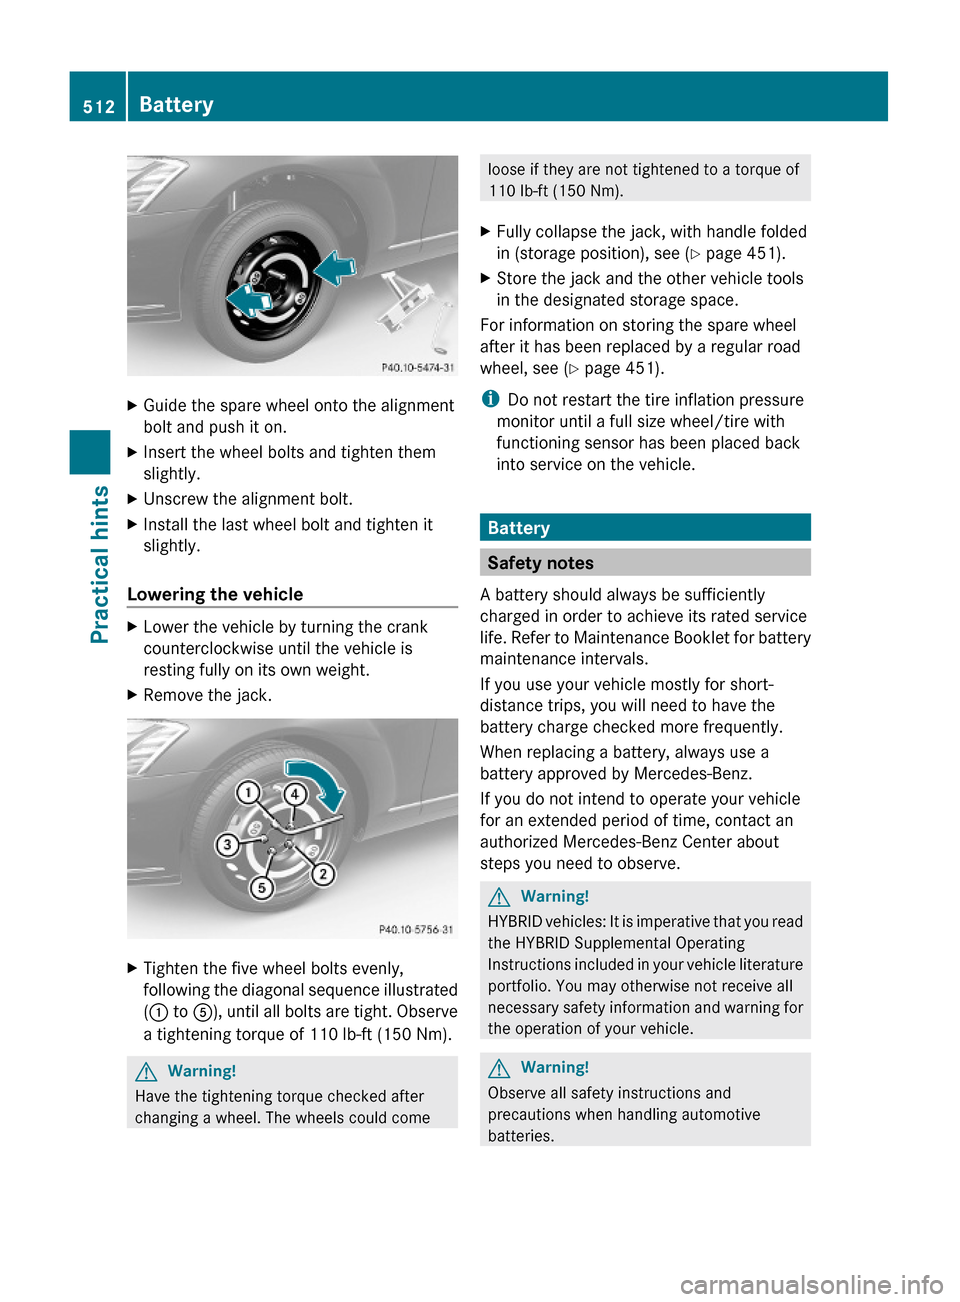
XGuide the spare wheel onto the alignment
bolt and push it on.
XInsert the wheel bolts and tighten them
slightly.
XUnscrew the alignment bolt.XInstall the last wheel bolt and tighten it
slightly.
Lowering the vehicle
XLower the vehicle by turning the crank
counterclockwise until the vehicle is
resting fully on its own weight.
XRemove the jack.XTighten the five wheel bolts evenly,
following the diagonal sequence illustrated
(: to A), until all bolts are tight. Observe
a tightening torque of 110 lb-ft (150 Nm).
GWarning!
Have the tightening torque checked after
changing a wheel. The wheels could come
loose if they are not tightened to a torque of
110 lb-ft (150 Nm).
XFully collapse the jack, with handle folded
in (storage position), see (Y page 451).
XStore the jack and the other vehicle tools
in the designated storage space.
For information on storing the spare wheel
after it has been replaced by a regular road
wheel, see (Y page 451).
iDo not restart the tire inflation pressure
monitor until a full size wheel/tire with
functioning sensor has been placed back
into service on the vehicle.
Battery
Safety notes
A battery should always be sufficiently
charged in order to achieve its rated service
life. Refer to Maintenance Booklet for battery
maintenance intervals.
If you use your vehicle mostly for short-
distance trips, you will need to have the
battery charge checked more frequently.
When replacing a battery, always use a
battery approved by Mercedes-Benz.
If you do not intend to operate your vehicle
for an extended period of time, contact an
authorized Mercedes-Benz Center about
steps you need to observe.
GWarning!
HYBRID vehicles: It is imperative that you read
the HYBRID Supplemental Operating
Instructions included in your vehicle literature
portfolio. You may otherwise not receive all
necessary safety information and warning for
the operation of your vehicle.
GWarning!
Observe all safety instructions and
precautions when handling automotive
batteries.
512BatteryPractical hints
221_AKB; 6; 20, en-USd2ugruen,Version: 2.11.8.12009-09-24T13:28:17+02:00 - Seite 512
Page 539 of 548
All models
(except AMG vehicles)S 63 AMG
S 63 AMG (Performance Package)
S 65 AMGRim (steel)4.5 B x 19 H2—Rim (light alloy)—4.5 B x 19 H2Wheel offset1.38 in (35 mm)1.38 in (35 mm)Minispare tire 68T 155/70 R19 113MT 155/70 R19 113MRecommended tire
inflation pressure61 psi (4.2 bar)61 psi (4.2 bar)Fuels, coolants, lubricants, etc.
Capacities
Vehicle components and their respective
lubricants must match. Therefore only use
products tested and approved by Mercedes-
Benz.
For information on tested and approved
products, contact an authorized Mercedes-
Benz Center or visit www.mbusa.com (USA
only).
GWarning!
Comply with all valid regulations with respect
to handling, storing, and disposing of service
fluids. Otherwise you could endanger persons
or the environment.
Keep service fluids out of the reach of
children.
For health reasons, you should prevent
service fluids from coming into direct contact
with your skin or clothing.
If a service fluid is swallowed, contact a
physician immediately.ModelCapacityFuels, coolants,
lubricants, etc.Engine with oil
filterS 450 4MATIC 69
S 550 70
S 550 4MATIC9.0 US qt (8.5 l)Approved engine
oilsS 600
S 65 AMG9.5 US qt (9.0 l)S 63 AMG 719.9 US qt (9.35 l)68
Must not be used with snow chains.
69 Canada only.
70 USA only.
71 Engine with oil cooler.Fuels, coolants, lubricants, etc.537Technical data221_AKB; 6; 20, en-USd2ugruen,Version: 2.11.8.12009-09-24T13:28:17+02:00 - Seite 537Z
Page 543 of 548
Under extremely strenuous operating
conditions, this moisture content can lead to
the formation of bubbles in the system, thus
reducing the system’s efficiency.
Therefore, the brake fluid must be replaced
regularly. Refer to your vehicle’s Maintenance
Booklet for replacement interval.
Only brake fluid approved by Mercedes-Benz
is recommended. Any authorized Mercedes-
Benz Center will provide you with additional
information.
Premium unleaded gasoline
GWarning!
Gasoline is highly flammable and poisonous.
It burns violently and can cause serious
personal injury.
Never allow sparks, flames or smoking
materials near gasoline!
Turn off the engine before refueling.
Whenever you are around gasoline, avoid
inhaling fumes and any skin or clothing
contact. Extinguish all smoking materials.
Direct skin contact with fuels and the
inhalation of fuel vapors are damaging your
health.
! To maintain the engine’s durability and
performance, premium unleaded gasoline
must be used.
If premium unleaded gasoline is not
available and low octane gasoline is used,
follow these precautions:
R Have the fuel tank only partially filled
with unleaded regular gasoline and fill up
with premium unleaded gasoline as soon
as possible.
R Avoid full throttle driving and abrupt
acceleration.
R Do not exceed an engine speed of
3 000 rpm if the vehicle is loaded with a
light load such as two persons and no
luggage.
R Do not exceed 2
/ 3 of maximum
accelerator pedal position if the vehicle
is fully loaded or operating in
mountainous terrain.
Fuel requirements
Only use premium unleaded gasoline. The
octane number (posted at the pump) must be
91 min. It is an average of both the Research
Octane Number (RON) and the Motor Octane
Number (MON): (RON+MON)/2. This is also
known as the ANTI-KNOCK INDEX.
Reformulated gasolines (RFG) and/or
unleaded gasoline containing oxygenates
such as ethanol, TAME, ETBE, IPA, IBA, and
TBA can be used provided the ratio of any one
of these oxygenates to gasoline does not
exceed 10%; MTBE must not exceed 15%.
The ratio of methanol to gasoline must not
exceed 3% plus additional cosolvents.
Using mixtures of ethanol and methanol is not
allowed. Gasohol, which contains 10%
ethanol and 90% unleaded gasoline, can be
used.
These blends must also meet all other fuel
requirements, such as resistance to spark
knock, boiling range, vapor pressure, etc.
Gasoline additives
A major concern among engine
manufacturers is carbon build-up caused by
gasoline. Mercedes-Benz recommends only
the use of quality gasoline containing
additives that prevent the build-up of carbon
deposits.
Fuels, coolants, lubricants, etc.541Technical data221_AKB; 6; 20, en-USd2ugruen,Version: 2.11.8.12009-09-24T13:28:17+02:00 - Seite 541Z