2010 MERCEDES-BENZ S600 warning light
[x] Cancel search: warning lightPage 136 of 548
Off-road and off-map
Route guidance to an off-road
destination
GWarning!
The COMAND navigation system may direct
you to off-road routes that your vehicle may
not be capable of traversing through without
damaging your tires, wheels or vehicle. It is
the driver’s sole responsibility to determine
the suitability of the route. Off-road routes
may be of varying conditions and their
appropriateness for use may be affected by
various factors such as time of day, time of
year and immediate weather conditions that
cannot be judged or taken into consideration
by the COMAND system.
COMAND can guide you to destinations
within the area covered by the digital map,
even if a destination is not located at a road
known to the system.
These destinations are shown as off-road
destinations, which you can enter using the
map, for example. In these cases, COMAND
guides you for as long as possible with
navigation announcements and displays on
roads known to the system.
Shortly before you reach the last known the
point to leave the digitized road network, you
will hear the announcement The
destination is nearby. Follow the
arrow on the display.
You will then see an arrow that indicates the
direction to the off-road destination. When
the off-road destination is close to the road,
Area of dest. reached appears in addition
below the arrow.
The section of the route from the last known
point on the map to the off-road destination
is indicated with a dashed line after a certain
length. It simply shows the direction to the
off-road destination without taking account of
any type of obstacles in the way.
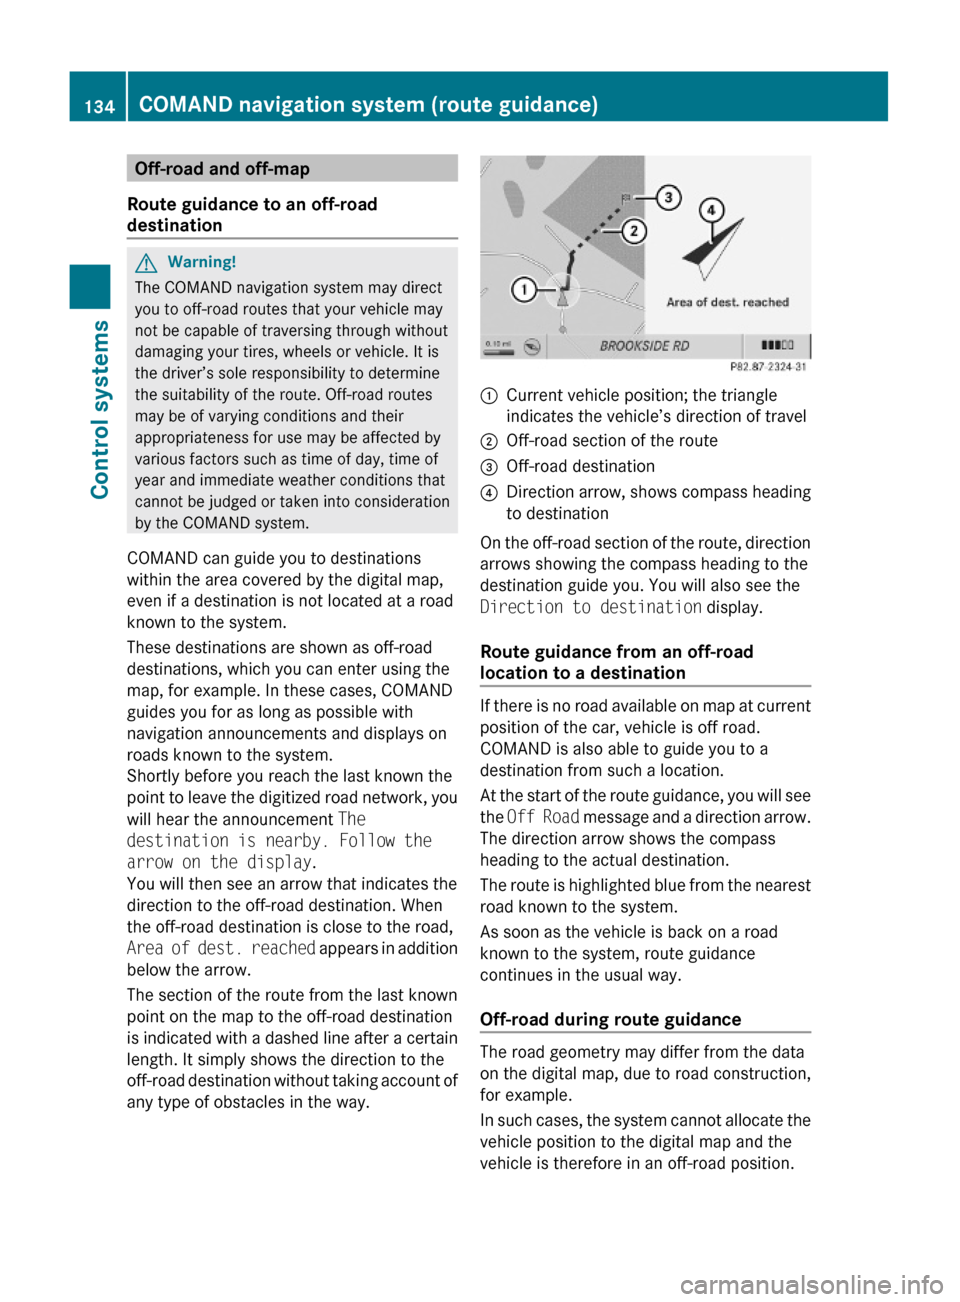
:Current vehicle position; the triangle
indicates the vehicle’s direction of travel
;Off-road section of the route=Off-road destination?Direction arrow, shows compass heading
to destination
On the off-road section of the route, direction
arrows showing the compass heading to the
destination guide you. You will also see the
Direction to destination display.
Route guidance from an off-road
location to a destination
If there is no road available on map at current
position of the car, vehicle is off road.
COMAND is also able to guide you to a
destination from such a location.
At the start of the route guidance, you will see
the Off Road message and a direction arrow.
The direction arrow shows the compass
heading to the actual destination.
The route is highlighted blue from the nearest
road known to the system.
As soon as the vehicle is back on a road
known to the system, route guidance
continues in the usual way.
Off-road during route guidance
The road geometry may differ from the data
on the digital map, due to road construction,
for example.
In such cases, the system cannot allocate the
vehicle position to the digital map and the
vehicle is therefore in an off-road position.
134COMAND navigation system (route guidance)Control systems
221_AKB; 6; 20, en-USd2ugruen,Version: 2.11.8.12009-09-24T13:28:17+02:00 - Seite 134
Page 188 of 548
iThe Group menu item cannot be selected
if only one audio format is saved on the
DVD.
The list of available audio formats appears. A
dot # indicates the format currently
selected.XChanging setting: Slide ZV Æ or rotate
c V d.XExiting menu: Slide XV Y.
Playback options
The following options are available:
R Normal Track Sequence : Tracks are
played back in the order in which they are
stored on the disc, e.g. track 1, 2, 3, etc.
R Medium Mix : Tracks are played back in
random order, e.g. track 3, 8, 5, etc.
R Track List Mix (MP3 mode only): Tracks
of the current folder and its subfolders are
played back in random order.
XSelecting an option: Select Audio.XSelect CD, DVD-A or MP3 .
The option list appears. A dot # indicates
which option is switched on.XSelect an option and press W.
The option is switched on. For all options
except Normal Track Sequence , you will
see a corresponding indicator in the main
area.
i The Normal Track Sequence option is
automatically activated when you select a
different medium. If an option is activated,
it remains activated after COMAND is
switched on/off.
Audio AUX and video AUX
You can play back external audio or video
sources via the systems installed in your
vehicle.
The sockets for external audio and video
sources (AUX) are located
R in the glove box (COMAND)
R on the CD/DVD drive in the rear passenger
compartment
R on the head restraints
i For operation of the external audio and
video sources, refer to the operating
instructions of the respective device. You
may have to adjust the proper video
standard on the external audio and video
source to ensure proper replay.
Do not leave external devices in the vehicle.
Proper function of the device could be
impaired due to excessive temperatures,
for example when exposing to direct
sunlight or when the outside temperature
is extremely low. Mercedes-Benz does not
assume liability for damage to external
devices.GWarning!
Operating an external audio source while the
vehicle is in motion will distract you. You may
not notice changing road and/or traffic
conditions which may cause an accident.
Bear in mind that at a speed of just 30 mph
(approximately 50 km/h), your vehicle is
covering a distance of 44 feet (approximately
14 m) every second.
For your safety and the safety of others, pull
over to a safe location and stop before
operating an external audio source.
GWarning!
Due to the different volumes of the external
audio sources, system messages of the
vehicle may be much louder. You may need to
disable these system messages or adjust the
volume of these messages manually.
i The volume of external audio sources is
extremely variable. It is possible that a
device connected as an external audio
source will sound quieter or louder in the
186Audio AUX and video AUXControl systems
221_AKB; 6; 20, en-USd2ugruen,Version: 2.11.8.12009-09-24T13:28:17+02:00 - Seite 186
Page 202 of 548
XSelect MUSIC REGISTER Q Rename/
Delete Files.
or
XPress W when the main area is highlighted.
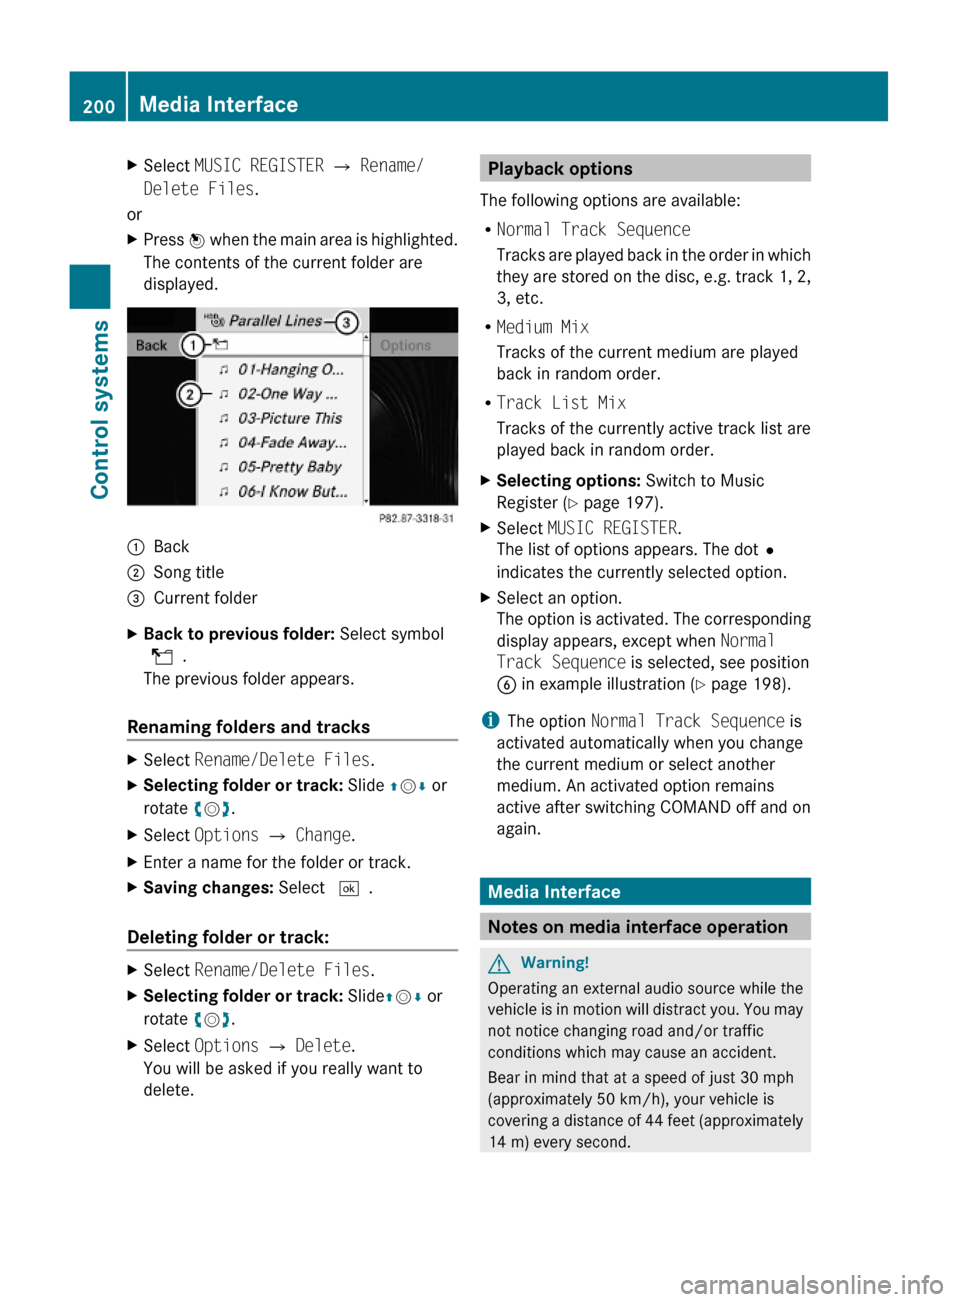
The contents of the current folder are
displayed.
:Back;Song title=Current folderXBack to previous folder: Select symbol
U.
The previous folder appears.
Renaming folders and tracks
XSelect Rename/Delete Files.XSelecting folder or track: Slide ZVÆ or
rotate cVd.
XSelect Options Q Change.XEnter a name for the folder or track.XSaving changes: Select ¬.
Deleting folder or track:
XSelect Rename/Delete Files.XSelecting folder or track: SlideZVÆ or
rotate cVd.
XSelect Options Q Delete.
You will be asked if you really want to
delete.
Playback options
The following options are available:
RNormal Track Sequence
Tracks are played back in the order in which
they are stored on the disc, e.g. track 1, 2,
3, etc.
RMedium Mix
Tracks of the current medium are played
back in random order.
RTrack List Mix
Tracks of the currently active track list are
played back in random order.
XSelecting options: Switch to Music
Register (Y page 197).
XSelect MUSIC REGISTER.
The list of options appears. The dot#
indicates the currently selected option.
XSelect an option.
The option is activated. The corresponding
display appears, except when Normal
Track Sequence is selected, see position
B in example illustration (Y page 198).
iThe option Normal Track Sequence is
activated automatically when you change
the current medium or select another
medium. An activated option remains
active after switching COMAND off and on
again.
Media Interface
Notes on media interface operation
GWarning!
Operating an external audio source while the
vehicle is in motion will distract you. You may
not notice changing road and/or traffic
conditions which may cause an accident.
Bear in mind that at a speed of just 30 mph
(approximately 50 km/h), your vehicle is
covering a distance of 44 feet (approximately
14 m) every second.
200Media InterfaceControl systems
221_AKB; 6; 20, en-USd2ugruen,Version: 2.11.8.12009-09-24T13:28:17+02:00 - Seite 200
Page 204 of 548
iDo not leave external devices in the
vehicle. Proper function of the device could
be impaired due to excessive
temperatures, for example when exposing
to direct sunlight or when the outside
temperature is extremely low. Mercedes-
Benz does not assume liability for damage
to external devices.
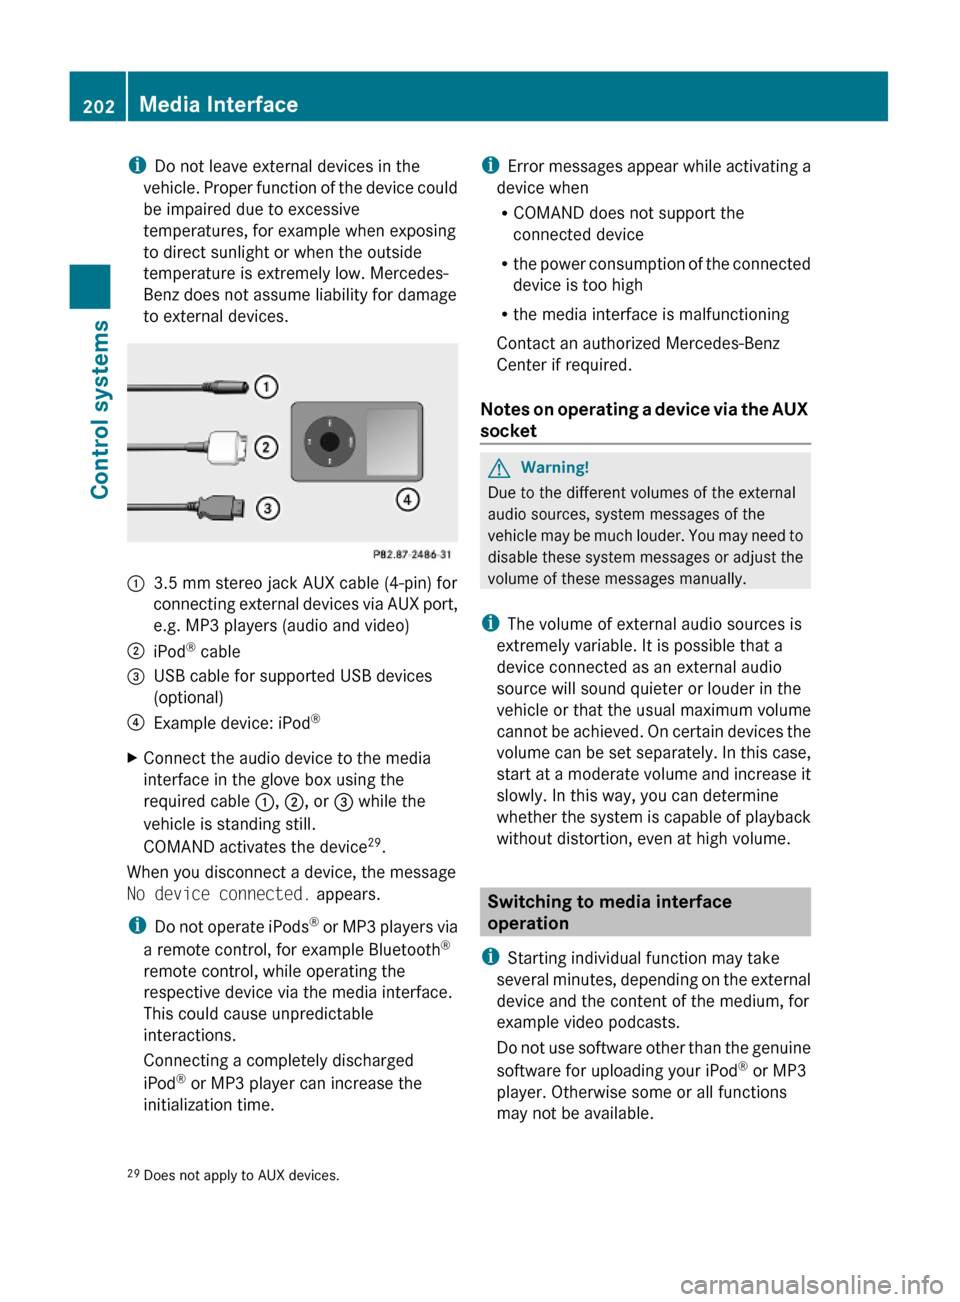
:3.5 mm stereo jack AUX cable (4-pin) for
connecting external devices via AUX port,
e.g. MP3 players (audio and video)
;iPod® cable=USB cable for supported USB devices
(optional)
?Example device: iPod®XConnect the audio device to the media
interface in the glove box using the
required cable :, ;, or = while the
vehicle is standing still.
COMAND activates the device29.
When you disconnect a device, the message
No device connected. appears.
iDo not operate iPods® or MP3 players via
a remote control, for example Bluetooth®
remote control, while operating the
respective device via the media interface.
This could cause unpredictable
interactions.
Connecting a completely discharged
iPod® or MP3 player can increase the
initialization time.
iError messages appear while activating a
device when
RCOMAND does not support the
connected device
Rthe power consumption of the connected
device is too high
Rthe media interface is malfunctioning
Contact an authorized Mercedes-Benz
Center if required.
Notes on operating a device via the AUX
socket
GWarning!
Due to the different volumes of the external
audio sources, system messages of the
vehicle may be much louder. You may need to
disable these system messages or adjust the
volume of these messages manually.
iThe volume of external audio sources is
extremely variable. It is possible that a
device connected as an external audio
source will sound quieter or louder in the
vehicle or that the usual maximum volume
cannot be achieved. On certain devices the
volume can be set separately. In this case,
start at a moderate volume and increase it
slowly. In this way, you can determine
whether the system is capable of playback
without distortion, even at high volume.
Switching to media interface
operation
iStarting individual function may take
several minutes, depending on the external
device and the content of the medium, for
example video podcasts.
Do not use software other than the genuine
software for uploading your iPod® or MP3
player. Otherwise some or all functions
may not be available.
29Does not apply to AUX devices.202Media InterfaceControl systems
221_AKB; 6; 20, en-USd2ugruen,Version: 2.11.8.12009-09-24T13:28:17+02:00 - Seite 202
Page 208 of 548
USB storage device
iThis function is available for
alphabetically ordered directories. The
function is not available within playlists for
example.
XWithin a folder, press the respective button
on the telephone keypad once or more to
enter the first character of the desired
artist name. For example, press button
l three times for an artist whose name
starts with a “C”.
The available characters are displayed on
the bottom of the display.
When the directory contains folders only,
COMAND will search for folders.
Selecting active partition (USB
storage devices only)
You can select this function with USB storage
devices when the storage space is
partitioned. The system supports up to 4
partitions (primary or logical, FAT formatted).
i The Windows formatting program
supports FAT partitions of up to 32 gigabyte
by default.
XSelect Media Interface Q Select
Active Partition .
Playback options
The following options are available:
R Normal Track Sequence
Tracks are played back in regular order (e.g.
in numerical or in alphabetical order).
R Random Tracks
All available tracks on the current medium
are played back in random order.
R Category Mix or Random Folder (with
USB devices when Folder was selected)
Tracks of the currently active category or
folder and its subfolders are played back in
random order.XSelecting playback options: Select
Media Interface in the basic display.
The list of options appears. The dot #
indicates the currently selected option.XSelect an option.
COMAND vehicle menu
Introduction
GWarning!
HYBRID vehicles: It is imperative that you read
the HYBRID Supplemental Operating
Instructions included in your vehicle literature
portfolio. You may otherwise not receive all
necessary safety information and warning for
the operation of your vehicle.
In this menu, you can program the following
vehicle functions:
FunctionMulti-function Contour Seat
Settings (Y page 216)Rear Window Sunshade (Y page 207)Easy Entry/Exit Feature
( Y page 208)Exterior Lighting Delayed Shut-off
( Y page 208)Interior Lighting Delayed Shut-off
( Y page 208)Ambient Lighting (Y page 209)Automatic Mirror Folding
( Y page 209)Locator Lighting (Y page 210)206COMAND vehicle menuControl systems
221_AKB; 6; 20, en-USd2ugruen,Version: 2.11.8.12009-09-24T13:28:17+02:00 - Seite 206
Page 210 of 548
Setting easy-entry/exit feature
iThe components and operating principles
of COMAND can be found on (Y page 76).
GWarning!
You must make sure no one can become
trapped or injured by the moving steering
wheel and driver’s seat when the easy-entry/
exit feature is activated.
To stop seat/steering wheel movement, do
one of the following:
RPress seat adjustment switch.
RMove steering wheel adjustment stalk.
RPress one of the memory position buttons
or the memory button M.
Do not leave children unattended in the
vehicle, or with access to an unlocked vehicle.
Children could open the driver’s door and
unintentionally activate the easy-entry/exit
feature, which could result in an accident
and/or serious personal injury.
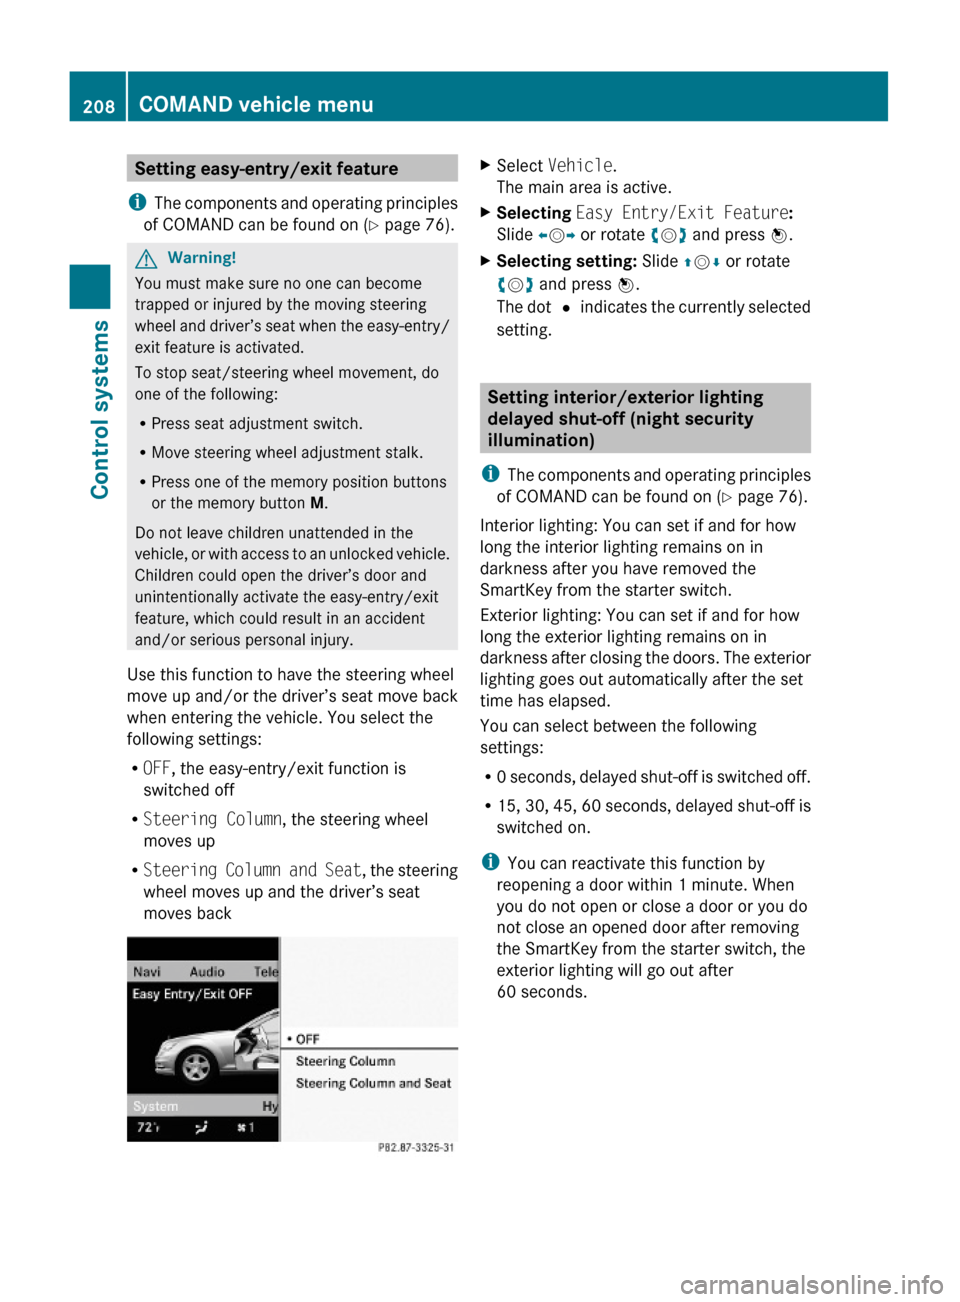
Use this function to have the steering wheel
move up and/or the driver’s seat move back
when entering the vehicle. You select the
following settings:
ROFF, the easy-entry/exit function is
switched off
RSteering Column, the steering wheel
moves up
RSteering Column and Seat, the steering
wheel moves up and the driver’s seat
moves back
XSelect Vehicle.
The main area is active.
XSelecting Easy Entry/Exit Feature:
Slide XVY or rotate cVd and press W.
XSelecting setting: Slide ZVÆ or rotate
cVd and press W.
The dot # indicates the currently selected
setting.
Setting interior/exterior lighting
delayed shut-off (night security
illumination)
iThe components and operating principles
of COMAND can be found on (Y page 76).
Interior lighting: You can set if and for how
long the interior lighting remains on in
darkness after you have removed the
SmartKey from the starter switch.
Exterior lighting: You can set if and for how
long the exterior lighting remains on in
darkness after closing the doors. The exterior
lighting goes out automatically after the set
time has elapsed.
You can select between the following
settings:
R0 seconds, delayed shut-off is switched off.
R15, 30, 45, 60 seconds, delayed shut-off is
switched on.
iYou can reactivate this function by
reopening a door within 1 minute. When
you do not open or close a door or you do
not close an opened door after removing
the SmartKey from the starter switch, the
exterior lighting will go out after
60 seconds.
208COMAND vehicle menuControl systems
221_AKB; 6; 20, en-USd2ugruen,Version: 2.11.8.12009-09-24T13:28:17+02:00 - Seite 208
Page 283 of 548
The power closing assist automatically
ensures that the trunk lid is pulled completely
close (Y page 283).
Closing the trunk from the inside
automatically
GWarning!
Maintain sight of the area around the rear of
the vehicle while operating the trunk lid with
the door mounted switch. Monitor the closing
procedure carefully to make sure no one is in
danger of being injured.
To interrupt the closing procedure, release
the door mounted remote trunk opening/
closing switch again.
Even with the SmartKey removed from the
starter switch or the SmartKey with KEYLESS-
GO removed from the vehicle, the remote
trunk opening/closing switch can be
operated. Therefore, do not leave children
unattended in the vehicle, or with access to
an unlocked vehicle. A child’s unsupervised
access to a vehicle could result in an accident
and/or serious personal injury.
In vehicles with trunk opening/closing
system you can close the trunk from the
inside using the remote trunk opening/
closing switch.
If the trunk lid comes into contact with an
object while closing, the closing procedure is
stopped and the trunk lid reopens slightly.
This will happen only while the trunk is in its
upper motion sequence. Check if luggage has
been piled too high, for example.
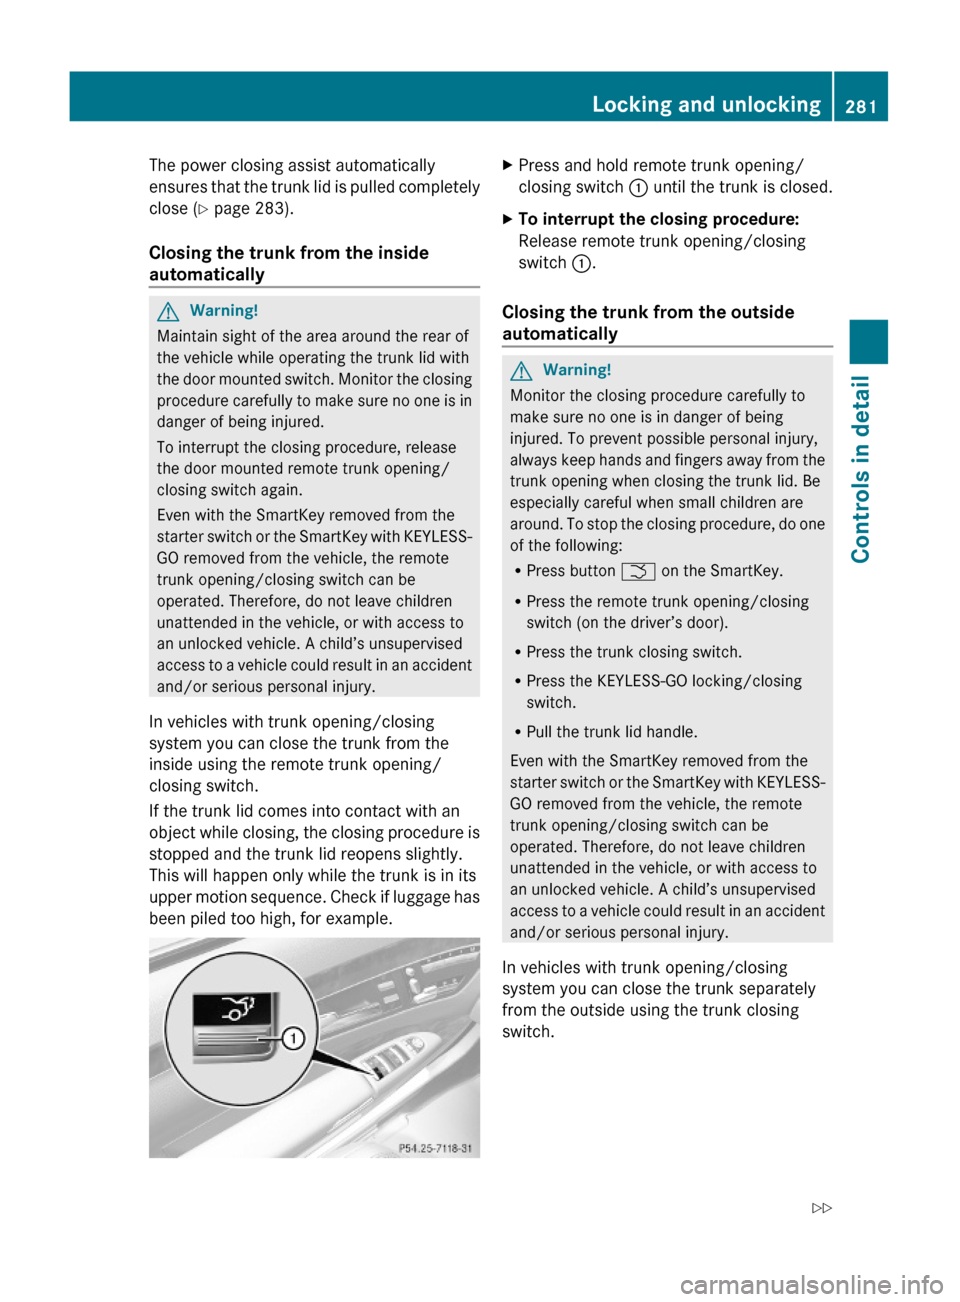
XPress and hold remote trunk opening/
closing switch : until the trunk is closed.
XTo interrupt the closing procedure:
Release remote trunk opening/closing
switch :.
Closing the trunk from the outside
automatically
GWarning!
Monitor the closing procedure carefully to
make sure no one is in danger of being
injured. To prevent possible personal injury,
always keep hands and fingers away from the
trunk opening when closing the trunk lid. Be
especially careful when small children are
around. To stop the closing procedure, do one
of the following:
RPress button F on the SmartKey.
RPress the remote trunk opening/closing
switch (on the driver’s door).
RPress the trunk closing switch.
RPress the KEYLESS-GO locking/closing
switch.
RPull the trunk lid handle.
Even with the SmartKey removed from the
starter switch or the SmartKey with KEYLESS-
GO removed from the vehicle, the remote
trunk opening/closing switch can be
operated. Therefore, do not leave children
unattended in the vehicle, or with access to
an unlocked vehicle. A child’s unsupervised
access to a vehicle could result in an accident
and/or serious personal injury.
In vehicles with trunk opening/closing
system you can close the trunk separately
from the outside using the trunk closing
switch.
Locking and unlocking281Controls in detail221_AKB; 6; 20, en-USd2ugruen,Version: 2.11.8.12009-09-24T13:28:17+02:00 - Seite 281Z
Page 288 of 548
iWhen you now press the KEYLESS-GO
start/stop button once and the driver’s
door is open, the power supply is switched
off.
Seats
Safety notes
GWarning!
In order to avoid possible loss of vehicle
control the following must be done before the
vehicle is put into motion:
R seat adjustment
R head restraint adjustment
R steering wheel adjustment
R rear view mirror adjustment
R fastening of seat belts
GWarning!
Do not adjust the driver’s seat while driving.
Adjusting the seat while driving could cause
the driver to lose control of the vehicle.
Never ride in a moving vehicle with the seat
backrest in an excessively reclined position as
this can be dangerous. You could slide under
the seat belt in a collision. If you slide under
it, the seat belt would apply force at the
abdomen or neck. That could cause serious
or fatal injuries. The seat backrest and seat
belts provide the best restraint when the
wearer is in a position that is as upright as
possible and seat belts are properly
positioned on the body.
GWarning!
Your seat must be adjusted so that you can
correctly fasten your seat belt.
Observe the following points:
R Adjust the seat backrest until your arms are
slightly angled when holding the steering
wheel.
R Adjust the seat to a comfortable seating
position that still allows you to reach the
accelerator/brake pedal safely. The
position should be as far back as possible
with the driver still able to operate the
controls properly.
R Adjust the head restraint so that it is as
close to the head as possible. The center of
the head restraint must support the back of
the head at eye level.
R Never place hands under the seat or near
any moving parts while a seat is being
adjusted.
Failure to do so could result in an accident
and/or serious personal injury.GWarning!
The power seats can be operated at any time.
Therefore, do not leave children unattended
in the vehicle, or with access to an unlocked
vehicle. A child’s unsupervised access to a
vehicle could result in an accident and/or
serious personal injury.
GWarning!
According to accident statistics, children are
safer when properly restrained in the rear
seating positions than in the front seating
position. Thus, we strongly recommend that
children be placed in the rear seats whenever
possible. Regardless of seating position,
children 12 years old and under must be
seated and properly secured in an
appropriately sized infant restraint, toddler
restraint, or booster seat recommended for
the size and weight of the child. For additional
information, see “Children in the vehicle”.
A child’s risk of serious or fatal injuries is
significantly increased if the child restraints
are not properly secured in the vehicle and/
286SeatsControls in detail
221_AKB; 6; 20, en-USd2ugruen,Version: 2.11.8.12009-09-24T13:28:17+02:00 - Seite 286