2010 MERCEDES-BENZ S550 4MATIC Settings
[x] Cancel search: SettingsPage 124 of 548

Entering a destination from the list of
last destinations
XSelect Navi Q Destination Q From
Last Destinations.
The list of last destinations appears. The
most recent destination is at the top of the
list.
XSelect desired destination.XStarting route calculation: Select Start,
see also (Y page 120).
Entering a destination from the map
iDepending on the factory settings of the
vehicle, it may not be possible to enter a
destination while the vehicle exceeds a
preset speed. As soon as the vehicles
speed drops to below the preset speed, the
function is available again.
Calling up the map
XIn the address input menu, select Map
(Y page 107).
You will see the map with a cross hair. The
map is set to the address set in the address
input menu.
or
XSelect Navi Q Destination Q Via
Map.
You will see the map with a cross hair.
:Cross hair;Details of the cross hair position=Map scaleiDisplay ; may be the name of a road, for
example, provided the digital map contains
the necessary data.
If no data is available, display ; shows:
Rthe coordinates if the Geo
Coordinates display is switched on
(Y page 105)
Rno display if the Geo Coordinates
display is switched off (Y page 105)
Moving the map and selecting the
destination
XMoving map: Slide ZVÆ, XVY or aVb.XAdjusting map scale: Rotate cVd.
Rotating clockwise enlarges the map,
rotating counterclockwise reduces it.
XSelecting a destination: Press W.
If the cross hair is located off the edge of
the digital map, a route cannot be
calculated to this destination and you will
see the message The destination is
located off the map..
XSelect OK.XMove the map and select a destination
again.
If the destination can be attributed, you will
see the address of the destination. If not,
you will see the display Destination
from map.
XStarting route calculation: Select Start,
see also (Y page 120).
Entering a stopover
When route guidance is active, you can enter
a stopover. Stopovers can be predefined
destinations from the following predefined
categories:
RMercedes-Benz Service Center
RHospital
RGas Station
RParking Lot
122COMAND navigation system (entering a destination)Control systems
221_AKB; 6; 20, en-USd2ugruen,Version: 2.11.8.12009-09-24T13:28:17+02:00 - Seite 122
Page 134 of 548
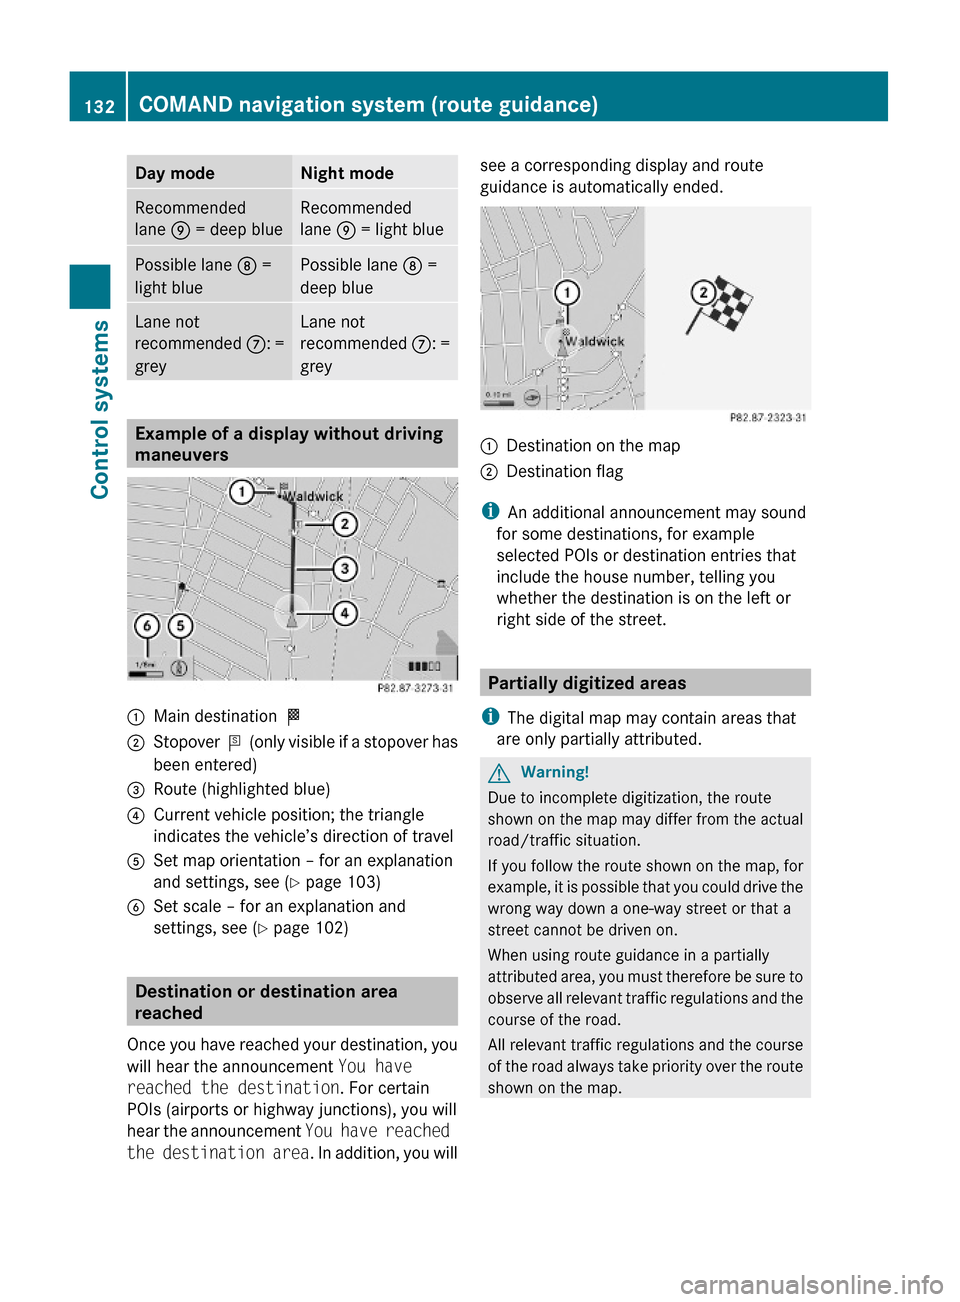
Day modeNight modeRecommended
lane E = deep blue
Recommended
lane E = light blue
Possible lane D =
light blue
Possible lane D =
deep blue
Lane not
recommended C: =
grey
Lane not
recommended C: =
grey
Example of a display without driving
maneuvers
:Main destination O;Stopover P (only visible if a stopover has
been entered)
=Route (highlighted blue)?Current vehicle position; the triangle
indicates the vehicle’s direction of travel
ASet map orientation – for an explanation
and settings, see (Y page 103)
BSet scale – for an explanation and
settings, see (Y page 102)
Destination or destination area
reached
Once you have reached your destination, you
will hear the announcement You have
reached the destination. For certain
POIs (airports or highway junctions), you will
hear the announcement You have reached
the destination area. In addition, you will
see a corresponding display and route
guidance is automatically ended.:Destination on the map;Destination flag
iAn additional announcement may sound
for some destinations, for example
selected POIs or destination entries that
include the house number, telling you
whether the destination is on the left or
right side of the street.
Partially digitized areas
iThe digital map may contain areas that
are only partially attributed.
GWarning!
Due to incomplete digitization, the route
shown on the map may differ from the actual
road/traffic situation.
If you follow the route shown on the map, for
example, it is possible that you could drive the
wrong way down a one-way street or that a
street cannot be driven on.
When using route guidance in a partially
attributed area, you must therefore be sure to
observe all relevant traffic regulations and the
course of the road.
All relevant traffic regulations and the course
of the road always take priority over the route
shown on the map.
132COMAND navigation system (route guidance)Control systems
221_AKB; 6; 20, en-USd2ugruen,Version: 2.11.8.12009-09-24T13:28:17+02:00 - Seite 132
Page 140 of 548

:Blocked route section;Current vehicle position; the triangle
indicates the vehicle’s direction of travel
=Information about the blocked route
section
iBlocked route section : is always
highlighted in red/white. The information
about blocked route section = shows
which section of the route is blocked and
the length of the blocked section.
XStarting route calculation: Select Start,
see also (Y page 120).
XDeleting blockage: Select Navi Q
Route Q Detour Q Delete.
Alternative Route
You can calculate and display alternative
routes in addition to the route that COMAND
displays automatically. The original route is
displayed in light blue while the alternative
route is dark blue.
XWith the menu system displayed
(Y page 102), select Route Q
Alternative Route.
:Route distance, time, and time of arrival
for the currently selected alternative
route marked in deep blue
;On the Route: Symbols indicate special
parts, such as tunnels, ferries or toll
roads, on the displayed alternative route.
=Mode: Current settings for the displayed
alternative route
Avoid: Symbols of route parts to avoid,
for example tunnels, ferries or toll roads
XDisplaying/selecting other alternative
routes: Select Previous or Next.
XAccepting the currently selected, deep
blue route for route guidance: Select
Start.
COMAND navigation system (real-
time traffic)
Traffic messages
iA subscription to SIRIUS XM Satellite
Radio service provider is required for the
satellite radio reception referred to here.
You can find more information on satellite
radio in chapter “Satellite Radio”
(Y page 170).
COMAND can receive and incorporate traffic
messages via satellite radio into the
navigation system. Traffic report messages
and map symbols can then be viewed in the
COMAND display.
138COMAND navigation system (real-time traffic)Control systems
221_AKB; 6; 20, en-USd2ugruen,Version: 2.11.8.12009-09-24T13:28:17+02:00 - Seite 138
Page 141 of 548
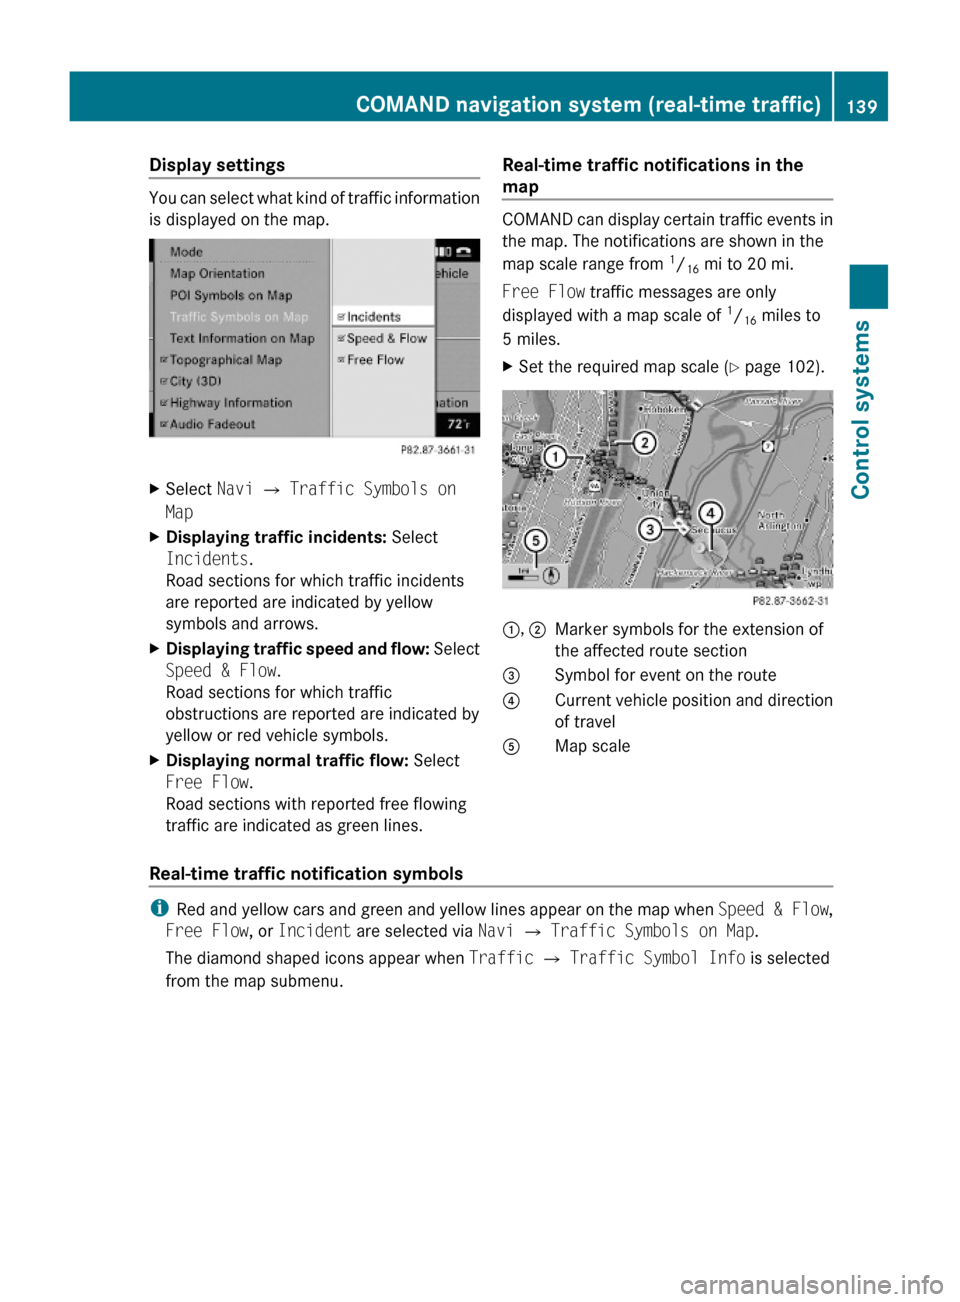
Display settings
You can select what kind of traffic information
is displayed on the map.
XSelect Navi Q Traffic Symbols on
Map
XDisplaying traffic incidents: Select
Incidents.
Road sections for which traffic incidents
are reported are indicated by yellow
symbols and arrows.
XDisplaying traffic speed and flow: Select
Speed & Flow.
Road sections for which traffic
obstructions are reported are indicated by
yellow or red vehicle symbols.
XDisplaying normal traffic flow: Select
Free Flow.
Road sections with reported free flowing
traffic are indicated as green lines.
Real-time traffic notifications in the
map
COMAND can display certain traffic events in
the map. The notifications are shown in the
map scale range from 1/16 mi to 20 mi.
Free Flow traffic messages are only
displayed with a map scale of 1/16 miles to
5 miles.
XSet the required map scale (Y page 102).1, 2Marker symbols for the extension of
the affected route section
3Symbol for event on the route4Current vehicle position and direction
of travel
AMap scale
Real-time traffic notification symbols
iRed and yellow cars and green and yellow lines appear on the map when Speed & Flow,
Free Flow, or Incident are selected via Navi Q Traffic Symbols on Map.
The diamond shaped icons appear when Traffic Q Traffic Symbol Info is selected
from the map submenu.
COMAND navigation system (real-time traffic)139Control systems221_AKB; 6; 20, en-USd2ugruen,Version: 2.11.8.12009-09-24T13:28:17+02:00 - Seite 139Z
Page 154 of 548
1-800-FOR-MERCedes
(1-800-367-6372) (in the USA)
R call Customer Service at
1-800-387-0100 (in Canada)
The battery of the mobile phone should
always be charged sufficiently to avoid
malfunctions.
You should check the following on your
mobile phone (see your mobile phone
operating instructions) to prepare for
telephony via the Bluetooth ®
interface:
R Hands-Free Profile (HFP)
The mobile phone must support Hands-
Free Profile 1.0 or higher.
i Some displays, such as the signal
strength, appear depending on the
supported Hands-Free Profile version.
R Bluetooth ®
visibility
With certain mobile phones, the
Bluetooth ®
function must be activated but
also made "visible" to other devices.
R Bluetooth ®
device name
Each Bluetooth ®
device has a Bluetooth ®
device name. The device name is arbitrary,
but it may be identical for all devices of a
single mobile phone manufacturer. You
should therefore assign an individual and
unique device name to your mobile phone.
Connecting the mobile phoneXSwitch on the mobile phone and enter the
PIN. Refer to the mobile phone operating
instructions for details.XActivate the Bluetooth ®
functionality on
the mobile phone. Refer to mobile phone
operating instructions for detail.
Bluetooth ®
is activated in the COMAND by
default. If the Bluetooth function in the
COMAND is not activated, the message
Bluetooth not activated in system
settings. appears. Activate Bluetooth ®
in
the COMAND manually ( Y page 151).
Authorizing the mobile phone
The mobile phone must be registered, e.g.
authorized, before you can use it in
connection with COMAND for the first time.
You can authorize several mobile phones.
COMAND will always connect to the last
connected mobile phone within range.
i If the connection to the last connected
mobile phone fails, COMAND searches for
the mobile phone that was connected
before that.
When authorizing a new mobile phone, it will
be connected automatically 11
.XSelect Data/Connections Q
Bluetooth Telephones Q Update .
The COMAND searches for Bluetooth ®
devices within range and lists them in the
Bluetooth ®
phone list.
The duration of the search depends on the
number of Bluetooth ®
devices within range
and the characteristics of the mobile
phone, such as Hands-Free Profile version
and possibly required visibility.11 Function available if supported by the mobile phone.152COMAND telephoneControl systems
221_AKB; 6; 20, en-USd2ugruen,Version: 2.11.8.12009-09-24T13:28:17+02:00 - Seite 152
Page 156 of 548
External authorization
Certain security settings in your mobile
phone may prevent COMAND from finding
your mobile phone. In this case, you might
want to check if your mobile phone can
recognize the COMAND. The Bluetooth ®
device name of COMAND is MB Bluetooth.XSelect Data/Connections Q
Bluetooth Telephones .XGo to Update and select Options Q
External Authorization .XActivate the Bluetooth®
search on the
mobile phone. Refer to mobile phone
operating instructions for detail.XSelect MB Bluetooth on the mobile phone.XWhen prompted, enter the passkey into
COMAND and the mobile phone
( Y page 153).
Show details
Details can be displayed for each mobile
phone in the Bluetooth ®
phone list.
XSelect Data/Connections Q
Bluetooth Telephones .XChoose the mobile phone from the list and
select Options Q Details .
The following mobile phone details appear:
R Bluetooth ®
name
R Bluetooth ®
address
R Availability status
R Authorization
R Bluetooth ®
Class (mobile phone,
notebook, etc.)XClosing detail display: Slide XV Y.Deauthorizing the mobile phone XSelect Data/Connections Q
Bluetooth Telephones .XChoose the mobile phone from the list and
select Options Q De-authorize .
You will be asked whether you want to
deauthorize the device.XSelect Yes.
i
You should delete the device name MB
Bluetooth from the Bluetooth ®
list of the
mobile phone before authorizing that
mobile phone again.
Connecting another mobile phone
You can switch between several mobile
phones that you have authorized.
i Switching to another authorized mobile
phone is only possible while no phone calls
are being made.
XSelect Data/Connections Q
Bluetooth Telephones .XSelect the mobile phone from the
Bluetooth ®
phone list.XConfirm the selection.
The selected mobile phone is connected
provided it is within Bluetooth ®
range and
Bluetooth ®
is activated on the respective
device.
You can only connect one mobile phone at
a time. The currently connected mobile
phone is indicated by a dot # in the
Bluetooth ®
phone list ( Y page 153).
Main telephone menu
When the connected mobile phone is ready,
the following display appears:
154COMAND telephoneControl systems
221_AKB; 6; 20, en-USd2ugruen,Version: 2.11.8.12009-09-24T13:28:17+02:00 - Seite 154
Page 157 of 548
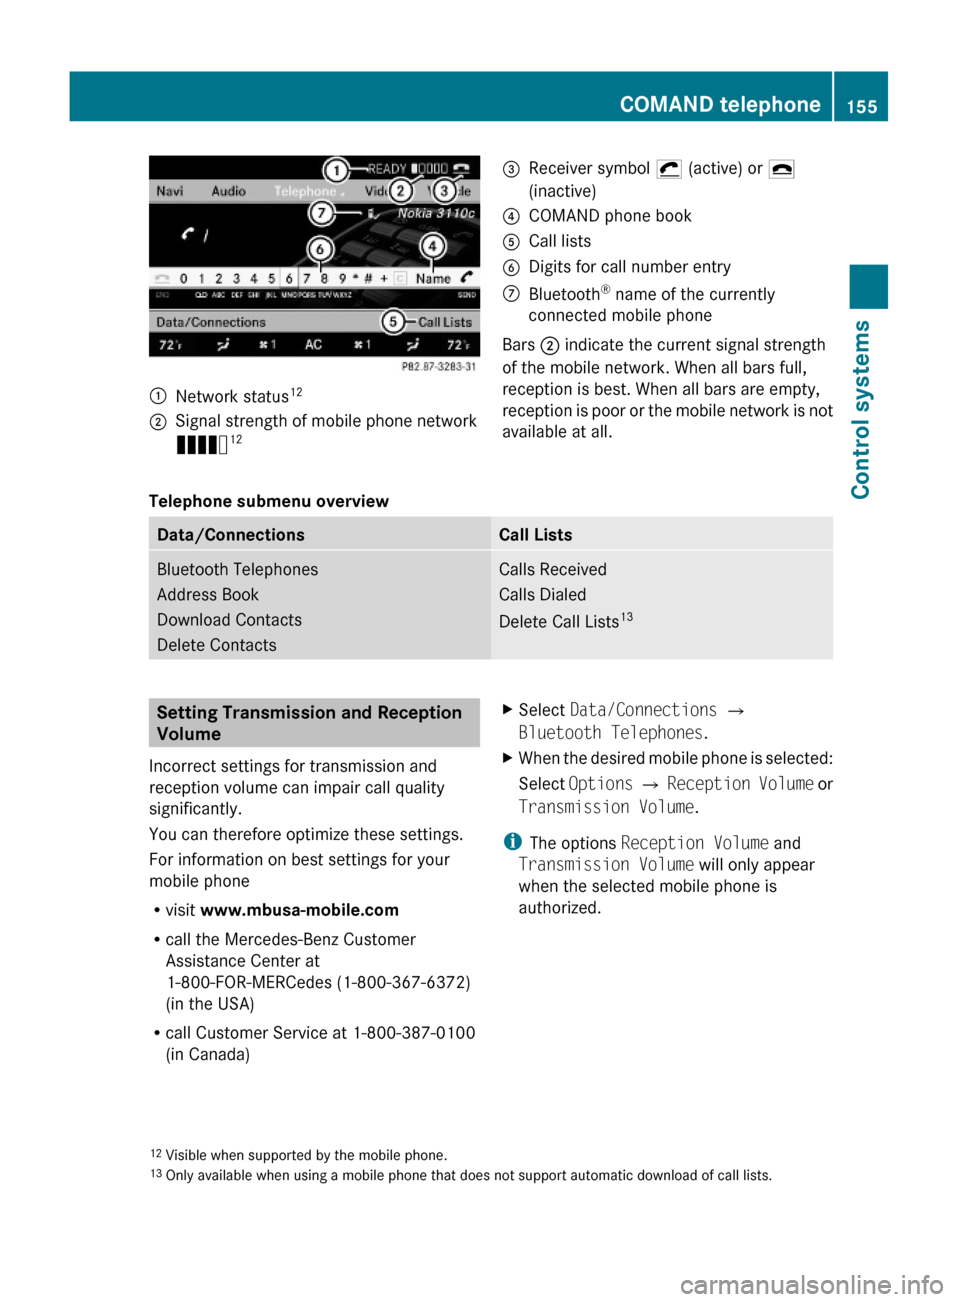
:Network status12;Signal strength of mobile phone network
Ä12=Receiver symbol ¡ (active) or ¢
(inactive)
?COMAND phone bookACall listsBDigits for call number entryCBluetooth® name of the currently
connected mobile phone
Bars ; indicate the current signal strength
of the mobile network. When all bars full,
reception is best. When all bars are empty,
reception is poor or the mobile network is not
available at all.
Telephone submenu overview
Data/ConnectionsCall ListsBluetooth Telephones
Address Book
Download Contacts
Delete Contacts
Calls Received
Calls Dialed
Delete Call Lists13
Setting Transmission and Reception
Volume
Incorrect settings for transmission and
reception volume can impair call quality
significantly.
You can therefore optimize these settings.
For information on best settings for your
mobile phone
Rvisit www.mbusa-mobile.com
Rcall the Mercedes-Benz Customer
Assistance Center at
1-800-FOR-MERCedes (1-800-367-6372)
(in the USA)
Rcall Customer Service at 1-800-387-0100
(in Canada)
XSelect Data/Connections Q
Bluetooth Telephones.
XWhen the desired mobile phone is selected:
Select Options Q Reception Volume or
Transmission Volume.
iThe options Reception Volume and
Transmission Volume will only appear
when the selected mobile phone is
authorized.
12Visible when supported by the mobile phone.13Only available when using a mobile phone that does not support automatic download of call lists.
COMAND telephone155Control systems221_AKB; 6; 20, en-USd2ugruen,Version: 2.11.8.12009-09-24T13:28:17+02:00 - Seite 155Z
Page 168 of 548
Radio
(except
Weather Band)
Presets
(except
Weather
Band)
Channel
(only
Weather
Band)
InfoFM or AM
or WB
SoundSave StationAutostoreChannel listProgram
Information
Switch to
FM wave
band
TrebleFrequency EntryPreset
station list
Switch to
AM wave
band
BassShow Station
Info
Switch to
Weather
Band
Balance/
Fader
ª¥Radio3D SoundActive Source
for Rear
Rear OFFSwitching to radio modeXSelect Audio Q FM/AM Radio.
or
XPress shortcut button R (Y page 77)
once or twice.
The radio display appears once you have
switched to radio mode. You will hear the
last tuned station/channel in the
previously selected wave band, provided
that the station/channel can be received.
iThe number of times you have to press
shortcut button R depends on the
operating mode currently selected.
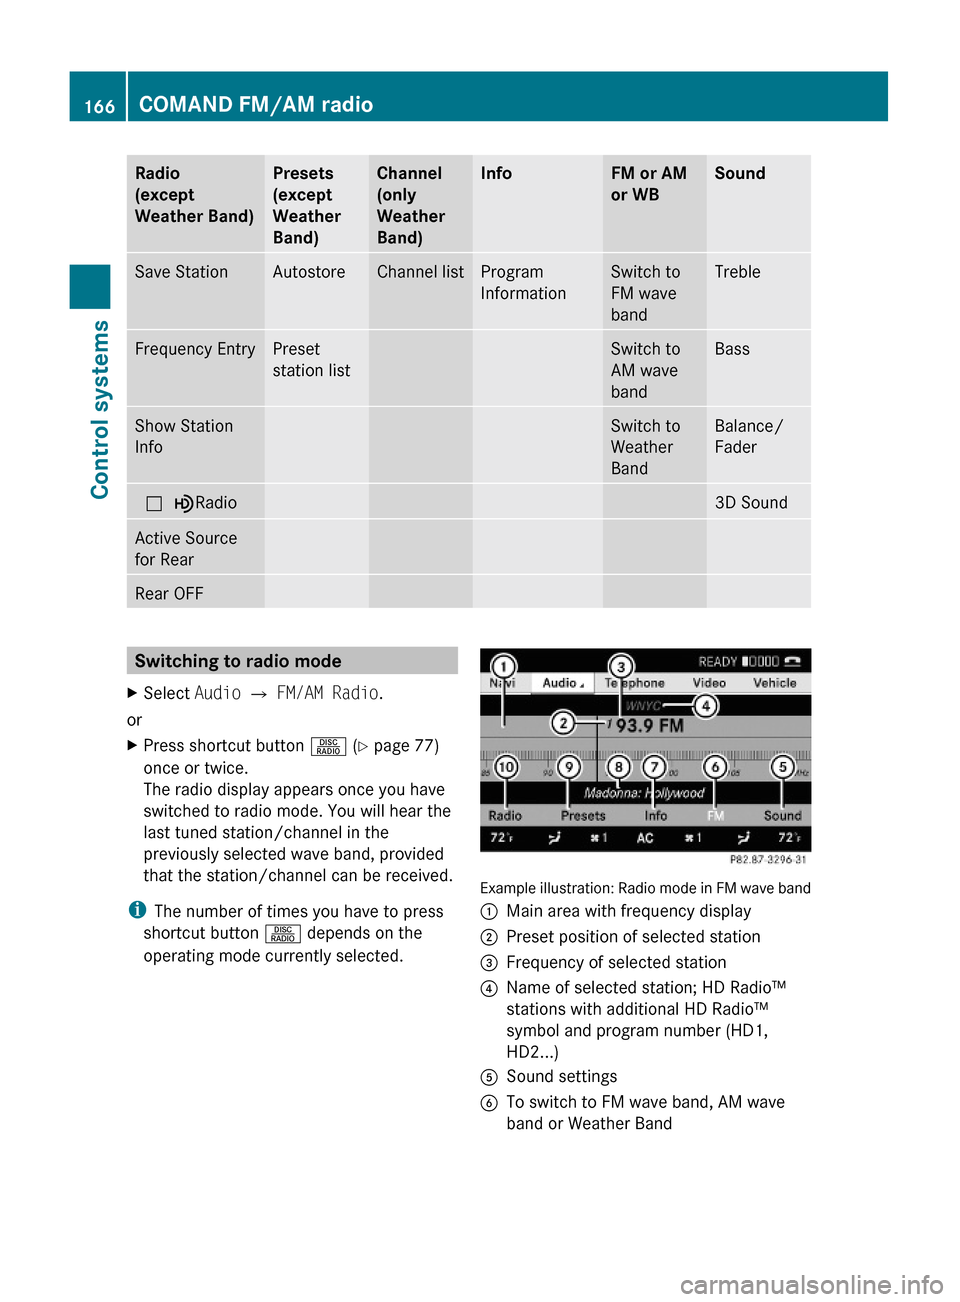
Example illustration: Radio mode in FM wave band
:Main area with frequency display;Preset position of selected station=Frequency of selected station?Name of selected station; HD Radio™
stations with additional HD Radio™
symbol and program number (HD1,
HD2...)
ASound settingsBTo switch to FM wave band, AM wave
band or Weather Band
166COMAND FM/AM radioControl systems
221_AKB; 6; 20, en-USd2ugruen,Version: 2.11.8.12009-09-24T13:28:17+02:00 - Seite 166