2010 MERCEDES-BENZ S550 4MATIC Settings
[x] Cancel search: SettingsPage 174 of 548
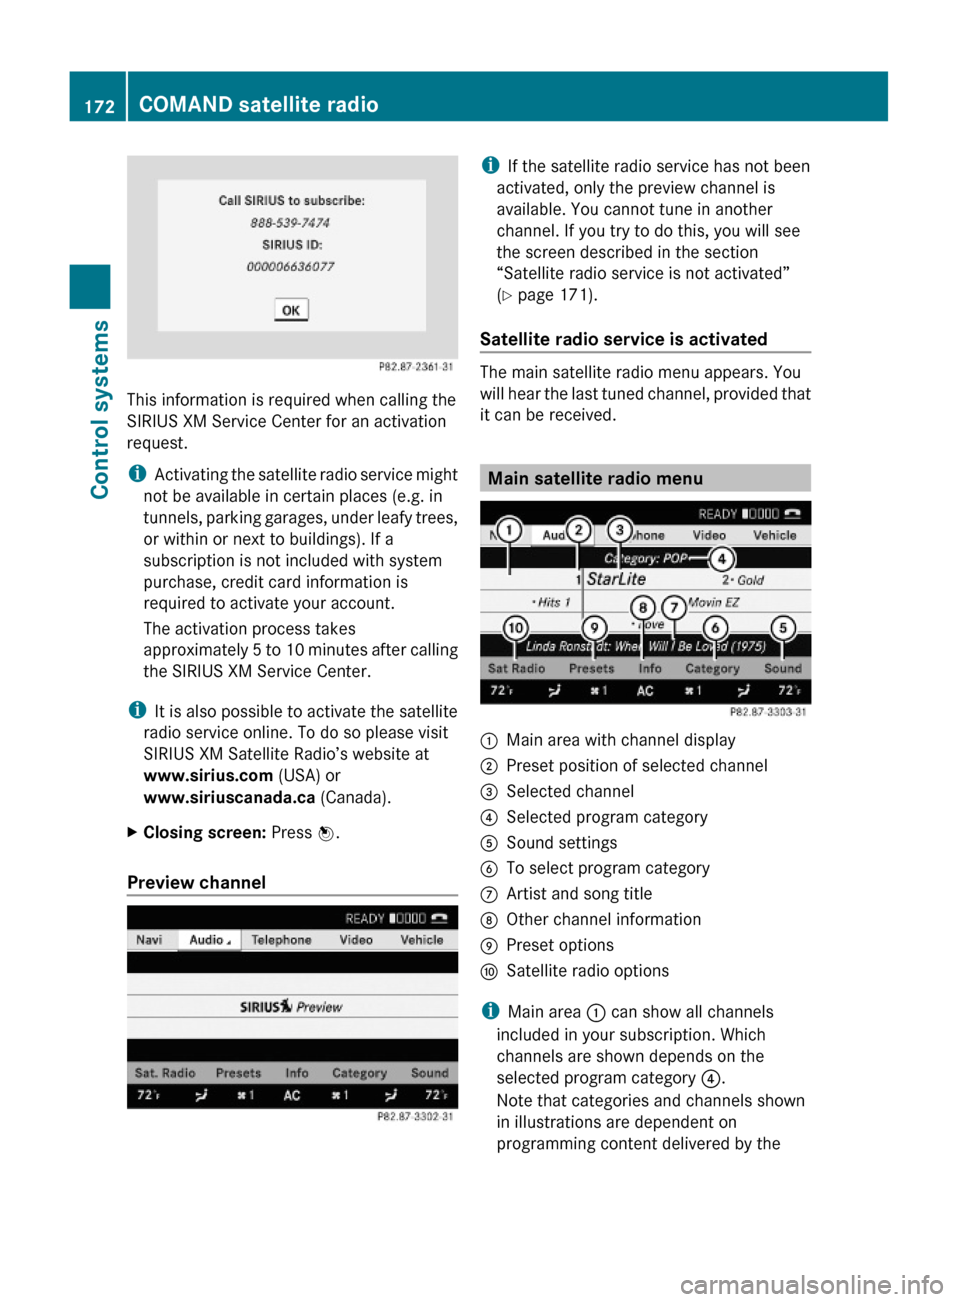
This information is required when calling the
SIRIUS XM Service Center for an activation
request.
iActivating the satellite radio service might
not be available in certain places (e.g. in
tunnels, parking garages, under leafy trees,
or within or next to buildings). If a
subscription is not included with system
purchase, credit card information is
required to activate your account.
The activation process takes
approximately 5 to 10 minutes after calling
the SIRIUS XM Service Center.
iIt is also possible to activate the satellite
radio service online. To do so please visit
SIRIUS XM Satellite Radio’s website at
www.sirius.com (USA) or
www.siriuscanada.ca (Canada).
XClosing screen: Press W.
Preview channel
iIf the satellite radio service has not been
activated, only the preview channel is
available. You cannot tune in another
channel. If you try to do this, you will see
the screen described in the section
“Satellite radio service is not activated”
(Y page 171).
Satellite radio service is activated
The main satellite radio menu appears. You
will hear the last tuned channel, provided that
it can be received.
Main satellite radio menu
:Main area with channel display;Preset position of selected channel=Selected channel?Selected program categoryASound settingsBTo select program categoryCArtist and song titleDOther channel informationEPreset optionsFSatellite radio options
iMain area : can show all channels
included in your subscription. Which
channels are shown depends on the
selected program category ?.
Note that categories and channels shown
in illustrations are dependent on
programming content delivered by the
172COMAND satellite radioControl systems
221_AKB; 6; 20, en-USd2ugruen,Version: 2.11.8.12009-09-24T13:28:17+02:00 - Seite 172
Page 179 of 548
File structure on a disc
When you create an audio disc, the tracks can
be organized in folders. A disc may contain a
maximum of 4000 tracks.
The directory depth may not exceed a
maximum of 8 levels. The system will ignore
files in lower levels.
Notes on USB storage media
Do not store data other than audio data on a
USB storage medium. Doing so will increase
the time required to initialize the USB storage
medium.
A maximum of 8 directory levels with up to
4000 tracks each are supported.
For information on connecting USB storage
media to the built-in USB socket in the glove
box see ( Y page 80).
Track and folder names
When you create an audio medium, you can
assign names to the tracks and folders.
COMAND uses these names for the
corresponding display. Empty folders or
folders which contain data other than MP3/
WMA tracks are not displayed by COMAND.
If MP3/WMA files are saved in the root
directory itself (uppermost directory on
storage medium), the root directory will also
be treated as a folder. COMAND will then
show the name of the root directory as the
folder name.
You must observe the following when
assigning track names:
R Track names must have at least one
character.
R Track names must have the extension
“mp3” or “wma”.
R There must be a period between the track
name and the extension.
Example of a correct track name:
Track1.mp3
Compatible file systems and
compression methods
COMAND supports the following formats:
R MPEG1 Audio Layer 3 (MP3) 25
R Microsoft Windows Media Audio (WMA) V2,
V7, V8 or V9 that are not copy-proof
Bit and sampling rates
MP3
COMAND supports MP3 files of the following
types:
R Fixed and variable bit rates from
32 kbit/s up to 320 kbit/s
R Sampling rates of 24 kHz to 48 kHz
WMA (Windows Media ®
Audio)
Windows Media ®
Audio (WMA) is an audio
data compression technology developed by
Microsoft ®
.
COMAND supports WMA files of the following
types:
R Fixed and variable bit rates from 5 kbit/s
up to 384 kbit/s
R Sampling rates of 8 kHz to 48 kHz
COMAND does not support WMA files of the
following types:
R DRM (Digital Rights Management) coded
files
R variable bit rates
R Losless Settings
R WMA Pro
R 5.1-Surround
i Only use tracks with a bit rate of above
128 kbit/s and a sampling rate of above
44.1 kHz. Lower rates will cause an audible
25 MPEG Layer 3 audio-coding technology under license of Fraunhofer-Institut for Integrated Circuits (IIS) and
ThomsonCOMAND audio CD/audio DVD/MP3177Control systems221_AKB; 6; 20, en-USd2ugruen,Version: 2.11.8.12009-09-24T13:28:17+02:00 - Seite 177Z
Page 184 of 548
iShortcut button R takes you directly
to the previously set disc mode (audio CD/
DVD, MP3-CD/DVD, video DVD). The
number of times you have to press the
shortcut button depends on the previously
set mode.
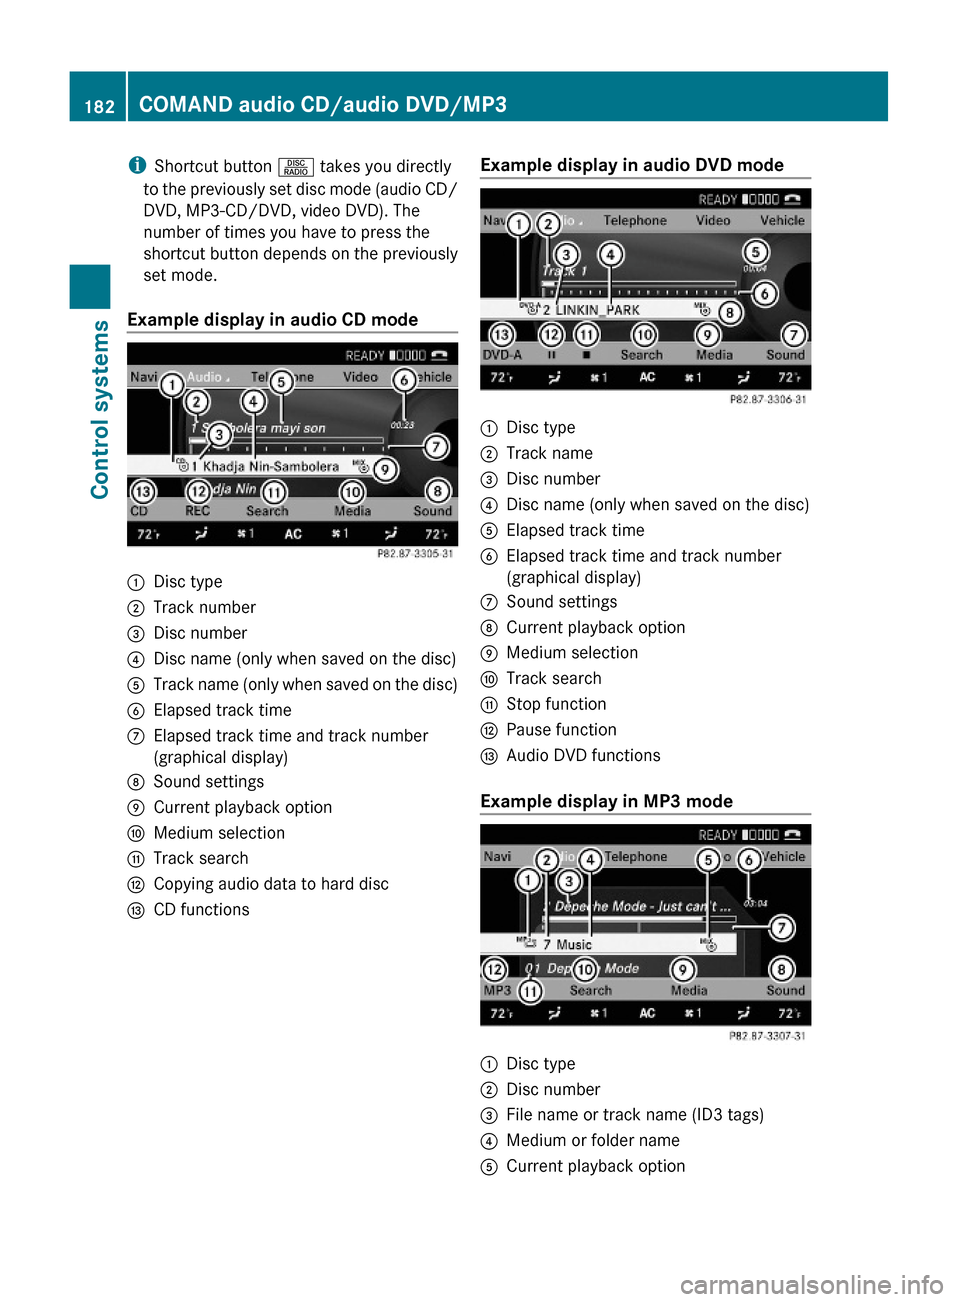
Example display in audio CD mode
:Disc type;Track number=Disc number?Disc name (only when saved on the disc)ATrack name (only when saved on the disc)BElapsed track timeCElapsed track time and track number
(graphical display)
DSound settingsECurrent playback optionFMedium selectionGTrack searchHCopying audio data to hard discICD functionsExample display in audio DVD mode:Disc type;Track name=Disc number?Disc name (only when saved on the disc)AElapsed track timeBElapsed track time and track number
(graphical display)
CSound settingsDCurrent playback optionEMedium selectionFTrack searchGStop functionHPause functionIAudio DVD functions
Example display in MP3 mode
:Disc type;Disc number=File name or track name (ID3 tags)?Medium or folder nameACurrent playback option182COMAND audio CD/audio DVD/MP3Control systems
221_AKB; 6; 20, en-USd2ugruen,Version: 2.11.8.12009-09-24T13:28:17+02:00 - Seite 182
Page 185 of 548
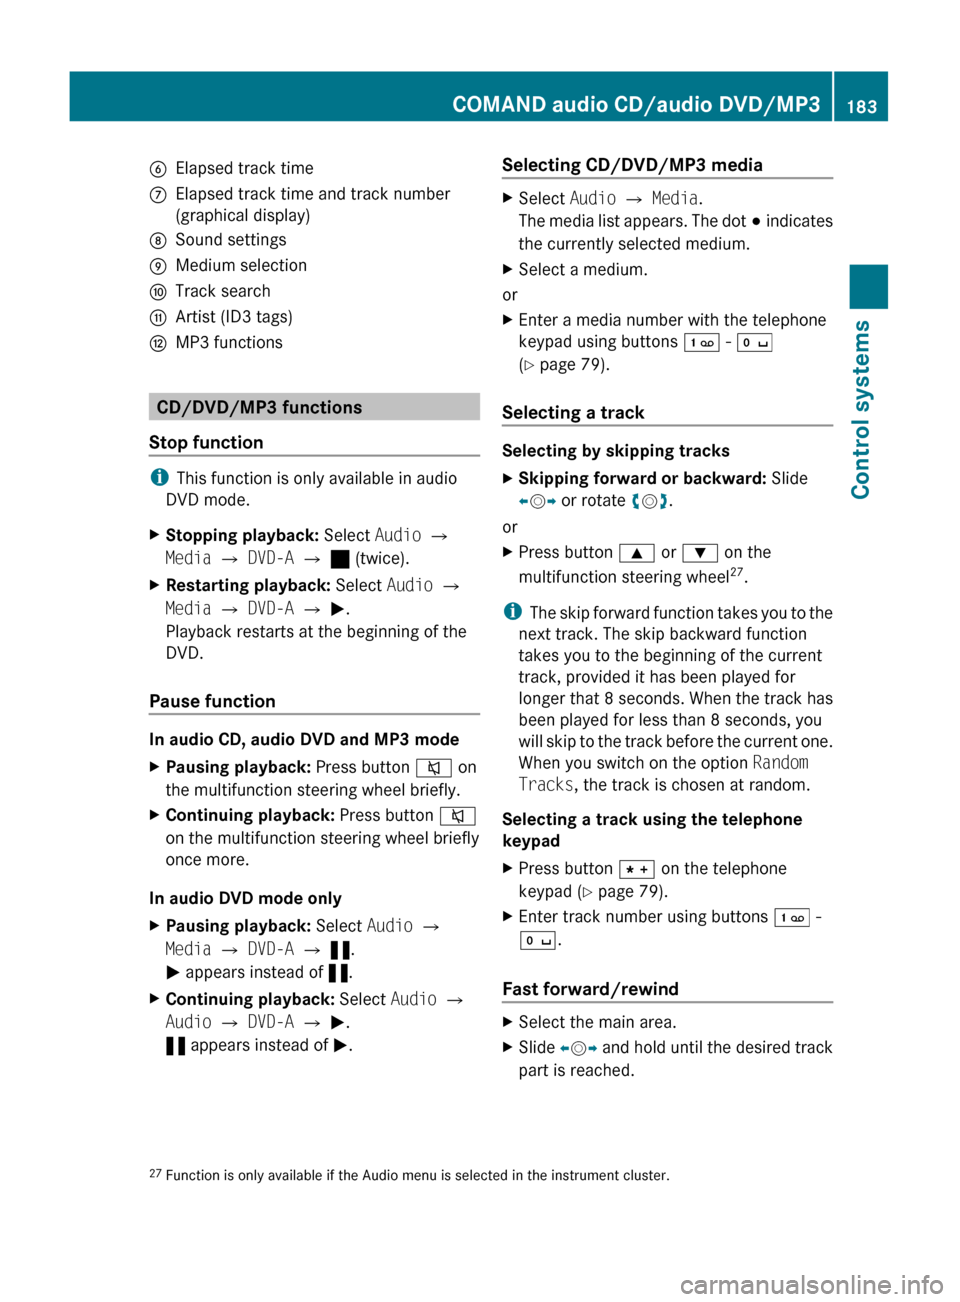
BElapsed track timeCElapsed track time and track number
(graphical display)DSound settingsEMedium selectionFTrack searchGArtist (ID3 tags)HMP3 functions
CD/DVD/MP3 functions
Stop function
i This function is only available in audio
DVD mode.
XStopping playback: Select Audio Q
Media Q DVD-A Q ± (twice).XRestarting playback: Select Audio Q
Media Q DVD-A Q M .
Playback restarts at the beginning of the
DVD.
Pause function
In audio CD, audio DVD and MP3 mode
XPausing playback: Press button 8 on
the multifunction steering wheel briefly.XContinuing playback: Press button 8
on the multifunction steering wheel briefly
once more.
In audio DVD mode only
XPausing playback: Select Audio Q
Media Q DVD-A Q « .
M appears instead of «.XContinuing playback: Select Audio Q
Audio Q DVD-A Q M .
« appears instead of M.Selecting CD/DVD/MP3 media XSelect Audio Q Media .
The media list appears. The dot # indicates
the currently selected medium.XSelect a medium.
or
XEnter a media number with the telephone
keypad using buttons ´ - Å
( Y page 79).
Selecting a track
Selecting by skipping tracks
XSkipping forward or backward: Slide
X V Y or rotate cV d.
or
XPress button 9 or : on the
multifunction steering wheel 27
.
i The skip forward function takes you to the
next track. The skip backward function
takes you to the beginning of the current
track, provided it has been played for
longer that 8 seconds. When the track has
been played for less than 8 seconds, you
will skip to the track before the current one.
When you switch on the option Random
Tracks , the track is chosen at random.
Selecting a track using the telephone
keypad
XPress button à on the telephone
keypad ( Y page 79).XEnter track number using buttons ´ -
Å .
Fast forward/rewind
XSelect the main area.XSlide XV Y and hold until the desired track
part is reached.27 Function is only available if the Audio menu is selected in the instrument cluster.COMAND audio CD/audio DVD/MP3183Control systems221_AKB; 6; 20, en-USd2ugruen,Version: 2.11.8.12009-09-24T13:28:17+02:00 - Seite 183Z
Page 190 of 548
playback. Refer to operating instructions of
the external device.XSelecting main function: Select Aux.XPress button ! on the remote control.XSelect Source .XSelect Display Aux for playback via the
connections in the head restraint.
or
XSelect Disk Drive Aux for playback via
the connections in the rear seat.
Switching to audio AUX operation
(COMAND)
XSelect Audio Q AUX .
The Audio AUX menu appears. You will hear
the medium in the external audio source
provided it is connected and set to
playback.
You can adjust the following during audio AUX
operation:
R Volume ( Y page 88)
R Balance and fader ( Y page 88)
R Treble and Bass (Y page 88)
R 3D Sound (Y page 89)
Switching to video AUX operation
(Rear Seat Entertainment System)
XConnect the video device to the sockets on
the head restraint or the rear seat and start
playback. Refer to operating instructions of
the external device.XSelecting main function: Select Aux.XPress button ! on the remote control.XSelect Source .XSelect Display Aux for playback via the
connections in the head restraint.
or
XSelect Disk Drive Aux for playback via
the connections in the rear seat.XSwitching from full screen to menu
system: Press button ! on the remote
control.XScreen settings: Select Display Aux .
A list appears.XProceed as described in the section
“Screen settings” ( Y page 194).
Switching to video AUX operation
(COMAND)
XSelect Video Q AUX .
The video AUX menu appears. You will hear
and see the medium in the external audio
source provided it is connected and set to
playback.
i For operation of the external video
source, refer to the operating instructions
of the respective device.
You can adjust the following during video AUX
operation:
R Brightness , Contrast and Color
( Y page 194)
R Picture format ( Y page 194)
R Volume ( Y page 88)
R Balance and fader ( Y page 88)
R Treble and Bass (Y page 88)
R 3D Sound (Y page 89)
188Audio AUX and video AUXControl systems
221_AKB; 6; 20, en-USd2ugruen,Version: 2.11.8.12009-09-24T13:28:17+02:00 - Seite 188
Page 191 of 548
Rear Seat Entertainment SystemGObserve Safety notes, see page 76.GWarning!
The driver should not wear a Rear Seat
Entertainment headphone while operating the
vehicle under any circumstances. The use of
a headphone while driving the vehicle could
drastically impair the ability to react to audible
traffic conditions (e.g. emergency sirens from
police/fire/ambulance, another car’s horn,
etc.).
GWarning!
When not in use, headphones or external
video sources should be stored in a safe
location (e.g. one of the vehicle’s storage
compartments) so that they are not loose
within the passenger compartment during
braking, vehicle maneuvers or a traffic
accident. Objects moving within the
passenger compartment could cause serious
personal injury to vehicle occupants.
GWarning!
Due to a potential choking hazard, wired
headphone usage by children should only
occur with adult supervision.
You can operate the Rear Seat Entertainment
System via the remote controls ( Y page 81)
that come with the vehicle.
The playback of audio and video sources with
the Rear Seat Entertainment System is
identical to playback with the COMAND to a
large extent.
The COMAND and the Rear Seat
Entertainment System can be operated
simultaneously almost independent of each
other. However, some menus may cause
conflicts when the systems are used by
multiple users. Conflicts can occur between
the rear screens as well as COMAND and the
Rear Seat Entertainment System.
Remote controls for Rear Seat
Entertainment System
The Rear Seat Entertainment System
contains two remote controls for the rear
passenger compartment.
For information on using the remote controls,
see ( Y page 81).
Headphones for Rear Seat
Entertainment System
The Rear Seat Entertainment System
contains two headphones for the rear
passenger compartment.
For information on using the headphones, see
( Y page 82).
Related topics
R Inserting/ejecting CDs and DVDs
( Y page 180)
R Connecting and playing back external
devices ( Y page 186)
R Remote control ( Y page 81)
R Playing back audio CDs/audio DVDs
( Y page 176)
R Playing back video CDs/audio DVDs
( Y page 191)
CD/DVD drive
GObserve Safety notes, see page 176.
When both screens are used with the CD/
DVD drive, selecting certain menus or
changing certain settings on one screen will
also be applied to the other screen.
The following functions will be applied to both
screens:
R Changing Playback options
R Selecting track
R Using Play, Pause, and Stop
Rear Seat Entertainment System189Control systems221_AKB; 6; 20, en-USd2ugruen,Version: 2.11.8.12009-09-24T13:28:17+02:00 - Seite 189Z
Page 192 of 548
RForward and Rewind as well as Skipping
tracks
RSelecting the DVD menu and moving within
that menu
RChanging language, subtitles and camera
angle
RCalling up interactive DVD contents
The following functions will be applied to one
screen only:
RChanging audio, video and screen settings
RSwitching between full screen, menu
system and control menu
Switching between main functions
By selecting the main functions you set the
playback options of the various audio and
video sources.
Main functionDiscPlayback with rear
CD/DVD drive
COMANDPlayback with
COMAND System
AuxPlayback with an
external device
connected in the
rear
SystemMenu for basic
settings
When exiting a main function, the settings are
saved. When calling up again the function
later the following is possible:
RThe main function is already running on
both screens.
RThe main function does not run on the other
screen.
In the first case, the main function appears
the way it is already displayed on the other
screen.
In the second case, the setting at which you
have exited the main function the last time
appears.
Inserting/ejecting CDs and DVDs
Loading or ejecting a disc is only displayed on
the screen on which the main function Disc
is selected. Storage of the current settings for
both screens are reset to the original settings.
Simultaneous usage of COMAND and
the Rear Seat Entertainment System
Adopting the audio signal from Rear
Seat Entertainment System for front
passenger
You can transmit the audio signal of the CD/
DVD drive of the Rear Seat Entertainment
System to the headphone of the front
passenger. The volume is adjusted on the
headphone. The audio signal is transmitted to
the COMAND when the main function Disc is
selected on either rear screen. When the
main function Disc is not selected on at least
one rear screen, the audio signal is not
transmitted to the COMAND.
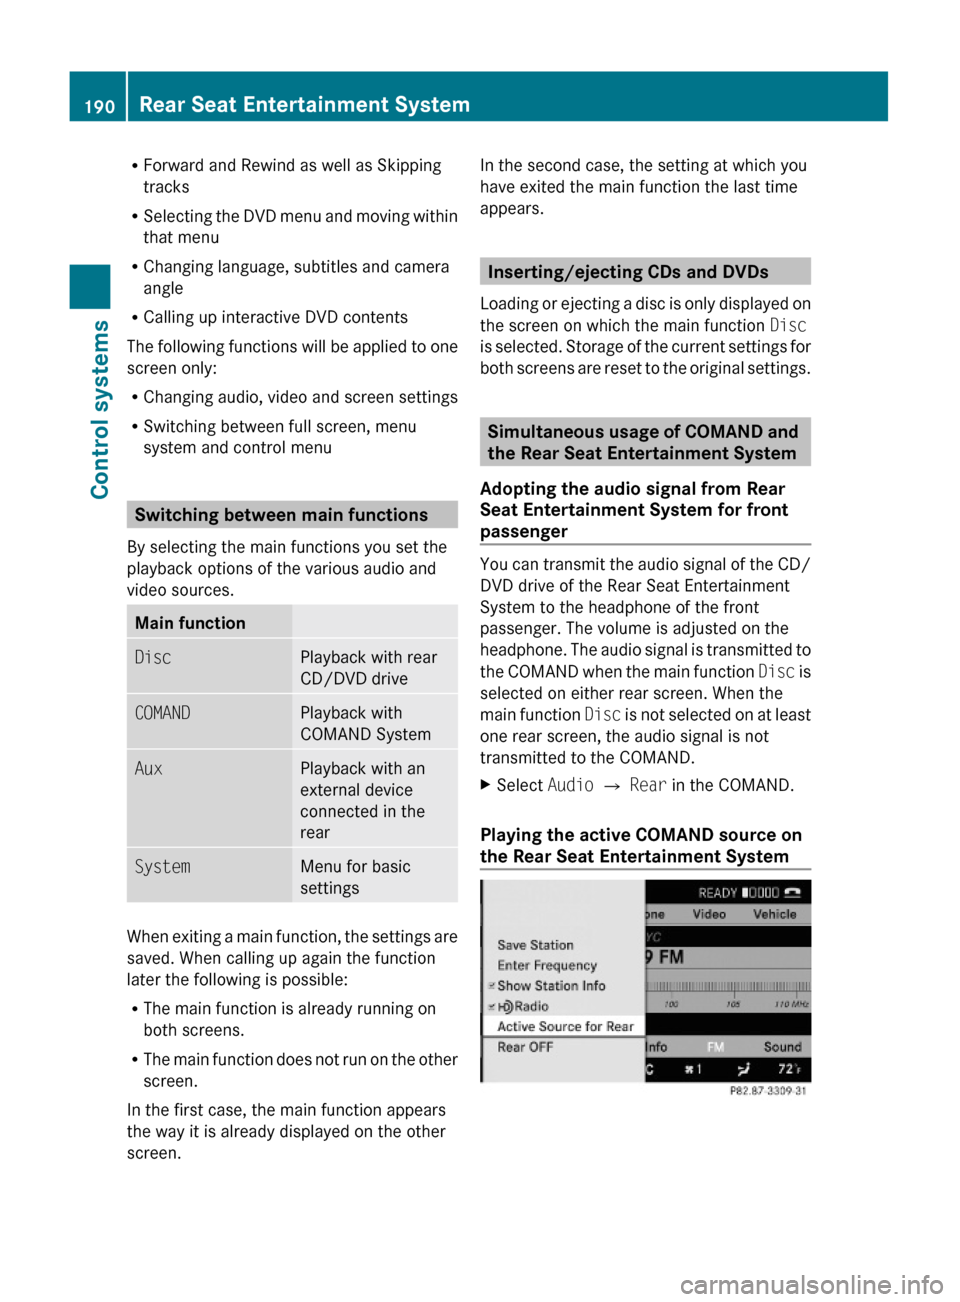
XSelect Audio Q Rear in the COMAND.
Playing the active COMAND source on
the Rear Seat Entertainment System
190Rear Seat Entertainment SystemControl systems
221_AKB; 6; 20, en-USd2ugruen,Version: 2.11.8.12009-09-24T13:28:17+02:00 - Seite 190
Page 195 of 548
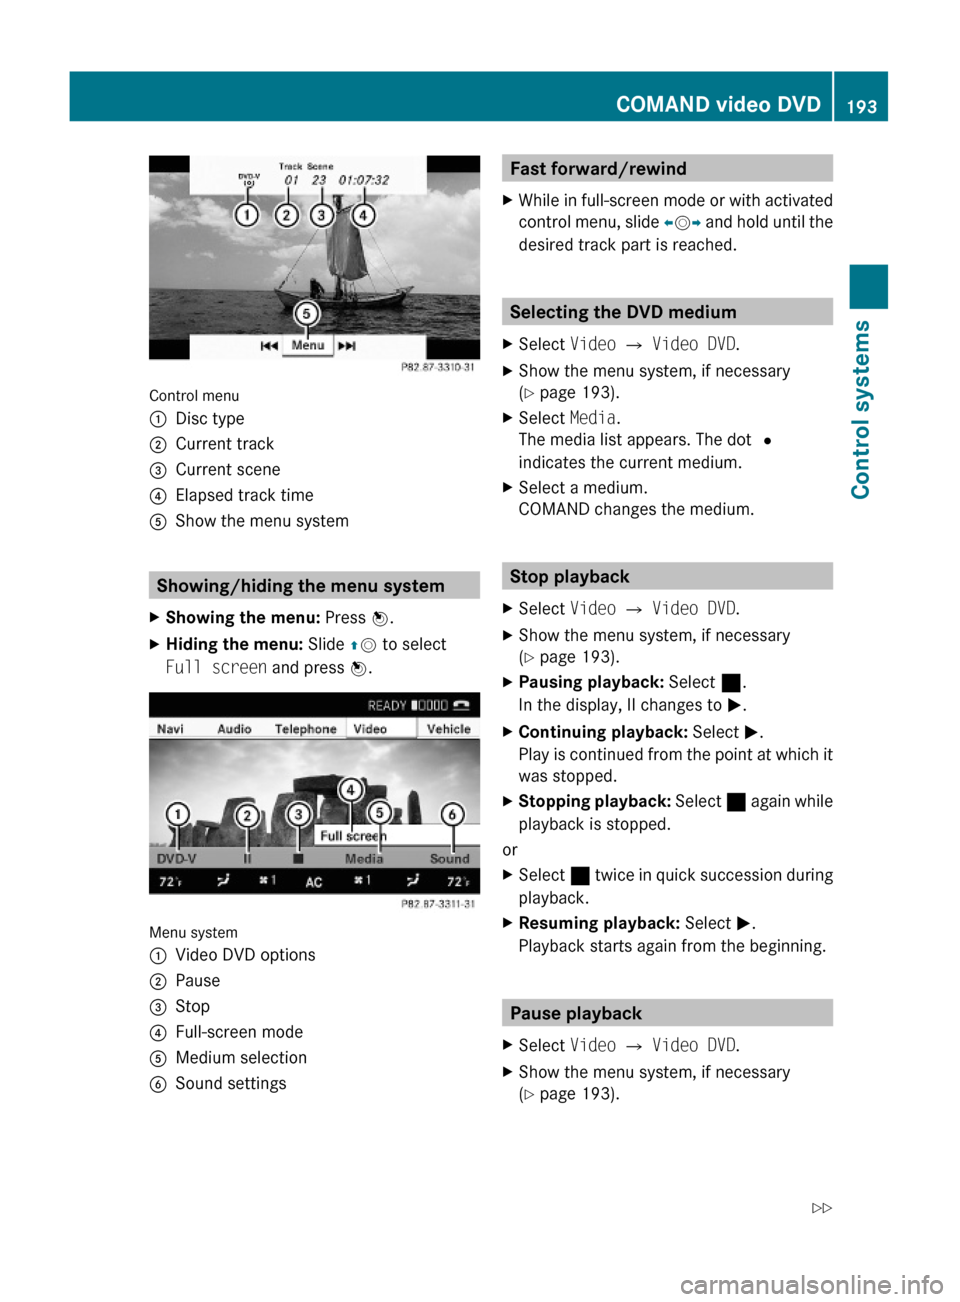
Control menu
:Disc type;Current track=Current scene?Elapsed track timeAShow the menu system
Showing/hiding the menu system
XShowing the menu: Press W.XHiding the menu: Slide ZV to select
Full screen and press W.
Menu system
:Video DVD options;Pause=Stop?Full-screen modeAMedium selectionBSound settingsFast forward/rewindXWhile in full-screen mode or with activated
control menu, slide XVY and hold until the
desired track part is reached.
Selecting the DVD medium
XSelect Video Q Video DVD.XShow the menu system, if necessary
(Y page 193).
XSelect Media.
The media list appears. The dot #
indicates the current medium.
XSelect a medium.
COMAND changes the medium.
Stop playback
XSelect Video Q Video DVD.XShow the menu system, if necessary
(Y page 193).
XPausing playback: Select ¯.
In the display, II changes to M.
XContinuing playback: Select M.
Play is continued from the point at which it
was stopped.
XStopping playback: Select ¯ again while
playback is stopped.
or
XSelect ¯ twice in quick succession during
playback.
XResuming playback: Select M.
Playback starts again from the beginning.
Pause playback
XSelect Video Q Video DVD.XShow the menu system, if necessary
(Y page 193).
COMAND video DVD193Control systems221_AKB; 6; 20, en-USd2ugruen,Version: 2.11.8.12009-09-24T13:28:17+02:00 - Seite 193Z