2010 MERCEDES-BENZ S CLASS transmission
[x] Cancel search: transmissionPage 343 of 548
The DISTRONIC PLUS has not yet detected
the vehicle changing lanes. There will be
insufficient distance to the lane-changing
vehicle.
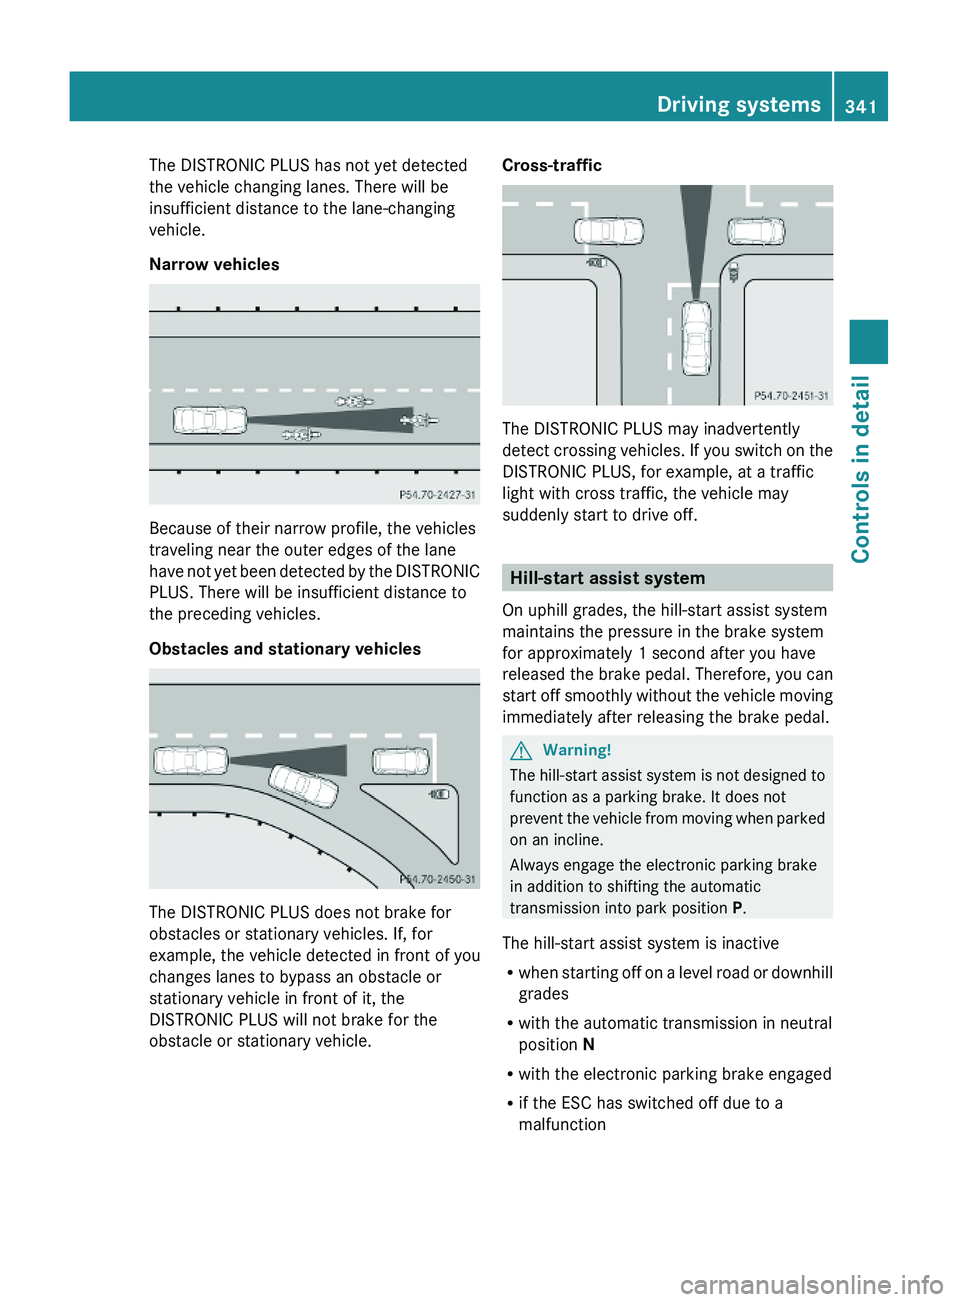
Narrow vehicles
Because of their narrow profile, the vehicles
traveling near the outer edges of the lane
have not yet been detected by the DISTRONIC
PLUS. There will be insufficient distance to
the preceding vehicles.
Obstacles and stationary vehicles
The DISTRONIC PLUS does not brake for
obstacles or stationary vehicles. If, for
example, the vehicle detected in front of you
changes lanes to bypass an obstacle or
stationary vehicle in front of it, the
DISTRONIC PLUS will not brake for the
obstacle or stationary vehicle.
Cross-traffic
The DISTRONIC PLUS may inadvertently
detect crossing vehicles. If you switch on the
DISTRONIC PLUS, for example, at a traffic
light with cross traffic, the vehicle may
suddenly start to drive off.
Hill-start assist system
On uphill grades, the hill-start assist system
maintains the pressure in the brake system
for approximately 1 second after you have
released the brake pedal. Therefore, you can
start off smoothly without the vehicle moving
immediately after releasing the brake pedal.
GWarning!
The hill-start assist system is not designed to
function as a parking brake. It does not
prevent the vehicle from moving when parked
on an incline.
Always engage the electronic parking brake
in addition to shifting the automatic
transmission into park position P.
The hill-start assist system is inactive
Rwhen starting off on a level road or downhill
grades
Rwith the automatic transmission in neutral
position N
Rwith the electronic parking brake engaged
Rif the ESC has switched off due to a
malfunction
Driving systems341Controls in detail221_AKB; 6; 20, en-USd2ugruen,Version: 2.11.8.12009-09-24T13:28:17+02:00 - Seite 341Z
Page 344 of 548

HOLD function
The HOLD function can assist you
Rwhen driving off, especially on steep slopes
Rwhen maneuvering on steep slopes
Rwhen waiting in traffic
The vehicle is kept stationary without the
driver having to depress the brake pedal.
Upon depressing the accelerator pedal, the
braking effect is canceled and the HOLD
function is deactivated.
GWarning!
HYBRID vehicles: It is imperative that you read
the HYBRID Supplemental Operating
Instructions included in your vehicle literature
portfolio. You may otherwise not receive all
necessary safety information and warning for
the operation of your vehicle.
Activation conditions
You can activate the HOLD function when
Rthe vehicle is stationary
Rthe engine is running
Ryour seat belt is fastened or the driver’s
door is closed
Rthe electronic parking brake is released
Rthe hood is closed
Rthe automatic transmission is in neutral
position N, drive position D, or reverse gear
R
When the automatic transmission is in
reverse gear R, the trunk lid must be
closed.
Rthe DISTRONIC PLUS is deactivated
(Y page 338).
Activating HOLD XMake sure the activation conditions are
met.
XDepress the brake pedal.XContinue to depress the brake pedal with
increased pedal pressure until the message
HOLD appears in the multifunction display.
The HOLD function is activated. You can
now release the brake pedal.
HOLD function activated
iThe brake pedal does not return to the
rest position completely while the HOLD
function is activated.
iIf the HOLD function is not activated when
depressing the brake pedal, wait briefly and
repeat the above steps.
GWarning!
The vehicle’s brakes are applied when the
HOLD function is activated. Therefore,
deactivate the HOLD function, for example,
when the vehicle is pulled through an
automatic car wash or being towed.
Deactivating HOLD
The HOLD function is switched off when
Ryou depress the accelerator pedal with the
automatic transmission in drive position D
or reverse gear R
Ryou shift the automatic transmission into
park position P
342Driving systemsControls in detail
221_AKB; 6; 20, en-USd2ugruen,Version: 2.11.8.12009-09-24T13:28:17+02:00 - Seite 342
Page 345 of 548
Ryou depress the brake pedal fully again
until the message HOLD in the multifunction
display disappears
Ryou engage the electronic parking brake
Ryou activate the DISTRONIC PLUS
iAfter a while, the vehicle will be secured
by the electronic parking brake to relieve
the service brake.
GWarning!
The braking effect of the HOLD function is
canceled and the vehicle can start to roll if
Rthe HOLD function is deactivated by
depressing the accelerator pedal or the
brake pedal
Rthe HOLD function or the power supply is
malfunctioning, e.g. due to battery failure
Rthe electrical components in the engine
compartment or the fuses have been
manipulated
Rthe battery is disconnected
GWarning!
Never get out of the vehicle while the HOLD
function is activated!
The HOLD function must never be operated
or deactivated by passengers or from outside
the vehicle.
The HOLD function does not replace the
electronic parking brake. It must not be used
to secure the vehicle when parking.
Deactivate the HOLD function when leaving
or parking the vehicle. Use the electronic
parking brake to secure the vehicle.
When the HOLD function is activated, the
automatic transmission shifts into park
position P automatically when
Ropening the driver’s door and releasing the
seat belt
Rturning off the engine
Ropening the hood
Ra system malfunction occurs
Rthe on-board voltage is insufficient
The HOLD function is deactivated.
AIRMATIC
Introduction
The AIRMATIC lets you select the chassis and
suspension setup. The chassis and
suspension setup adjusts the damping
behavior and the ride height for your vehicle.
The AIRMATIC consists of two components.
The Adaptive Damping System (ADS)
(Y page 343) and the vehicle level control
(Y page 344).
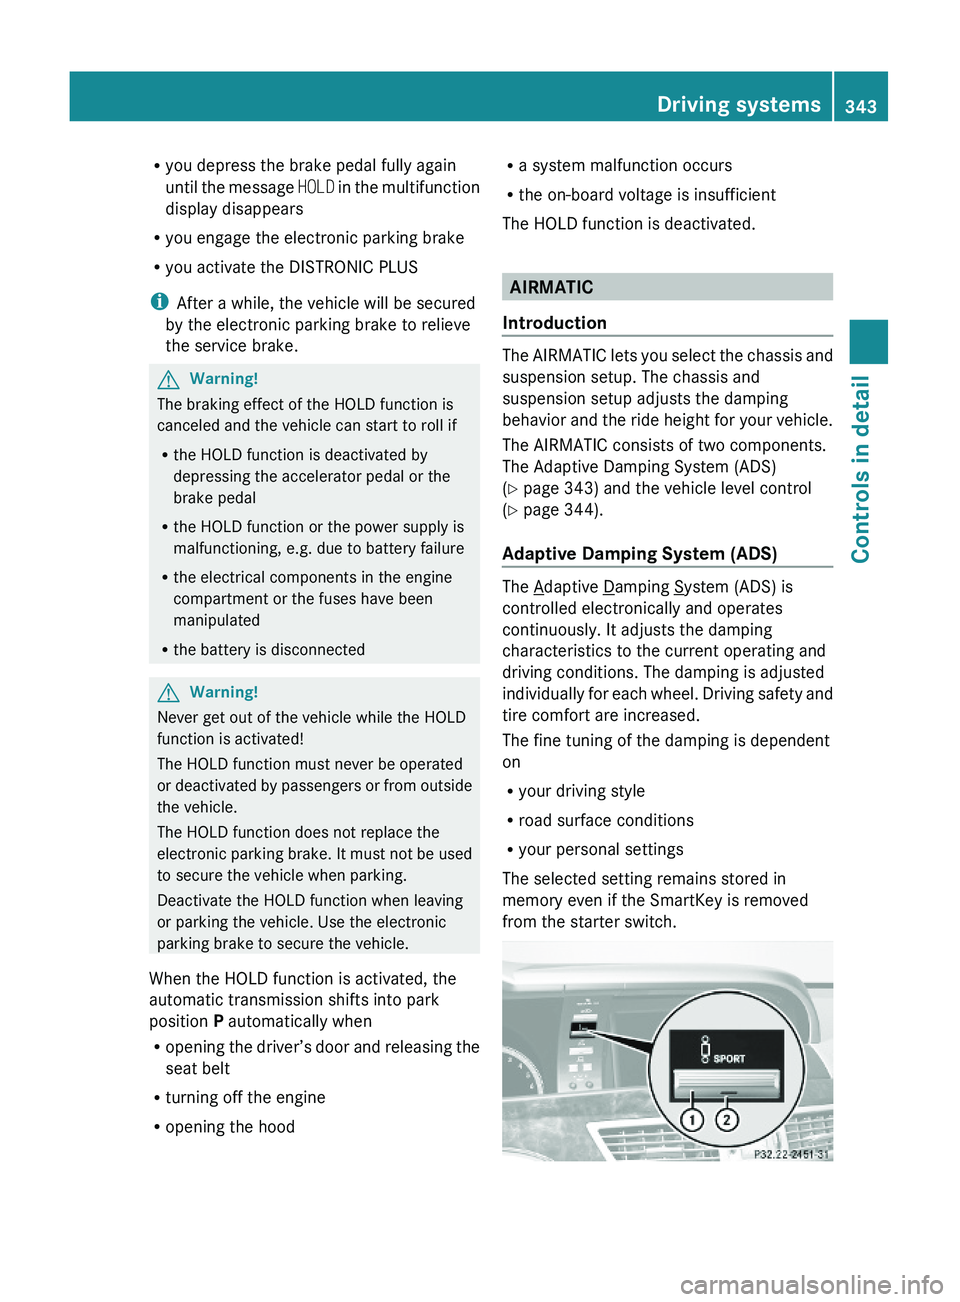
Adaptive Damping System (ADS)
The Adaptive Damping System (ADS) is
controlled electronically and operates
continuously. It adjusts the damping
characteristics to the current operating and
driving conditions. The damping is adjusted
individually for each wheel. Driving safety and
tire comfort are increased.
The fine tuning of the damping is dependent
on
Ryour driving style
Rroad surface conditions
Ryour personal settings
The selected setting remains stored in
memory even if the SmartKey is removed
from the starter switch.
Driving systems343Controls in detail221_AKB; 6; 20, en-USd2ugruen,Version: 2.11.8.12009-09-24T13:28:17+02:00 - Seite 343Z
Page 349 of 548

Comfort suspension tuning
Vehicle handling in comfort driving mode is
softer. Select this mode when you prefer a
more comfortable driving style.XWhen indicator lamp 0047 is on: Press
button 0046.
Indicator lamp 0047 goes out. The
comfortable chassis and suspension setup
is selected.
The message ABC Active Body Control
COMFORT appears in the multifunction
display.
All-wheel drive (4MATIC)
In vehicles with all-wheel drive (4MATIC),
both axles are powered at all times when the
vehicle is being operated. The 4MATIC
improves traction in conjunction with the ESC
( Y page 66) and the Electronic Traction
System (ETS/4-ETS) ( Y page 67).
GWarning!
If a drive wheel is spinning due to insufficient
traction:
R While driving off, apply as little throttle as
possible.
R While driving, ease up on the accelerator
pedal.
R Adapt your speed and driving style to the
prevailing road conditions.
Failure to observe these guidelines could
cause the vehicle to skid.
The 4MATIC cannot prevent accidents
resulting from excessive speed.
! Do not tow with one axle raised. Doing so
could damage the transfer case, which is
not covered by the Mercedes-Benz Limited
Warranty. All wheels must be on or off the
ground. Observe instructions for towing the
vehicle with all wheels on the ground.
! Only conduct operational or performance
tests on a two-axle dynamometer. If such
tests are necessary, contact an authorized
Mercedes-Benz Center. You could
otherwise seriously damage the brake
system and/or the transfer case which is
not covered by the Mercedes-Benz Limited
Warranty.
i In winter operation, the maximum
effectiveness of the 4MATIC is only
achieved with winter tires ( Y page 432) or
snow chains as required.
Parktronic system
The Parktronic system with Parking Guidance
is an electronic parking aid with ultrasonic
sensors designed to assist the driver during
parking maneuvers. The Parktronic system
indicates the relative distance between the
vehicle and an obstacle visually and audibly.
The Parktronic system is activated
automatically when
R you switch on the ignition
and
R you release the electronic parking brake
or
R you start the engine
and
R shift the automatic transmission into drive
position D, reverse gear R, or neutral
position N
The Parktronic system deactivates at speeds
above approximately 11 mph (18 km/h). At
lower speeds, the Parktronic system
activates again.
The Parktronic system also deactivates when
you shift the automatic transmission into
park position P or engage the electronic
parking brake and turn off the engine.
The Parktronic system monitors the
surroundings of your vehicle with six sensors
Driving systems347Controls in detail221_AKB; 6; 20, en-USd2ugruen,Version: 2.11.8.12009-09-24T13:28:17+02:00 - Seite 347Z
Page 357 of 548
GWarning!
Use of rear view camera can be dangerous if
you are color-blind or have impaired color
vision.
Only use rear view camera if you can see and
distinguish all colored guidelines shown by
rear view camera on the COMAND system
display.
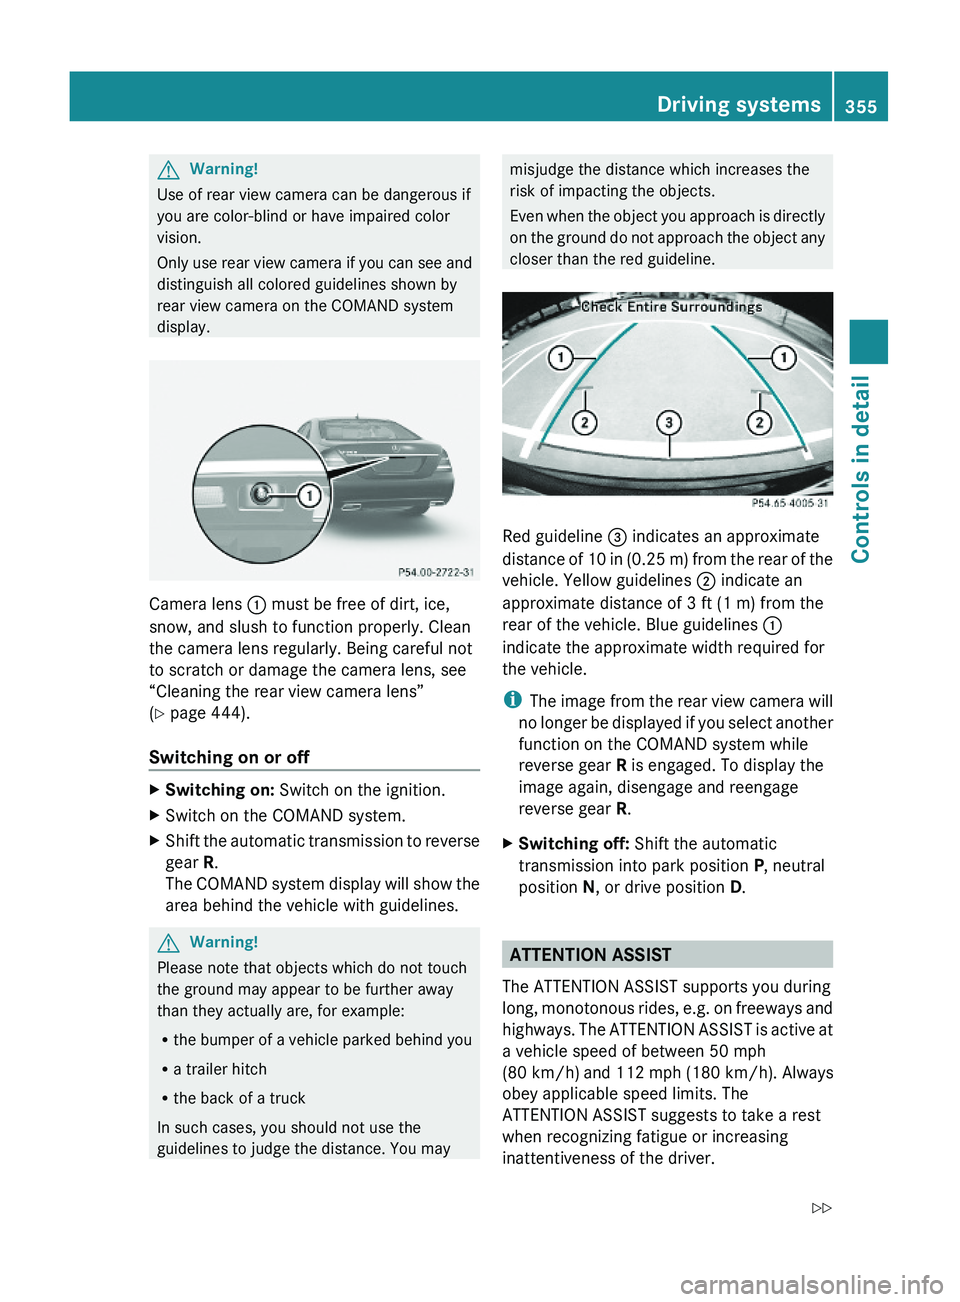
Camera lens \000F must be free of dirt, ice,
snow, and slush to function properly. Clean
the camera lens regularly. Being careful not
to scratch or damage the camera lens, see
“Cleaning the rear view camera lens”
(Y page 444).
Switching on or off
XSwitching on: Switch on the ignition.XSwitch on the COMAND system.XShift the automatic transmission to reverse
gear R.
The COMAND system display will show the
area behind the vehicle with guidelines.
GWarning!
Please note that objects which do not touch
the ground may appear to be further away
than they actually are, for example:
Rthe bumper of a vehicle parked behind you
Ra trailer hitch
Rthe back of a truck
In such cases, you should not use the
guidelines to judge the distance. You may
misjudge the distance which increases the
risk of impacting the objects.
Even when the object you approach is directly
on the ground do not approach the object any
closer than the red guideline.
Red guideline \000
Page 359 of 548
display. The image in the multifunction
display corresponds to a road lit up by high-
beam headlamps.
GWarning!
The Night View Assist Plus is only an aid to
support you while driving and cannot
substitute your careful attention. Do not rely
on the display of the Night View Assist Plus;
instead, continue to look through the
windshield. You are always responsible for
safety and must drive in accordance with
traffic conditions. Otherwise, you could
endanger yourself and others.
The system may be impaired or unavailable
when
Rvisibility is poor, e.g. due to snow, rain, fog,
or heavy spray
Rthe camera area of the windshield is dirty,
fogged up or covered by a sticker for
example
Rdriving through curves or on inclines or
declines
GWarning!
The Night View Assist Plus cannot record
objects immediately in front of or next to the
vehicle. When maneuvering, continue to look
through the windshield. Make sure no
persons or animals are in the area in which
you are maneuvering. You could otherwise
injure them.
The Night View Assist Plus image in the
multifunction display is not impaired by the
headlamps of approaching vehicles.
As a result, you can better follow the course
of the road and detect obstacles earlier on.
iInfrared light is invisible to the human eye
and thus does not blind. The Night View
Assist Plus can remain switched on
permanently even with oncoming traffic
present.
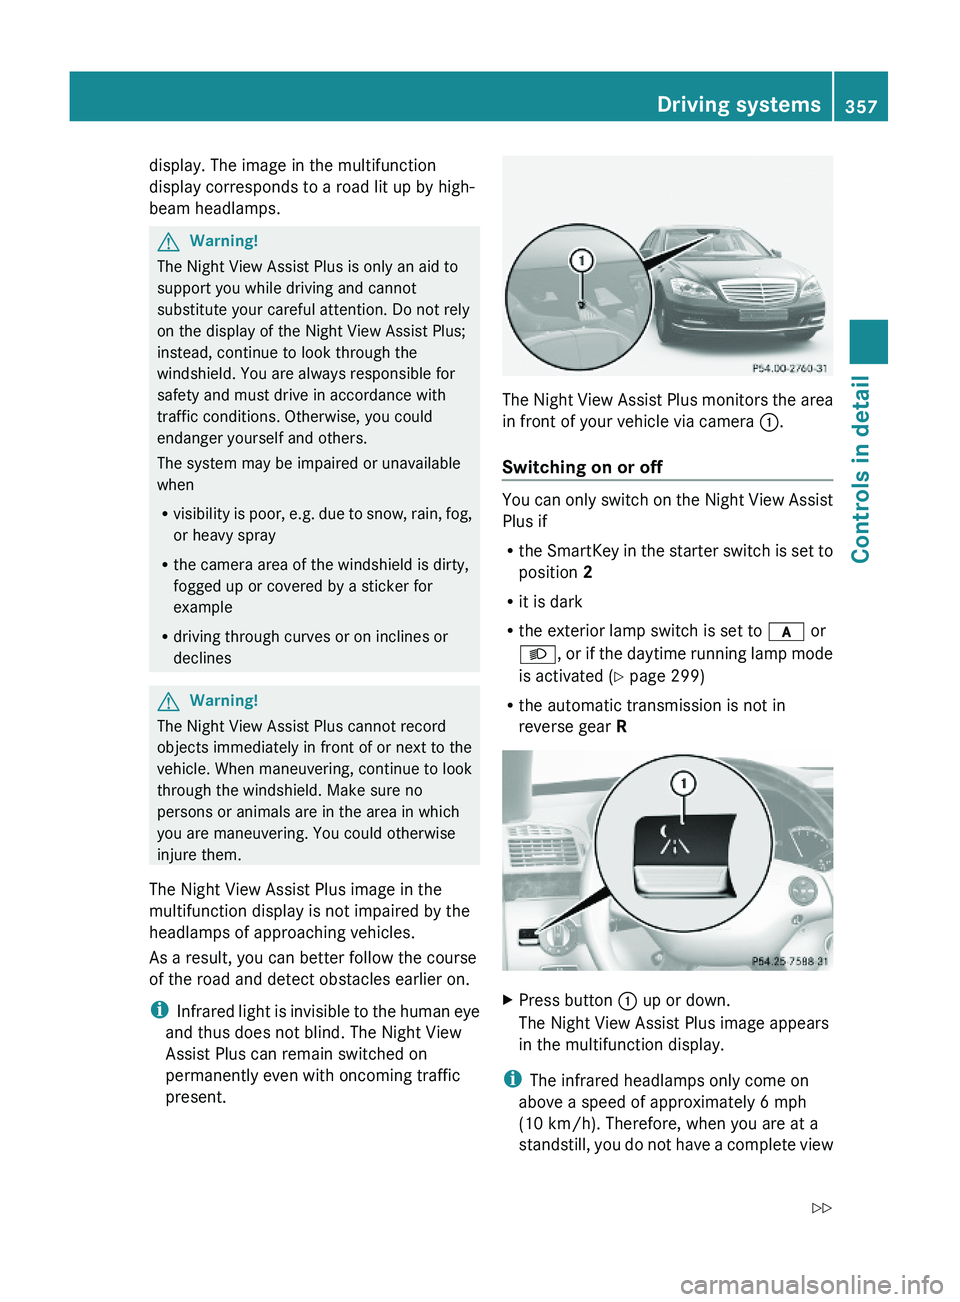
The Night View Assist Plus monitors the area
in front of your vehicle via camera \000F.
Switching on or off
You can only switch on the Night View Assist
Plus if
Rthe SmartKey in the starter switch is set to
position 2
Rit is dark
Rthe exterior lamp switch is set to \000f or
\000d, or if the daytime running lamp mode
is activated (Y page 299)
Rthe automatic transmission is not in
reverse gear R
XPress button \000F up or down.
The Night View Assist Plus image appears
in the multifunction display.
iThe infrared headlamps only come on
above a speed of approximately 6 mph
(10 km/h). Therefore, when you are at a
standstill, you do not have a complete view
Driving systems357Controls in detail221_AKB; 6; 20, en-USd2ugruen,Version: 2.11.8.12009-09-24T13:28:17+02:00 - Seite 357Z
Page 363 of 548

of the bumper around the sensors is free of
dirt, ice and snow. The radar sensors must not
be obstructed, for example, by bicycle
carriers or overhanging luggage.
! In the event of a significant impact or
damage affecting the bumpers, have the
radar sensors checked by a qualified
specialist workshop such as a Mercedes-
Benz Center. Failure to do this can result in
Blind Spot Assist not functioning correctly.
Indicator and warning lamps
Exterior rear view mirror, driver’s side
XMake sure that the radar sensors
(Y page 236) and Blind Spot Assist
(Y page 233) are switched on.
XSwitch on the ignition.
Red warning lamps \000F in the exterior rear
view mirrors come on.
XStart the engine.
Yellow indicator lamps \000F in the exterior
rear view mirrors come on up to a speed of
20 mph (30 km/h).
Above a speed of 20 mph (30 km/h), yellow
indicator lamps \000F go out and the Blind Spot
Assist is active. If the Blind Spot Assist
detects a vehicle in its range, red warning
lamp \000F on the corresponding side of the
vehicle comes on. The warning is issued each
time a vehicle enters the area monitored by
the Blind Spot Assist from behind or from the
side. When you pass another vehicle, the
warning is issued only when the speed
differential is less than 7 mph (12 km/h).
When you shift the automatic transmission in
reverse gear R, yellow indicator lamps \000F in
the exterior rear view mirrors goes out after
approximately 3 seconds. The Blind Spot
Assist is then not active.
The brightness of indicator lamps/warning
lamps \000F is controlled automatically
depending on the brightness of the ambient
light.
GWarning!
The Blind Spot Assist is not active at speeds
below approximately 20 mph (30 km/h). The
yellow indicator lamps in the exterior rear
view mirrors are illuminated. You will not be
alerted to the presence of vehicles in the
monitored area at these speeds.
It is the driver’s responsibility at all times to
be attentive to road, weather and traffic
conditions and to provide the steering,
braking and other driving inputs necessary to
retain control of the vehicle. Failure to do so
could result in recognizing dangers too late,
possibly resulting in an accident and serious
injury to yourself and others.
Collision warning
If a vehicle is detected in the Blind Spot Assist
range and you activate the turn signal, a two-
tone warning will sound once. Red warning
lamp \000F on the corresponding side of the
vehicle will flash.
GWarning!
Do not change lanes or make turns, while red
warning lamp \000F is flashing. Doing so could
result in an accident and serious injury to
yourself and others.
XRemain on the lane that you are currently
on until traffic conditions permit to change.
If the turn signal remains on, red warning
lamp \000F will flash to indicate that vehicles
have been detected. No further audible
warnings will sound.
Driving systems361Controls in detail221_AKB; 6; 20, en-USd2ugruen,Version: 2.11.8.12009-09-24T13:28:17+02:00 - Seite 361Z
Page 399 of 548
Rolling code programming
To train a garage door opener (or other rolling
code devices) with the rolling code feature,
follow these instructions after completing the
“Programming” portion (steps 1 through 6) of
this text. For your convenience and to
complete the procedure faster, you might
want to have someone assist you.XStep 8: Locate the “training” button on the
garage door opener motor head unit.
i Exact location and color of the button may
vary by garage door opener brand.
Depending on manufacturer, the “training”
button may also be referred to as “learn” or
“smart” button. If there is difficulty locating
the transmitting button, refer to the garage
door opener Operator’s Manual.
XStep 9: Press the “training” button on the
garage door opener motor head unit.
The “training light” is activated.
You have 30 seconds to initiate the
following two steps.XStep 10: Return to the vehicle and firmly
press, hold for 2 seconds and release the
programmed signal transmitter button ( 0047,
008A or 0088).XStep 11: Press, hold for 2 seconds and
release same signal transmitter button a
second time to complete the training
process.
i Some garage door openers (or other
rolling code equipped devices) may require
you to press, hold for 2 seconds and
release the same signal transmitter button
a third time to complete the training
process.
XStep 12: Confirm the garage door
operation by pressing the programmed
signal transmitter button ( 0047, 008A or 0088).XStep 13: To program the remaining two
signal transmitter buttons, repeat the steps
above starting with step 3.Gate operator/Canadian programming
Canadian radio-frequency laws require
transmitter signals to “time-out” (or quit)
after several seconds of transmission which
may not be long enough for the integrated
signal transmitter to pick up the signal during
programming. Similar to this Canadian law,
some U.S. gate operators are designed to
“time-out” in the same manner.
If you live in Canada or if you are having
difficulties programming a gate operator
(regardless of where you live) by using the
programming procedures, replace step 4 with
the following:XStep 4: Press and hold the signal
transmitter button ( 0047, 008A or 0088). Do not
release this button until it has been
successfully trained.XWhile still holding down the signal
transmitter button ( 0047, 008A or 0088), “cycle”
your hand-held remote control button 0087
as follows: Press and hold button 0087 for
2 seconds, then release it for 2 seconds,
and again press and hold it for 2 seconds.
Repeat this sequence on the hand-held
remote control until the frequency signal
has been learned.
Upon successful training, indicator
lamp 0046 will flash slowly and then rapidly
after several seconds.XProceed with programming step 5 and
step 6 to complete.
i Upon completion of programming the
integrated remote control, make sure you
retain the hand-held remote control that
came with the garage door opener, gate
operator or other device. You may need it
for use in other vehicles, for future
programming of an integrated remote
control, or simply for continued use as a
hand-held remote control to operate the
respective device in other situations.
Useful features397Controls in detail221_AKB; 6; 20, en-USd2ugruen,Version: 2.11.8.12009-09-24T13:28:17+02:00 - Seite 397Z