2010 MERCEDES-BENZ S CLASS center console
[x] Cancel search: center consolePage 29 of 548
Exterior view .......................................28
Rear passenger compartment ...........29
Cockpit .................................................30
Instrument cluster ..............................32
Control systems ..................................34
Center console ....................................36
Overhead control panel ......................37
Driver’s door control panel ................38
Rear door control panel ......................38
27At a glance221_AKB; 6; 20, en-USd2ugruen,Version: 2.11.8.12009-09-24T13:28:17+02:00 - Seite 27
Page 38 of 548
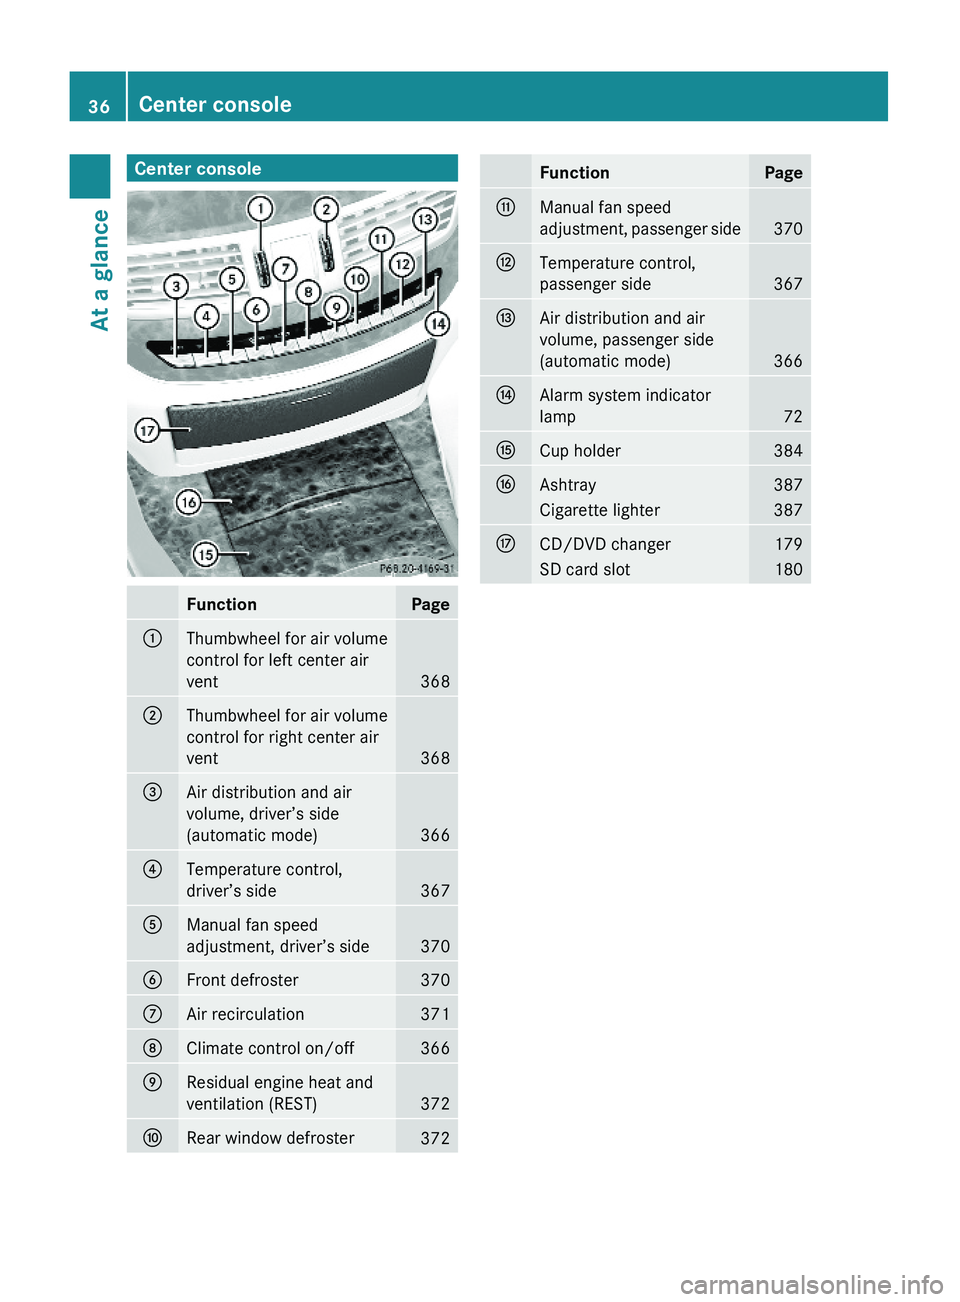
Center consoleFunctionPage\000FThumbwheel for air volume
control for left center air
vent368
\000GThumbwheel for air volume
control for right center air
vent368
\000
Page 46 of 548

followed. These instructions are available
from any authorized Mercedes-Benz
Center.
RGiven the considerable deployment speed,
required inflation volume, and the material
of the air bags, there is the possibility of
abrasions or other, potentially more serious
injuries resulting from air bag deployment.
If you sell your vehicle, we strongly
recommend that you inform the subsequent
owner that the vehicle is equipped with SRS.
Also refer them to the applicable section in
the Operator’s Manual.
Front air bags
GObserve Safety notes, see page 41.
Driver’s front air bag \000F and front passenger
front air bag \000G are designed to provide
increased protection for the driver and front
passenger against the risk of injuries to the
head and thorax.
Driver and front passenger front air bags are
deployed
Rin the event of certain frontal impacts
Rif the system determines that air bag
deployment can offer additional protection
to that provided by the seat belt
Rdepending on whether the respective seat
belt is in use
Rindependently of the side impact air bags
and/or the window curtain air bags
The front air bags in this vehicle have been
designed to inflate in two stages. This allows
the air bags to have different rates of inflation.
The rate of inflation is based on the vehicle
deceleration rate as assessed by the air bag
control unit.
The front passenger front air bag deployment
is additionally influenced by the passenger’s
weight category as identified by the Occupant
Classification System (OCS) (Y page 46).
The lighter the front passenger-side
occupant, the higher the vehicle deceleration
rate required for second stage inflation of the
front passenger front air bag.
The air bags will not deploy in impacts which
do not exceed the system’s preset
deployment thresholds. You will then be
protected by the fastened seat belts.
The front air bags will not deploy in the event
of a rollover unless the vehicle’s rate of
longitudinal deceleration or acceleration
exceeds the preset deployment threshold for
the front air bags.
The front passenger front air bag will only be
deployed if
Rthe system, based on OCS weight sensor
readings, detects that the front passenger
seat is occupied
Rthe \000\000} indicator lamp in the
center console is not lit (Y page 46)
Rthe impact exceeds a preset deployment
threshold
44Occupant safetySafety and security
221_AKB; 6; 20, en-USd2ugruen,Version: 2.11.8.12009-09-24T13:28:17+02:00 - Seite 44
Page 63 of 548
XVehicles with rear center seat: Make sure
that the seat belt for the rear center seat
can operate freely with a child seat
installed.
GWarning!
Vehicles with rear power seats:
Never change the rear seat position after
installing the child restraint. This could
Rdamage the child restraint
Rintroduce undesirable slack or tension into
the seat belt
Rloosen the child restraint
Rmisposition the child restraint
All of the above will lessen the
effectiveness of the child restraint and thus
increase the chance or severity of injury in
an accident.
Child safety
Child safety locks
GObserve Safety notes, see page 56.GWarning!
Children could open a rear door from the
inside. This may cause serious personal injury
or an accident. Therefore, secure the rear
doors with the child safety locks whenever
children are riding in the back seats of the
vehicle.
The child safety locks on the rear doors
enable you to secure each rear door
individually. You cannot open a secured rear
door from the inside. You can open the rear
door from the outside when the vehicle is
unlocked.
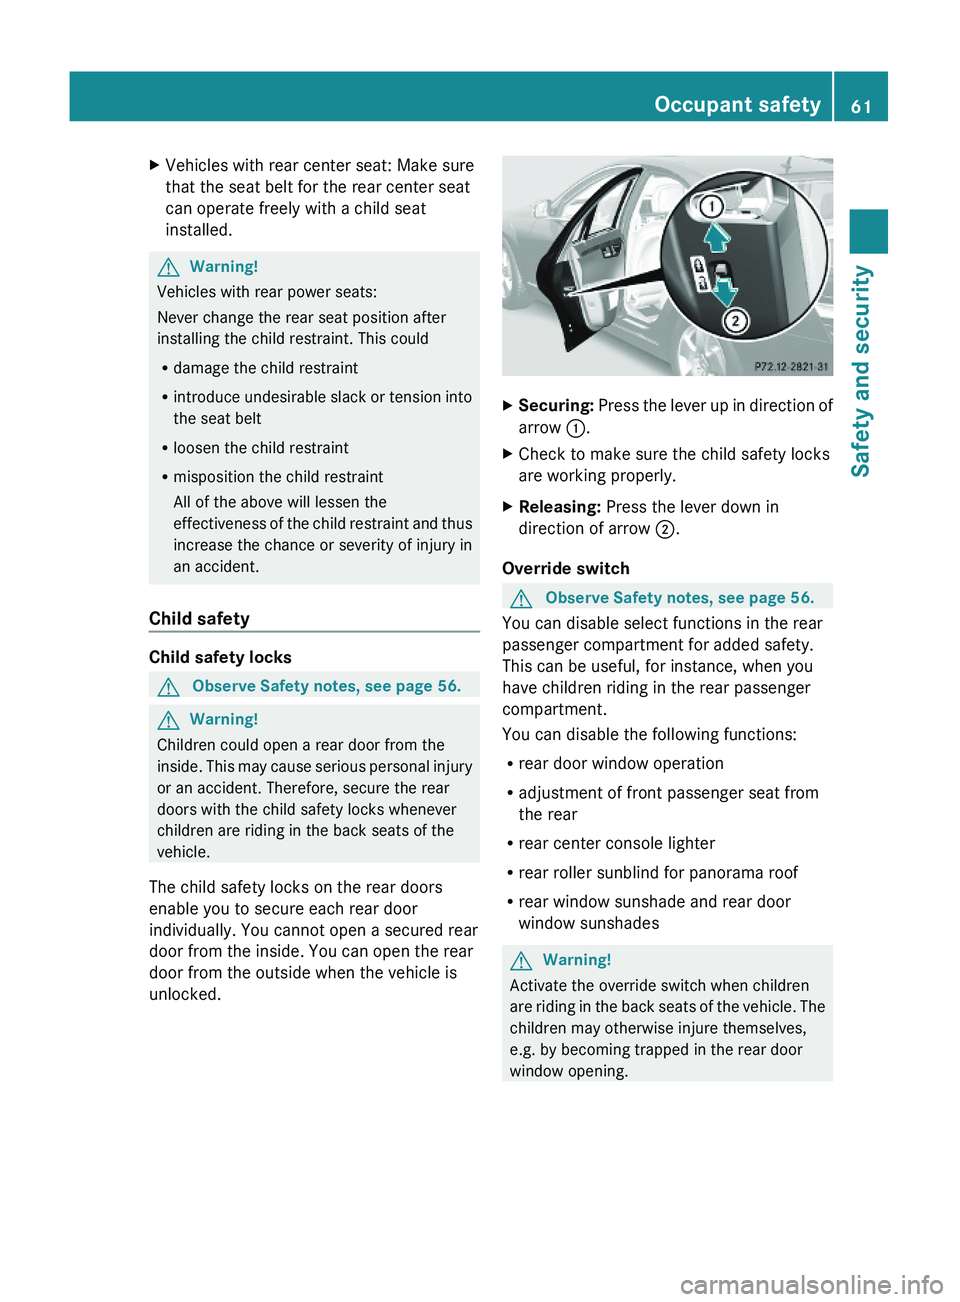
XSecuring: Press the lever up in direction of
arrow \000F.
XCheck to make sure the child safety locks
are working properly.
XReleasing: Press the lever down in
direction of arrow \000G.
Override switch
GObserve Safety notes, see page 56.
You can disable select functions in the rear
passenger compartment for added safety.
This can be useful, for instance, when you
have children riding in the rear passenger
compartment.
You can disable the following functions:
Rrear door window operation
Radjustment of front passenger seat from
the rear
Rrear center console lighter
Rrear roller sunblind for panorama roof
Rrear window sunshade and rear door
window sunshades
GWarning!
Activate the override switch when children
are riding in the back seats of the vehicle. The
children may otherwise injure themselves,
e.g. by becoming trapped in the rear door
window opening.
Occupant safety61Safety and security221_AKB; 6; 20, en-USd2ugruen,Version: 2.11.8.12009-09-24T13:28:17+02:00 - Seite 61Z
Page 106 of 548
RBird’s-eye View: Map display 0046 is oriented
in the direction into which you are heading;
the orange tip of the symbol points to the
North.
R 3-D Map: Certain buildings in selected
cities are displayed in detail as a 3-D (three-
dimensional) model. The map displays
mountains and valleys three-
dimensionally. The 3-D map is country-
specific and is connected with the function
City (3D) ( Y page 105).XSelecting map orientation: Select Navi
0054 Map Orientation .
The list of available map orientations
appears. The dot 003F indicates the currently
selected map orientation.XSelect North Up , Heading Up , Bird's-
eye View , or 3-D Map and press 00A1.XExiting menu: Slide 009E005B 009F.
Setting POI symbols
You can set which points of interest (POIs)
should be displayed as symbols in the map.
POIs are parking facilities, hotels, restaurants
or movie theaters, for example.
i Depending on the map scale, POI symbols
may not be visible although their display is
activated. In addition, POI symbols may be
covered by other POIs or names displayed
on the map.
The following settings are possible:
R Standard symbols (factory setting)
R Personal symbols (you can select the
desired POIs)
R No symbols
XAdjusting: Select Navi 0054 POI Symbols
on Map .
The map display list appears. A dot 003F
indicates the current setting.XSelect Standard symbols , Personal
symbols or No symbols .
If you select Personal symbols , the list of
POIs appears.XSwitching POI symbol display on or
off: Select the desired POI.
The corresponding symbol displays are
switched on or off, depending on the
previous status. A checkmark indicates
which status is active. You can switch on
the symbol displays for more than one POI.
i The list shows all symbols that are
contained in the digital map across all
states (USA) and provinces (Canada). Not
all POIs in all states (USA) or in all provinces
(Canada) are available, however. Certain
POI symbols may not be displayed on the
map, even if the symbol display is switched
on. You can use this list as a map legend.
The map legend also contains, in addition
to the POI symbols, the names of the POI
categories.
XExiting menu: Slide 009E005B 009F or press back
button 0041 in the center console
( Y page 87).
Selecting traffic symbols on the map
You can select what kind of traffic information
is displayed on the map ( Y page 139).
Selecting text information on the map
COMAND can display various text
information below the map:
R Time of arrival and distance to destination
R Current street
R Geo coordinates
R None
104COMAND navigation (introduction)Control systems
221_AKB; 6; 20, en-USd2ugruen,Version: 2.11.8.12009-09-24T13:28:17+02:00 - Seite 104
Page 108 of 548
XSelect Navi.XCheck the check box for menu item City
(3D) .
Setting route type
You can set the following route types:
R Fast Route : COMAND calculates a route
with minimized driving time.
R Dynamic Route : COMAND calculates a
route with minimized driving time and takes
into account traffic messages received
along the route. Thus, the navigation
system can dynamically recalculate the
route. Roads that are blocked will be
avoided whenever possible. For
information on traffic messages see
( Y page 138).
R Short Route : COMAND calculates a route
with minimized route length.
XSelect Navi 0054 Mode .
The list of available rote types appears. The
dot 003F indicates the currently selected
setting.XSelect route type: Fast Route , Dynamic
Route or Short Route .XExit menu: Slide 009E005B 009F.
i
If you change the route type setting during
active route guidance, COMAND calculates
a new route. If you change the setting when
route guidance is inactive, COMAND uses
the new setting for the next route guidance.
Setting route mode
With this function you can select the following
options for route calculation:
R Minimize Highways
R Minimize Toll Roads
R Minimize Tunnels
R Minimize Ferries
R Minimize Motorail Trains
XSelect Navi 0054 Mode .
The mode list appears.XSwitching mode on or off: Select desired
modes.
Depending on the previous status, the
mode is switched on or off. A checkmark
indicates that the mode is switched on. It
is possible to switch on more than one
mode.XExiting menu: Slide 009E005B 009F or press back
button 0041 in the center console
( Y page 87).
COMAND will verify whether it can
incorporate the modes if you select them
with route guidance active.
If possible, COMAND calculates a new
route considering the selected options.
If the route cannot be recalculated with the
selected options, a message appears and
an announcement is made. COMAND
calculates a new route. Only options that
are possible will be considered.
Displaying highway information
When this function is enabled, highway
information ahead will display automatically
( Y page 137).
Audio fadeout
XSelect Navi 0054 Audio Fadeout .
When the check box is checked 0069 the
volume of the current audio source fades
during a navigation announcement.
COMAND navigation system
(entering a destination)
Introduction
GWarning!
For safety reasons, only enter a new
destination when the vehicle is stationary.
106COMAND navigation system (entering a destination)Control systems
221_AKB; 6; 20, en-USd2ugruen,Version: 2.11.8.12009-09-24T13:28:17+02:00 - Seite 106
Page 111 of 548
XSelecting a state: Slide 00A0005B 0050 or rotate
0082 005B 0083.XCanceling selection: Select Back by
sliding 009E005B and press 00A1.
or
XPress back button 0041 in the center
console ( Y page 87).XConfirming selection: Press 00A1.
The address input menu appears again. It
shows the abbreviation for the selected
state.
The following menu items are now available:
R Map : Entering a destination from the map
( Y page 122)
R State/Prov. : Change state (USA) or
province (Canada)
R City : Entering a city ( Y page 111) within
the selected state
R Street : Entering a street ( Y page 114)
within the selected state
R Zip Code : Entering the zip code
( Y page 109) within the selected state
XContinuing destination entry: Select one
of the menu items mentioned above.
Entering a province (Canada)
XIn the address input menu, select State/
Prov. 0054 Provinces (Canada) .
A list of provinces appears.XSelect desired province.
The address input menu appears again. It
shows the abbreviation for the selected
province.
The following menu items are now available:
R Map : Entering a destination from the map
( Y page 122)
R State/Prov. : Change state (USA) or
province (Canada)
R City : Entering a city ( Y page 111) within
the selected province
R Street : Entering a street ( Y page 114)
within the selected province
R Zip Code : Entering the postal code
( Y page 109) within the selected provinceXContinuing destination entry: Select one
of the menu items mentioned above.
Quick access to most recently entered
states (USA) or provinces (CDN)
XIn the address input menu, select State/
Prov. 0054 Last States/Provinces .
The list of most recently entered states
(USA) or provinces (Canada) appears. The
last entry is at the top of the list.XSelect desired state (USA) or desired
province (Canada).
The address input menu appears again. It
shows the abbreviation for the selected
state (USA) or province (Canada).
The following menu items are now available:
R Map : Entering a destination from the map
( Y page 122)
R State/Prov. : Change state (USA) or
province (Canada)
R City : Entering a city within the selected
state (USA)/province (Canada)
( Y page 111)
R Street : Entering a street within the
selected state (USA)/province (Canada)
( Y page 114)
R Zip Code : Entering the zip code/postal
code within the selected state (USA)/
province (Canada) ( Y page 109)
XContinuing destination entry: Select one
of the menu items mentioned above.
Entering the zip code/postal code
i It is not possible to enter a zip code/
postal code if you have already entered
other address data aside from the state
(USA) or province (Canada).
COMAND navigation system (entering a destination)109Control systems221_AKB; 6; 20, en-USd2ugruen,Version: 2.11.8.12009-09-24T13:28:17+02:00 - Seite 109Z
Page 151 of 548
Using the Bluetooth®
interface
COMAND provides telephony via the
Bluetooth ®
interface by connecting a
Bluetooth ®
-compatible mobile phone. The
following functions can be used when a
suitable mobile phone is connected to the
Bluetooth ®
interface:
R Hands-free phone operation
R Phone book
R Reception of electronic business cards
(vCards 10
)
i For further information on suitable mobile
phones and connecting Bluetooth ®
-
enabled mobile phones to COMAND
R visit www.mbusa-mobile.com
R call the Mercedes-Benz Customer
Assistance Center at
1-800-FOR-MERCedes
(1-800-367-6372) (in the USA)
R call Customer Service at
1-800-387-0100 (in Canada)
Calls disconnected while the vehicle is
in motion
A call may be disconnected if
R there is insufficient network coverage
R you move from one transmitter/receiver
area (cell) into another and no channels are
free or the cell is full
Operating options
i The components and operating principles
of COMAND can be found on ( Y page 76).
You can operate the mobile phone using the
following:
R the keys on the mobile phone
R the COMAND telephone keypad in the
center console
R the COMAND controller
R the multifunction steering wheel
R the Voice Control System ( Y page 237)
Unless otherwise specified, the descriptions
and illustrations in this section apply to
COMAND or the telephone keypad in the
center console. Thus, in order to use the
described functions you always have to call
up the Telephone menu. The fastest way to
get to the Telephone menu is pressing
shortcut button 0058.
You can control other functions of the mobile
phone via the COMAND, instrument cluster
control system (Y page 230) or Voice Control
System ( Y page 237).
Caller ID
COMAND can display the telephone number
and the name of the caller, e.g. for an
incoming call and also in other menus or
displays.
For the telephone number to be displayed,
the caller must transmit his telephone
number.
This is also the case for name displays. For
this, the telephone number and the name of
the caller must also be saved in the mobile
phone book.
Functional restrictions
You will not be able to use the telephone, or
you may have to wait a while, in the following
situations:
R If the Bluetooth function in COMAND or
on the mobile phone is switched off.
R If the telephone has not yet logged into the
network.
The telephone tries to log into a network
automatically. If no network is available,
you will also not be able to make a “911”
emergency call. If you attempt to make an
10 vCards are electronic business cards used by e-mail applications, mobile phones, PDAs, etc. to exchange
contact information.COMAND telephone149Control systems221_AKB; 6; 20, en-USd2ugruen,Version: 2.11.8.12009-09-24T13:28:17+02:00 - Seite 149Z