2010 MERCEDES-BENZ S CLASS length
[x] Cancel search: lengthPage 108 of 548
XSelect Navi.XCheck the check box for menu item City
(3D) .
Setting route type
You can set the following route types:
R Fast Route : COMAND calculates a route
with minimized driving time.
R Dynamic Route : COMAND calculates a
route with minimized driving time and takes
into account traffic messages received
along the route. Thus, the navigation
system can dynamically recalculate the
route. Roads that are blocked will be
avoided whenever possible. For
information on traffic messages see
( Y page 138).
R Short Route : COMAND calculates a route
with minimized route length.
XSelect Navi 0054 Mode .
The list of available rote types appears. The
dot 003F indicates the currently selected
setting.XSelect route type: Fast Route , Dynamic
Route or Short Route .XExit menu: Slide 009E005B 009F.
i
If you change the route type setting during
active route guidance, COMAND calculates
a new route. If you change the setting when
route guidance is inactive, COMAND uses
the new setting for the next route guidance.
Setting route mode
With this function you can select the following
options for route calculation:
R Minimize Highways
R Minimize Toll Roads
R Minimize Tunnels
R Minimize Ferries
R Minimize Motorail Trains
XSelect Navi 0054 Mode .
The mode list appears.XSwitching mode on or off: Select desired
modes.
Depending on the previous status, the
mode is switched on or off. A checkmark
indicates that the mode is switched on. It
is possible to switch on more than one
mode.XExiting menu: Slide 009E005B 009F or press back
button 0041 in the center console
( Y page 87).
COMAND will verify whether it can
incorporate the modes if you select them
with route guidance active.
If possible, COMAND calculates a new
route considering the selected options.
If the route cannot be recalculated with the
selected options, a message appears and
an announcement is made. COMAND
calculates a new route. Only options that
are possible will be considered.
Displaying highway information
When this function is enabled, highway
information ahead will display automatically
( Y page 137).
Audio fadeout
XSelect Navi 0054 Audio Fadeout .
When the check box is checked 0069 the
volume of the current audio source fades
during a navigation announcement.
COMAND navigation system
(entering a destination)
Introduction
GWarning!
For safety reasons, only enter a new
destination when the vehicle is stationary.
106COMAND navigation system (entering a destination)Control systems
221_AKB; 6; 20, en-USd2ugruen,Version: 2.11.8.12009-09-24T13:28:17+02:00 - Seite 106
Page 136 of 548
Off-road and off-map
Route guidance to an off-road
destination
GWarning!
The COMAND navigation system may direct
you to off-road routes that your vehicle may
not be capable of traversing through without
damaging your tires, wheels or vehicle. It is
the driver’s sole responsibility to determine
the suitability of the route. Off-road routes
may be of varying conditions and their
appropriateness for use may be affected by
various factors such as time of day, time of
year and immediate weather conditions that
cannot be judged or taken into consideration
by the COMAND system.
COMAND can guide you to destinations
within the area covered by the digital map,
even if a destination is not located at a road
known to the system.
These destinations are shown as off-road
destinations, which you can enter using the
map, for example. In these cases, COMAND
guides you for as long as possible with
navigation announcements and displays on
roads known to the system.
Shortly before you reach the last known the
point to leave the digitized road network, you
will hear the announcement The
destination is nearby. Follow the
arrow on the display.
You will then see an arrow that indicates the
direction to the off-road destination. When
the off-road destination is close to the road,
Area of dest. reached appears in addition
below the arrow.
The section of the route from the last known
point on the map to the off-road destination
is indicated with a dashed line after a certain
length. It simply shows the direction to the
off-road destination without taking account of
any type of obstacles in the way.
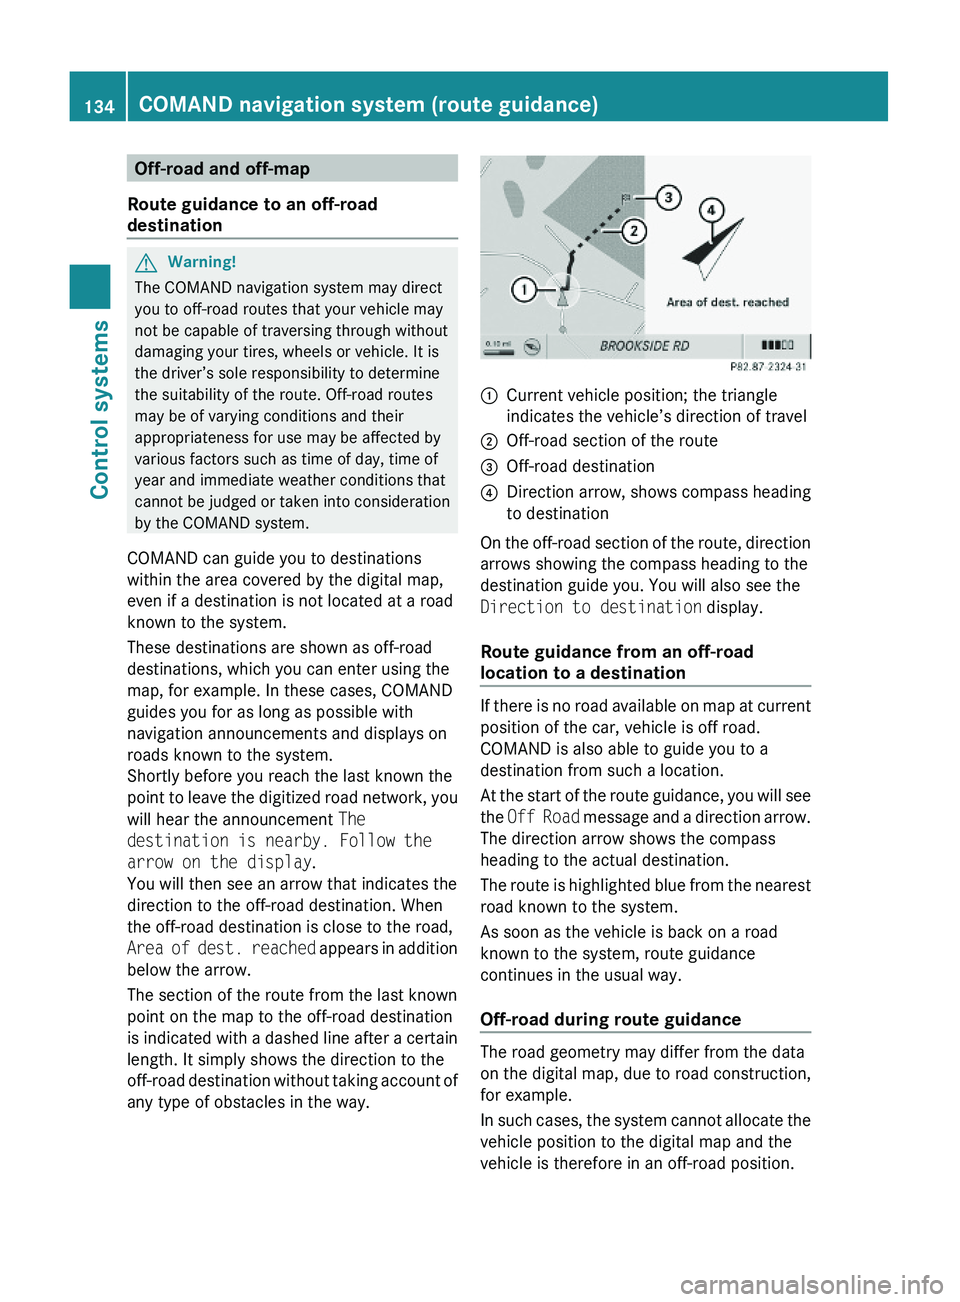
\000FCurrent vehicle position; the triangle
indicates the vehicle’s direction of travel
\000GOff-road section of the route\000
Page 142 of 548
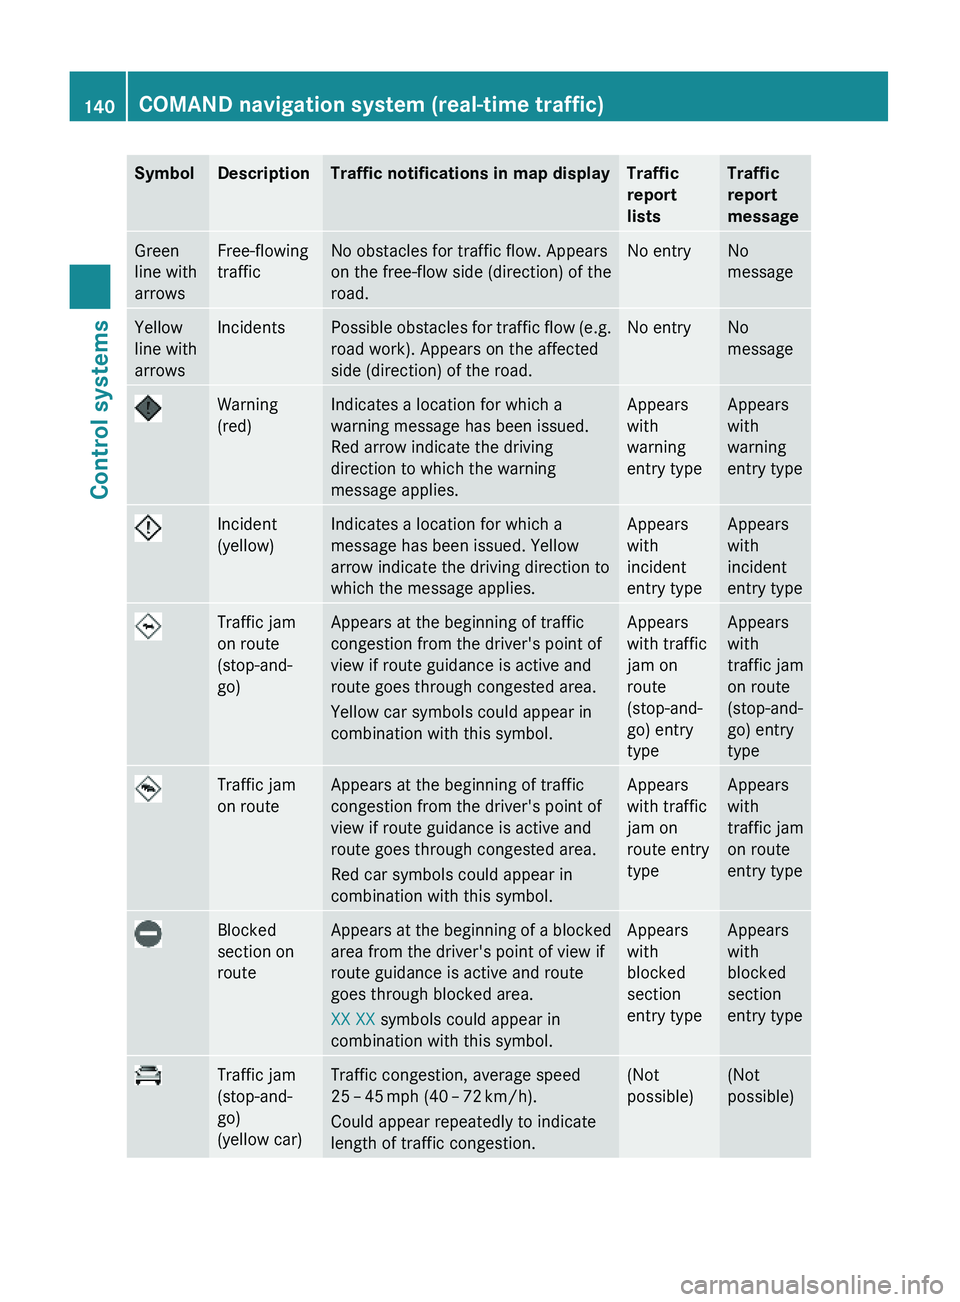
SymbolDescriptionTraffic notifications in map displayTraffic
report
lists
Traffic
report
message
Green
line with
arrows
Free-flowing
traffic
No obstacles for traffic flow. Appears
on the free-flow side (direction) of the
road.
No entryNo
message
Yellow
line with
arrows
IncidentsPossible obstacles for traffic flow (e.g.
road work). Appears on the affected
side (direction) of the road.
No entryNo
message
Warning
(red)
Indicates a location for which a
warning message has been issued.
Red arrow indicate the driving
direction to which the warning
message applies.
Appears
with
warning
entry type
Appears
with
warning
entry type
Incident
(yellow)
Indicates a location for which a
message has been issued. Yellow
arrow indicate the driving direction to
which the message applies.
Appears
with
incident
entry type
Appears
with
incident
entry type
Traffic jam
on route
(stop-and-
go)
Appears at the beginning of traffic
congestion from the driver's point of
view if route guidance is active and
route goes through congested area.
Yellow car symbols could appear in
combination with this symbol.
Appears
with traffic
jam on
route
(stop-and-
go) entry
type
Appears
with
traffic jam
on route
(stop-and-
go) entry
type
Traffic jam
on route
Appears at the beginning of traffic
congestion from the driver's point of
view if route guidance is active and
route goes through congested area.
Red car symbols could appear in
combination with this symbol.
Appears
with traffic
jam on
route entry
type
Appears
with
traffic jam
on route
entry type
Blocked
section on
route
Appears at the beginning of a blocked
area from the driver's point of view if
route guidance is active and route
goes through blocked area.
XX XX symbols could appear in
combination with this symbol.
Appears
with
blocked
section
entry type
Appears
with
blocked
section
entry type
Traffic jam
(stop-and-
go)
(yellow car)
Traffic congestion, average speed
25 – 45 mph (40 – 72 km/h).
Could appear repeatedly to indicate
length of traffic congestion.
(Not
possible)
(Not
possible)
140COMAND navigation system (real-time traffic)Control systems
221_AKB; 6; 20, en-USd2ugruen,Version: 2.11.8.12009-09-24T13:28:17+02:00 - Seite 140
Page 143 of 548
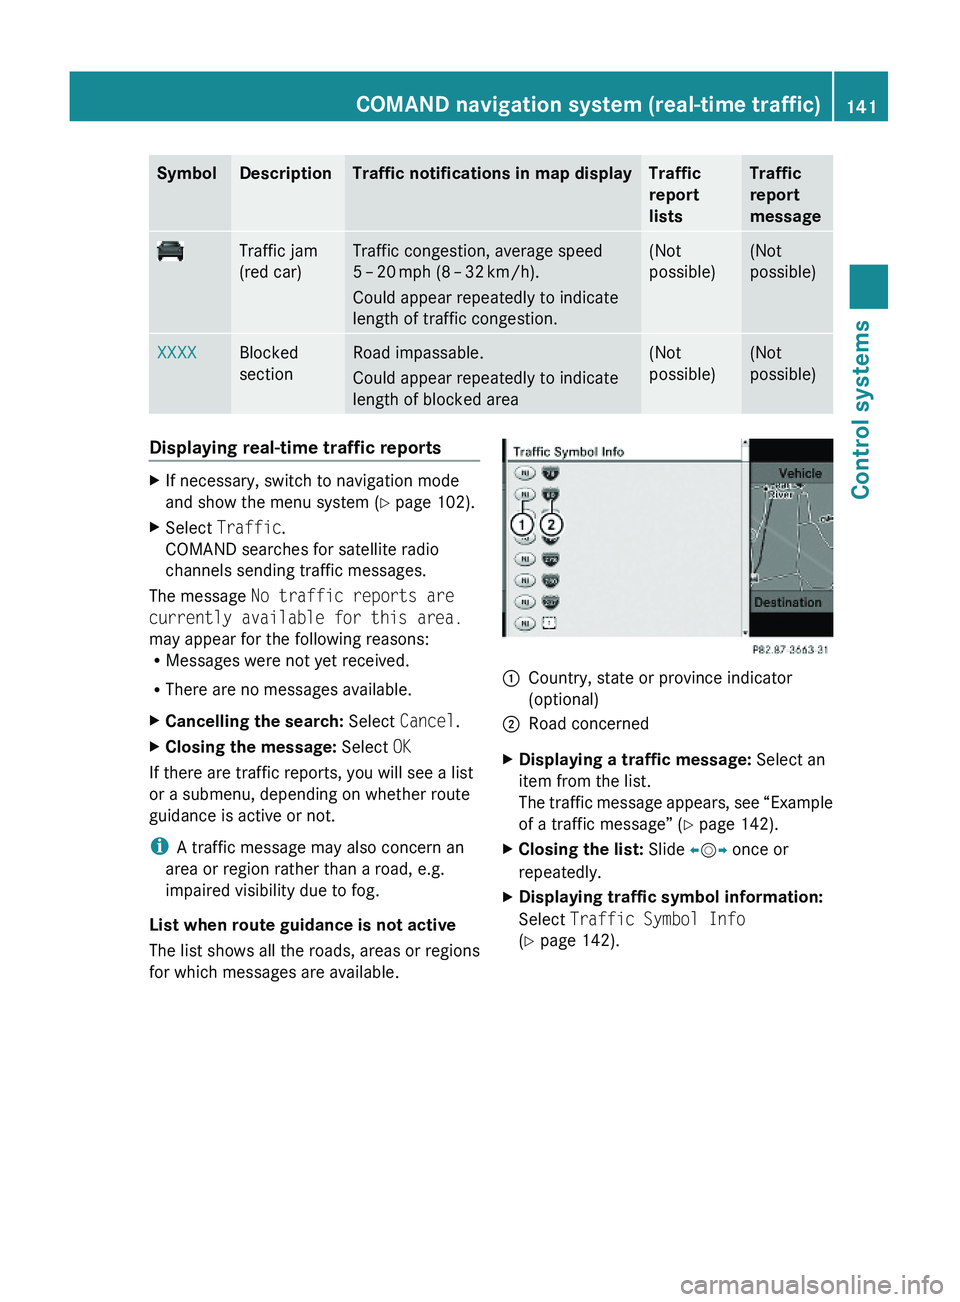
SymbolDescriptionTraffic notifications in map displayTraffic
report
lists
Traffic
report
message
Traffic jam
(red car)
Traffic congestion, average speed
5 – 20 mph (8 – 32 km/h).
Could appear repeatedly to indicate
length of traffic congestion.
(Not
possible)
(Not
possible)
XXXXBlocked
section
Road impassable.
Could appear repeatedly to indicate
length of blocked area
(Not
possible)
(Not
possible)
Displaying real-time traffic reportsXIf necessary, switch to navigation mode
and show the menu system (Y page 102).
XSelect Traffic.
COMAND searches for satellite radio
channels sending traffic messages.
The message No traffic reports are
currently available for this area.
may appear for the following reasons:RMessages were not yet received.
RThere are no messages available.
XCancelling the search: Select Cancel.XClosing the message: Select OK
If there are traffic reports, you will see a list
or a submenu, depending on whether route
guidance is active or not.
iA traffic message may also concern an
area or region rather than a road, e.g.
impaired visibility due to fog.
List when route guidance is not active
The list shows all the roads, areas or regions
for which messages are available.
1Country, state or province indicator
(optional)
2Road concernedXDisplaying a traffic message: Select an
item from the list.
The traffic message appears, see “Example
of a traffic message” (Y page 142).
XClosing the list: Slide \000
Page 324 of 548
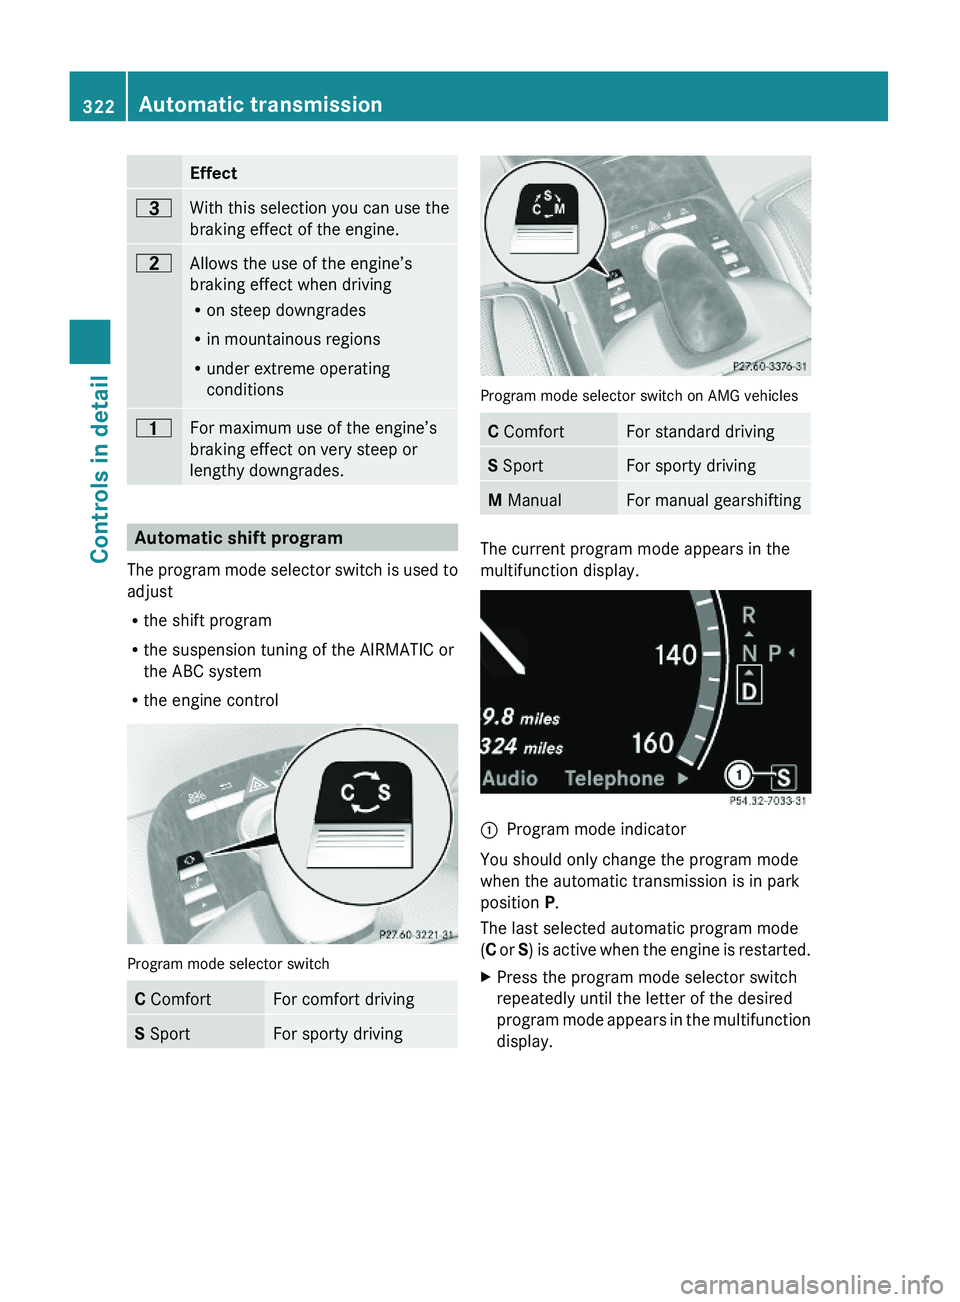
Effect\000@With this selection you can use the
braking effect of the engine.
\0008Allows the use of the engine’s
braking effect when driving
Ron steep downgrades
Rin mountainous regions
Runder extreme operating
conditions
\0007For maximum use of the engine’s
braking effect on very steep or
lengthy downgrades.
Automatic shift program
The program mode selector switch is used to
adjust
Rthe shift program
Rthe suspension tuning of the AIRMATIC or
the ABC system
Rthe engine control
Program mode selector switch
C ComfortFor comfort drivingS SportFor sporty driving
Program mode selector switch on AMG vehicles
C ComfortFor standard drivingS SportFor sporty drivingM ManualFor manual gearshifting
The current program mode appears in the
multifunction display.
\000FProgram mode indicator
You should only change the program mode
when the automatic transmission is in park
position P.
The last selected automatic program mode
(C or S) is active when the engine is restarted.
XPress the program mode selector switch
repeatedly until the letter of the desired
program mode appears in the multifunction
display.
322Automatic transmissionControls in detail
221_AKB; 6; 20, en-USd2ugruen,Version: 2.11.8.12009-09-24T13:28:17+02:00 - Seite 322
Page 400 of 548
Reprogramming a single signal
transmitter button
To program a device using a signal
transmitter button previously trained, follow
these steps:
XSwitch on the ignition.XPress and hold the desired signal
transmitter button ( 0047, 008A or 0088). Do not
release the button.
Indicator lamp 0046 will begin to flash after
20 seconds.XWithout releasing the signal transmitter
button, proceed with programming starting
with step 3.
Operation of integrated remote control
XSwitch on the ignition.XSelect and press the appropriate
integrated signal transmitter button ( 0047,
008A or 0088) to activate the remote controlled
device.
The integrated remote control transmitter
continues to send the signal as long as the
button is pressed – up to 20 seconds.
Erasing the integrated remote control
memory
i If you sell your vehicle, erase the codes of
all three channels.
XSwitch on the ignition.XSimultaneously press and hold outer signal
transmitter buttons 0047 and 0088, for
approximately 20 seconds, until indicator
lamp 0046 flashes rapidly. Do not hold for
longer than 30 seconds.
The codes of all three channels are erased.Programming tips
If you are having difficulty programming the
integrated remote control, here are some
helpful tips:
R Check the frequency of hand-held remote
control 0086 (typically located on the reverse
side of the remote). The integrated remote
control is compatible with radio-frequency
devices operating between 280-390 MHz.
R Put a new battery in hand-held remote
control 0086. This will increase the likelihood
of the hand-held remote control sending a
stronger and more accurate signal to the
integrated remote control.
R While performing step 3, hold hand-held
remote control 0086 at different lengths and
angles from the signal transmitter button
( 0047 , 008A or 0088) you are programming.
Attempt varying angles at the distance of 2
to 12 inches (5 to 30 cm) away or the same
angle at varying distances.
R If another hand-held remote control is
available for the same device, try the
programming steps again using that other
hand-held remote control. Make sure new
batteries are in the hand-held remote
control before beginning the procedure.
R Straighten the antenna wire from the
garage door opener assembly. This may
help improve transmitting and/or receiving
signals.
i Certain types of garage door openers are
incompatible with the integrated remote
control. If you should experience further
difficulties with programming the
integrated remote control, contact an
authorized Mercedes-Benz Center, or call
the Mercedes-Benz Customer Assistance
Center (USA only) at
1-800-FOR-MERCedes (1-800-367-6372),
or the HomeLink ®
Hotline (USA only) at
1-800-355-3515, or the Customer Service
(Canada only) at 1-800-387-0100.
398Useful featuresControls in detail
221_AKB; 6; 20, en-USd2ugruen,Version: 2.11.8.12009-09-24T13:28:17+02:00 - Seite 398
Page 436 of 548
GWarning!
The outside temperature indicator is not
designed to serve as an ice-warning device
and is therefore unsuitable for that purpose.
Indicated temperatures just above the
freezing point do not guarantee that the road
surface is free of ice. The road may still be icy,
especially in wooded areas or on bridges.
GWarning!
On slippery road surfaces, never downshift in
order to obtain braking action. This could
result in drive wheel slip and reduced vehicle
control. Your vehicle’s ABS will not prevent
this type of loss of control.
The most important rule for slippery or icy
roads is to drive sensibly and to avoid abrupt
acceleration, braking and steering
maneuvers. Do not use the cruise control or
DISTRONIC PLUS system under such
conditions.
When the vehicle is in danger of skidding, shift
the automatic transmission to neutral
position N. Try to keep the vehicle under
control by corrective steering action.
i For information on driving with snow
chains, see “Snow chains” ( Y page 433).
Road salts and chemicals can adversely
affect braking efficiency. Increased pedal
force may become necessary to produce the
normal brake effect.
Depressing the brake pedal periodically when
traveling at length on salt-strewn roads can
bring road-salt-impaired braking efficiency
back to normal.
If the vehicle is parked after being driven on
salt-treated roads, the braking efficiency
should be tested as soon as possible after
driving is resumed.
GWarning!
Make sure not to endanger any other road
users when carrying out these braking
maneuvers.
Driving instructions
Drive sensibly – save fuel
To save fuel you should:
R Keep tires at the recommended inflation
pressures.
R Remove unnecessary loads.
R Remove roof rack when not in use.
R Allow engine to warm up under low load
use.
R Avoid frequent acceleration and
deceleration.
R Have all maintenance work performed at
the intervals specified in the Maintenance
Booklet and as required by the
Maintenance system. Contact an
authorized Mercedes-Benz Center.
Fuel consumption is also increased by driving
in cold weather, in stop-and-go traffic, on
short trips and in mountainous areas.
Drinking and driving
GWarning!
Drinking and driving and/or taking drugs and
driving are very dangerous combinations.
Even a small amount of alcohol or drugs can
affect your reflexes, perceptions and
judgment.
The possibility of a serious or even fatal
accident are greatly increased when you drink
or take drugs and drive.
Do not drink or take drugs and drive or allow
anyone to drive who has been drinking or
taking drugs.
Pedals
GWarning!
Make sure absolutely no objects are
obstructing the pedals’ range of movement.
Keep the driver’s footwell clear of all
434Driving instructionsOperation
221_AKB; 6; 20, en-USd2ugruen,Version: 2.11.8.12009-09-24T13:28:17+02:00 - Seite 434
Page 513 of 548
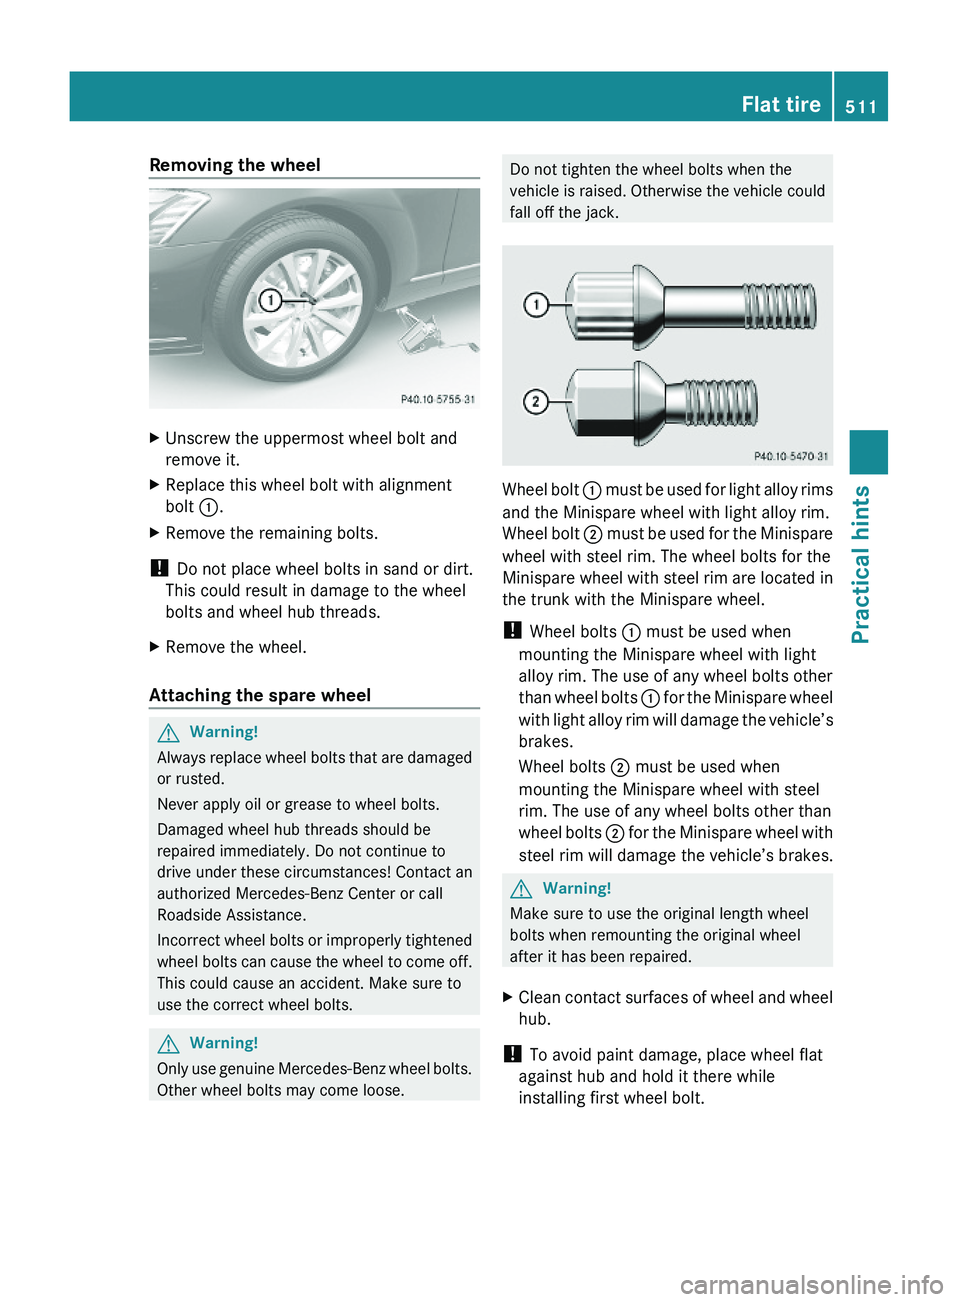
Removing the wheelXUnscrew the uppermost wheel bolt and
remove it.
XReplace this wheel bolt with alignment
bolt \000F.
XRemove the remaining bolts.
! Do not place wheel bolts in sand or dirt.
This could result in damage to the wheel
bolts and wheel hub threads.
XRemove the wheel.
Attaching the spare wheel
GWarning!
Always replace wheel bolts that are damaged
or rusted.
Never apply oil or grease to wheel bolts.
Damaged wheel hub threads should be
repaired immediately. Do not continue to
drive under these circumstances! Contact an
authorized Mercedes-Benz Center or call
Roadside Assistance.
Incorrect wheel bolts or improperly tightened
wheel bolts can cause the wheel to come off.
This could cause an accident. Make sure to
use the correct wheel bolts.
GWarning!
Only use genuine Mercedes-Benz wheel bolts.
Other wheel bolts may come loose.
Do not tighten the wheel bolts when the
vehicle is raised. Otherwise the vehicle could
fall off the jack.
Wheel bolt \000F must be used for light alloy rims
and the Minispare wheel with light alloy rim.
Wheel bolt \000G must be used for the Minispare
wheel with steel rim. The wheel bolts for the
Minispare wheel with steel rim are located in
the trunk with the Minispare wheel.
! Wheel bolts \000F must be used when
mounting the Minispare wheel with light
alloy rim. The use of any wheel bolts other
than wheel bolts \000F for the Minispare wheel
with light alloy rim will damage the vehicle’s
brakes.
Wheel bolts \000G must be used when
mounting the Minispare wheel with steel
rim. The use of any wheel bolts other than
wheel bolts \000G for the Minispare wheel with
steel rim will damage the vehicle’s brakes.
GWarning!
Make sure to use the original length wheel
bolts when remounting the original wheel
after it has been repaired.
XClean contact surfaces of wheel and wheel
hub.
! To avoid paint damage, place wheel flat
against hub and hold it there while
installing first wheel bolt.
Flat tire511Practical hints221_AKB; 6; 20, en-USd2ugruen,Version: 2.11.8.12009-09-24T13:28:17+02:00 - Seite 511Z