2010 MERCEDES-BENZ R320 belt
[x] Cancel search: beltPage 139 of 364
Vehicle submenu
Access the
Vehicle submenu via the
Settings menu. Use the Vehicle submenu
to set the automatic central locking.
Switching automatic central locking on or
off
Use this function to switch the automatic
central locking on or off. With the automatic
central locking activated, the vehicle is
locked centrally at a vehicle speed of
approximately 9 mph (15 km/h).
X Press button V or U repeatedly until
the Settings menu appears in the
multifunction display.
X Press button &.
X Move the selection marker with button
W or X to the Vehicle submenu.
X Press button & or * repeatedly until
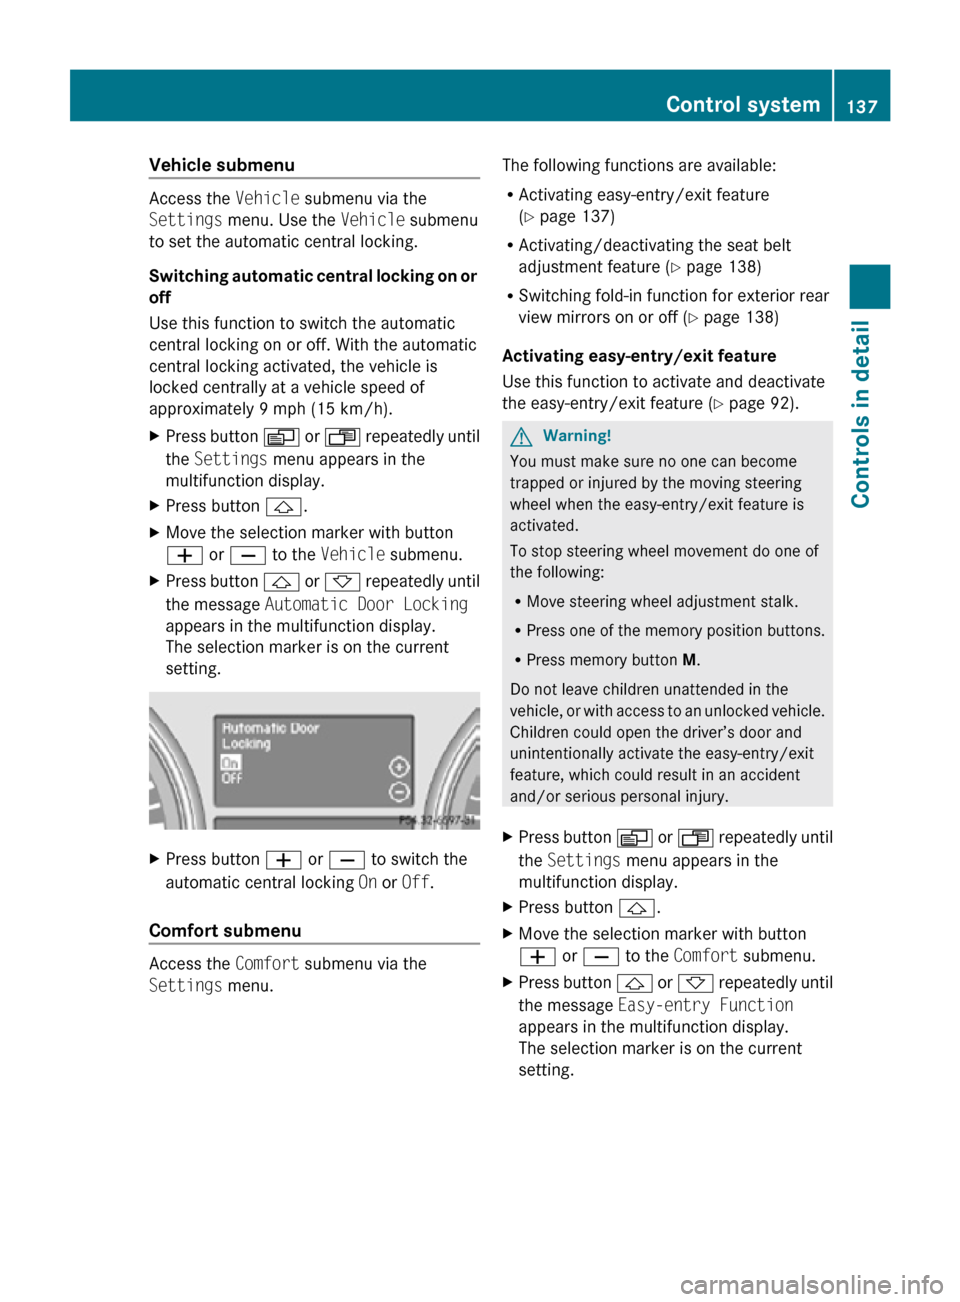
the message Automatic Door Locking
appears in the multifunction display.
The selection marker is on the current
setting. X
Press button W or X to switch the
automatic central locking On or Off.
Comfort submenu Access the
Comfort submenu via the
Settings menu. The following functions are available:
R
Activating easy-entry/exit feature
(Y page 137)
R Activating/deactivating the seat belt
adjustment feature (Y page 138)
R Switching fold-in function for exterior rear
view mirrors on or off (Y page 138)
Activating easy-entry/exit feature
Use this function to activate and deactivate
the easy-entry/exit feature (Y page 92). G
Warning!
You must make sure no one can become
trapped or injured by the moving steering
wheel when the easy-entry/exit feature is
activated.
To stop steering wheel movement do one of
the following:
R Move steering wheel adjustment stalk.
R Press one of the memory position buttons.
R Press memory button M.
Do not leave children unattended in the
vehicle, or with access to an unlocked vehicle.
Children could open the driver’s door and
unintentionally activate the easy-entry/exit
feature, which could result in an accident
and/or serious personal injury.
X Press button V or U repeatedly until
the Settings menu appears in the
multifunction display.
X Press button &.
X Move the selection marker with button
W or X to the Comfort submenu.
X Press button & or * repeatedly until
the message Easy-entry Function
appears in the multifunction display.
The selection marker is on the current
setting. Control system
137Controls in detail
251_AKB; 4; 52, en-US
d2ureepe, Version: 2.11.8.1 2009-03-23T09:22:52+01:00 - Seite 137 Z
Page 140 of 364
X
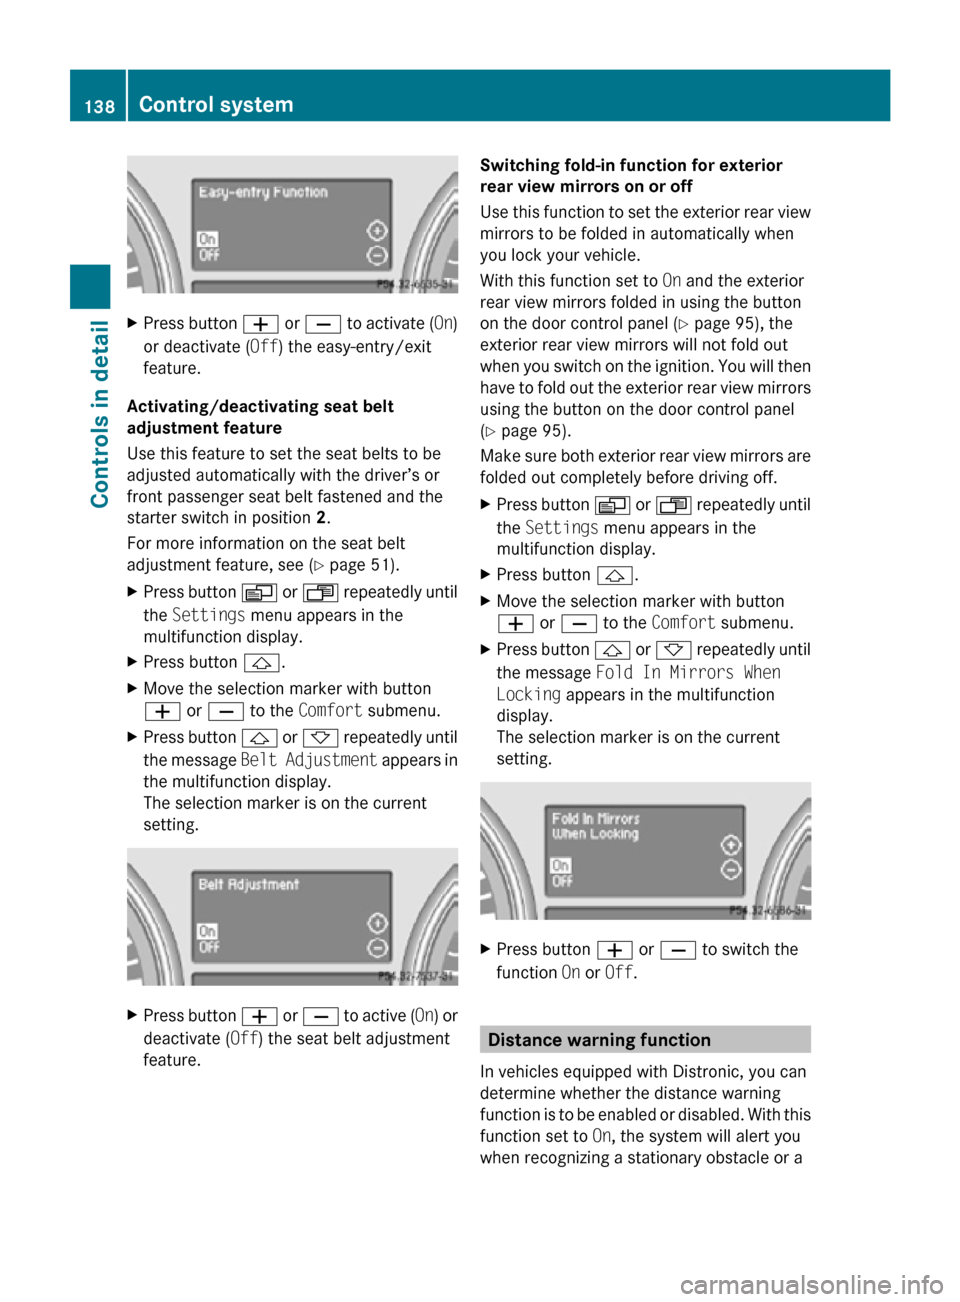
Press button W or X to activate ( On)
or deactivate (Off) the easy-entry/exit
feature.
Activating/deactivating seat belt
adjustment feature
Use this feature to set the seat belts to be
adjusted automatically with the driver’s or
front passenger seat belt fastened and the
starter switch in position 2.
For more information on the seat belt
adjustment feature, see ( Y page 51).
X Press button V or U repeatedly until
the Settings menu appears in the
multifunction display.
X Press button &.
X Move the selection marker with button
W or X to the Comfort submenu.
X Press button & or * repeatedly until
the message Belt Adjustment appears in
the multifunction display.
The selection marker is on the current
setting. X
Press button W or X to active ( On) or
deactivate (Off) the seat belt adjustment
feature. Switching fold-in function for exterior
rear view mirrors on or off
Use this function to set the exterior rear view
mirrors to be folded in automatically when
you lock your vehicle.
With this function set to
On and the exterior
rear view mirrors folded in using the button
on the door control panel ( Y page 95), the
exterior rear view mirrors will not fold out
when you switch on the ignition. You will then
have to fold out the exterior rear view mirrors
using the button on the door control panel
(Y page 95).
Make sure both exterior rear view mirrors are
folded out completely before driving off.
X Press button V or U repeatedly until
the Settings menu appears in the
multifunction display.
X Press button &.
X Move the selection marker with button
W or X to the Comfort submenu.
X Press button & or * repeatedly until
the message Fold In Mirrors When
Locking appears in the multifunction
display.
The selection marker is on the current
setting. X
Press button W or X to switch the
function On or Off. Distance warning function
In vehicles equipped with Distronic, you can
determine whether the distance warning
function is to be enabled or disabled. With this
function set to On, the system will alert you
when recognizing a stationary obstacle or a 138
Control systemControls in detail
251_AKB; 4; 52, en-US
d2ureepe,
Version: 2.11.8.1 2009-03-23T09:22:52+01:00 - Seite 138
Page 183 of 364
X
Switch on the ignition.
X Switching on: Press button ª on the
respective climate control panel.
The
indicator lamp in the button comes on.
X Switching off: Press button ª again.
The rear window defroster switches off when
the battery voltage is too low. The indicator
lamp in button ª flashes. Too many
electrical consumers may be operating
simultaneously.
X Switch off consumers that are currently not
needed if required. Power tilt/sliding sunroof
Opening and closing
G
Observe Safety notes, see page 55. G
Warning!
When opening or closing the tilt/sliding
sunroof, make sure there is no danger of
anyone
being harmed by the opening/closing
procedure.
The tilt/sliding sunroof is equipped with the
express operation and automatic reversal
function. If the movement of the tilt/sliding
sunroof is blocked during the closing
procedure, the tilt/sliding sunroof will stop
and open slightly.
The tilt/sliding sunroof operates differently
when the sunroof switch is pressed and held.
See the “Closing when the tilt/sliding sunroof
is blocked” section for details.
The opening/closing procedure of the tilt/
sliding sunroof can be immediately halted by
releasing the sunroof switch or, if the sunroof
switch was moved past the resistance point
and released, by moving the sunroof switch in
any direction. G
Warning!
The tilt/sliding sunroof is made out of glass.
In the event of an accident, the glass may shatter. This may result in an opening in the
roof.
In a vehicle rollover, occupants not wearing
their seat belts or not wearing them properly
may be thrown out of the opening. Such an
opening
also presents a potential for injury for
occupants wearing their seat belts properly as
entire body parts or portions of them may
protrude from the passenger compartment.
! To avoid damaging the seals, do not
transport any objects with sharp edges
which can stick out of the tilt/sliding
sunroof.
Do not open the tilt/sliding sunroof if there
is snow or ice on the roof, as this could
result in malfunctions.
If you cannot open or close the tilt/sliding
sunroof due to a malfunction contact
Roadside Assistance or an authorized
Mercedes-Benz Center.
! Please keep in mind that weather
conditions can sometimes change rapidly.
Make sure to close the tilt/sliding sunroof
when leaving the vehicle. If water enters
the vehicle interior, vehicle electronics
could be damaged which is not covered by
the Mercedes-Benz Limited Warranty.
i You can also open or close the tilt/sliding
sunroof using the SmartKey or the
KEYLESS-GO function, see “Summer
opening feature” ( Y page 108) and
“Convenience closing feature”
(Y page 108).
i After switching off the ignition or
removing the SmartKey from the starter
switch, you can operate the tilt/sliding
sunroof until you open the driver’s or front
passenger door. If no door was opened you
can operate the tilt/sliding sunroof for up
to 5 minutes. Power tilt/sliding sunroof
181
Controls in detail
251_AKB; 4; 52, en-US
d2ureepe, Version: 2.11.8.1 2009-03-23T09:22:52+01:00 - Seite 181 Z
Page 186 of 364
Panorama roof with power tilt/
sliding panel
Extending and retracting the roller
sunblinds
The roller sunblinds only operate with the tilt/
sliding panel closed. The front and rear roller
sunblind cannot be operated individually. G
Warning!
When extending the roller sunblinds, make
sure no one is in danger of being injured by
the extending procedure. The extending of the
roller sunblinds can be immediately halted by
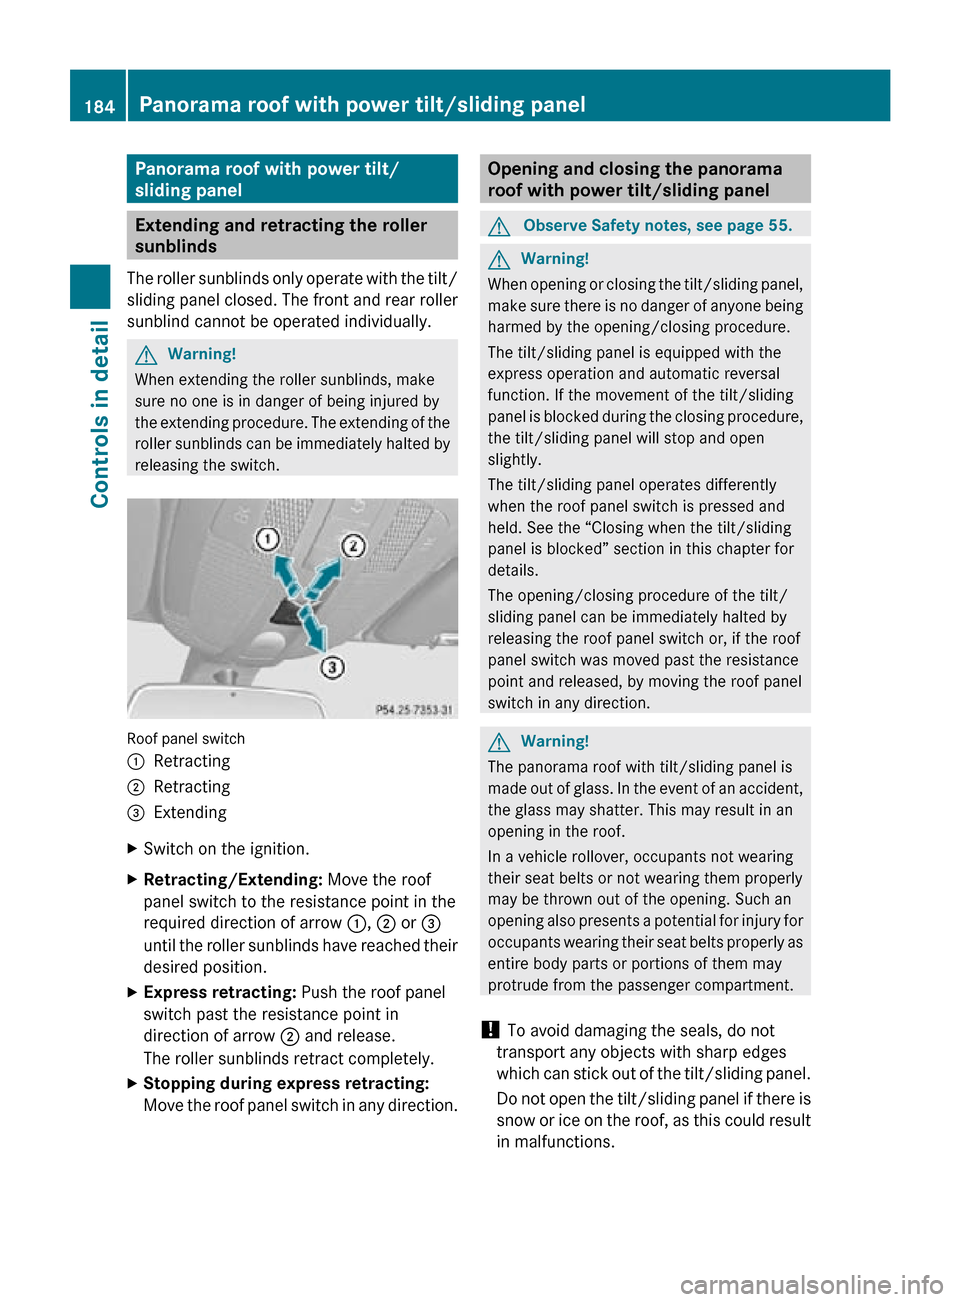
releasing the switch. Roof panel switch
:
Retracting
; Retracting
= Extending
X Switch on the ignition.
X Retracting/Extending: Move the roof
panel switch to the resistance point in the
required direction of arrow :, ; or =
until the roller sunblinds have reached their
desired position.
X Express retracting: Push the roof panel
switch past the resistance point in
direction of arrow ; and release.
The roller sunblinds retract completely.
X Stopping during express retracting:
Move the roof panel switch in any direction. Opening and closing the panorama
roof with power tilt/sliding panel
G
Observe Safety notes, see page 55. G
Warning!
When opening or closing the tilt/sliding panel,
make sure there is no danger of anyone being
harmed by the opening/closing procedure.
The tilt/sliding panel is equipped with the
express operation and automatic reversal
function. If the movement of the tilt/sliding
panel is blocked during the closing procedure,
the tilt/sliding panel will stop and open
slightly.
The tilt/sliding panel operates differently
when the roof panel switch is pressed and
held. See the “Closing when the tilt/sliding
panel is blocked” section in this chapter for
details.
The opening/closing procedure of the tilt/
sliding panel can be immediately halted by
releasing the roof panel switch or, if the roof
panel switch was moved past the resistance
point and released, by moving the roof panel
switch in any direction. G
Warning!
The panorama roof with tilt/sliding panel is
made out of glass. In the event of an accident,
the glass may shatter. This may result in an
opening in the roof.
In a vehicle rollover, occupants not wearing
their seat belts or not wearing them properly
may be thrown out of the opening. Such an
opening also presents a potential for injury for
occupants wearing their seat belts properly as
entire body parts or portions of them may
protrude from the passenger compartment.
! To avoid damaging the seals, do not
transport any objects with sharp edges
which can stick out of the tilt/sliding panel.
Do not open the tilt/sliding panel if there is
snow or ice on the roof, as this could result
in malfunctions. 184
Panorama roof with power tilt/sliding panelControls in detail
251_AKB; 4; 52, en-US
d2ureepe,
Version: 2.11.8.1 2009-03-23T09:22:52+01:00 - Seite 184
Page 192 of 364
Expanding cargo volume in part
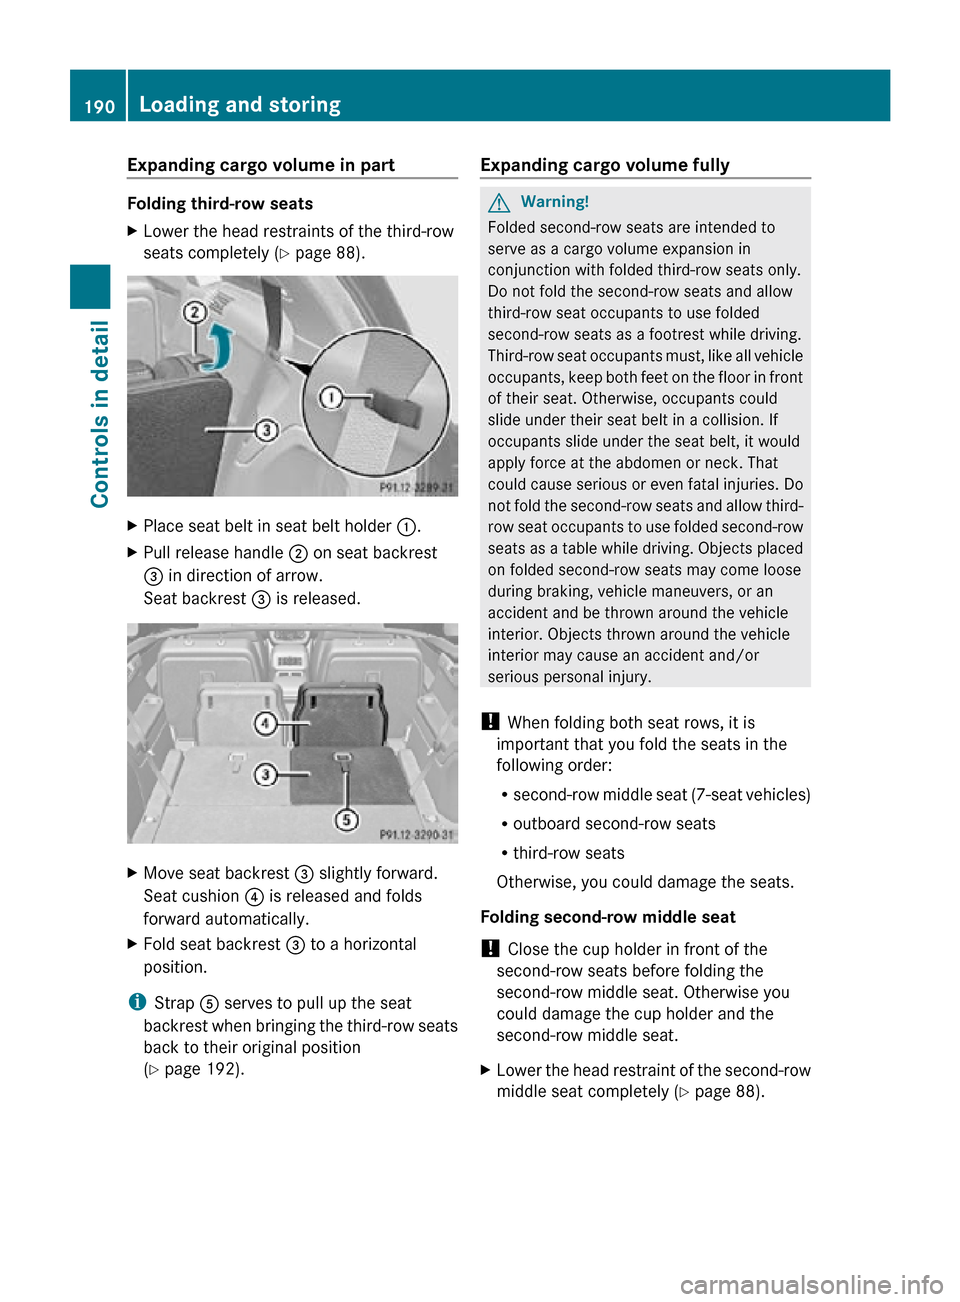
Folding third-row seats
X
Lower the head restraints of the third-row
seats completely ( Y page 88).X
Place seat belt in seat belt holder :.
X Pull release handle ; on seat backrest
= in direction of arrow.
Seat backrest = is released. X
Move seat backrest = slightly forward.
Seat cushion ? is released and folds
forward automatically.
X Fold seat backrest = to a horizontal
position.
i Strap A serves to pull up the seat
backrest when bringing the third-row seats
back to their original position
(Y page 192). Expanding cargo volume fully G
Warning!
Folded second-row seats are intended to
serve as a cargo volume expansion in
conjunction with folded third-row seats only.
Do not fold the second-row seats and allow
third-row seat occupants to use folded
second-row seats as a footrest while driving.
Third-row seat occupants must, like all vehicle
occupants, keep both feet on the floor in front
of their seat. Otherwise, occupants could
slide under their seat belt in a collision. If
occupants slide under the seat belt, it would
apply force at the abdomen or neck. That
could cause serious or even fatal injuries. Do
not fold the second-row seats and allow third-
row seat occupants to use folded second-row
seats as a table while driving. Objects placed
on folded second-row seats may come loose
during braking, vehicle maneuvers, or an
accident and be thrown around the vehicle
interior. Objects thrown around the vehicle
interior may cause an accident and/or
serious personal injury.
! When folding both seat rows, it is
important that you fold the seats in the
following order:
R second-row middle seat (7-seat vehicles)
R outboard second-row seats
R third-row seats
Otherwise, you could damage the seats.
Folding second-row middle seat
! Close the cup holder in front of the
second-row seats before folding the
second-row middle seat. Otherwise you
could damage the cup holder and the
second-row middle seat.
X Lower the head restraint of the second-row
middle seat completely ( Y page 88).190
Loading and storingControls in detail
251_AKB; 4; 52, en-US
d2ureepe,
Version: 2.11.8.1 2009-03-23T09:22:52+01:00 - Seite 190
Page 194 of 364
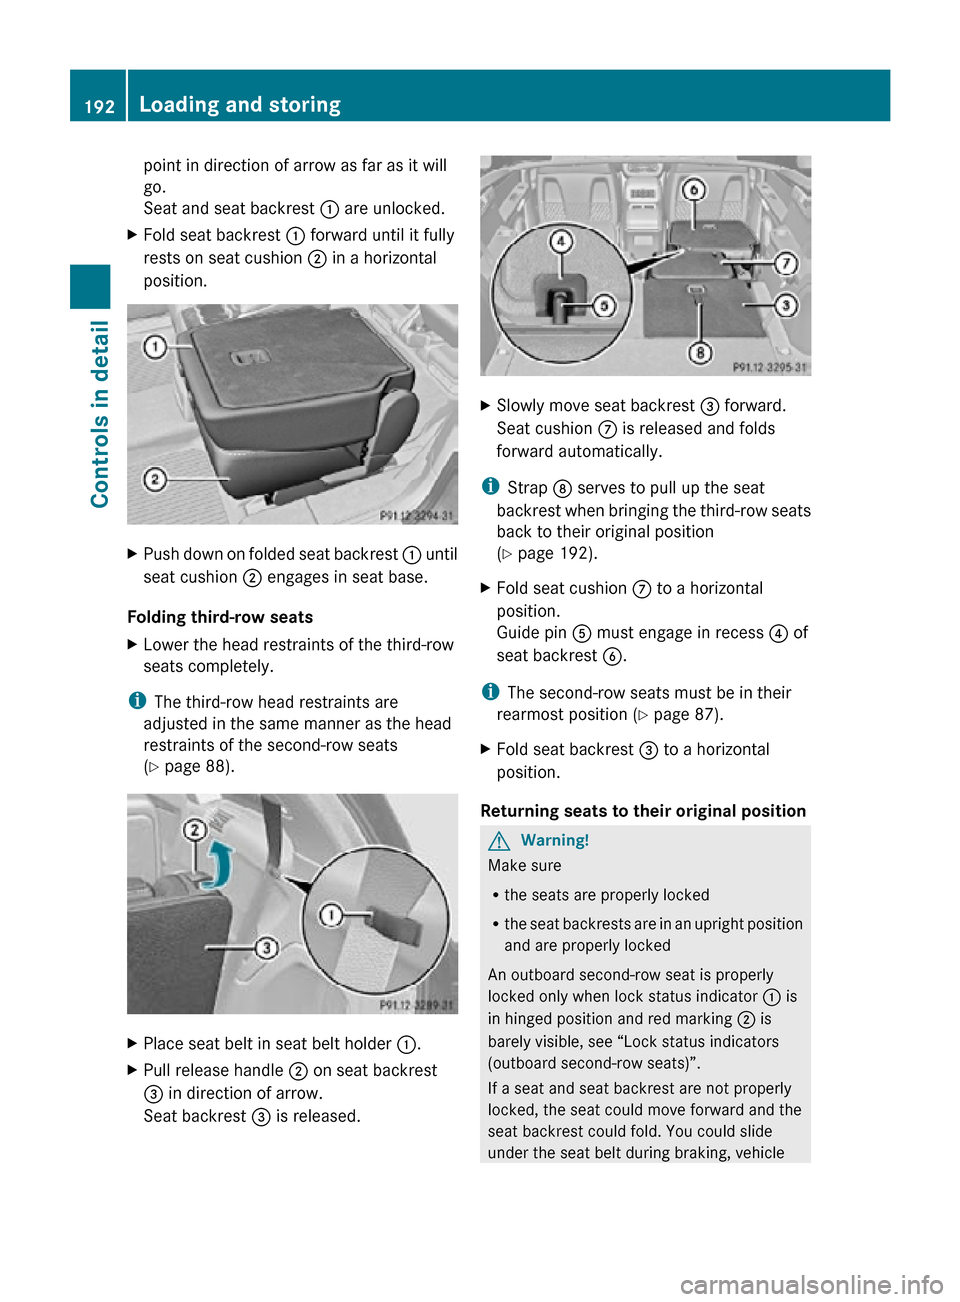
point in direction of arrow as far as it will
go.
Seat and seat backrest
: are unlocked.
X Fold seat backrest : forward until it fully
rests on seat cushion ; in a horizontal
position. X
Push down on folded seat backrest : until
seat cushion ; engages in seat base.
Folding third-row seats
X Lower the head restraints of the third-row
seats completely.
i The third-row head restraints are
adjusted in the same manner as the head
restraints of the second-row seats
(Y page 88). X
Place seat belt in seat belt holder :.
X Pull release handle ; on seat backrest
= in direction of arrow.
Seat backrest = is released. X
Slowly move seat backrest = forward.
Seat cushion C is released and folds
forward automatically.
i Strap D serves to pull up the seat
backrest when bringing the third-row seats
back to their original position
(Y page 192).
X Fold seat cushion C to a horizontal
position.
Guide pin A must engage in recess ? of
seat backrest B.
i The second-row seats must be in their
rearmost position (Y page 87).
X Fold seat backrest = to a horizontal
position.
Returning seats to their original position G
Warning!
Make sure
R the seats are properly locked
R the seat backrests are in an upright position
and are properly locked
An outboard second-row seat is properly
locked only when lock status indicator : is
in hinged position and red marking ; is
barely visible, see “Lock status indicators
(outboard second-row seats)”.
If a seat and seat backrest are not properly
locked, the seat could move forward and the
seat backrest could fold. You could slide
under the seat belt during braking, vehicle 192
Loading and storingControls in detail
251_AKB; 4; 52, en-US
d2ureepe,
Version: 2.11.8.1 2009-03-23T09:22:52+01:00 - Seite 192
Page 195 of 364
maneuvers, or in an accident. If you slide
under it, the belt would apply force at the
abdomen or neck. That could cause serious
or even fatal injuries.
! When returning the seats to their original
position, it is important to proceed in the
following order:
R third-row seats
R outboard second-row seats
R second-row middle seat (7-seat vehicles)
Otherwise, you could damage the seats.
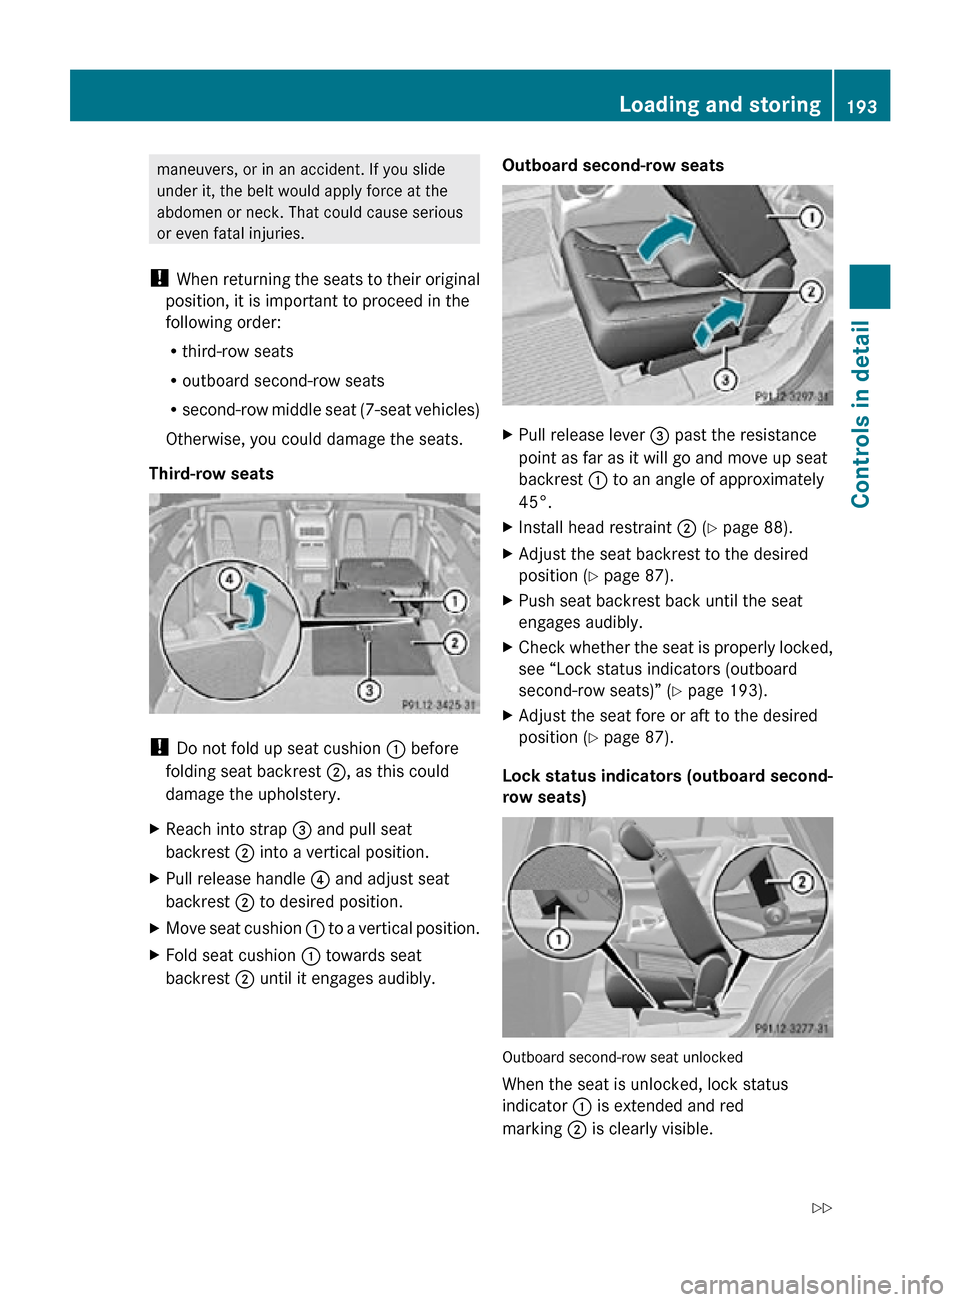
Third-row seats !
Do not fold up seat cushion : before
folding seat backrest ;, as this could
damage the upholstery.
X Reach into strap = and pull seat
backrest ; into a vertical position.
X Pull release handle ? and adjust seat
backrest ; to desired position.
X Move seat cushion : to a vertical position.
X Fold seat cushion : towards seat
backrest ; until it engages audibly. Outboard second-row seats X
Pull release lever = past the resistance
point as far as it will go and move up seat
backrest : to an angle of approximately
45°.
X Install head restraint ; (Y page 88).
X Adjust the seat backrest to the desired
position (Y page 87).
X Push seat backrest back until the seat
engages audibly.
X Check whether the seat is properly locked,
see “Lock status indicators (outboard
second-row seats)” ( Y page 193).
X Adjust the seat fore or aft to the desired
position (Y page 87).
Lock status indicators (outboard second-
row seats) Outboard second-row seat unlocked
When the seat is unlocked, lock status
indicator : is extended and red
marking ; is clearly visible. Loading and storing
193Controls in detail
251_AKB; 4; 52, en-US
d2ureepe, Version: 2.11.8.1 2009-03-23T09:22:52+01:00 - Seite 193 Z
Page 198 of 364
When not in use, you can attach the blind
extensions to the cargo compartment cover
blind.
X
With the cargo compartment cover blind
installed behind third-row seats, insert
extension guide rail A into mounting B.
X Push blind extension into mounting B as
far as it will go. Cargo net
G
Warning!
Make sure the cargo net is properly engaged
at top and bottom position and the tightening
belts are securely fastened.
Never use a damaged cargo net.
Always use cargo net when transporting
cargo. This helps to avoid personal injury from
smaller objects being thrown around in the
occupant compartment during a collision or
sudden maneuver.
The cargo net cannot prevent the movement
of large, heavier objects into the passenger
compartment in an accident. Such items must
be properly secured using the cargo tie-down
rings in the cargo compartment floor.
Passenger use of seats behind installed cargo
net is restricted because of the footwell being
taken up by the net.
Use of the cargo net is a particularly
important safety factor when the vehicle is
loaded higher than the top of the seat
backrests with smaller objects. For your safety, always use the cargo net when
transporting cargo.
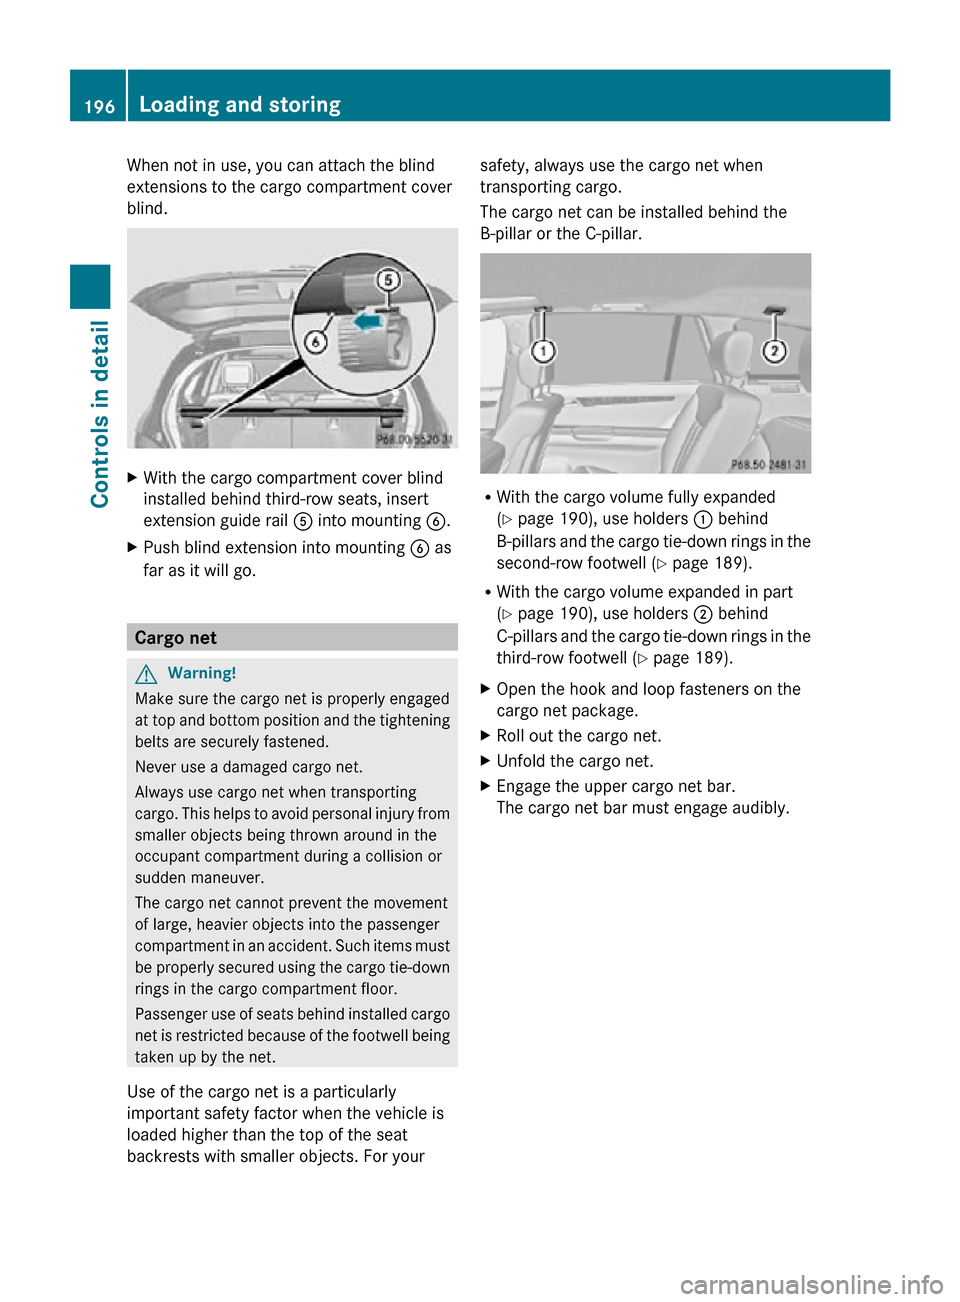
The cargo net can be installed behind the
B-pillar or the C-pillar.
R
With the cargo volume fully expanded
(Y page 190), use holders : behind
B-pillars and the cargo tie-down rings in the
second-row footwell ( Y page 189).
R With the cargo volume expanded in part
(Y page 190), use holders ; behind
C-pillars and the cargo tie-down rings in the
third-row footwell ( Y page 189).
X Open the hook and loop fasteners on the
cargo net package.
X Roll out the cargo net.
X Unfold the cargo net.
X Engage the upper cargo net bar.
The cargo net bar must engage audibly. 196
Loading and storingControls in detail
251_AKB; 4; 52, en-US
d2ureepe,
Version: 2.11.8.1 2009-03-23T09:22:52+01:00 - Seite 196