2010 MERCEDES-BENZ R320 steering
[x] Cancel search: steeringPage 123 of 364
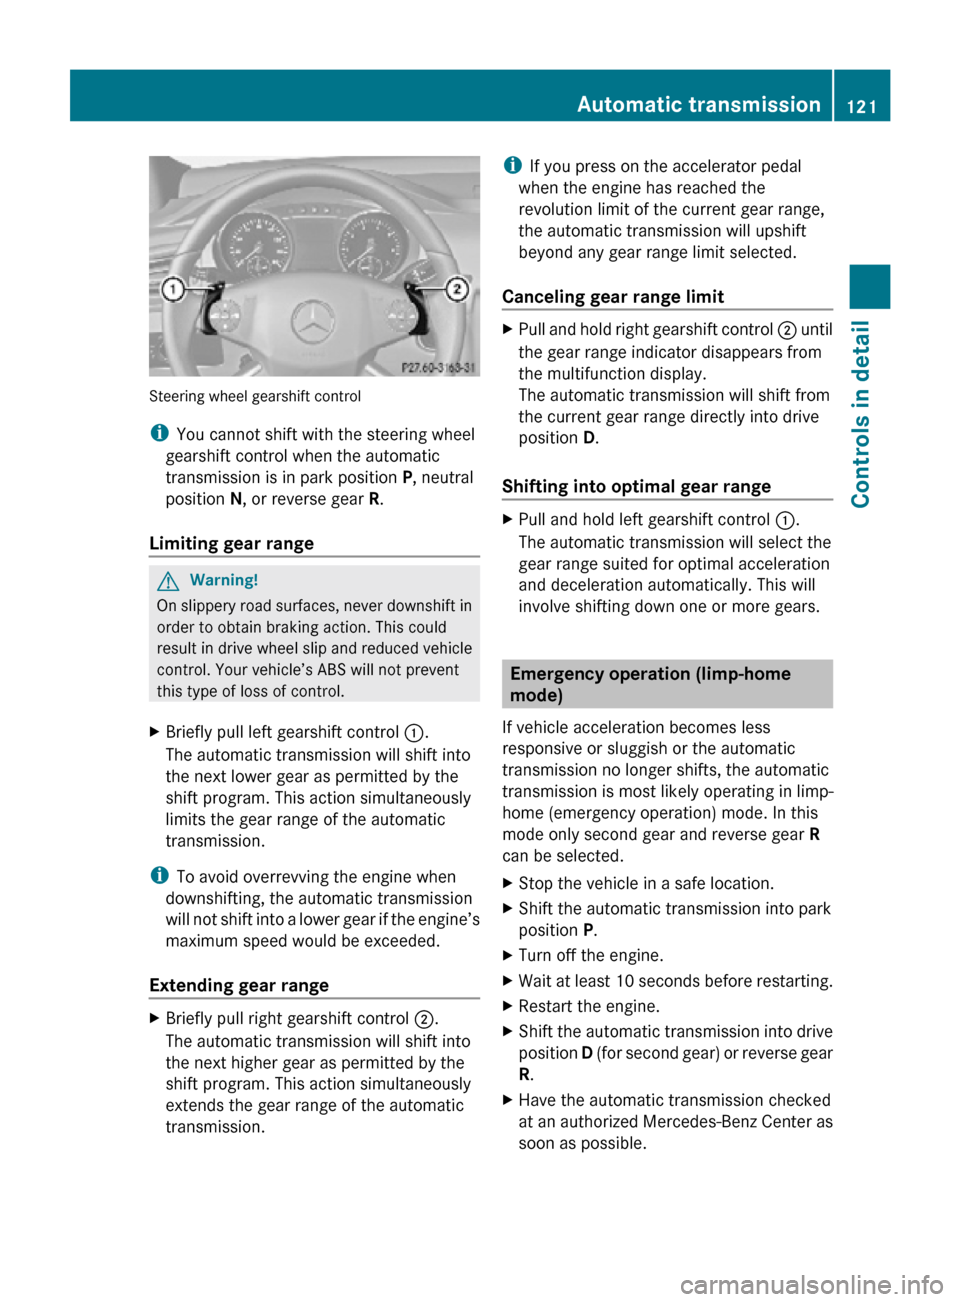
Steering wheel gearshift control
i
You cannot shift with the steering wheel
gearshift control when the automatic
transmission is in park position P, neutral
position N, or reverse gear R.
Limiting gear range G
Warning!
On slippery road surfaces, never downshift in
order to obtain braking action. This could
result in drive wheel slip and reduced vehicle
control. Your vehicle’s ABS will not prevent
this type of loss of control.
X Briefly pull left gearshift control :.
The automatic transmission will shift into
the next lower gear as permitted by the
shift program. This action simultaneously
limits the gear range of the automatic
transmission.
i To avoid overrevving the engine when
downshifting, the automatic transmission
will not shift into a lower gear if the engine’s
maximum speed would be exceeded.
Extending gear range X
Briefly pull right gearshift control ;.
The automatic transmission will shift into
the next higher gear as permitted by the
shift program. This action simultaneously
extends the gear range of the automatic
transmission. i
If you press on the accelerator pedal
when the engine has reached the
revolution limit of the current gear range,
the automatic transmission will upshift
beyond any gear range limit selected.
Canceling gear range limit X
Pull and hold right gearshift control ; until
the gear range indicator disappears from
the multifunction display.
The automatic transmission will shift from
the current gear range directly into drive
position D.
Shifting into optimal gear range X
Pull and hold left gearshift control :.
The automatic transmission will select the
gear range suited for optimal acceleration
and deceleration automatically. This will
involve shifting down one or more gears. Emergency operation (limp-home
mode)
If vehicle acceleration becomes less
responsive or sluggish or the automatic
transmission no longer shifts, the automatic
transmission is most likely operating in limp-
home (emergency operation) mode. In this
mode only second gear and reverse gear R
can be selected.
X Stop the vehicle in a safe location.
X Shift the automatic transmission into park
position P.
X Turn off the engine.
X Wait at least 10 seconds before restarting.
X Restart the engine.
X Shift the automatic transmission into drive
position D (for second gear) or reverse gear
R.
X Have the automatic transmission checked
at an authorized Mercedes-Benz Center as
soon as possible. Automatic transmission
121Controls in detail
251_AKB; 4; 52, en-US
d2ureepe, Version: 2.11.8.1 2009-03-23T09:22:52+01:00 - Seite 121 Z
Page 125 of 364
Adjusting the instrument cluster
illumination
X To brighten illumination: Press and hold
button = until the desired level of
illumination is reached.
X To dim illumination: Press and hold
button : until the desired level of
illumination is reached.
i The instrument cluster illumination is
dimmed
or brightened automatically to suit
ambient light conditions.
The instrument cluster illumination will also
be adjusted automatically when you switch
on the vehicle’s exterior lamps.
i With the exterior lighting switched on, the
brightness of the switches in the center
console will also be adjusted when using
button : or =. Resetting trip odometer
X Make sure you are viewing the standard
display
(Y page 126) in the multifunction
display.
X Press and hold the reset button in the
instrument cluster
(Y page 122) until the
trip odometer is reset. Tachometer
The red marking on the tachometer
(Y
page 29) denotes excessive engine speed.
! Avoid driving at excessive engine speeds,
as it may result in serious engine damage
that is not covered by the Mercedes-Benz
Limited Warranty.
To help protect the engine, the fuel supply is
interrupted if the engine is operated within
the red marking. Control system
Introduction
The
control system is activated as soon as the
starter switch is in position 1 (Y page 79).
The control system enables you to call up
information about your vehicle and to change
vehicle settings.
For example, you can use the control system
to find out when your vehicle is next due for
maintenance service, to set the language for
messages in the instrument cluster display,
and much more. G
Warning!
A driver’s attention to the road and traffic
conditions must always be his/her primary
focus when driving.
For your safety and the safety of others,
selecting features through the multifunction
steering wheel should only be done by the
driver
when traffic and road conditions permit
it to be done safely.
Bear in mind that at a speed of just 30 mph
(approximately 50 km/h), your vehicle is
covering a distance of 44 feet (approximately
14 m) every second.
The control system relays information to the
multifunction display. Multifunction steering wheel
The displays in the multifunction display and
the settings in the control system are
controlled by using the buttons on the
multifunction steering wheel. Control system
123Controls in detail
251_AKB; 4; 52, en-US
d2ureepe, Version: 2.11.8.1 2009-03-23T09:22:52+01:00 - Seite 123 Z
Page 126 of 364
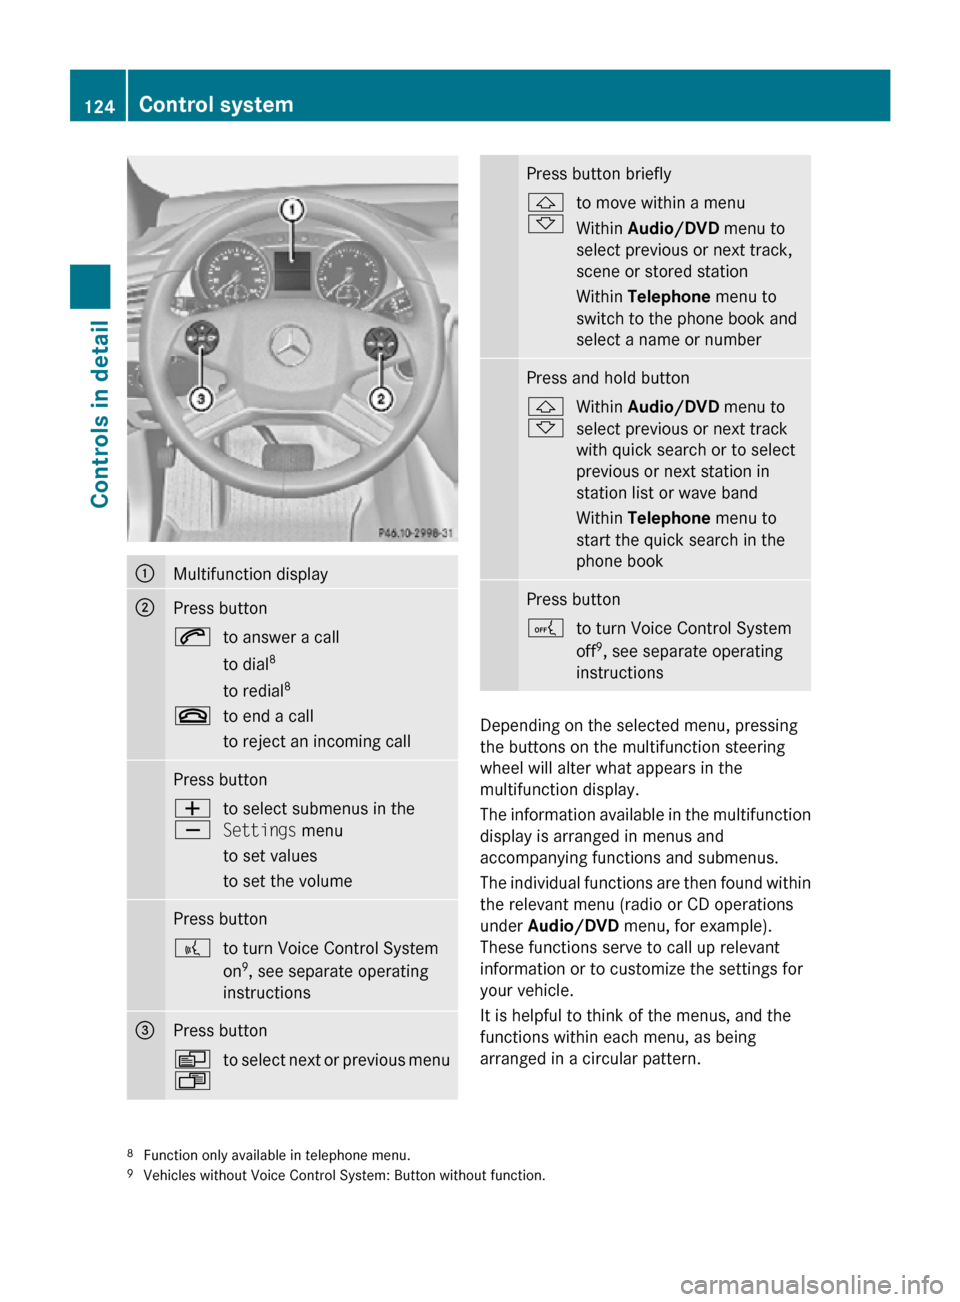
:
Multifunction display
;
Press button
6
to answer a call
to dial8
to redial 8
~ to end a call
to reject an incoming call Press button
W
X
to select submenus in the
Settings menu
to set values
to set the volume Press button
?
to turn Voice Control System
on9
, see separate operating
instructions =
Press button
V
U
to select next or previous menu Press button briefly
&
*
to move within a menu
Within Audio/DVD
menu to
select previous or next track,
scene or stored station
Within Telephone menu to
switch to the phone book and
select a name or number Press and hold button
&
*
Within Audio/DVD
menu to
select previous or next track
with quick search or to select
previous or next station in
station list or wave band
Within Telephone menu to
start the quick search in the
phone book Press button
A
to turn Voice Control System
off9
, see separate operating
instructions Depending on the selected menu, pressing
the buttons on the multifunction steering
wheel will alter what appears in the
multifunction display.
The information available in the multifunction
display is arranged in menus and
accompanying functions and submenus.
The individual functions are then found within
the relevant menu (radio or CD operations
under Audio/DVD
menu, for example).
These functions serve to call up relevant
information or to customize the settings for
your vehicle.
It is helpful to think of the menus, and the
functions within each menu, as being
arranged in a circular pattern.
8 Function only available in telephone menu.
9 Vehicles without Voice Control System: Button without function. 124
Control systemControls in detail
251_AKB; 4; 52, en-US
d2ureepe,
Version: 2.11.8.1 2009-03-23T09:22:52+01:00 - Seite 124
Page 139 of 364
Vehicle submenu
Access the
Vehicle submenu via the
Settings menu. Use the Vehicle submenu
to set the automatic central locking.
Switching automatic central locking on or
off
Use this function to switch the automatic
central locking on or off. With the automatic
central locking activated, the vehicle is
locked centrally at a vehicle speed of
approximately 9 mph (15 km/h).
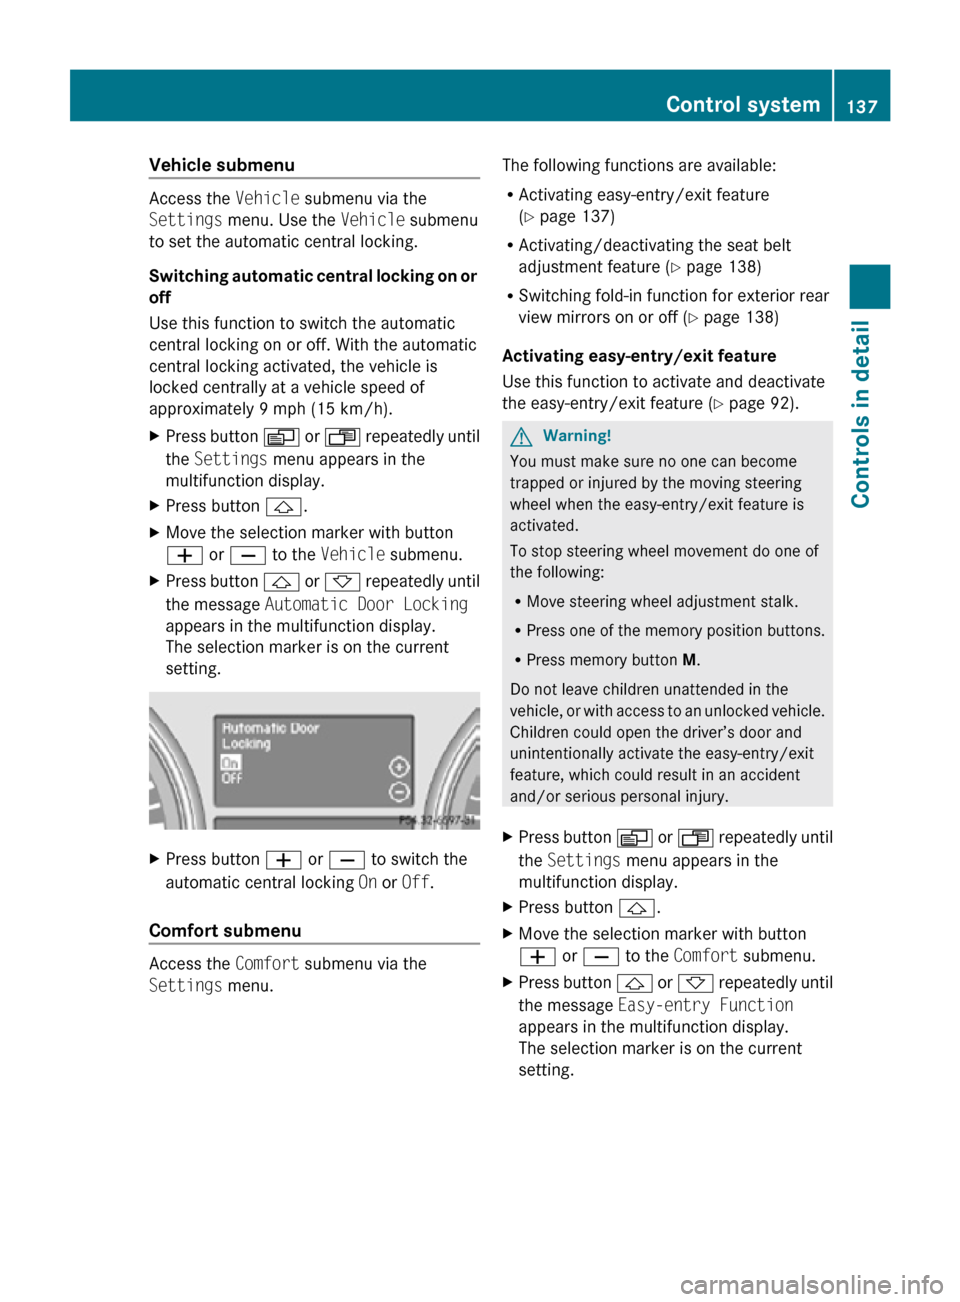
X Press button V or U repeatedly until
the Settings menu appears in the
multifunction display.
X Press button &.
X Move the selection marker with button
W or X to the Vehicle submenu.
X Press button & or * repeatedly until
the message Automatic Door Locking
appears in the multifunction display.
The selection marker is on the current
setting. X
Press button W or X to switch the
automatic central locking On or Off.
Comfort submenu Access the
Comfort submenu via the
Settings menu. The following functions are available:
R
Activating easy-entry/exit feature
(Y page 137)
R Activating/deactivating the seat belt
adjustment feature (Y page 138)
R Switching fold-in function for exterior rear
view mirrors on or off (Y page 138)
Activating easy-entry/exit feature
Use this function to activate and deactivate
the easy-entry/exit feature (Y page 92). G
Warning!
You must make sure no one can become
trapped or injured by the moving steering
wheel when the easy-entry/exit feature is
activated.
To stop steering wheel movement do one of
the following:
R Move steering wheel adjustment stalk.
R Press one of the memory position buttons.
R Press memory button M.
Do not leave children unattended in the
vehicle, or with access to an unlocked vehicle.
Children could open the driver’s door and
unintentionally activate the easy-entry/exit
feature, which could result in an accident
and/or serious personal injury.
X Press button V or U repeatedly until
the Settings menu appears in the
multifunction display.
X Press button &.
X Move the selection marker with button
W or X to the Comfort submenu.
X Press button & or * repeatedly until
the message Easy-entry Function
appears in the multifunction display.
The selection marker is on the current
setting. Control system
137Controls in detail
251_AKB; 4; 52, en-US
d2ureepe, Version: 2.11.8.1 2009-03-23T09:22:52+01:00 - Seite 137 Z
Page 147 of 364
X
Briefly pull the cruise control lever in
direction of arrow ?.
If no speed is stored, the current speed is
set and stored.
X Remove your foot from the accelerator
pedal.
The last stored speed is deleted from memory
when the engine is turned off. Distronic
Safety notes When activated, the Distronic adaptive cruise
control increases the driving convenience
afforded
by the cruise control while traveling
on expressways and other major roadways.
R If the Distronic distance sensor detects a
slower moving vehicle directly ahead, your
vehicle speed will be reduced so that you
follow that vehicle at your preset following
distance.
R If there is no vehicle directly ahead of you,
the Distronic will function in the same way
as standard cruise control ( Y page 142).G
Warning!
The Distronic requires familiarity with its
operational characteristics. We strongly
recommend that you review the following
information carefully before operating the
system. G
Warning!
When the Distronic is braking, the brake pedal
is retracted (i.e. depressed automatically).
The pedals’ range of motion must not be
impeded by any obstacles:
R Do not place any objects in the footwell.
R Make sure that the floormats and carpets
are securely in place.
R Do
not rest your foot underneath the brake
pedal, as it could otherwise be trapped. You could otherwise cause an accident and
injure yourself and/or others.
G
Warning!
The Distronic is a convenience system. Its
speed adjustment reduction capability is
intended to make cruise control more
effective
and usable when traffic speeds vary.
It is not however, intended to, nor does it,
replace the need for extreme care.
The responsibility for the vehicle’s speed,
distance to the preceding vehicle and, most
importantly, brake operation to ensure a safe
stopping distance, always remains with the
driver.
The Distronic cannot take street and traffic
conditions into account. Complex driving
situations are not always fully recognized by
the Distronic. This could result in wrong or
missing distance warnings. G
Warning!
The Distronic adaptive cruise control is not a
substitute for active driving involvement. It
does
not react to pedestrians or on stationary
objects, nor does it recognize or predict the
lane curvature or the movement of preceding
vehicles.
The Distronic can only apply 20% of the
maximum braking power of the vehicle.
It is the driver’s responsibility at all times to
be attentive to the road, weather and traffic
conditions. Additionally, the driver must
provide the steering, braking and other driving
inputs necessary to remain in control of the
vehicle.
High-frequency sources such as toll stations,
speed measuring systems etc. can cause the
Distronic system to malfunction. G
Warning!
The Distronic cannot take road and traffic
conditions into account. Only use the
Distronic if the road, weather and traffic
conditions make it advisable to travel at a
constant speed. Driving systems
145
Controls in detail
251_AKB; 4; 52, en-US
d2ureepe, Version: 2.11.8.1 2009-03-23T09:22:52+01:00 - Seite 145 Z
Page 153 of 364
X
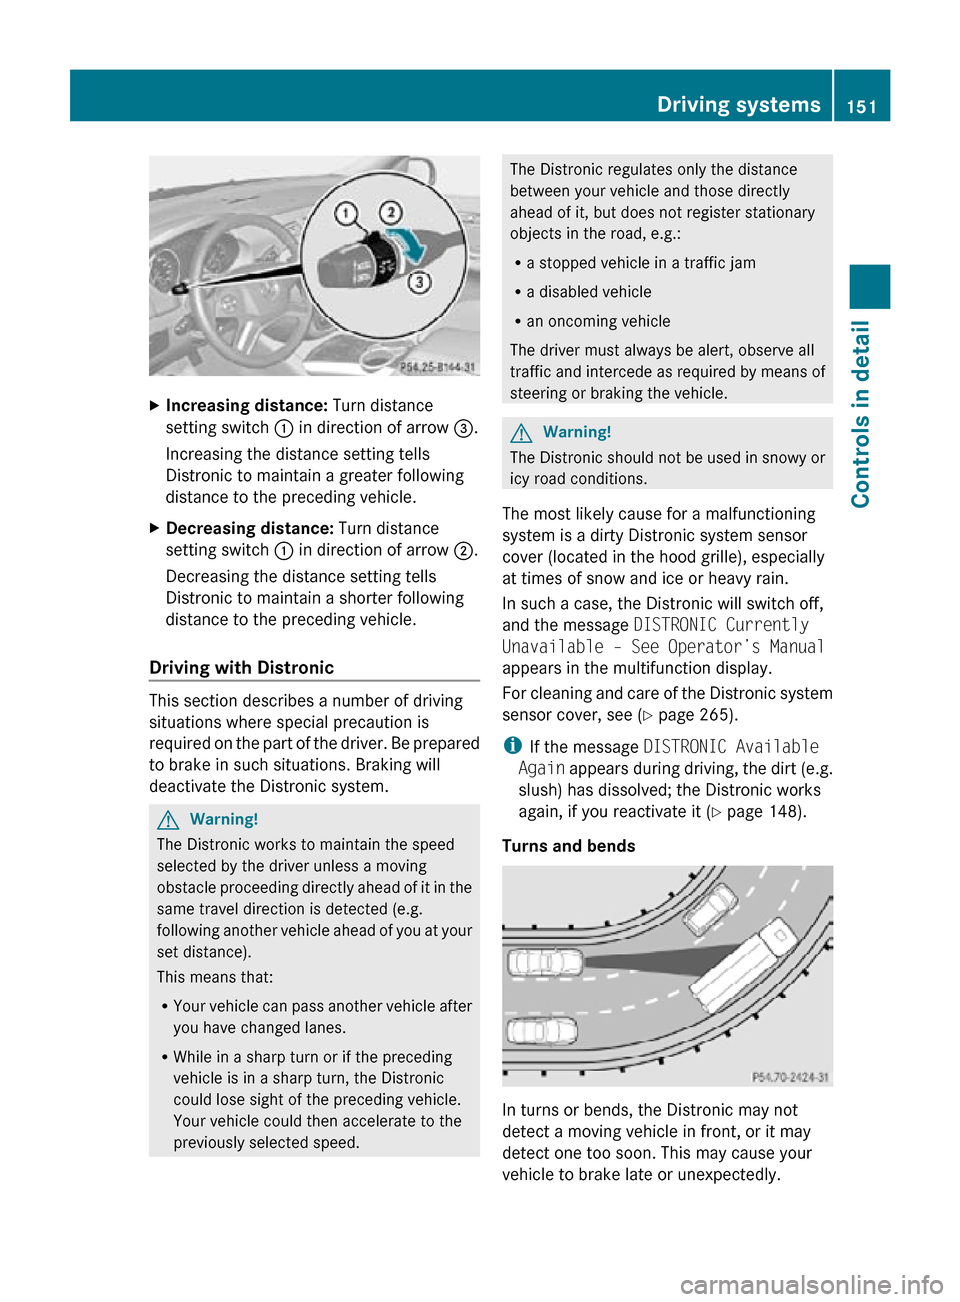
Increasing distance: Turn distance
setting switch : in direction of arrow =.
Increasing the distance setting tells
Distronic to maintain a greater following
distance to the preceding vehicle.
X Decreasing distance: Turn distance
setting switch : in direction of arrow ;.
Decreasing the distance setting tells
Distronic to maintain a shorter following
distance to the preceding vehicle.
Driving with Distronic This section describes a number of driving
situations where special precaution is
required on the part of the driver. Be prepared
to brake in such situations. Braking will
deactivate the Distronic system.
G
Warning!
The Distronic works to maintain the speed
selected by the driver unless a moving
obstacle proceeding directly ahead of it in the
same travel direction is detected (e.g.
following another vehicle ahead of you at your
set distance).
This means that:
R Your vehicle can pass another vehicle after
you have changed lanes.
R While in a sharp turn or if the preceding
vehicle is in a sharp turn, the Distronic
could lose sight of the preceding vehicle.
Your vehicle could then accelerate to the
previously selected speed. The Distronic regulates only the distance
between your vehicle and those directly
ahead of it, but does not register stationary
objects in the road, e.g.:
R
a stopped vehicle in a traffic jam
R a disabled vehicle
R an oncoming vehicle
The driver must always be alert, observe all
traffic and intercede as required by means of
steering or braking the vehicle. G
Warning!
The Distronic should not be used in snowy or
icy road conditions.
The most likely cause for a malfunctioning
system is a dirty Distronic system sensor
cover (located in the hood grille), especially
at times of snow and ice or heavy rain.
In such a case, the Distronic will switch off,
and the message DISTRONIC Currently
Unavailable – See Operator’s Manual
appears in the multifunction display.
For cleaning and care of the Distronic system
sensor cover, see (Y page 265).
i If the message DISTRONIC Available
Again appears during driving, the dirt (e.g.
slush) has dissolved; the Distronic works
again, if you reactivate it ( Y page 148).
Turns and bends In turns or bends, the Distronic may not
detect a moving vehicle in front, or it may
detect one too soon. This may cause your
vehicle to brake late or unexpectedly. Driving systems
151Controls in detail
251_AKB; 4; 52, en-US
d2ureepe, Version: 2.11.8.1 2009-03-23T09:22:52+01:00 - Seite 151 Z
Page 157 of 364
i
The third available level is the highspeed
level that is set automatically.
The following is the approximate change in
ride height for each of the level settings: Level Ride height
Raised level +1.97 in (50 mm)
Highway
level +/-0 in (0 mm)
Highspeed
level -0.78 in (-20 mm)
i
The vehicle is lowered to the highspeed
level automatically if the vehicle speed is
above 70 mph (112 km/h) or if the vehicle
speed stays between 60 mph (96 km/h)
and 70 mph (112 km/h) for
approximately 20 seconds.
i The highspeed level is not available when
towing a trailer. For more information on
towing a trailer, see “Trailer towing”
(Y page 256).
i Obey local speed limits. Use prudent
driving speeds appropriate to prevailing
conditions.
Raised level Only select the raised level if appropriate for
the driving situation encountered. Otherwise
the fuel consumption may increase and/or
the handling characteristics of the vehicle
may be unfavorable.
i
You can select the raised level at speeds
up to 25 mph (40 km/h). At higher speeds,
the message Á Level Selection
Not Permitted appears in the
multifunction display.
X Start the engine. When indicator lamp
; is off:
X Press switch :.
Indicator lamp ; flashes. The vehicle
adjusts to the raised level.
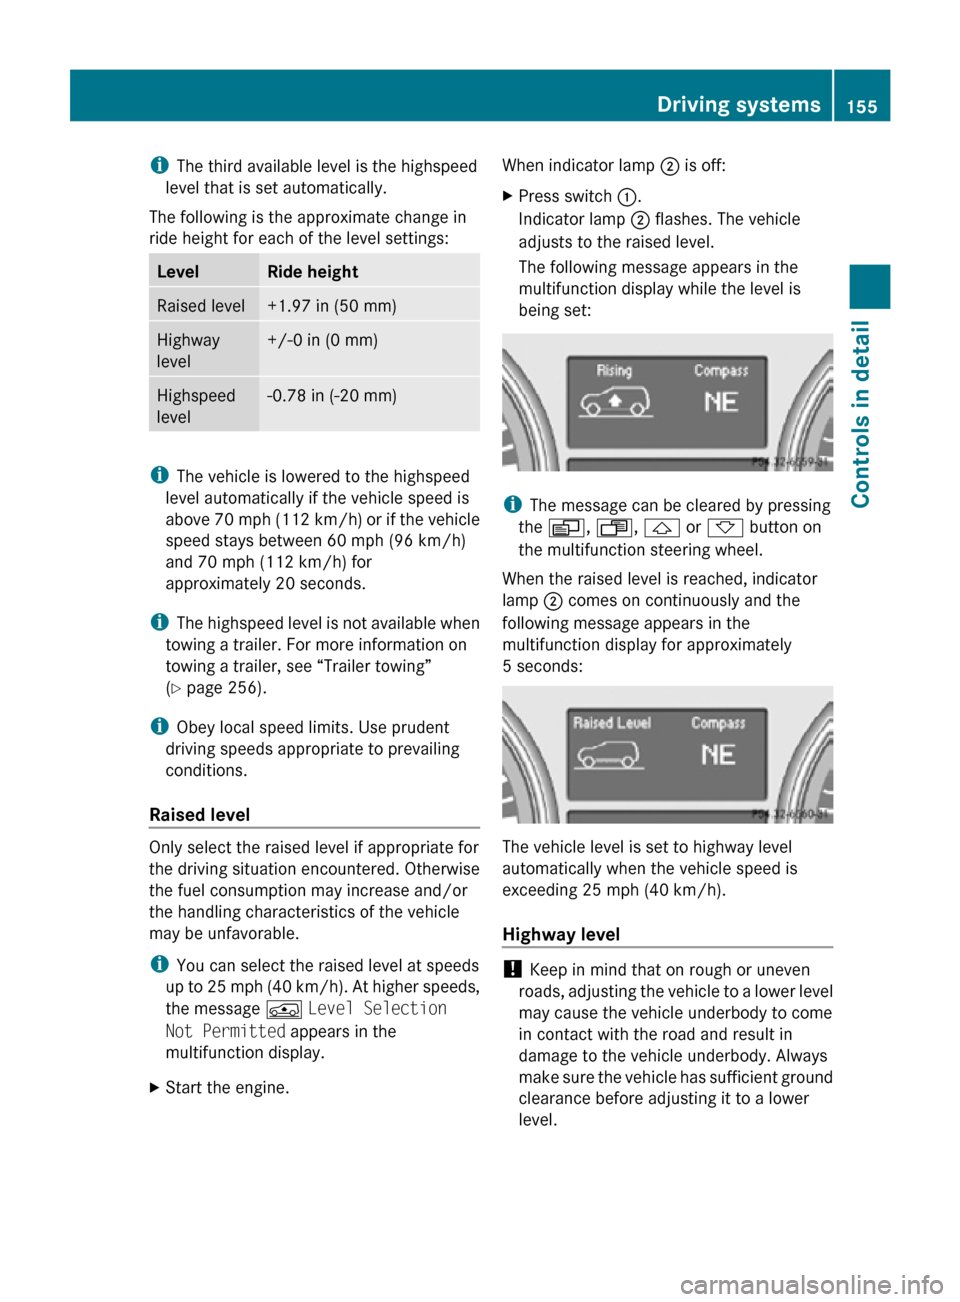
The following message appears in the
multifunction display while the level is
being set: i
The message can be cleared by pressing
the V, U, & or * button on
the multifunction steering wheel.
When the raised level is reached, indicator
lamp ; comes on continuously and the
following message appears in the
multifunction display for approximately
5 seconds: The vehicle level is set to highway level
automatically when the vehicle speed is
exceeding 25 mph (40 km/h).
Highway level
!
Keep in mind that on rough or uneven
roads, adjusting the vehicle to a lower level
may cause the vehicle underbody to come
in contact with the road and result in
damage to the vehicle underbody. Always
make sure the vehicle has sufficient ground
clearance before adjusting it to a lower
level. Driving systems
155Controls in detail
251_AKB; 4; 52, en-US
d2ureepe, Version: 2.11.8.1 2009-03-23T09:22:52+01:00 - Seite 155 Z
Page 158 of 364
X
Close all doors and the tailgate.
X Start the engine.
When indicator lamp ; is on:
X Press switch :.
Indicator lamp ; flashes. The vehicle
adjusts to the highway level.
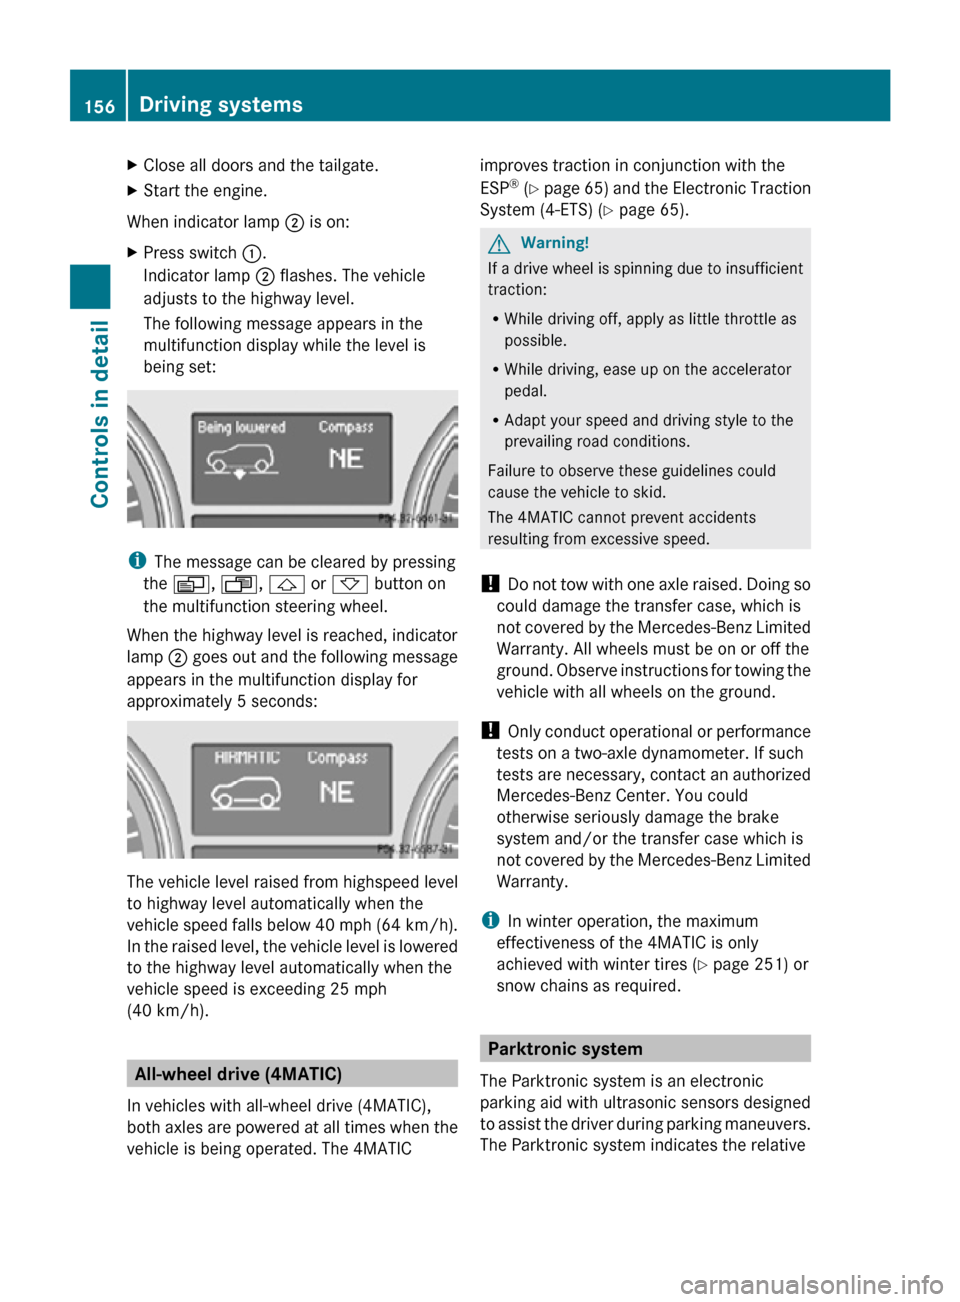
The following message appears in the
multifunction display while the level is
being set: i
The message can be cleared by pressing
the V, U, & or * button on
the multifunction steering wheel.
When the highway level is reached, indicator
lamp ; goes out and the following message
appears in the multifunction display for
approximately 5 seconds: The vehicle level raised from highspeed level
to highway level automatically when the
vehicle speed falls below 40 mph (64 km/h).
In the raised level, the vehicle level is lowered
to the highway level automatically when the
vehicle speed is exceeding 25 mph
(40 km/h).
All-wheel drive (4MATIC)
In vehicles with all-wheel drive (4MATIC),
both axles are powered at all times when the
vehicle is being operated. The 4MATIC improves traction in conjunction with the
ESP
®
(Y page 65) and the Electronic Traction
System (4-ETS) (Y page 65). G
Warning!
If a drive wheel is spinning due to insufficient
traction:
R While driving off, apply as little throttle as
possible.
R While driving, ease up on the accelerator
pedal.
R Adapt your speed and driving style to the
prevailing road conditions.
Failure to observe these guidelines could
cause the vehicle to skid.
The 4MATIC cannot prevent accidents
resulting from excessive speed.
! Do not tow with one axle raised. Doing so
could damage the transfer case, which is
not covered by the Mercedes-Benz Limited
Warranty. All wheels must be on or off the
ground. Observe instructions for towing the
vehicle with all wheels on the ground.
! Only conduct operational or performance
tests on a two-axle dynamometer. If such
tests are necessary, contact an authorized
Mercedes-Benz Center. You could
otherwise seriously damage the brake
system and/or the transfer case which is
not covered by the Mercedes-Benz Limited
Warranty.
i In winter operation, the maximum
effectiveness of the 4MATIC is only
achieved with winter tires ( Y page 251) or
snow chains as required. Parktronic system
The Parktronic system is an electronic
parking aid with ultrasonic sensors designed
to assist the driver during parking maneuvers.
The Parktronic system indicates the relative 156
Driving systemsControls in detail
251_AKB; 4; 52, en-US
d2ureepe,
Version: 2.11.8.1 2009-03-23T09:22:52+01:00 - Seite 156