2010 MERCEDES-BENZ R320 fuel
[x] Cancel search: fuelPage 114 of 364
The engine does not start. You can hear
the starter.
There could be a malfunction in the engine
electronics or in the fuel supply system.
Carry out the following steps:
X
If you are starting the engine with the
SmartKey:
Turn the SmartKey in the starter
switch to position 0 and repeat the starting
procedure.
X If you are starting the engine with KEYLESS-
GO: Close any doors that may be open to
allow
for better detection of the SmartKey.
or
X Remove the KEYLESS-GO start/stop
button from the starter switch.
X Start the engine with the SmartKey as radio
signals from another source may be
interfering with the KEYLESS-GO function.
X Repeat the starting procedure.
If the engine does not start after several
starting attempts:
X Contact an authorized Mercedes-Benz
Center or call Roadside Assistance.
The engine does not start. You cannot
hear the starter.
The battery may not be charged sufficiently.
X Get a jump start (Y page 336).
If the engine will not start despite a jump
start:
X Contact an authorized Mercedes-Benz
Center or call Roadside Assistance.
The starter has been exposed to excessive
temperatures.
X Let the starter cool for about 2 minutes.
X Repeat the starting procedure.
If the engine does not start after several
starting attempts:
X Contact an authorized Mercedes-Benz
Center or call Roadside Assistance. Driving off
G
Warning!
On slippery road surfaces, never downshift in
order to obtain braking action. This could
result
in drive wheel slip and reduced vehicle
control. Your vehicle’s ABS will not prevent
this type of loss of control.
! Do not run a cold engine at high engine
speeds. Running a cold engine at high
engine speeds may shorten the service life
of the engine. This is not covered by the
Mercedes-Benz Limited Warranty.
! If an acoustic warning sounds and the
message Release Parking Brake
appears in the multifunction display when
driving off, you have forgotten to release
the parking brake.
Release the parking brake.
! Avoid spinning of a drive wheel. This may
cause serious damage to the drivetrain
which is not covered by the Mercedes-Benz
Limited Warranty.
! Simultaneously depressing the
accelerator pedal and applying the brakes
reduces engine performance and causes
premature brake and drivetrain wear which
is not covered by the Mercedes-Benz
Limited Warranty.
i Once the vehicle is in motion, the
automatic central locking function engages
and the locking knobs in the doors move
down.
The automatic central locking function can
be switched off( Y page 137).
Automatic transmission G
Warning!
It is dangerous to shift the automatic
transmission
out of park position P or neutral
position N if the engine speed is higher than 112
Driving and parking
Controls in detail
251_AKB; 4; 52, en-US
d2ureepe,
Version: 2.11.8.1 2009-03-23T09:22:52+01:00 - Seite 112
Page 115 of 364
idle speed. If your foot is not firmly on the
brake pedal, the vehicle could accelerate
quickly forward or in reverse. You could lose
control of the vehicle and hit someone or
something. Only shift into gear when the
engine is idling normally and when your right
foot is firmly on the brake pedal.
! Only
shift the automatic transmission into
reverse gear R or park position P when the
vehicle is stopped. Otherwise the
automatic transmission could be damaged.
X Depress the brake pedal.
The gear selector lever can now be used.
X Shift the automatic transmission into drive
position D or reverse gear R.
i Shifting
the automatic transmission out of
park position P is only possible with the
brake pedal depressed.
Without the brake pedal depressed, the
gear selector lever can be moved up or
down. However, the parking pawl remains
engaged, not allowing shifting to occur.
X Wait for the gear selection process to
complete before setting the vehicle in
motion.
X If engaged, release the parking brake.
X Release the brake pedal.
X Carefully depress the accelerator pedal.
After a cold start, the automatic transmission
shifts at a higher engine speed. This allows
the catalytic converter (gasoline engine) or
the
oxidation catalyst (diesel engine) to reach
its operating temperature earlier.
For more information on driving, see “Driving
instructions” ( Y page 253). Problems while driving
The
engine runs erratically and misfires R
Gasoline engine: An ignition cable may be
damaged.
R The engine electronics may not be
operating properly.
R Gasoline engine: Unburned gasoline may
have entered the catalytic converter and
damaged it.
X Give very little gas.
X Have the problem checked at an authorized
Mercedes-Benz
Center as soon as possible.
The coolant temperature is above
248‡
(120†) The coolant is too hot and is no longer cooling
the engine.
X
Stop the vehicle in a safe location as soon
as possible.
X Turn off the engine immediately.
X Allow the engine and coolant to cool off.
X Check the coolant level and add coolant if
necessary ( Y page 225).
In case of accident If the vehicle is leaking fuel:
X
Do not start the engine under any
circumstances.
X Exit the vehicle at a safe distance from the
roadway.
X Notify local fire and/or police authorities.
If the extent of the damage cannot be
determined:
X Contact an authorized Mercedes-Benz
Center or call Roadside Assistance.
If no damage on major assemblies, fuel
system, and engine mount can be
determined:
X Start the engine in the usual manner. Driving and parking
113Controls in detail
251_AKB; 4; 52, en-US
d2ureepe, Version: 2.11.8.1 2009-03-23T09:22:52+01:00 - Seite 113 Z
Page 125 of 364
Adjusting the instrument cluster
illumination
X To brighten illumination: Press and hold
button = until the desired level of
illumination is reached.
X To dim illumination: Press and hold
button : until the desired level of
illumination is reached.
i The instrument cluster illumination is
dimmed
or brightened automatically to suit
ambient light conditions.
The instrument cluster illumination will also
be adjusted automatically when you switch
on the vehicle’s exterior lamps.
i With the exterior lighting switched on, the
brightness of the switches in the center
console will also be adjusted when using
button : or =. Resetting trip odometer
X Make sure you are viewing the standard
display
(Y page 126) in the multifunction
display.
X Press and hold the reset button in the
instrument cluster
(Y page 122) until the
trip odometer is reset. Tachometer
The red marking on the tachometer
(Y
page 29) denotes excessive engine speed.
! Avoid driving at excessive engine speeds,
as it may result in serious engine damage
that is not covered by the Mercedes-Benz
Limited Warranty.
To help protect the engine, the fuel supply is
interrupted if the engine is operated within
the red marking. Control system
Introduction
The
control system is activated as soon as the
starter switch is in position 1 (Y page 79).
The control system enables you to call up
information about your vehicle and to change
vehicle settings.
For example, you can use the control system
to find out when your vehicle is next due for
maintenance service, to set the language for
messages in the instrument cluster display,
and much more. G
Warning!
A driver’s attention to the road and traffic
conditions must always be his/her primary
focus when driving.
For your safety and the safety of others,
selecting features through the multifunction
steering wheel should only be done by the
driver
when traffic and road conditions permit
it to be done safely.
Bear in mind that at a speed of just 30 mph
(approximately 50 km/h), your vehicle is
covering a distance of 44 feet (approximately
14 m) every second.
The control system relays information to the
multifunction display. Multifunction steering wheel
The displays in the multifunction display and
the settings in the control system are
controlled by using the buttons on the
multifunction steering wheel. Control system
123Controls in detail
251_AKB; 4; 52, en-US
d2ureepe, Version: 2.11.8.1 2009-03-23T09:22:52+01:00 - Seite 123 Z
Page 141 of 364
slower vehicle moving in your vehicle’s path
and the danger of a collision exists, even
when the Distronic is switched off.
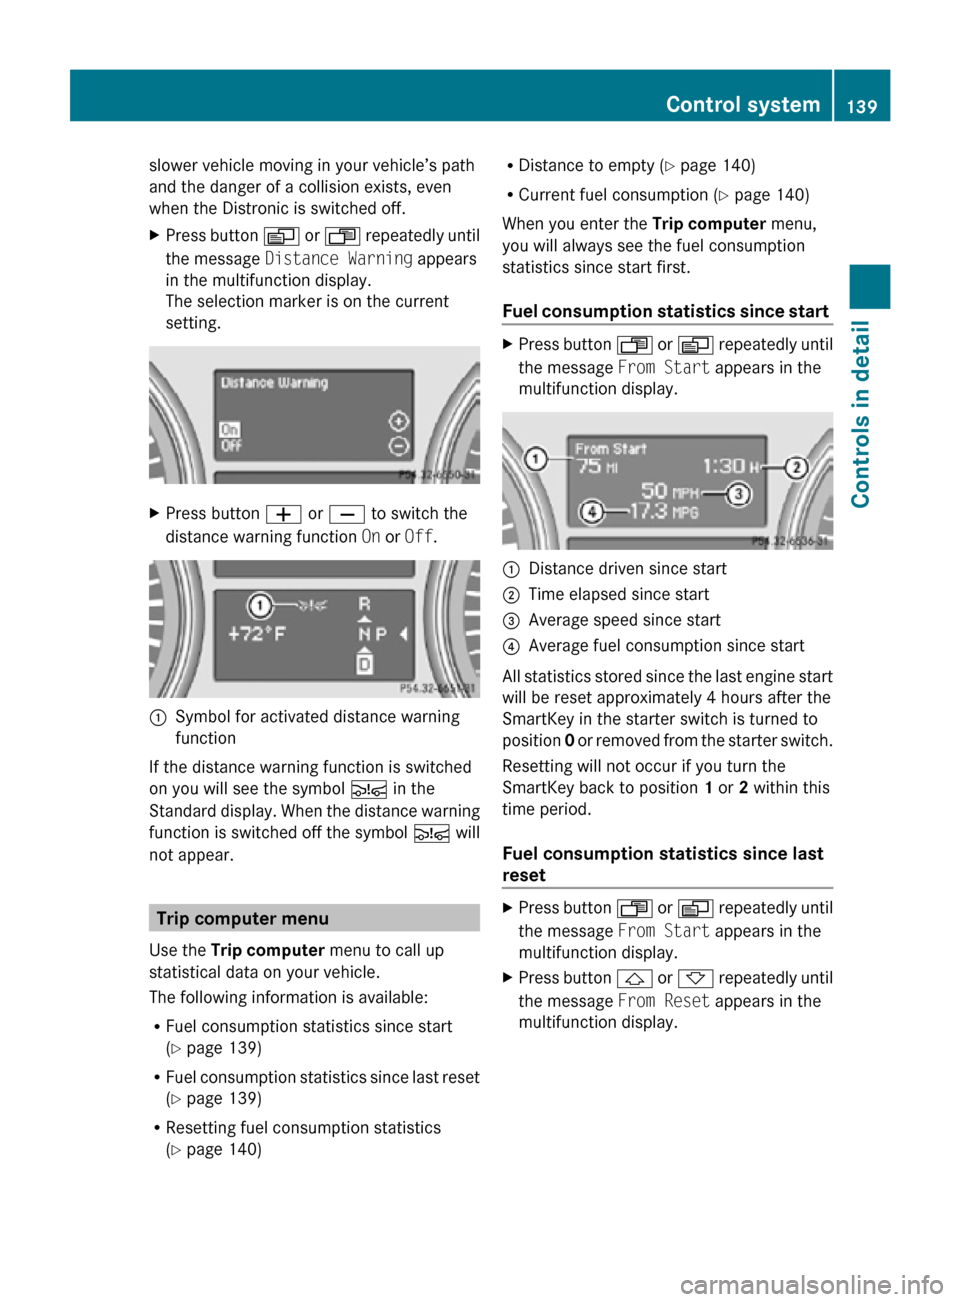
X
Press button V or U repeatedly until
the message Distance Warning appears
in the multifunction display.
The selection marker is on the current
setting. X
Press button W or X to switch the
distance warning function On or Off.:
Symbol for activated distance warning
function
If the distance warning function is switched
on you will see the symbol Ä in the
Standard display. When the distance warning
function is switched off the symbol Ä will
not appear. Trip computer menu
Use the Trip computer menu to call up
statistical data on your vehicle.
The following information is available:
R Fuel consumption statistics since start
(Y page 139)
R Fuel consumption statistics since last reset
(Y page 139)
R Resetting fuel consumption statistics
(Y page 140) R
Distance to empty ( Y page 140)
R Current fuel consumption (Y page 140)
When you enter the Trip computer menu,
you will always see the fuel consumption
statistics since start first.
Fuel consumption statistics since start X
Press button U or V repeatedly until
the message From Start appears in the
multifunction display. :
Distance driven since start
; Time elapsed since start
= Average speed since start
? Average fuel consumption since start
All statistics stored since the last engine start
will be reset approximately 4 hours after the
SmartKey in the starter switch is turned to
position 0 or removed from the starter switch.
Resetting will not occur if you turn the
SmartKey back to position 1 or 2 within this
time period.
Fuel consumption statistics since last
reset X
Press button U or V repeatedly until
the message From Start appears in the
multifunction display.
X Press button & or * repeatedly until
the message From Reset appears in the
multifunction display. Control system
139Controls in detail
251_AKB; 4; 52, en-US
d2ureepe, Version: 2.11.8.1 2009-03-23T09:22:52+01:00 - Seite 139 Z
Page 142 of 364
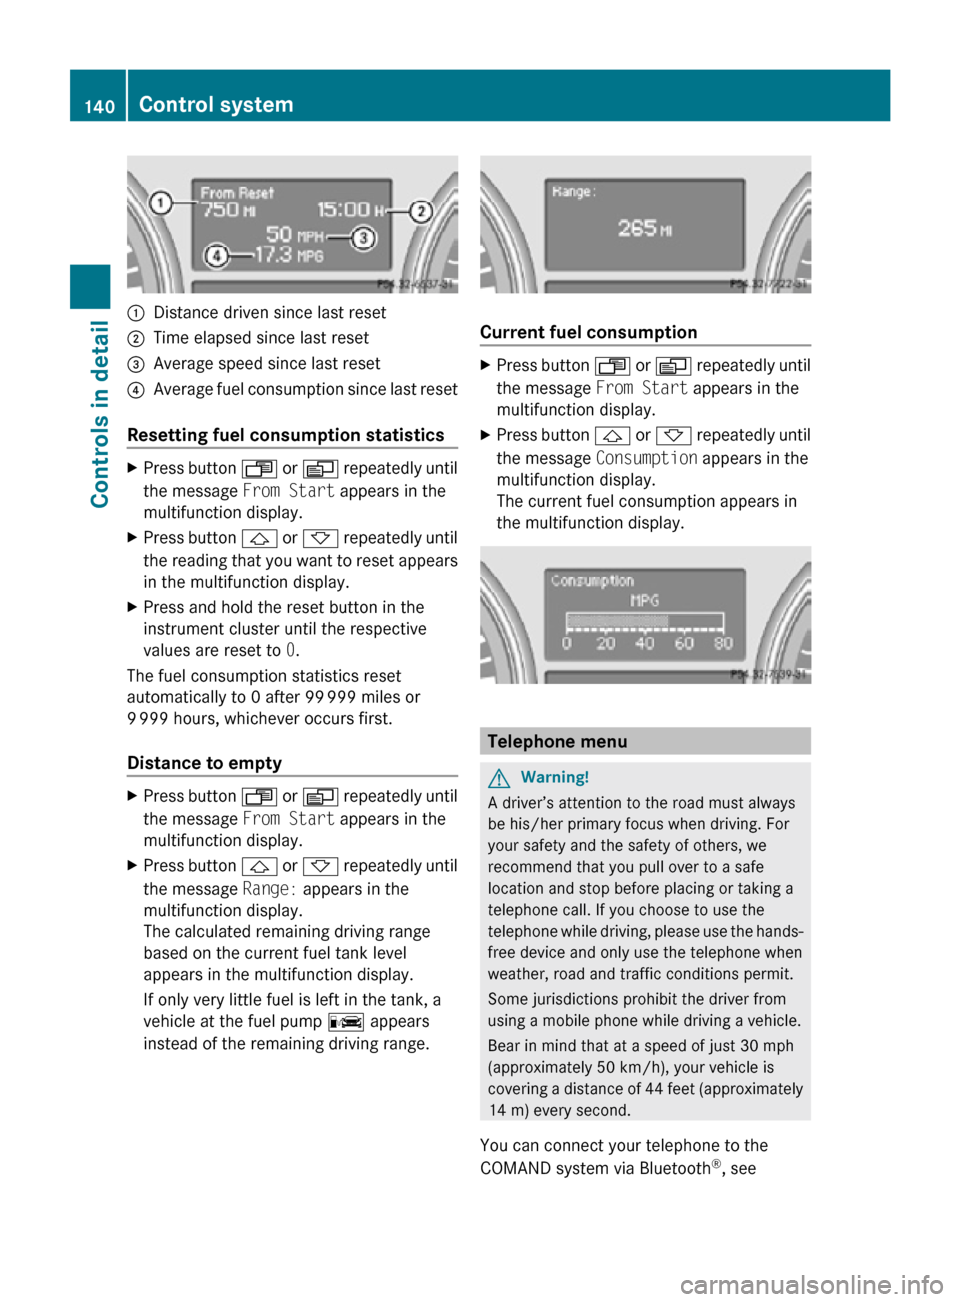
:
Distance driven since last reset
; Time elapsed since last reset
= Average speed since last reset
? Average fuel consumption since last reset
Resetting fuel consumption statistics X
Press button U or V repeatedly until
the message From Start appears in the
multifunction display.
X Press button & or * repeatedly until
the reading that you want to reset appears
in the multifunction display.
X Press and hold the reset button in the
instrument cluster until the respective
values are reset to 0.
The fuel consumption statistics reset
automatically to 0 after 99 999 miles or
9 999 hours, whichever occurs first.
Distance to empty X
Press button U or V repeatedly until
the message From Start appears in the
multifunction display.
X Press button & or * repeatedly until
the message Range: appears in the
multifunction display.
The calculated remaining driving range
based on the current fuel tank level
appears in the multifunction display.
If only very little fuel is left in the tank, a
vehicle at the fuel pump C appears
instead of the remaining driving range. Current fuel consumption
X
Press button U or V repeatedly until
the message From Start appears in the
multifunction display.
X Press button & or * repeatedly until
the message Consumption appears in the
multifunction display.
The current fuel consumption appears in
the multifunction display. Telephone menu
G
Warning!
A driver’s attention to the road must always
be his/her primary focus when driving. For
your safety and the safety of others, we
recommend that you pull over to a safe
location and stop before placing or taking a
telephone call. If you choose to use the
telephone while driving, please use the hands-
free device and only use the telephone when
weather, road and traffic conditions permit.
Some jurisdictions prohibit the driver from
using a mobile phone while driving a vehicle.
Bear in mind that at a speed of just 30 mph
(approximately 50 km/h), your vehicle is
covering a distance of 44 feet (approximately
14 m) every second.
You can connect your telephone to the
COMAND system via Bluetooth ®
, see 140
Control systemControls in detail
251_AKB; 4; 52, en-US
d2ureepe,
Version: 2.11.8.1 2009-03-23T09:22:52+01:00 - Seite 140
Page 156 of 364

Indicator lamps ; and = are off.
R SPORT (for sporty driving)
Indicator lamp ; comes on.
R COMF (for comfort driving)
Indicator lamp = comes on.
X Start the engine.
X Press ADS switch : repeatedly until the
desired suspension tuning is reached.
The setting remains stored when you turn off
the engine. Vehicle level control
Your vehicle automatically adjusts its ride
height.
The all-around vehicle level control provides
best possible suspension and constant
ground clearance. The vehicle lowers at high
speed automatically in order to increase
driving safety and to reduce fuel
consumption.
Changes to the vehicle level should be made
while the vehicle is moving. The vehicle will
then reach the set level as fast as possible.
When you park the vehicle and the ambient
temperature changes, the vehicle level may
change visibly. When the temperature drops,
the vehicle lowers. When the temperature
rises, the vehicle raises.
The vehicle begins adjusting to the set vehicle
level as soon as the doors or tailgate are
unlocked or opened or closed with the vehicle
unlocked.
For major changes in vehicle level, the engine
must be running. G
Warning!
Make sure no one is near the wheel housing
or under the vehicle when you lower the
vehicle while it is standing still. Limbs could
become wedged into or under the vehicle.
For safety reasons, the vehicle can only be
lowered with all doors and the tailgate closed.
Lowering is interrupted if a door or the tailgate is opened and will continue after the door is
closed again.
! Keep in mind that on rough or uneven
roads, adjusting the vehicle to a lower level
may cause the vehicle underbody to come
in contact with the road and result in
damage to the vehicle underbody. Always
make sure the vehicle has sufficient ground
clearance before adjusting it to a lower
level.
! Before jacking up the vehicle with
equipment that lifts one or more of the
wheels completely off of the ground,
remove the SmartKey from the starter
switch.
i The activation threshold is defined by the
ADS setting (Y page 153). Basic settings
The following vehicle chassis ride heights can
be selected using vehicle level control
switch : in the center console:
Level Driving situation
Raised level For driving on rough roads.
Indicator lamp ; is on.
Highway
level For driving on paved roads
in fair or better condition.
Indicator lamp ; is off.154
Driving systemsControls in detail
251_AKB; 4; 52, en-US
d2ureepe,
Version: 2.11.8.1 2009-03-23T09:22:52+01:00 - Seite 154
Page 157 of 364
i
The third available level is the highspeed
level that is set automatically.
The following is the approximate change in
ride height for each of the level settings: Level Ride height
Raised level +1.97 in (50 mm)
Highway
level +/-0 in (0 mm)
Highspeed
level -0.78 in (-20 mm)
i
The vehicle is lowered to the highspeed
level automatically if the vehicle speed is
above 70 mph (112 km/h) or if the vehicle
speed stays between 60 mph (96 km/h)
and 70 mph (112 km/h) for
approximately 20 seconds.
i The highspeed level is not available when
towing a trailer. For more information on
towing a trailer, see “Trailer towing”
(Y page 256).
i Obey local speed limits. Use prudent
driving speeds appropriate to prevailing
conditions.
Raised level Only select the raised level if appropriate for
the driving situation encountered. Otherwise
the fuel consumption may increase and/or
the handling characteristics of the vehicle
may be unfavorable.
i
You can select the raised level at speeds
up to 25 mph (40 km/h). At higher speeds,
the message Á Level Selection
Not Permitted appears in the
multifunction display.
X Start the engine. When indicator lamp
; is off:
X Press switch :.
Indicator lamp ; flashes. The vehicle
adjusts to the raised level.
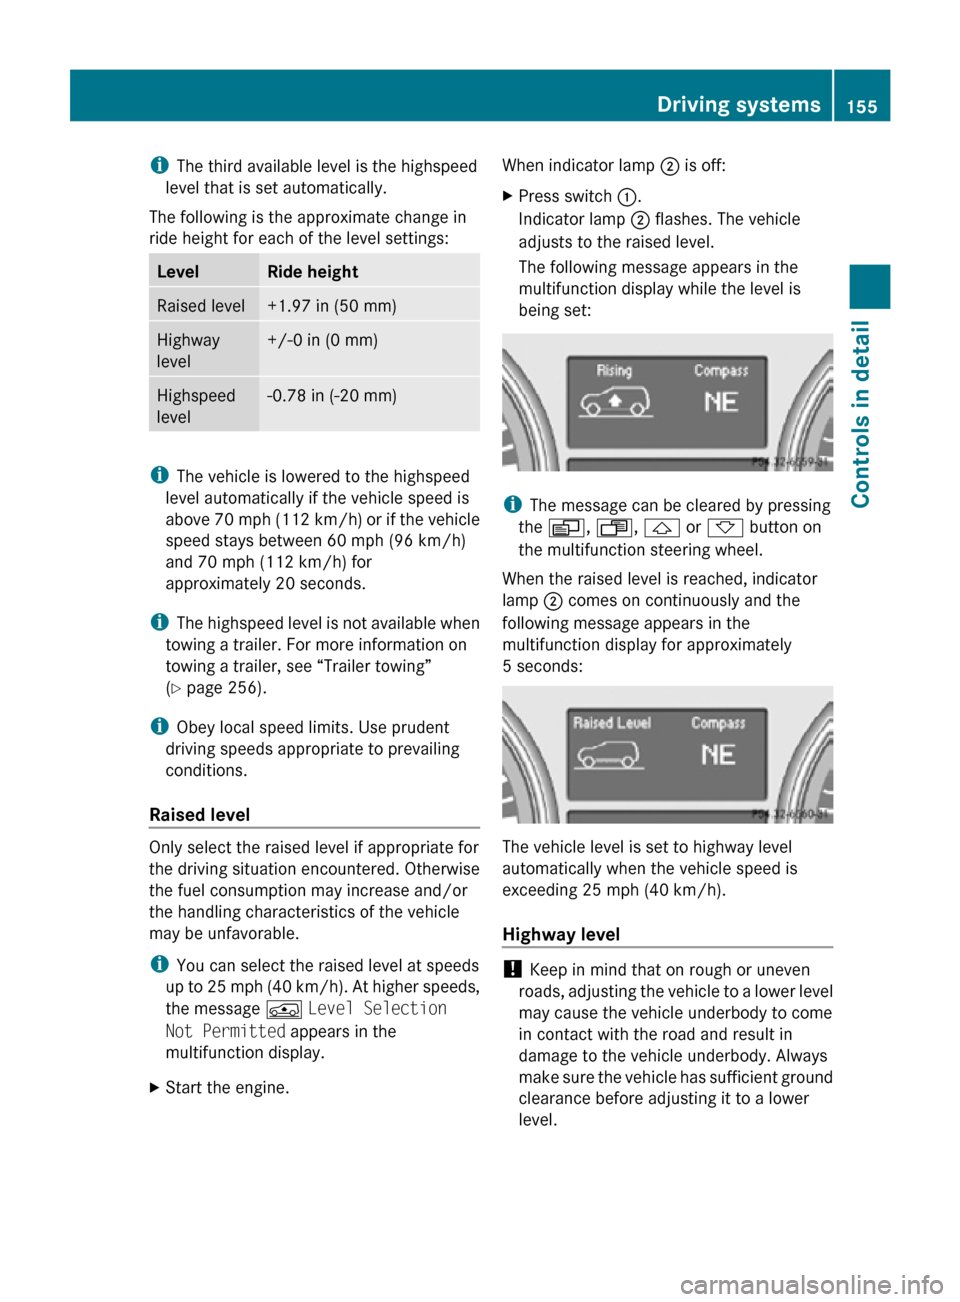
The following message appears in the
multifunction display while the level is
being set: i
The message can be cleared by pressing
the V, U, & or * button on
the multifunction steering wheel.
When the raised level is reached, indicator
lamp ; comes on continuously and the
following message appears in the
multifunction display for approximately
5 seconds: The vehicle level is set to highway level
automatically when the vehicle speed is
exceeding 25 mph (40 km/h).
Highway level
!
Keep in mind that on rough or uneven
roads, adjusting the vehicle to a lower level
may cause the vehicle underbody to come
in contact with the road and result in
damage to the vehicle underbody. Always
make sure the vehicle has sufficient ground
clearance before adjusting it to a lower
level. Driving systems
155Controls in detail
251_AKB; 4; 52, en-US
d2ureepe, Version: 2.11.8.1 2009-03-23T09:22:52+01:00 - Seite 155 Z
Page 189 of 364
vehicle occupants unless the items are
securely fastened in the vehicle.
To help avoid personal injury during a collision
or sudden maneuver, exercise care when
transporting cargo. Do not pile luggage or
cargo higher than the seat backrests.
The cargo compartment is the preferred place
to carry objects. Always use cargo tie-down
rings, and if so equipped, always use the cargo
net when transporting cargo.
Never drive a vehicle with the tailgate open.
Deadly carbon monoxide (CO) gases may
enter vehicle interior resulting in
unconsciousness and death.
Load distribution The Gross Vehicle Weight (GVW) is the weight
of the vehicle including:
R
fuel
R tools
R spare wheel
R installed accessories R
passengers
R luggage/cargo
It must never exceed the load limit and the
Gross Vehicle Weight Rating (GVWR) for your
vehicle. The load limit and the GVWR are
specified on the placard located on the
driver’s door B-pillar ( Y page 236).
In addition, the load must be distributed so
that the weight on each axle never exceeds
the Gross Axle Weight Rating (GAWR) for the
front and rear axle. The GVWR and GAWR for
your vehicle are indicated on the certification
label located on the driver’s door B-pillar
(Y page 236).
For more information, see “Tire and Loading
Information” ( Y page 237).
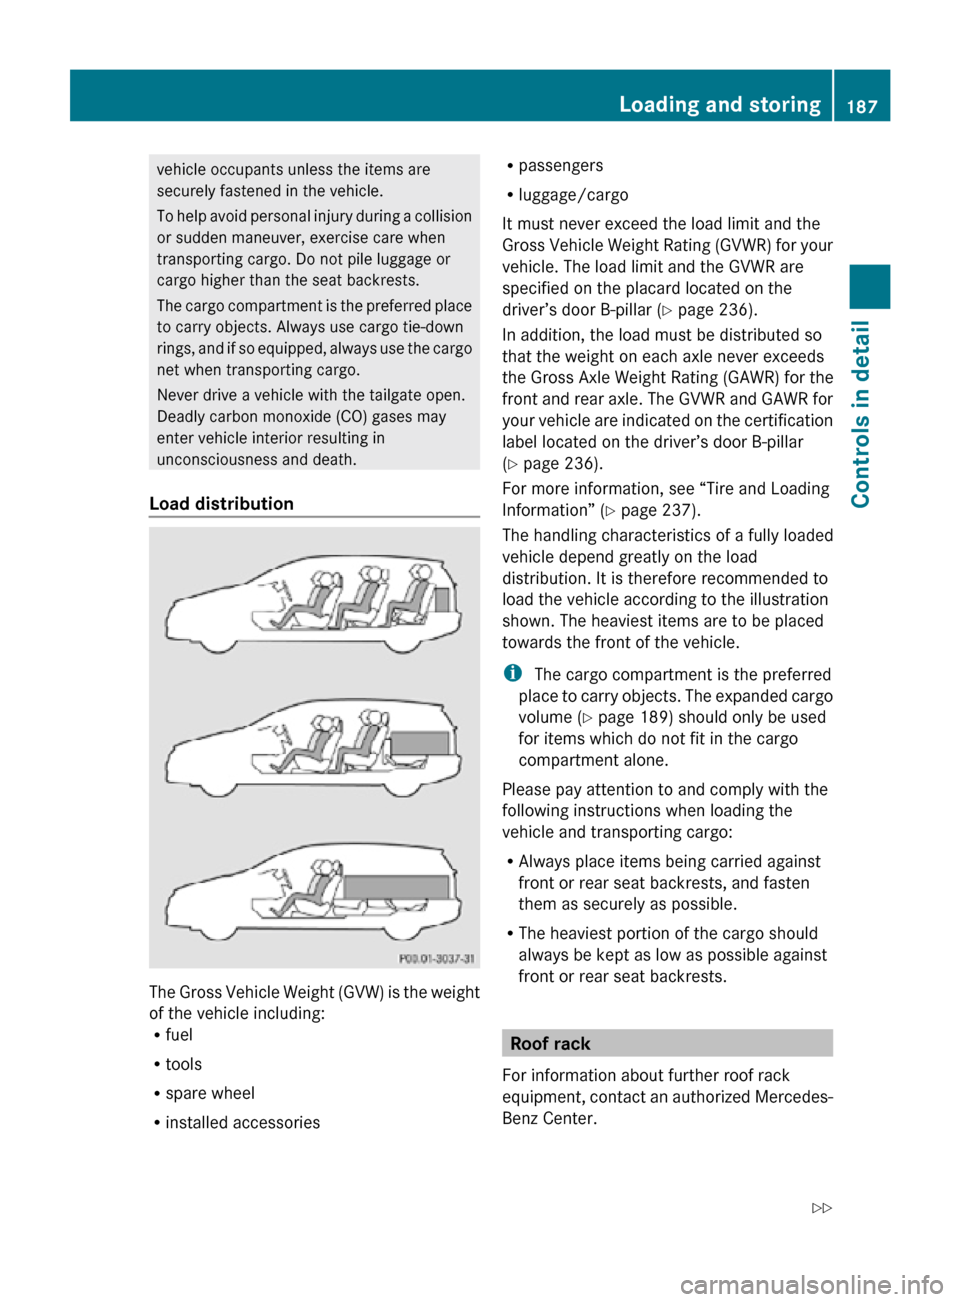
The handling characteristics of a fully loaded
vehicle depend greatly on the load
distribution. It is therefore recommended to
load the vehicle according to the illustration
shown. The heaviest items are to be placed
towards the front of the vehicle.
i The cargo compartment is the preferred
place to carry objects. The expanded cargo
volume ( Y page 189) should only be used
for items which do not fit in the cargo
compartment alone.
Please pay attention to and comply with the
following instructions when loading the
vehicle and transporting cargo:
R Always place items being carried against
front or rear seat backrests, and fasten
them as securely as possible.
R The heaviest portion of the cargo should
always be kept as low as possible against
front or rear seat backrests. Roof rack
For information about further roof rack
equipment, contact an authorized Mercedes-
Benz Center. Loading and storing
187Controls in detail
251_AKB; 4; 52, en-US
d2ureepe, Version: 2.11.8.1 2009-03-23T09:22:52+01:00 - Seite 187 Z