2010 MERCEDES-BENZ R320 ad blue
[x] Cancel search: ad bluePage 142 of 364
:
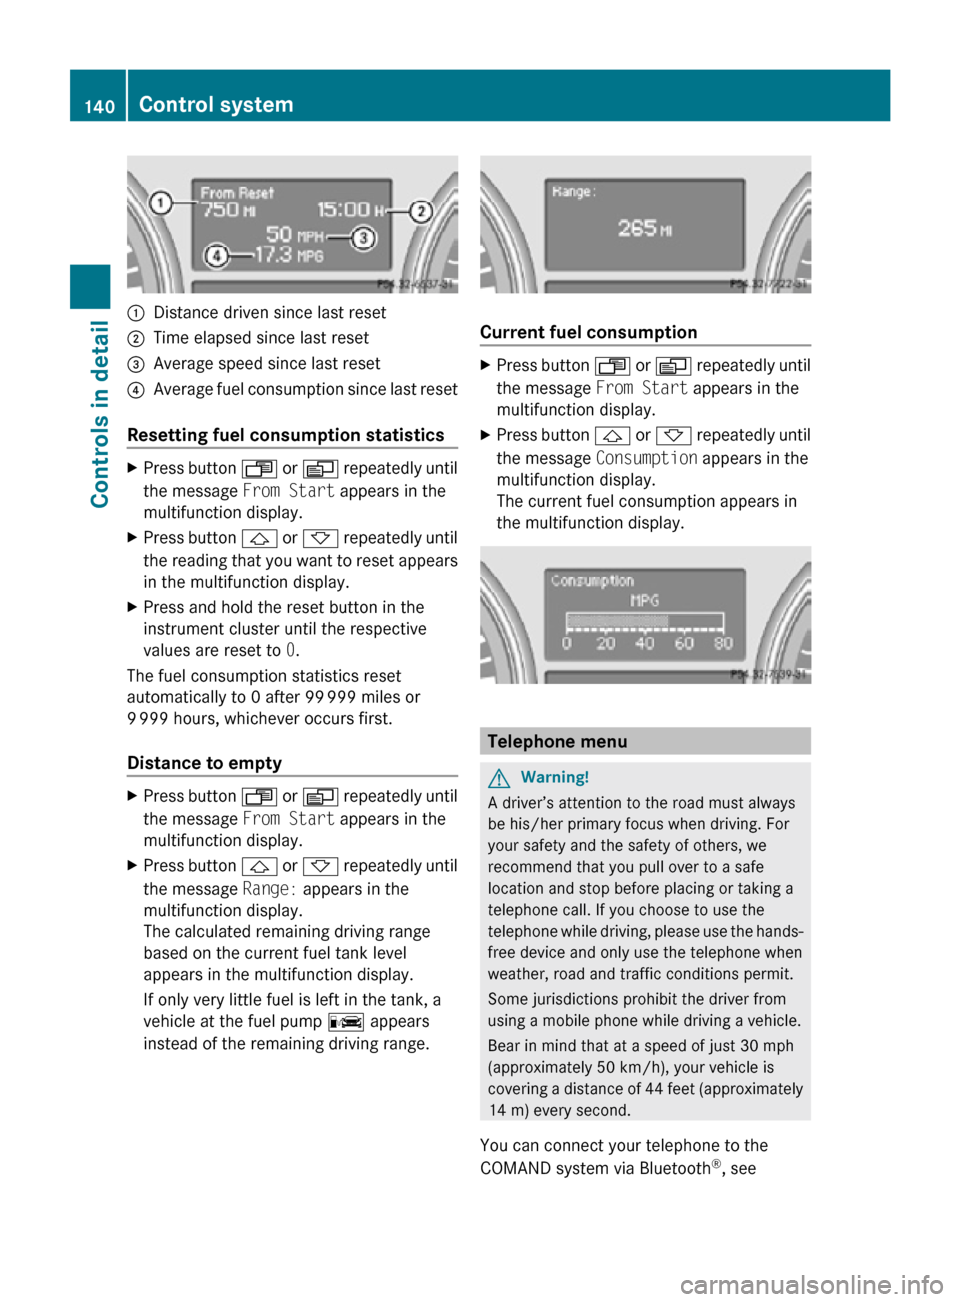
Distance driven since last reset
; Time elapsed since last reset
= Average speed since last reset
? Average fuel consumption since last reset
Resetting fuel consumption statistics X
Press button U or V repeatedly until
the message From Start appears in the
multifunction display.
X Press button & or * repeatedly until
the reading that you want to reset appears
in the multifunction display.
X Press and hold the reset button in the
instrument cluster until the respective
values are reset to 0.
The fuel consumption statistics reset
automatically to 0 after 99 999 miles or
9 999 hours, whichever occurs first.
Distance to empty X
Press button U or V repeatedly until
the message From Start appears in the
multifunction display.
X Press button & or * repeatedly until
the message Range: appears in the
multifunction display.
The calculated remaining driving range
based on the current fuel tank level
appears in the multifunction display.
If only very little fuel is left in the tank, a
vehicle at the fuel pump C appears
instead of the remaining driving range. Current fuel consumption
X
Press button U or V repeatedly until
the message From Start appears in the
multifunction display.
X Press button & or * repeatedly until
the message Consumption appears in the
multifunction display.
The current fuel consumption appears in
the multifunction display. Telephone menu
G
Warning!
A driver’s attention to the road must always
be his/her primary focus when driving. For
your safety and the safety of others, we
recommend that you pull over to a safe
location and stop before placing or taking a
telephone call. If you choose to use the
telephone while driving, please use the hands-
free device and only use the telephone when
weather, road and traffic conditions permit.
Some jurisdictions prohibit the driver from
using a mobile phone while driving a vehicle.
Bear in mind that at a speed of just 30 mph
(approximately 50 km/h), your vehicle is
covering a distance of 44 feet (approximately
14 m) every second.
You can connect your telephone to the
COMAND system via Bluetooth ®
, see 140
Control systemControls in detail
251_AKB; 4; 52, en-US
d2ureepe,
Version: 2.11.8.1 2009-03-23T09:22:52+01:00 - Seite 140
Page 143 of 364
separate COMAND system operating
instructions.
X
Switch on the COMAND system.
Refer to separate COMAND system
operating instructions.
X Press button U or V repeatedly until
the message TEL appears in the
multifunction display.
One of the following messages will appear
in the multifunction display:
R No Service: No network is available.
R Bluetooth Ready: The telephone has
not been connected to the COMAND
system via Bluetooth ®
yet.
X Connect the telephone to the
COMAND system via Bluetooth ®
.
R Ready or name of the network provider
(if available): The telephone has found a
network and is ready for use. You can
operate it using the control system.
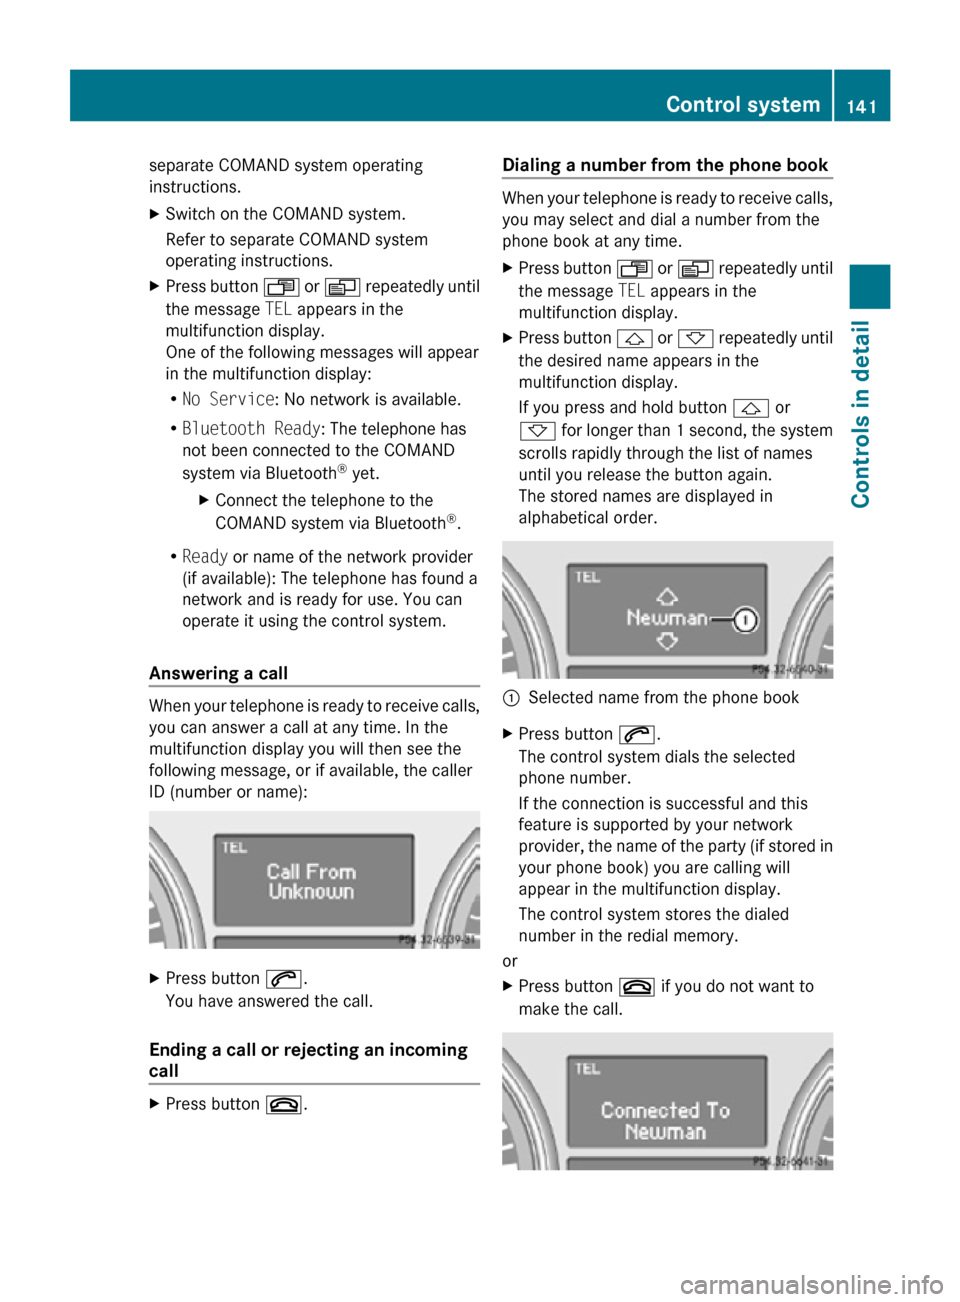
Answering a call When your telephone is ready to receive calls,
you can answer a call at any time. In the
multifunction display you will then see the
following message, or if available, the caller
ID (number or name):
X
Press button 6.
You have answered the call.
Ending a call or rejecting an incoming
call X
Press button ~. Dialing a number from the phone book When your telephone is ready to receive calls,
you may select and dial a number from the
phone book at any time.
X
Press button U or V repeatedly until
the message TEL appears in the
multifunction display.
X Press button & or * repeatedly until
the desired name appears in the
multifunction display.
If you press and hold button & or
* for longer than 1 second, the system
scrolls rapidly through the list of names
until you release the button again.
The stored names are displayed in
alphabetical order. :
Selected name from the phone book
X Press button 6.
The control system dials the selected
phone number.
If the connection is successful and this
feature is supported by your network
provider, the name of the party (if stored in
your phone book) you are calling will
appear in the multifunction display.
The control system stores the dialed
number in the redial memory.
or
X Press button ~ if you do not want to
make the call. Control system
141Controls in detail
251_AKB; 4; 52, en-US
d2ureepe, Version: 2.11.8.1 2009-03-23T09:22:52+01:00 - Seite 141 Z
Page 163 of 364
Switching on/off
X
Switching on: Switch on the ignition.
X Switch on the COMAND system.
X Shift the automatic transmission to reverse
gear R.
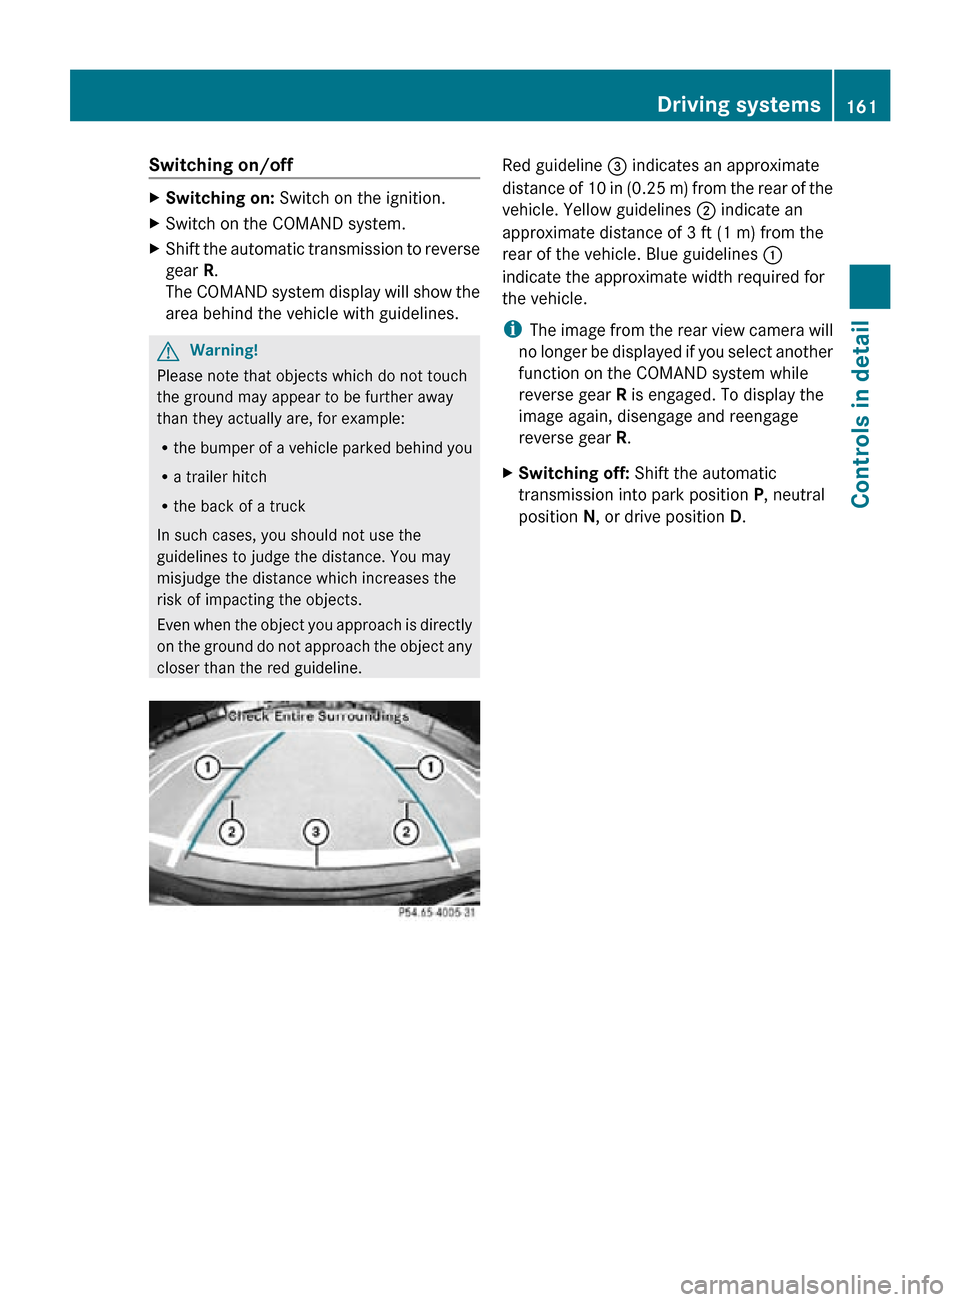
The COMAND system display will show the
area behind the vehicle with guidelines. G
Warning!
Please note that objects which do not touch
the ground may appear to be further away
than they actually are, for example:
R the bumper of a vehicle parked behind you
R a trailer hitch
R the back of a truck
In such cases, you should not use the
guidelines to judge the distance. You may
misjudge the distance which increases the
risk of impacting the objects.
Even when the object you approach is directly
on the ground do not approach the object any
closer than the red guideline. Red guideline
= indicates an approximate
distance of 10 in (0.25 m) from the rear of the
vehicle. Yellow guidelines ; indicate an
approximate distance of 3 ft (1 m) from the
rear of the vehicle. Blue guidelines :
indicate the approximate width required for
the vehicle.
i The image from the rear view camera will
no longer be displayed if you select another
function on the COMAND system while
reverse gear R is engaged. To display the
image again, disengage and reengage
reverse gear R.
X Switching off: Shift the automatic
transmission into park position P, neutral
position N, or drive position D. Driving systems
161Controls in detail
251_AKB; 4; 52, en-US
d2ureepe, Version: 2.11.8.1 2009-03-23T09:22:52+01:00 - Seite 161 Z
Page 271 of 364
Vehicle equipment ............................
270
Where will I find ...? .......................... 270
Vehicle status messages in the
multifunction display ....................... 274
What to do if … .................................. 299
Unlocking/locking manually ...........308
Resetting activated NECK-PRO
active front head restraints .............310
Replacing SmartKey batteries ......... 310
Replacing bulbs ................................. 312
Replacing wiper blades ....................317
Flat tire .............................................. 319
Bleeding the fuel system (diesel
engine only) ....................................... 331
AdBlue ®
(diesel engine only) ...........331
Battery ............................................... 333
Jump starting .................................... 336
Towing the vehicle ............................338
Fuses .................................................. 340 269Practical hints
251_AKB; 4; 52, en-US
d2ureepe,
Version: 2.11.8.1 2009-03-23T09:22:52+01:00 - Seite 269
Page 272 of 364
Vehicle equipment
i This Operator’s Manual describes all
features, standard or optional, potentially
available for your vehicle at the time of
purchase. Please be aware that your
vehicle might not be equipped with all
features described in this manual. Where will I find ...?
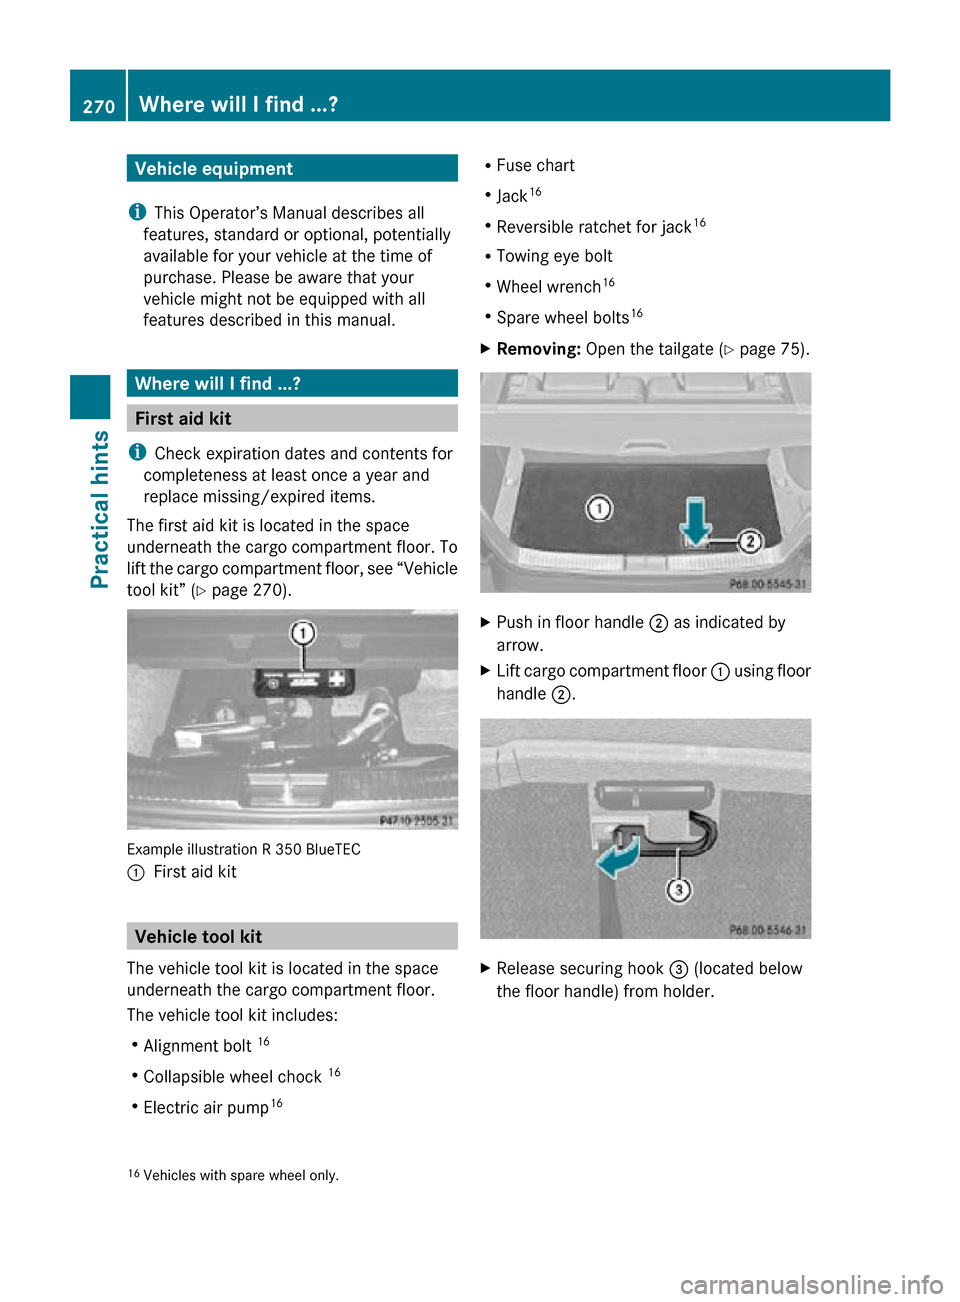
First aid kit
i Check expiration dates and contents for
completeness at least once a year and
replace missing/expired items.
The first aid kit is located in the space
underneath the cargo compartment floor. To
lift the cargo compartment floor, see “Vehicle
tool kit” (Y page 270). Example illustration R 350 BlueTEC
:
First aid kit Vehicle tool kit
The vehicle tool kit is located in the space
underneath the cargo compartment floor.
The vehicle tool kit includes:
R Alignment bolt 16
R Collapsible wheel chock 16
R Electric air pump 16 R
Fuse chart
R Jack 16
R Reversible ratchet for jack 16
R Towing eye bolt
R Wheel wrench 16
R Spare wheel bolts 16
X Removing: Open the tailgate ( Y page 75). X
Push in floor handle ; as indicated by
arrow.
X Lift cargo compartment floor : using floor
handle ;. X
Release securing hook = (located below
the floor handle) from holder.
16 Vehicles with spare wheel only. 270
Where will I find ...?Practical hints
251_AKB; 4; 52, en-US
d2ureepe,
Version: 2.11.8.1 2009-03-23T09:22:52+01:00 - Seite 270
Page 274 of 364
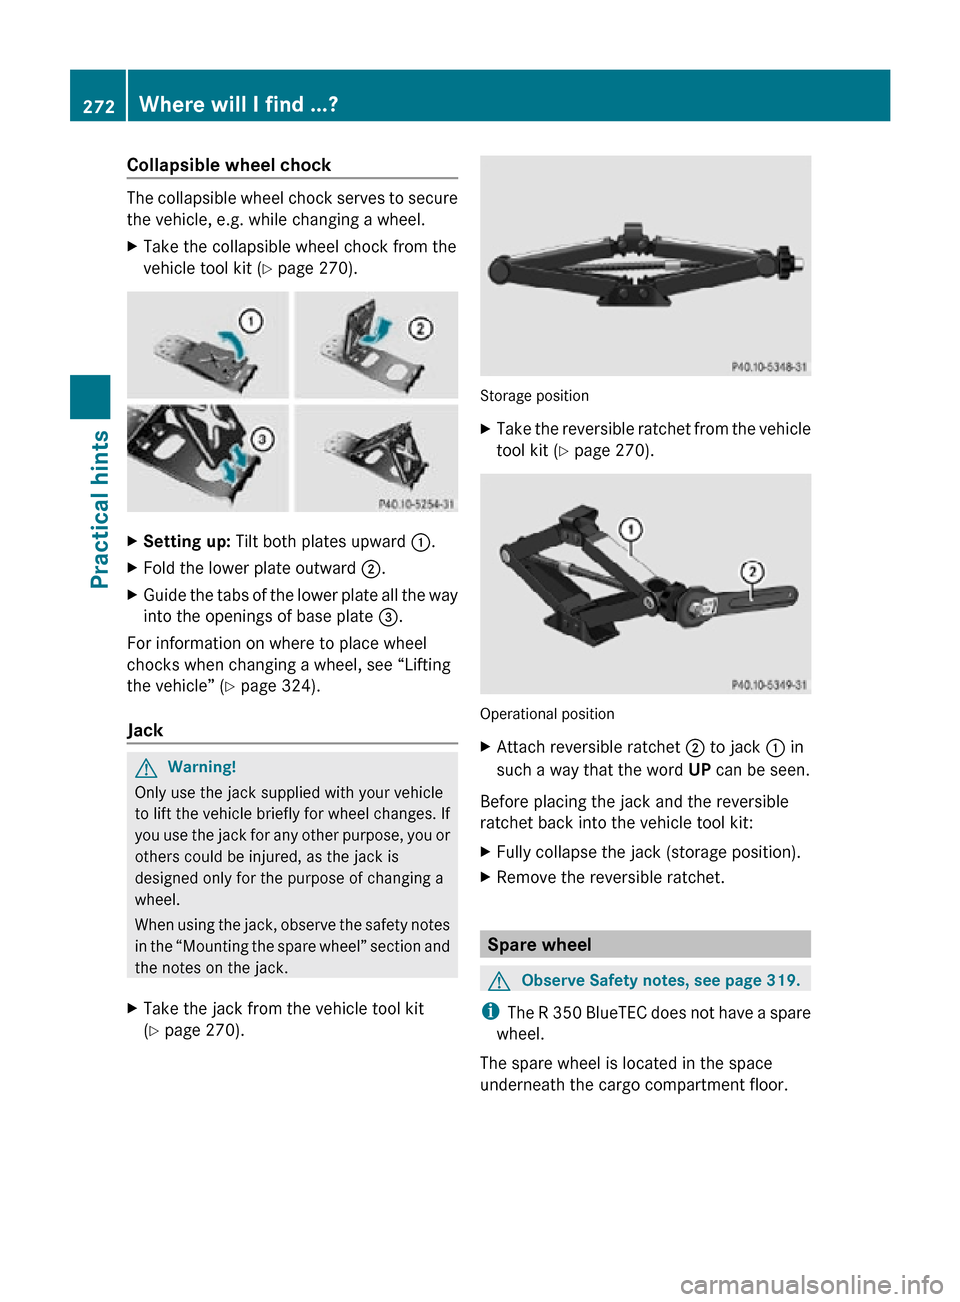
Collapsible wheel chock
The collapsible wheel chock serves to secure
the vehicle, e.g. while changing a wheel.
X
Take the collapsible wheel chock from the
vehicle tool kit (Y page 270). X
Setting up: Tilt both plates upward :.
X Fold the lower plate outward ;.
X Guide the tabs of the lower plate all the way
into the openings of base plate =.
For information on where to place wheel
chocks when changing a wheel, see “Lifting
the vehicle” ( Y page 324).
Jack G
Warning!
Only use the jack supplied with your vehicle
to lift the vehicle briefly for wheel changes. If
you use the jack for any other purpose, you or
others could be injured, as the jack is
designed only for the purpose of changing a
wheel.
When using the jack, observe the safety notes
in the “Mounting the spare wheel” section and
the notes on the jack.
X Take the jack from the vehicle tool kit
(Y page 270). Storage position
X
Take the reversible ratchet from the vehicle
tool kit ( Y page 270). Operational position
X
Attach reversible ratchet ; to jack : in
such a way that the word UP can be seen.
Before placing the jack and the reversible
ratchet back into the vehicle tool kit:
X Fully collapse the jack (storage position).
X Remove the reversible ratchet. Spare wheel
G
Observe Safety notes, see page 319.
i The R 350 BlueTEC does not have a spare
wheel.
The spare wheel is located in the space
underneath the cargo compartment floor. 272
Where will I find ...?Practical hints
251_AKB; 4; 52, en-US
d2ureepe,
Version: 2.11.8.1 2009-03-23T09:22:52+01:00 - Seite 272
Page 292 of 364
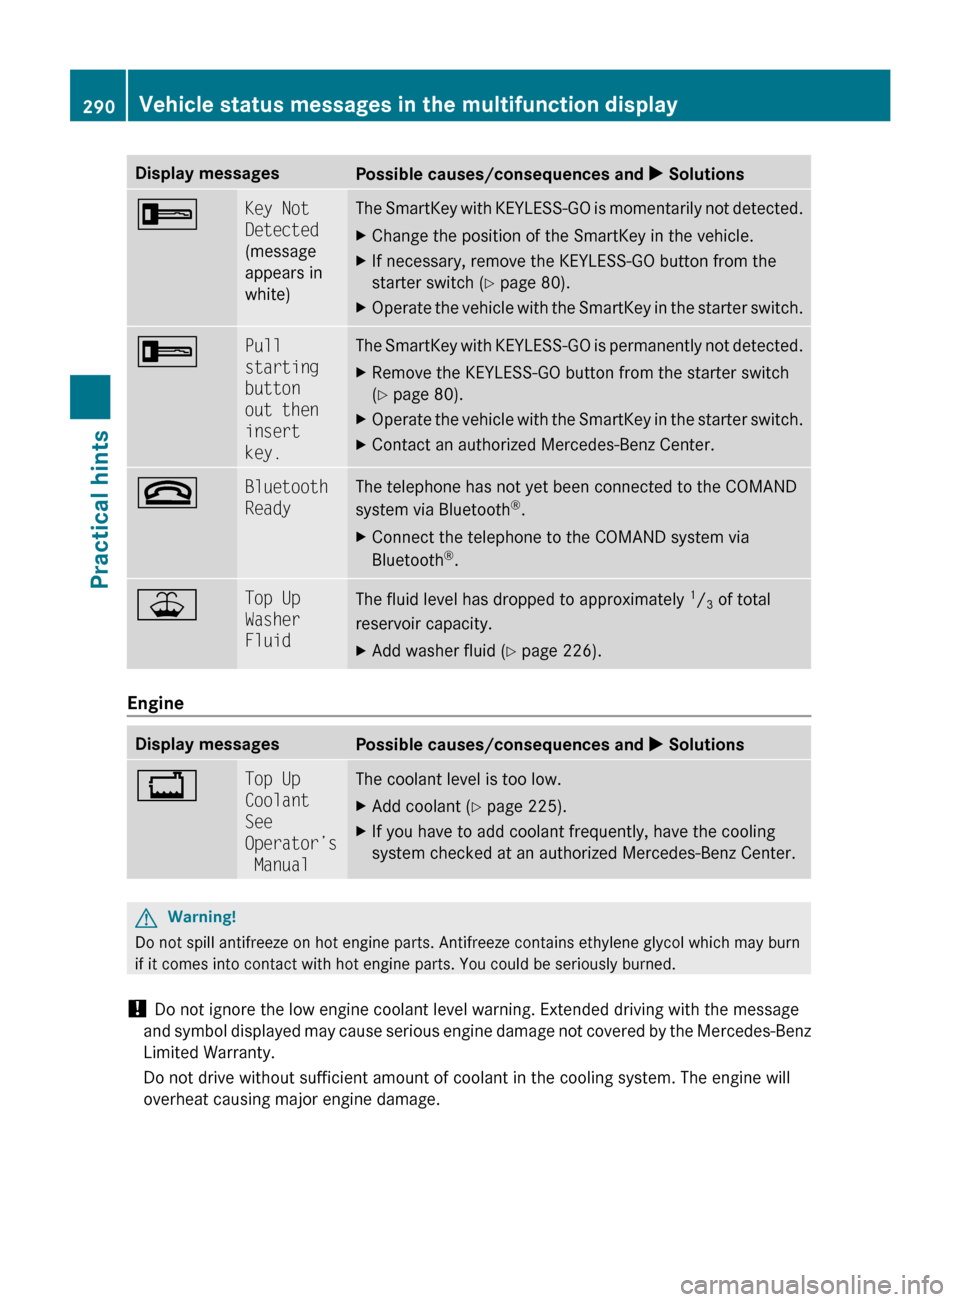
Display messages
Possible causes/consequences and
X Solutions+ Key Not
Detected
(message
appears in
white) The SmartKey with KEYLESS-GO is momentarily not detected.
X
Change the position of the SmartKey in the vehicle.
X If necessary, remove the KEYLESS-GO button from the
starter switch ( Y page 80).
X Operate the vehicle with the SmartKey in the starter switch. + Pull
starting
button
out then
insert
key. The SmartKey with KEYLESS-GO is permanently not detected.
X
Remove the KEYLESS-GO button from the starter switch
(Y page 80).
X Operate the vehicle with the SmartKey in the starter switch.
X Contact an authorized Mercedes-Benz Center. ~ Bluetooth
Ready The telephone has not yet been connected to the COMAND
system via Bluetooth
®
.
X Connect the telephone to the COMAND system via
Bluetooth ®
. ¥ Top Up
Washer
Fluid
The fluid level has dropped to approximately
1
/ 3 of total
reservoir capacity.
X Add washer fluid ( Y page 226).Engine
Display messages
Possible causes/consequences and
X Solutions+ Top Up
Coolant
See
Operator’s
Manual The coolant level is too low.
X
Add coolant (Y page 225).
X If you have to add coolant frequently, have the cooling
system checked at an authorized Mercedes-Benz Center. G
Warning!
Do not spill antifreeze on hot engine parts. Antifreeze contains ethylene glycol which may burn
if it comes into contact with hot engine parts. You could be seriously burned.
! Do not ignore the low engine coolant level warning. Extended driving with the message
and
symbol displayed may cause serious engine damage not covered by the Mercedes-Benz
Limited Warranty.
Do not drive without sufficient amount of coolant in the cooling system. The engine will
overheat causing major engine damage. 290
Vehicle status messages in the multifunction display
Practical hints
251_AKB; 4; 52, en-US
d2ureepe,
Version: 2.11.8.1 2009-03-23T09:22:52+01:00 - Seite 290
Page 296 of 364
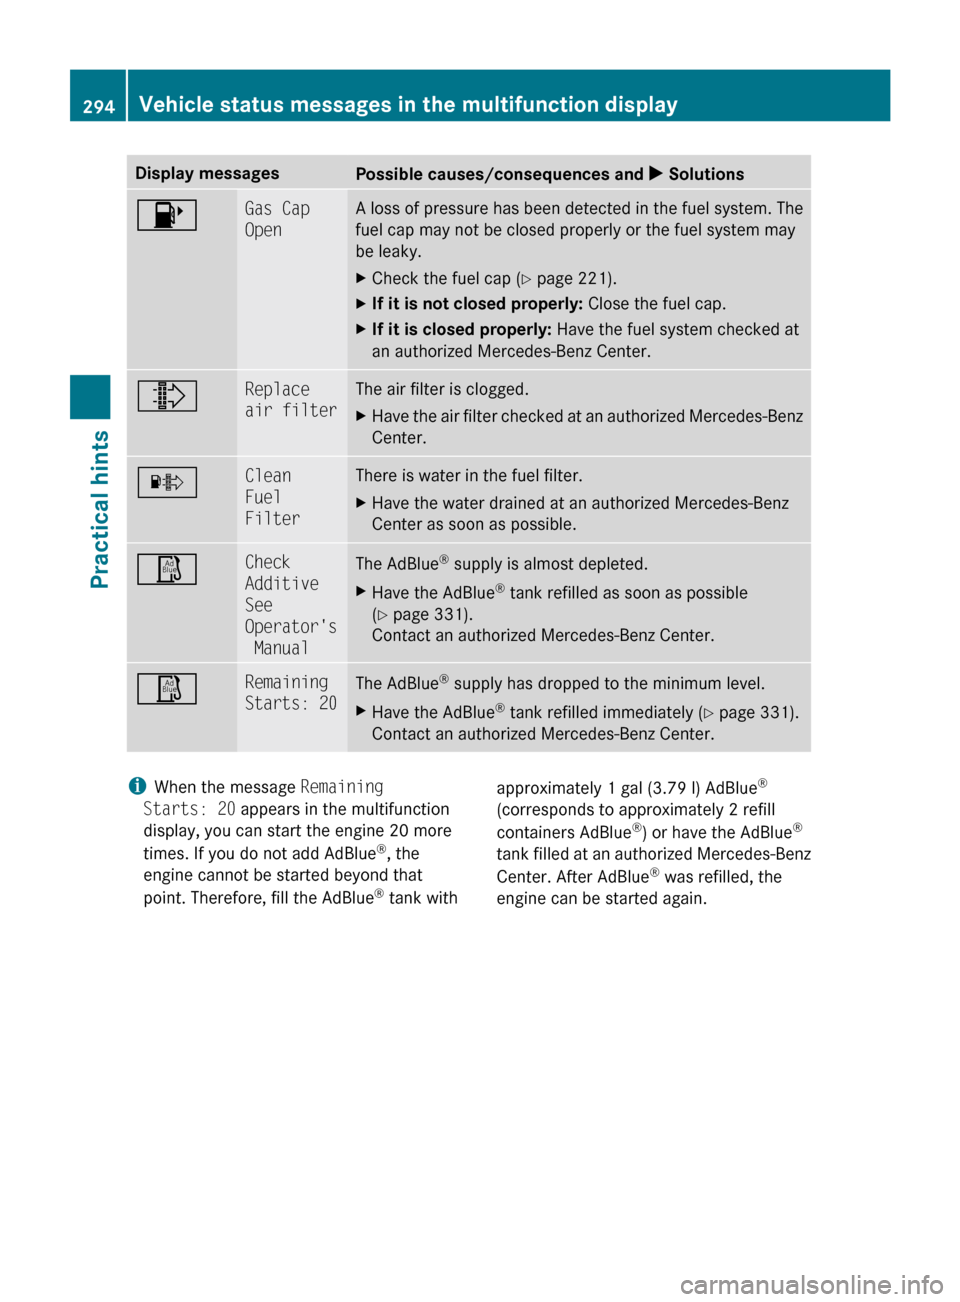
Display messages
Possible causes/consequences and
X Solutions8 Gas Cap
Open A loss of pressure has been detected in the fuel system. The
fuel cap may not be closed properly or the fuel system may
be leaky.
X
Check the fuel cap ( Y page 221).
X If it is not closed properly: Close the fuel cap.
X If it is closed properly: Have the fuel system checked at
an authorized Mercedes-Benz Center. ¸ Replace
air filter The air filter is clogged.
X
Have the air filter checked at an authorized Mercedes-Benz
Center. · Clean
Fuel
Filter There is water in the fuel filter.
X
Have the water drained at an authorized Mercedes-Benz
Center as soon as possible. Ø Check
Additive
See
Operator's
Manual
The AdBlue
®
supply is almost depleted.
X Have the AdBlue ®
tank refilled as soon as possible
(Y page 331).
Contact an authorized Mercedes-Benz Center. Ø Remaining
Starts: 20
The AdBlue
®
supply has dropped to the minimum level.
X Have the AdBlue ®
tank refilled immediately (Y page 331).
Contact an authorized Mercedes-Benz Center. i
When the message Remaining
Starts: 20 appears in the multifunction
display, you can start the engine 20 more
times. If you do not add AdBlue ®
, the
engine cannot be started beyond that
point. Therefore, fill the AdBlue ®
tank with approximately 1 gal (3.79 l) AdBlue
®
(corresponds to approximately 2 refill
containers AdBlue ®
) or have the AdBlue ®
tank
filled at an authorized Mercedes-Benz
Center. After AdBlue ®
was refilled, the
engine can be started again. 294
Vehicle status messages in the multifunction display
Practical hints
251_AKB; 4; 52, en-US
d2ureepe,
Version: 2.11.8.1 2009-03-23T09:22:52+01:00 - Seite 294