2010 MERCEDES-BENZ GLK350 4MATIC mirror controls
[x] Cancel search: mirror controlsPage 89 of 344
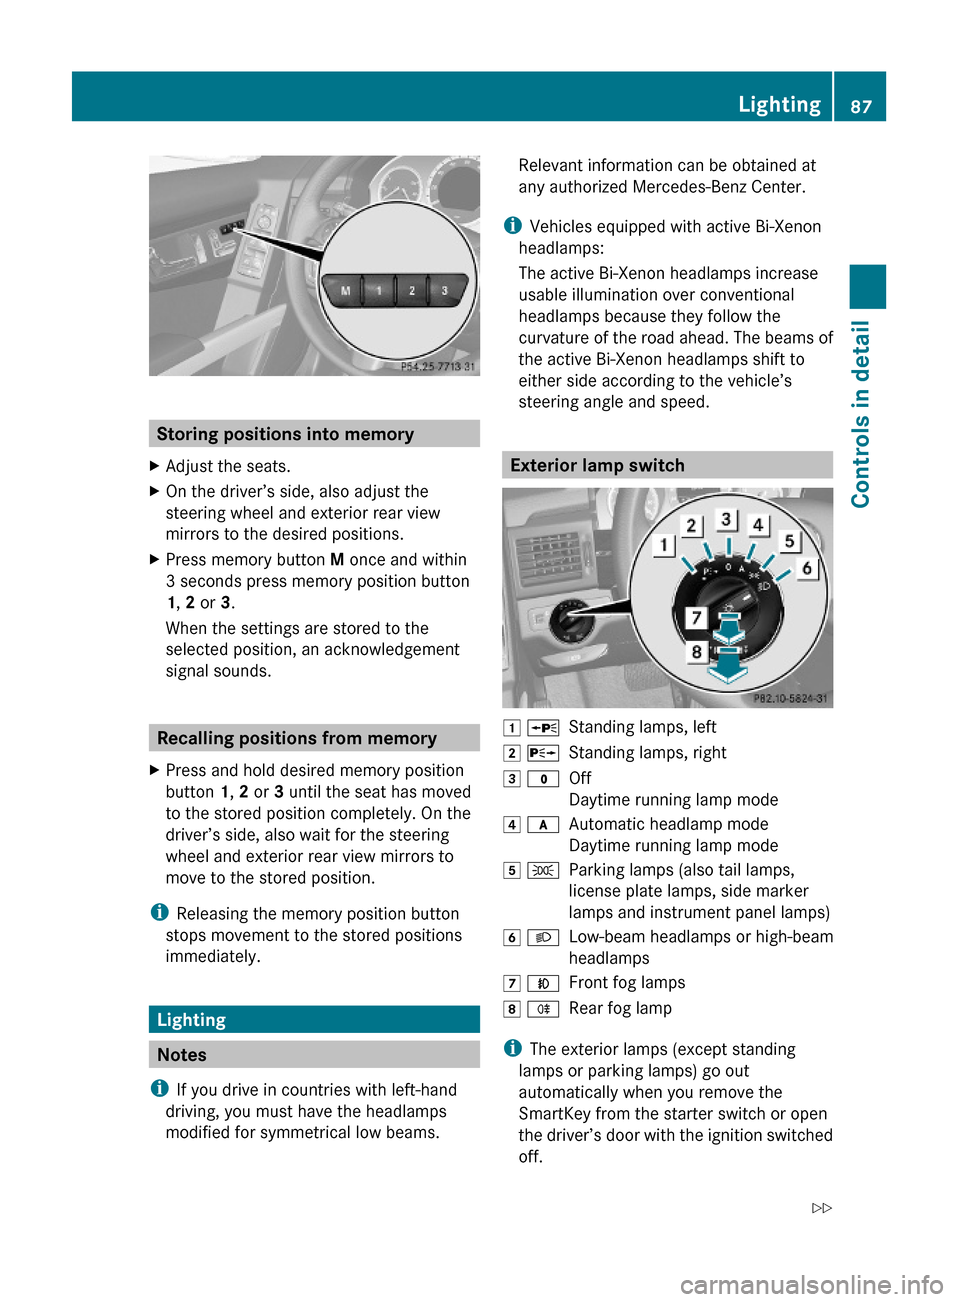
Storing positions into memory
XAdjust the seats.XOn the driver’s side, also adjust the
steering wheel and exterior rear view
mirrors to the desired positions.
XPress memory button M once and within
3 seconds press memory position button
1, 2 or 3.
When the settings are stored to the
selected position, an acknowledgement
signal sounds.
Recalling positions from memory
XPress and hold desired memory position
button 1, 2 or 3 until the seat has moved
to the stored position completely. On the
driver’s side, also wait for the steering
wheel and exterior rear view mirrors to
move to the stored position.
iReleasing the memory position button
stops movement to the stored positions
immediately.
Lighting
Notes
iIf you drive in countries with left-hand
driving, you must have the headlamps
modified for symmetrical low beams.
Relevant information can be obtained at
any authorized Mercedes-Benz Center.
iVehicles equipped with active Bi-Xenon
headlamps:
The active Bi-Xenon headlamps increase
usable illumination over conventional
headlamps because they follow the
curvature of the road ahead. The beams of
the active Bi-Xenon headlamps shift to
either side according to the vehicle’s
steering angle and speed.
Exterior lamp switch
1 WStanding lamps, left2 XStanding lamps, right3 $Off
Daytime running lamp mode
4 cAutomatic headlamp mode
Daytime running lamp mode
5 TParking lamps (also tail lamps,
license plate lamps, side marker
lamps and instrument panel lamps)
6 LLow-beam headlamps or high-beam
headlamps
7 NFront fog lamps8 RRear fog lamp
iThe exterior lamps (except standing
lamps or parking lamps) go out
automatically when you remove the
SmartKey from the starter switch or open
the driver’s door with the ignition switched
off.
Lighting87Controls in detailX204_AKB; 3; 23, en-USd2ureepe,Version: 2.11.8.12009-07-16T19:16:58+02:00 - Seite 87Z
Page 122 of 344
XPress button : or 9 to select a
submenu.
Scroll down with button :, scroll up with
button 9.
With the selection marker on the desired
submenu, use the button a to access the
individual functions within that submenu.
Once within the submenu, you can use button
9 to move to the next function or
button : to move to the previous function
within that submenu.
The following lists show what settings can be
changed within the various menus. Detailed
instructions on making individual settings can
be found on the following pages.
Instrument cluster submenu
RSelecting speedometer display mode
(Y page 120)
RPermanent display (speed display or
outside temperature) (Y page 121)
Time/Date submenu
RSetting the time (Y page 121)
RSetting the date (Y page 121)
Lights submenu
RSwitching daytime running lamp mode on
or off (USA only) (Y page 122)
RSwitching locator lighting on or off
(Y page 122)
RSwitching interior lighting delayed shut-off
on or off (Y page 123)
Vehicle submenu
RSwitching automatic central locking on or
off (Y page 124)
Convenience submenu
RActivating easy-entry/exit feature
(Y page 124)
RSwitching fold-in function for exterior rear
view mirrors on or off (Y page 124)
Instrument cluster submenu
Access the Instr. Cluster submenu via
the Settings menu. Use the Instr.
Cluster submenu to change the instrument
cluster display settings.
The following functions are available:
RSelecting speedometer display mode
(Y page 120)
RPermanent display (speed display or
outside temperature) (Y page 121)
Selecting speedometer display mode
XPress = or ; to select the
Settings menu.
XPress button : or 9 to select the
Instr. Cluster submenu.
XPress button a.XPress button : or 9 to select the
Display Unit Speed-/Odometer:
function.
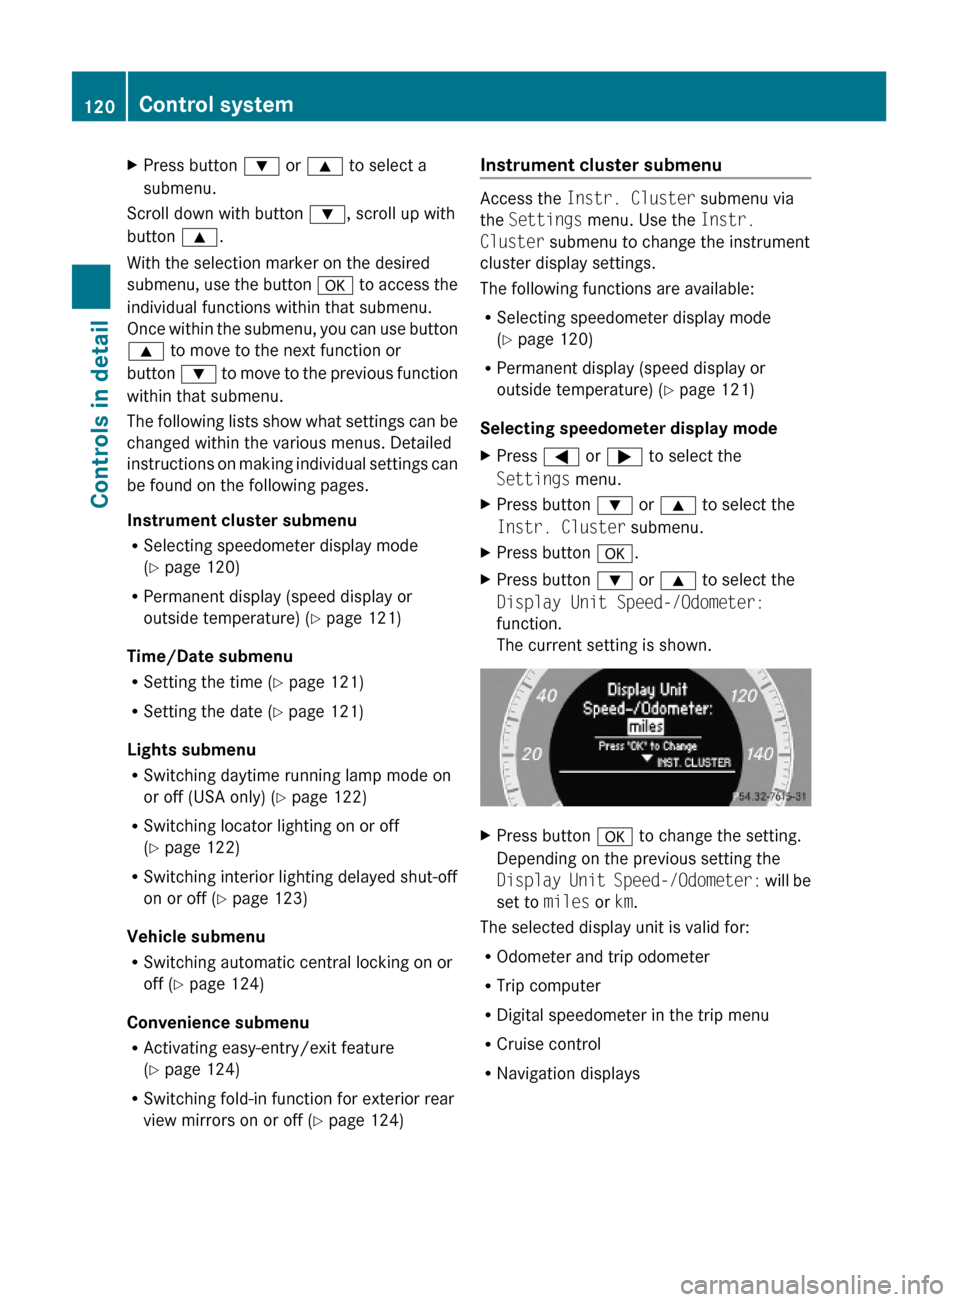
The current setting is shown.
XPress button a to change the setting.
Depending on the previous setting the
Display Unit Speed-/Odometer: will be
set to miles or km.
The selected display unit is valid for:
ROdometer and trip odometer
RTrip computer
RDigital speedometer in the trip menu
RCruise control
RNavigation displays
120Control systemControls in detail
X204_AKB; 3; 23, en-USd2ureepe,Version: 2.11.8.12009-07-16T19:16:58+02:00 - Seite 120
Page 126 of 344
Switching automatic central locking on or
off
Use this function to switch the automatic
central locking on or off. With the automatic
central locking activated, the vehicle is
locked centrally at a vehicle speed of
approximately 9 mph (15 km/h).
XPress button = or ; to select the
Settings menu.
XPress button : or 9 to select the
Vehicle submenu.
XPress button a.XPress button : or 9 to select the
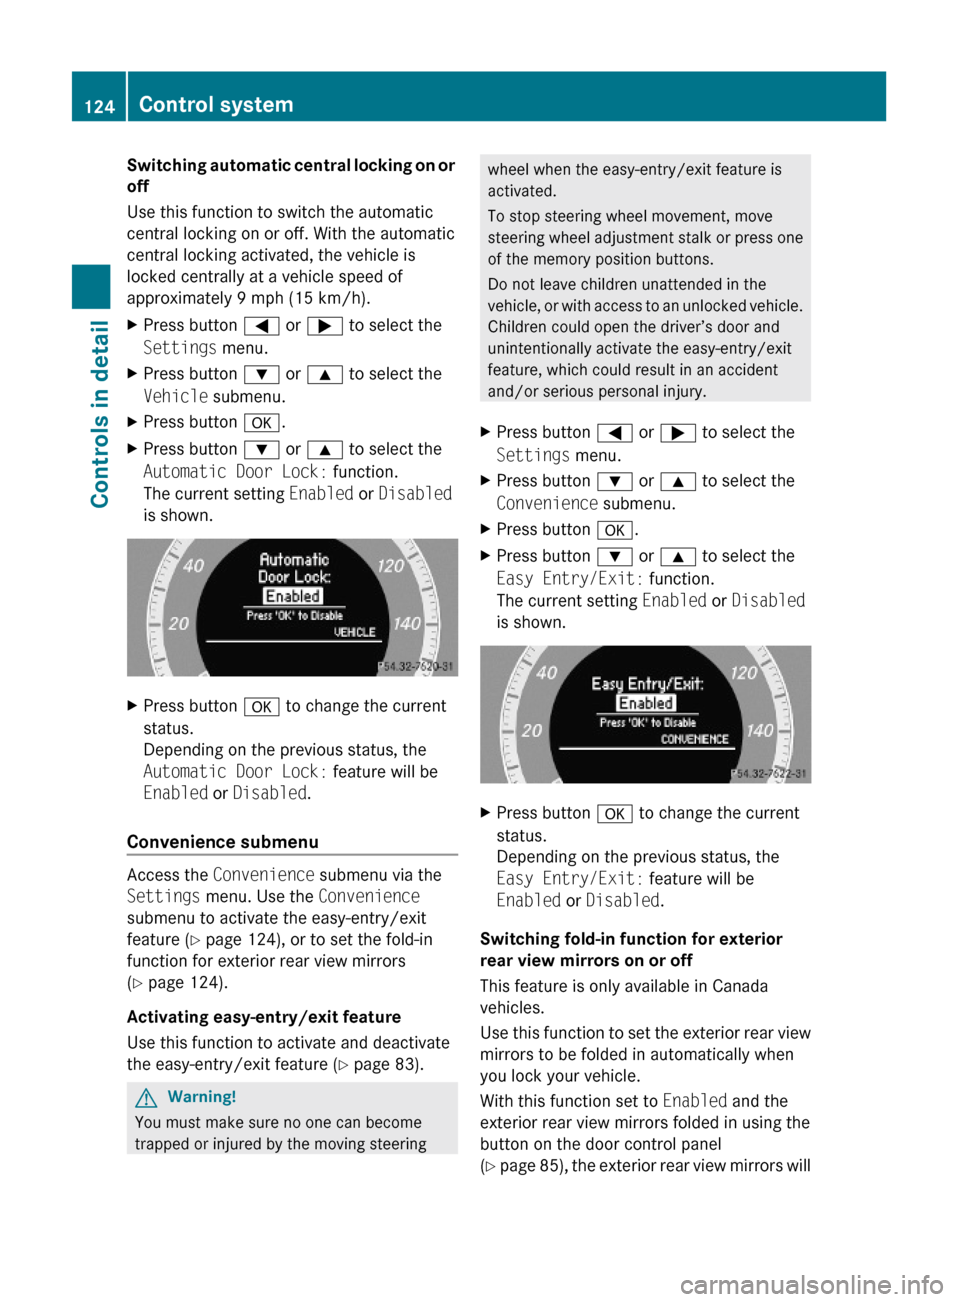
Automatic Door Lock: function.
The current setting Enabled or Disabled
is shown.
XPress button a to change the current
status.
Depending on the previous status, the
Automatic Door Lock: feature will be
Enabled or Disabled.
Convenience submenu
Access the Convenience submenu via the
Settings menu. Use the Convenience
submenu to activate the easy-entry/exit
feature (Y page 124), or to set the fold-in
function for exterior rear view mirrors
(Y page 124).
Activating easy-entry/exit feature
Use this function to activate and deactivate
the easy-entry/exit feature (Y page 83).
GWarning!
You must make sure no one can become
trapped or injured by the moving steering
wheel when the easy-entry/exit feature is
activated.
To stop steering wheel movement, move
steering wheel adjustment stalk or press one
of the memory position buttons.
Do not leave children unattended in the
vehicle, or with access to an unlocked vehicle.
Children could open the driver’s door and
unintentionally activate the easy-entry/exit
feature, which could result in an accident
and/or serious personal injury.
XPress button = or ; to select the
Settings menu.
XPress button : or 9 to select the
Convenience submenu.
XPress button a.XPress button : or 9 to select the
Easy Entry/Exit: function.
The current setting Enabled or Disabled
is shown.
XPress button a to change the current
status.
Depending on the previous status, the
Easy Entry/Exit: feature will be
Enabled or Disabled.
Switching fold-in function for exterior
rear view mirrors on or off
This feature is only available in Canada
vehicles.
Use this function to set the exterior rear view
mirrors to be folded in automatically when
you lock your vehicle.
With this function set to Enabled and the
exterior rear view mirrors folded in using the
button on the door control panel
(Y page 85), the exterior rear view mirrors will
124Control systemControls in detail
X204_AKB; 3; 23, en-USd2ureepe,Version: 2.11.8.12009-07-16T19:16:58+02:00 - Seite 124
Page 127 of 344
not fold out when you switch on the ignition.
You will then have to fold out the exterior rear
view mirrors using the button on the door
control panel (Y page 85).
Make sure both exterior rear view mirrors are
folded out completely before driving off.
XPress button = or ; to select the
Settings menu.
XPress button : or 9 to select the
Convenience submenu.
XPress a.XPress button : or 9 to select the
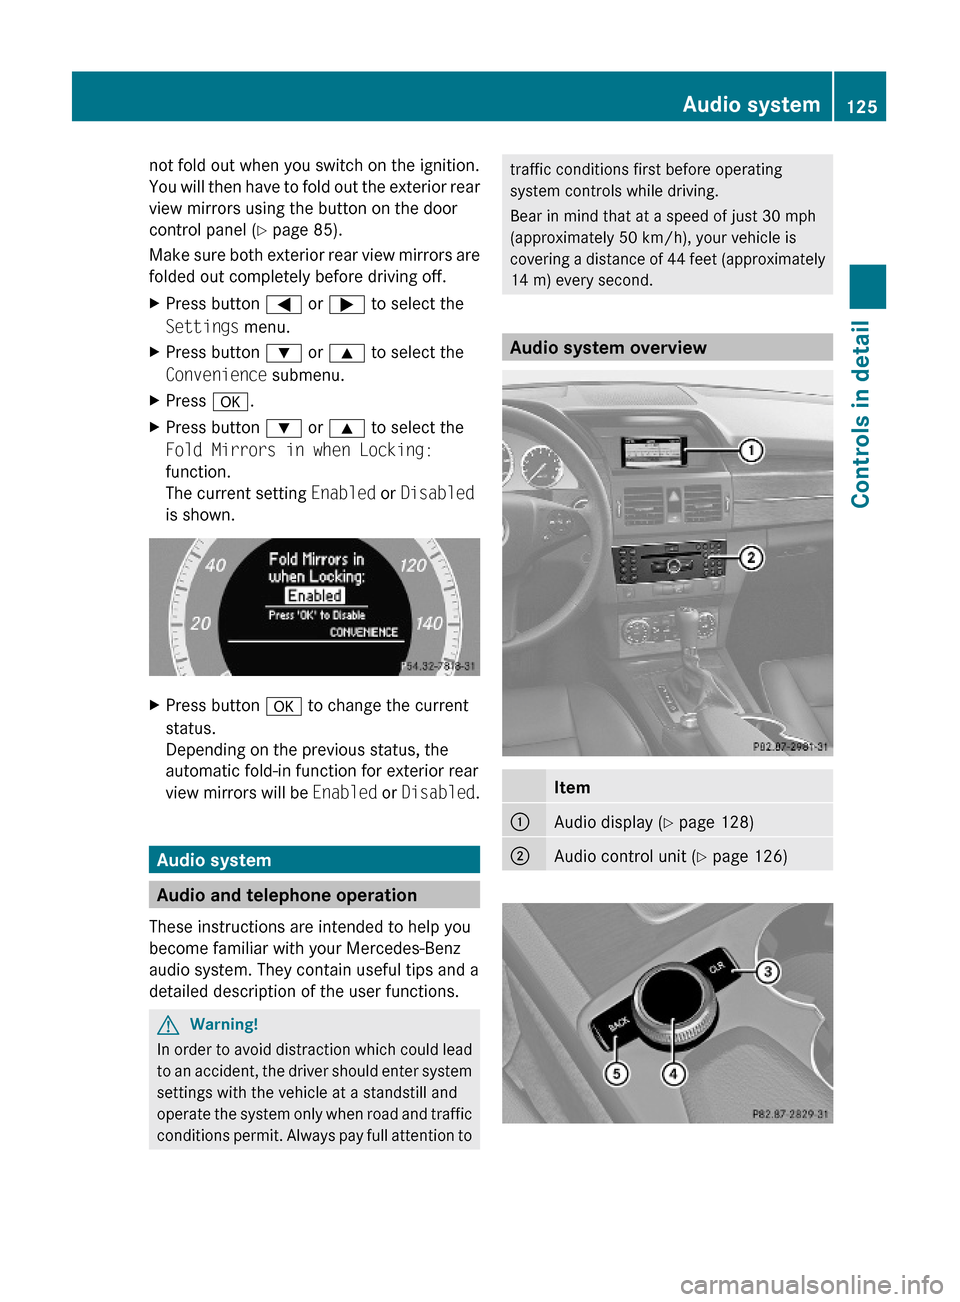
Fold Mirrors in when Locking:
function.
The current setting Enabled or Disabled
is shown.
XPress button a to change the current
status.
Depending on the previous status, the
automatic fold-in function for exterior rear
view mirrors will be Enabled or Disabled.
Audio system
Audio and telephone operation
These instructions are intended to help you
become familiar with your Mercedes-Benz
audio system. They contain useful tips and a
detailed description of the user functions.
GWarning!
In order to avoid distraction which could lead
to an accident, the driver should enter system
settings with the vehicle at a standstill and
operate the system only when road and traffic
conditions permit. Always pay full attention to
traffic conditions first before operating
system controls while driving.
Bear in mind that at a speed of just 30 mph
(approximately 50 km/h), your vehicle is
covering a distance of 44 feet (approximately
14 m) every second.
Audio system overview
Item:Audio display (Y page 128);Audio control unit (Y page 126)Audio system125Controls in detailX204_AKB; 3; 23, en-USd2ureepe,Version: 2.11.8.12009-07-16T19:16:58+02:00 - Seite 125Z
Page 176 of 344
RFront area: An intermittent acoustic
warning will sound as the first red distance
segment illuminates and a constant
acoustic warning lasting a maximum of
2 seconds will sound for the second red
distance segment. The signal is canceled
when the automatic transmission is shifted
into park position P or the parking brake is
engaged.
RRear area: An intermittent acoustic
warning will sound as the first red distance
segment illuminates and a constant
acoustic warning lasting a maximum of
2 seconds will sound for the second red
distance segment. The signal is canceled
when the automatic transmission is shifted
into drive position D, or park position P, or
the parking brake is engaged.
Switching the Parktronic system on/
off
The Parktronic system switches on
automatically when the ignition is switched
on.
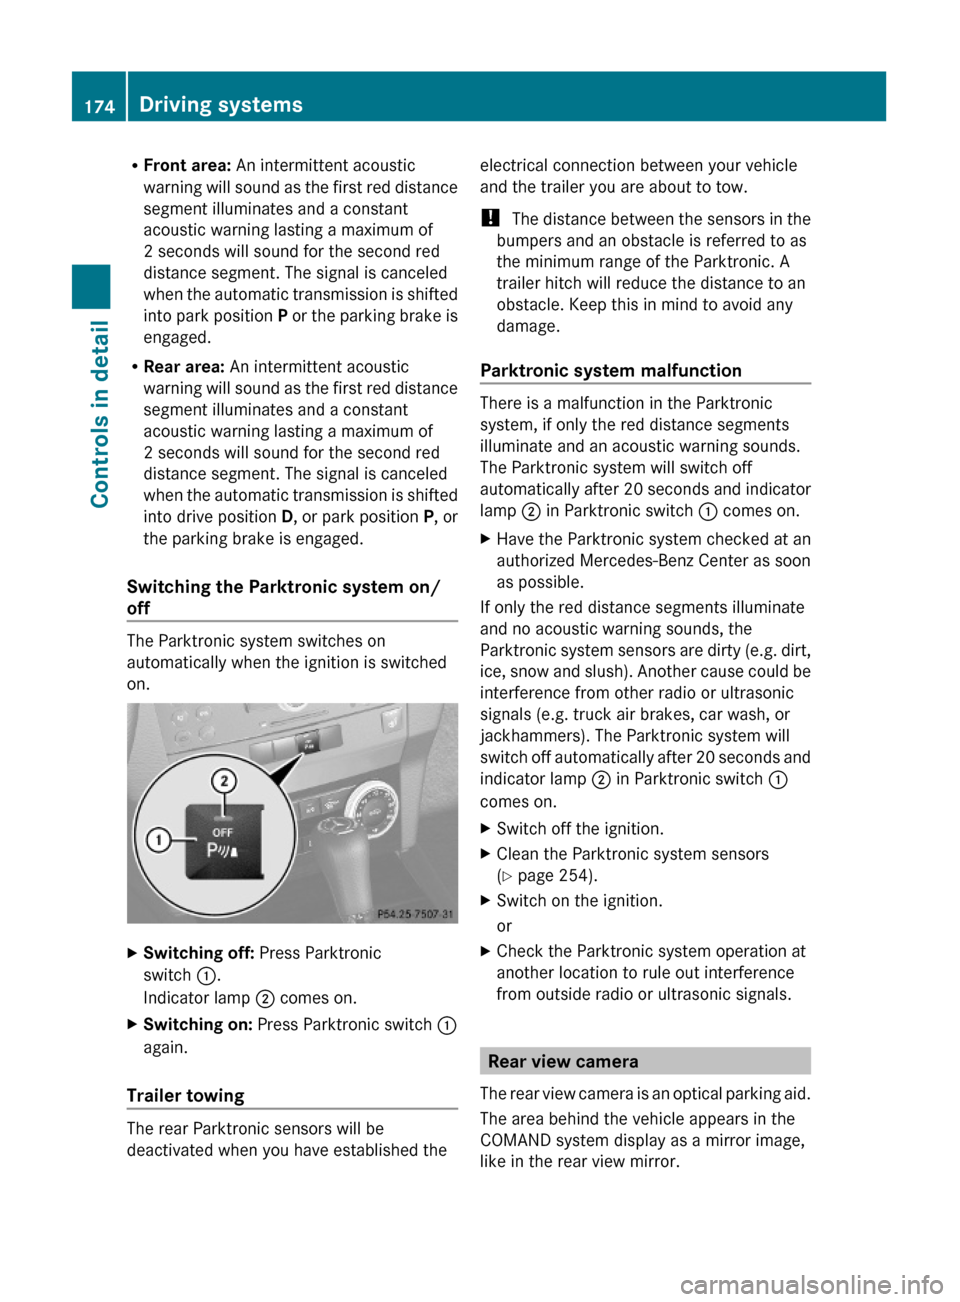
XSwitching off: Press Parktronic
switch :.
Indicator lamp ; comes on.
XSwitching on: Press Parktronic switch :
again.
Trailer towing
The rear Parktronic sensors will be
deactivated when you have established the
electrical connection between your vehicle
and the trailer you are about to tow.
! The distance between the sensors in the
bumpers and an obstacle is referred to as
the minimum range of the Parktronic. A
trailer hitch will reduce the distance to an
obstacle. Keep this in mind to avoid any
damage.
Parktronic system malfunction
There is a malfunction in the Parktronic
system, if only the red distance segments
illuminate and an acoustic warning sounds.
The Parktronic system will switch off
automatically after 20 seconds and indicator
lamp ; in Parktronic switch : comes on.
XHave the Parktronic system checked at an
authorized Mercedes-Benz Center as soon
as possible.
If only the red distance segments illuminate
and no acoustic warning sounds, the
Parktronic system sensors are dirty (e.g. dirt,
ice, snow and slush). Another cause could be
interference from other radio or ultrasonic
signals (e.g. truck air brakes, car wash, or
jackhammers). The Parktronic system will
switch off automatically after 20 seconds and
indicator lamp ; in Parktronic switch :
comes on.
XSwitch off the ignition.XClean the Parktronic system sensors
(Y page 254).
XSwitch on the ignition.
or
XCheck the Parktronic system operation at
another location to rule out interference
from outside radio or ultrasonic signals.
Rear view camera
The rear view camera is an optical parking aid.
The area behind the vehicle appears in the
COMAND system display as a mirror image,
like in the rear view mirror.
174Driving systemsControls in detail
X204_AKB; 3; 23, en-USd2ureepe,Version: 2.11.8.12009-07-16T19:16:58+02:00 - Seite 174
Page 197 of 344
Useful features
Cup holders
GWarning!
In order to help prevent spilling liquids on
vehicle occupants and/or vehicle equipment,
only use containers that fit into the cup
holder. Use lids on open containers and do
not fill containers to a height where the
contents, especially hot liquids, could spill
during braking, vehicle maneuvers, or in an
accident. Liquids spilled on vehicle occupants
may cause serious personal injury. Liquids
spilled on vehicle equipment may cause
damage not covered by the Mercedes-Benz
Limited Warranty.
When not in use, keep the cup holder closed.
An open cup holder may cause injury to you
or others when contacted during braking,
vehicle maneuvers, or in an accident.
Keep in mind that objects placed in the cup
holder may come loose during braking,
vehicle maneuvers, or in an accident and be
thrown around in the vehicle interior. Objects
thrown around in the vehicle interior may
cause an accident and/or serious personal
injury.
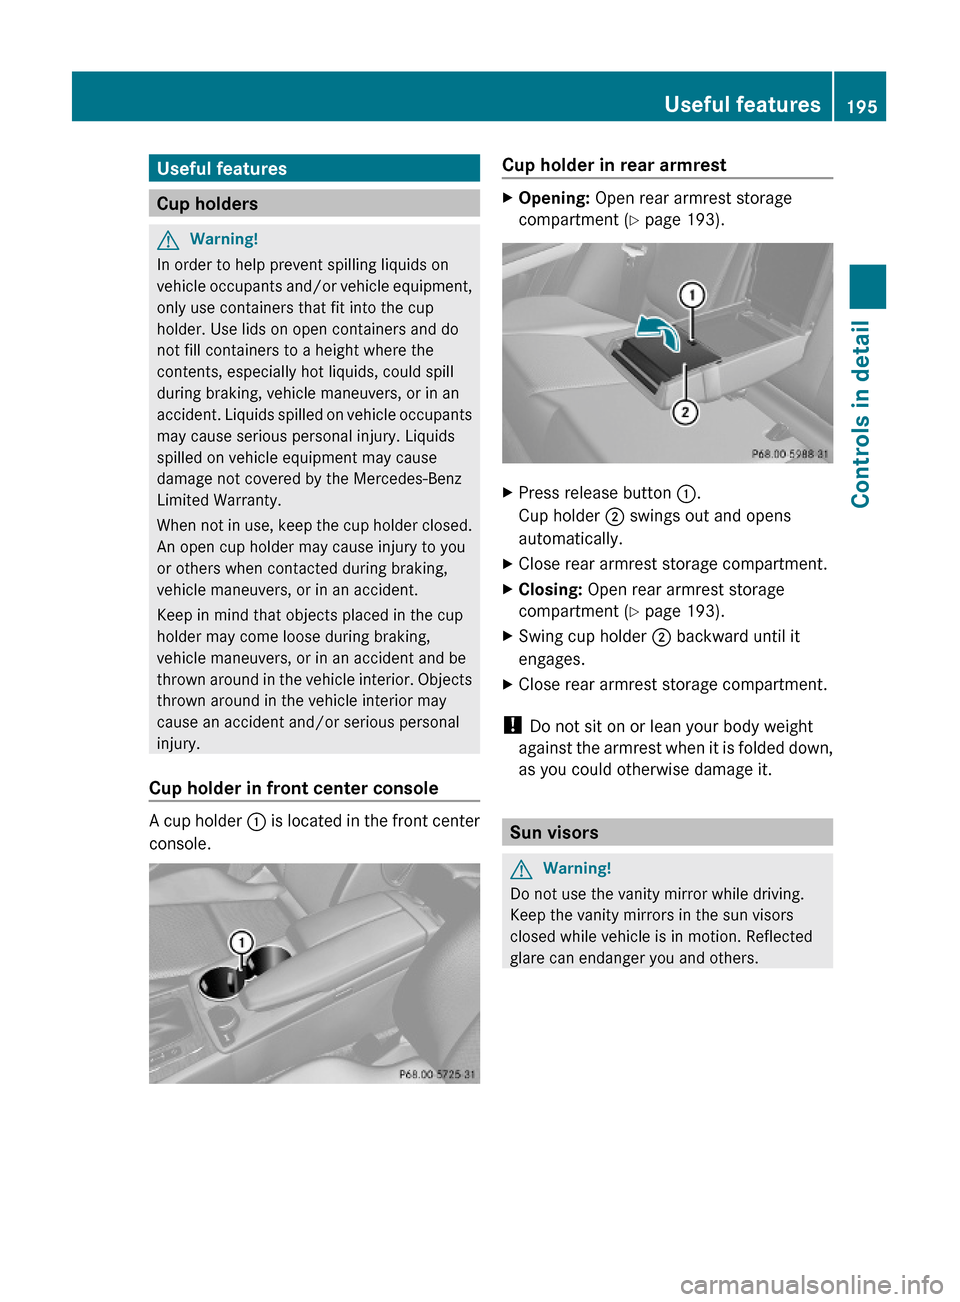
Cup holder in front center console
A cup holder : is located in the front center
console.
Cup holder in rear armrest XOpening: Open rear armrest storage
compartment (Y page 193).
XPress release button :.
Cup holder ; swings out and opens
automatically.
XClose rear armrest storage compartment.XClosing: Open rear armrest storage
compartment (Y page 193).
XSwing cup holder ; backward until it
engages.
XClose rear armrest storage compartment.
! Do not sit on or lean your body weight
against the armrest when it is folded down,
as you could otherwise damage it.
Sun visors
GWarning!
Do not use the vanity mirror while driving.
Keep the vanity mirrors in the sun visors
closed while vehicle is in motion. Reflected
glare can endanger you and others.
Useful features195Controls in detailX204_AKB; 3; 23, en-USd2ureepe,Version: 2.11.8.12009-07-16T19:16:58+02:00 - Seite 195Z
Page 198 of 344
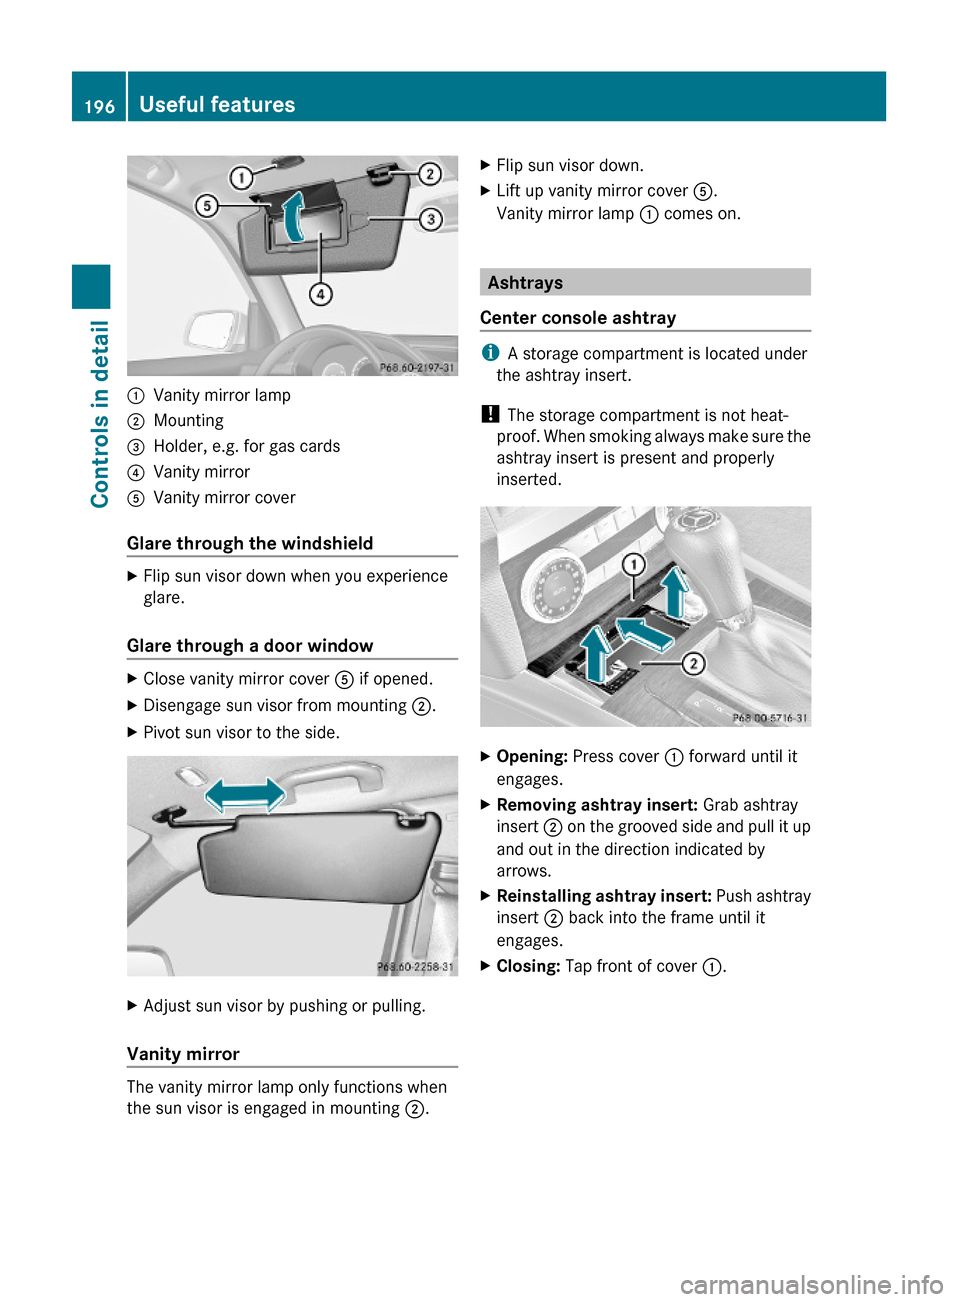
:Vanity mirror lamp;Mounting=Holder, e.g. for gas cards?Vanity mirrorAVanity mirror cover
Glare through the windshield
XFlip sun visor down when you experience
glare.
Glare through a door window
XClose vanity mirror cover A if opened.XDisengage sun visor from mounting ;.XPivot sun visor to the side.XAdjust sun visor by pushing or pulling.
Vanity mirror
The vanity mirror lamp only functions when
the sun visor is engaged in mounting ;.
XFlip sun visor down.XLift up vanity mirror cover A.
Vanity mirror lamp : comes on.
Ashtrays
Center console ashtray
iA storage compartment is located under
the ashtray insert.
! The storage compartment is not heat-
proof. When smoking always make sure the
ashtray insert is present and properly
inserted.
XOpening: Press cover : forward until it
engages.
XRemoving ashtray insert: Grab ashtray
insert ; on the grooved side and pull it up
and out in the direction indicated by
arrows.
XReinstalling ashtray insert: Push ashtray
insert ; back into the frame until it
engages.
XClosing: Tap front of cover :.196Useful featuresControls in detail
X204_AKB; 3; 23, en-USd2ureepe,Version: 2.11.8.12009-07-16T19:16:58+02:00 - Seite 196
Page 201 of 344
XOperation: Open cover =.XSwitch on the ignition.XInsert the plug of the small device into
115V AC socket :.
LED ; comes on.
If LED ; does not come on, refer to the
section on possible nonoperation causes.
XSwitching off: Pull the plug out of 115V AC
socket :.
Do not pull on the cable.
XClose cover =.
Possible nonoperation causes:
RThe on-board voltage of the vehicle is not
within the permissible voltage range.
XStart the engine.
RThe temperature of the DC/AC inverter is
temporarily too high.
XPull the plug of the small device out of
115V AC socket : and plug it in again
after waiting a few minutes.
RSome small devices have a continuous
power rating of less than 150 W but a very
high switch-on current. Such devices will
not operate. When connecting such a
device, 115V AC socket : will not provide
power.
If LED ; still does not come on, contact an
authorized Mercedes-Benz Center.
Compass
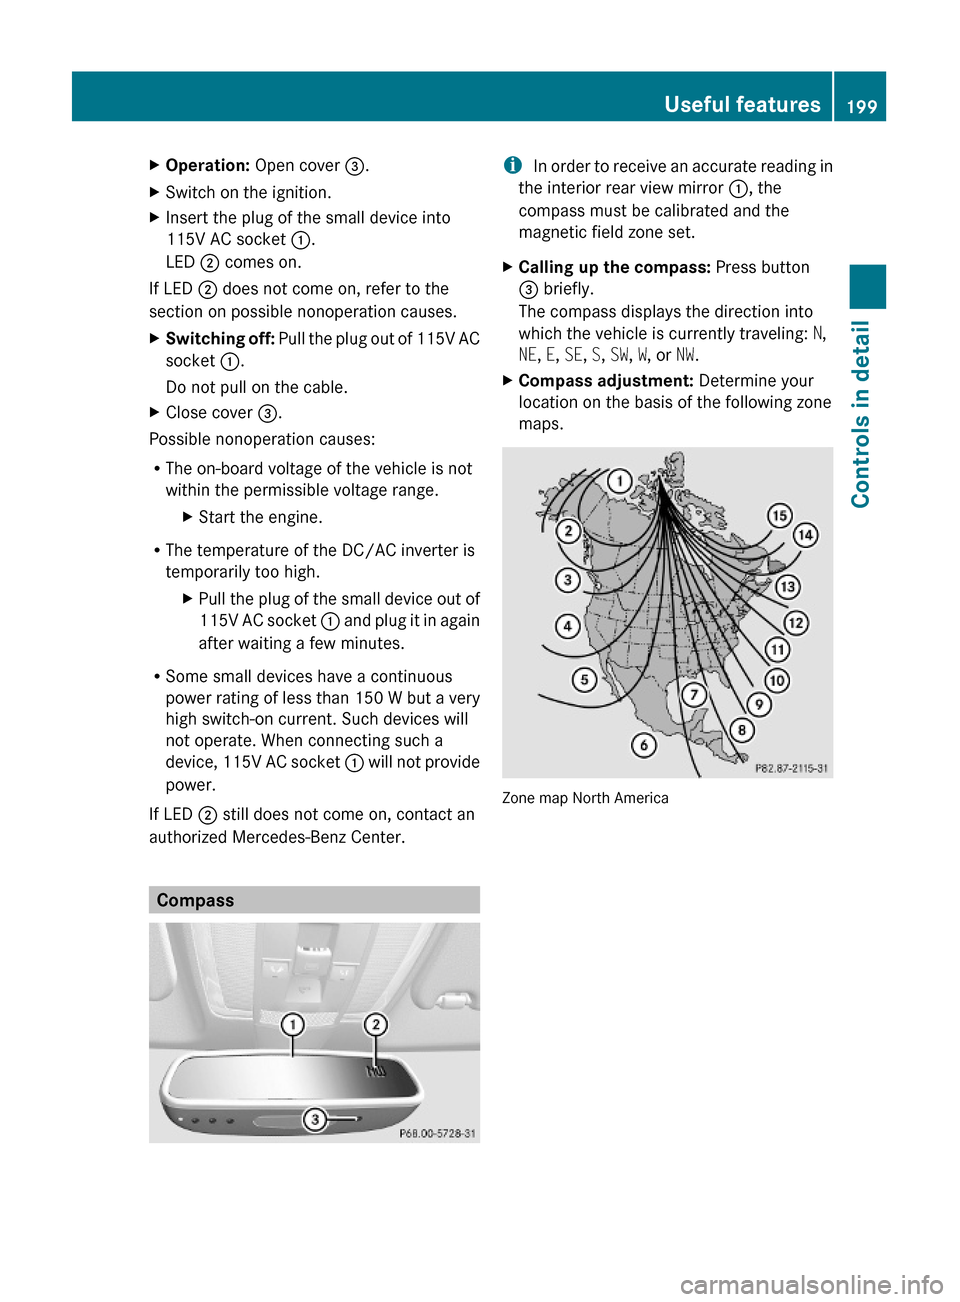
i In order to receive an accurate reading in
the interior rear view mirror :, the
compass must be calibrated and the
magnetic field zone set.
XCalling up the compass: Press button
= briefly.
The compass displays the direction into
which the vehicle is currently traveling: N,
NE, E, SE, S, SW, W, or NW.
XCompass adjustment: Determine your
location on the basis of the following zone
maps.
Zone map North America
Useful features199Controls in detailX204_AKB; 3; 23, en-USd2ureepe,Version: 2.11.8.12009-07-16T19:16:58+02:00 - Seite 199Z