2010 MERCEDES-BENZ GLK350 4MATIC clock
[x] Cancel search: clockPage 219 of 344
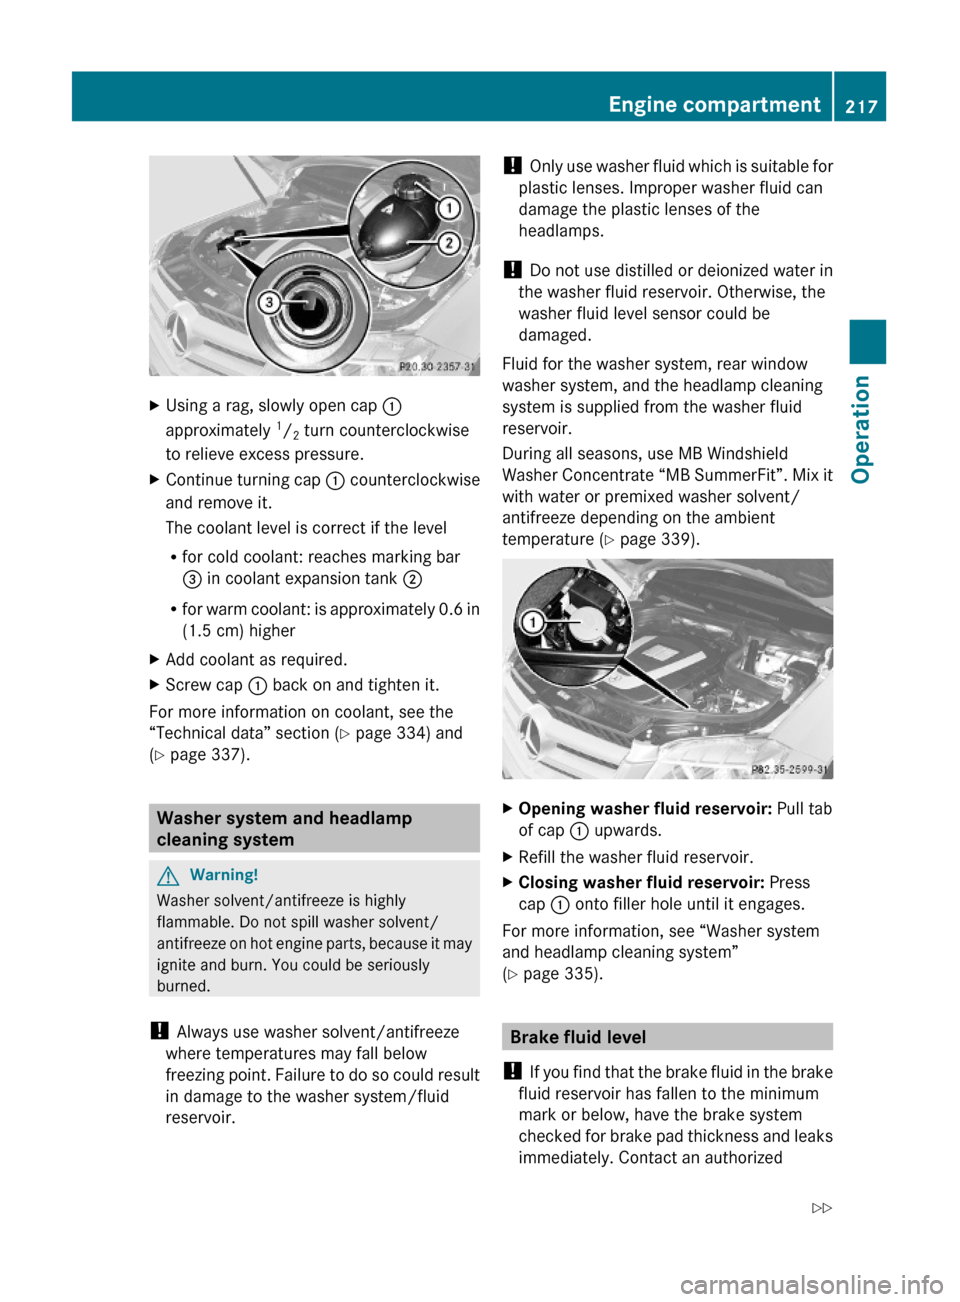
XUsing a rag, slowly open cap :
approximately 1/2 turn counterclockwise
to relieve excess pressure.
XContinue turning cap : counterclockwise
and remove it.
The coolant level is correct if the level
Rfor cold coolant: reaches marking bar
= in coolant expansion tank ;
Rfor warm coolant: is approximately 0.6 in
(1.5 cm) higher
XAdd coolant as required.XScrew cap : back on and tighten it.
For more information on coolant, see the
“Technical data” section (Y page 334) and
(Y page 337).
Washer system and headlamp
cleaning system
GWarning!
Washer solvent/antifreeze is highly
flammable. Do not spill washer solvent/
antifreeze on hot engine parts, because it may
ignite and burn. You could be seriously
burned.
! Always use washer solvent/antifreeze
where temperatures may fall below
freezing point. Failure to do so could result
in damage to the washer system/fluid
reservoir.
! Only use washer fluid which is suitable for
plastic lenses. Improper washer fluid can
damage the plastic lenses of the
headlamps.
! Do not use distilled or deionized water in
the washer fluid reservoir. Otherwise, the
washer fluid level sensor could be
damaged.
Fluid for the washer system, rear window
washer system, and the headlamp cleaning
system is supplied from the washer fluid
reservoir.
During all seasons, use MB Windshield
Washer Concentrate “MB SummerFit”. Mix it
with water or premixed washer solvent/
antifreeze depending on the ambient
temperature (Y page 339).
XOpening washer fluid reservoir: Pull tab
of cap : upwards.
XRefill the washer fluid reservoir.XClosing washer fluid reservoir: Press
cap : onto filler hole until it engages.
For more information, see “Washer system
and headlamp cleaning system”
(Y page 335).
Brake fluid level
! If you find that the brake fluid in the brake
fluid reservoir has fallen to the minimum
mark or below, have the brake system
checked for brake pad thickness and leaks
immediately. Contact an authorized
Engine compartment217OperationX204_AKB; 3; 23, en-USd2ureepe,Version: 2.11.8.12009-07-16T19:16:58+02:00 - Seite 217Z
Page 264 of 344
XAttach reversible ratchet ; to jack : in
such a way that the word UP can be seen.
Before placing the jack and the reversible
ratchet back into the vehicle tool kit:
XFully collapse the jack (storage position).XRemove the reversible ratchet.
Spare wheel
GObserve Safety notes, see page 312.
The spare wheel is located in the space
underneath the cargo compartment floor.
XRemoving: Open the tailgate (Y page 71).XLift the cargo compartment floor and
secure it on the upper cargo compartment
lip (Y page 194).
! To prevent damage, always disengage the
securing hook from upper cargo
compartment lip and lower the cargo
compartment floor before closing the
tailgate.
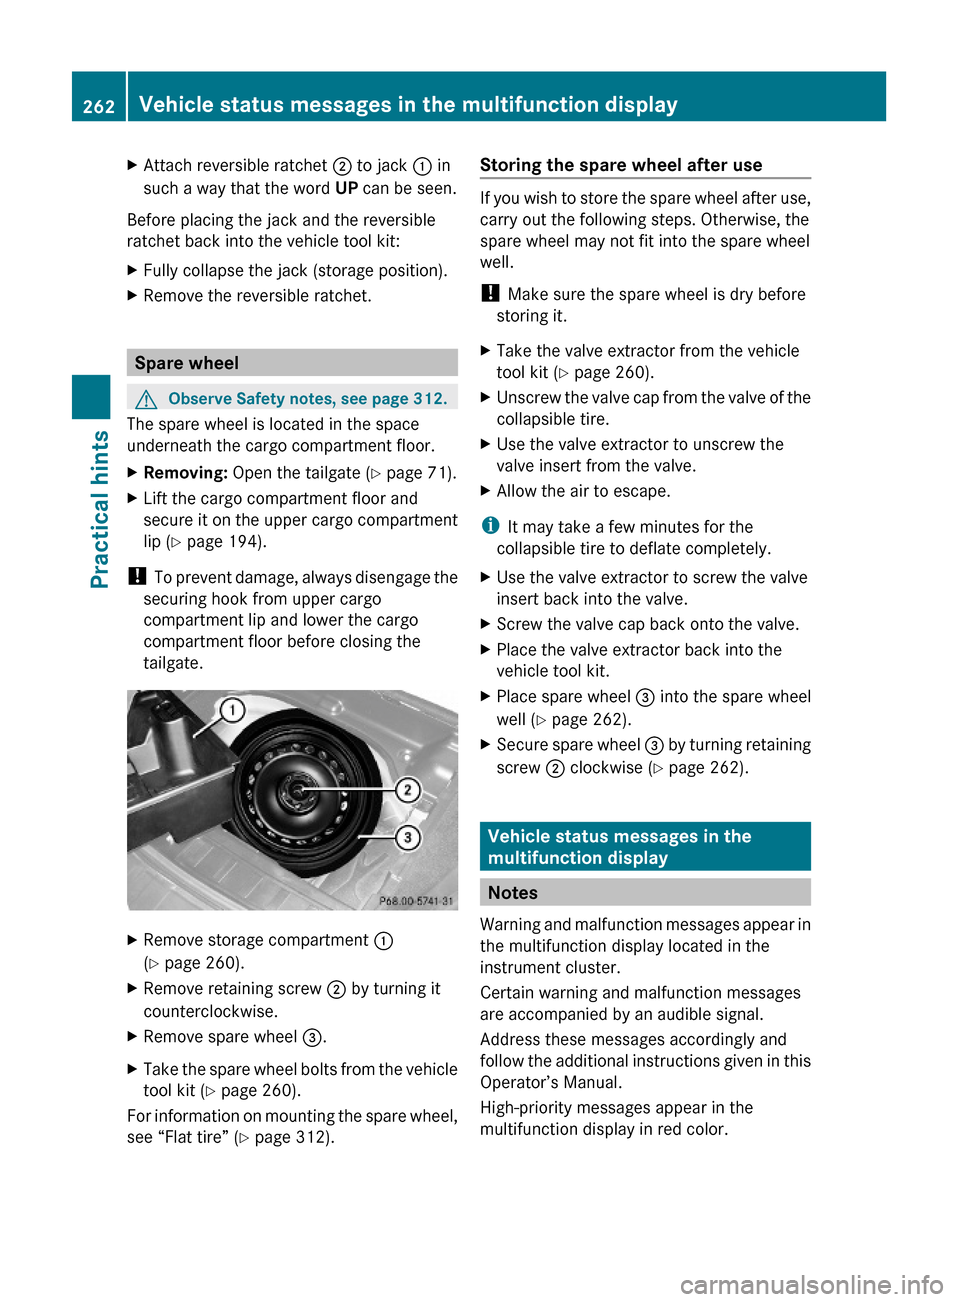
XRemove storage compartment :
(Y page 260).
XRemove retaining screw ; by turning it
counterclockwise.
XRemove spare wheel =.XTake the spare wheel bolts from the vehicle
tool kit (Y page 260).
For information on mounting the spare wheel,
see “Flat tire” (Y page 312).
Storing the spare wheel after use
If you wish to store the spare wheel after use,
carry out the following steps. Otherwise, the
spare wheel may not fit into the spare wheel
well.
! Make sure the spare wheel is dry before
storing it.
XTake the valve extractor from the vehicle
tool kit (Y page 260).
XUnscrew the valve cap from the valve of the
collapsible tire.
XUse the valve extractor to unscrew the
valve insert from the valve.
XAllow the air to escape.
iIt may take a few minutes for the
collapsible tire to deflate completely.
XUse the valve extractor to screw the valve
insert back into the valve.
XScrew the valve cap back onto the valve.XPlace the valve extractor back into the
vehicle tool kit.
XPlace spare wheel = into the spare wheel
well (Y page 262).
XSecure spare wheel = by turning retaining
screw ; clockwise (Y page 262).
Vehicle status messages in the
multifunction display
Notes
Warning and malfunction messages appear in
the multifunction display located in the
instrument cluster.
Certain warning and malfunction messages
are accompanied by an audible signal.
Address these messages accordingly and
follow the additional instructions given in this
Operator’s Manual.
High-priority messages appear in the
multifunction display in red color.
262Vehicle status messages in the multifunction displayPractical hints
X204_AKB; 3; 23, en-USd2ureepe,Version: 2.11.8.12009-07-16T19:16:58+02:00 - Seite 262
Page 301 of 344
GWarning!
If the 45 indicator lamp does not
illuminate or remains out with the weight of a
typical 12-month-old child in a standard child
restraint or less on the front passenger seat,
do not transport a child on the front
passenger seat until the system has been
repaired.
Unlocking/locking manually
Unlocking the vehicle
If you cannot unlock the vehicle with the
SmartKey or with KEYLESS-GO, unlock the
driver’s door using the mechanical key.
The anti-theft alarm system will trigger when
you
Runlock the driver’s door with the
mechanical key
and
Ropen the driver’s door
To cancel the alarm, insert the SmartKey into
the starter switch.
Removing the mechanical key
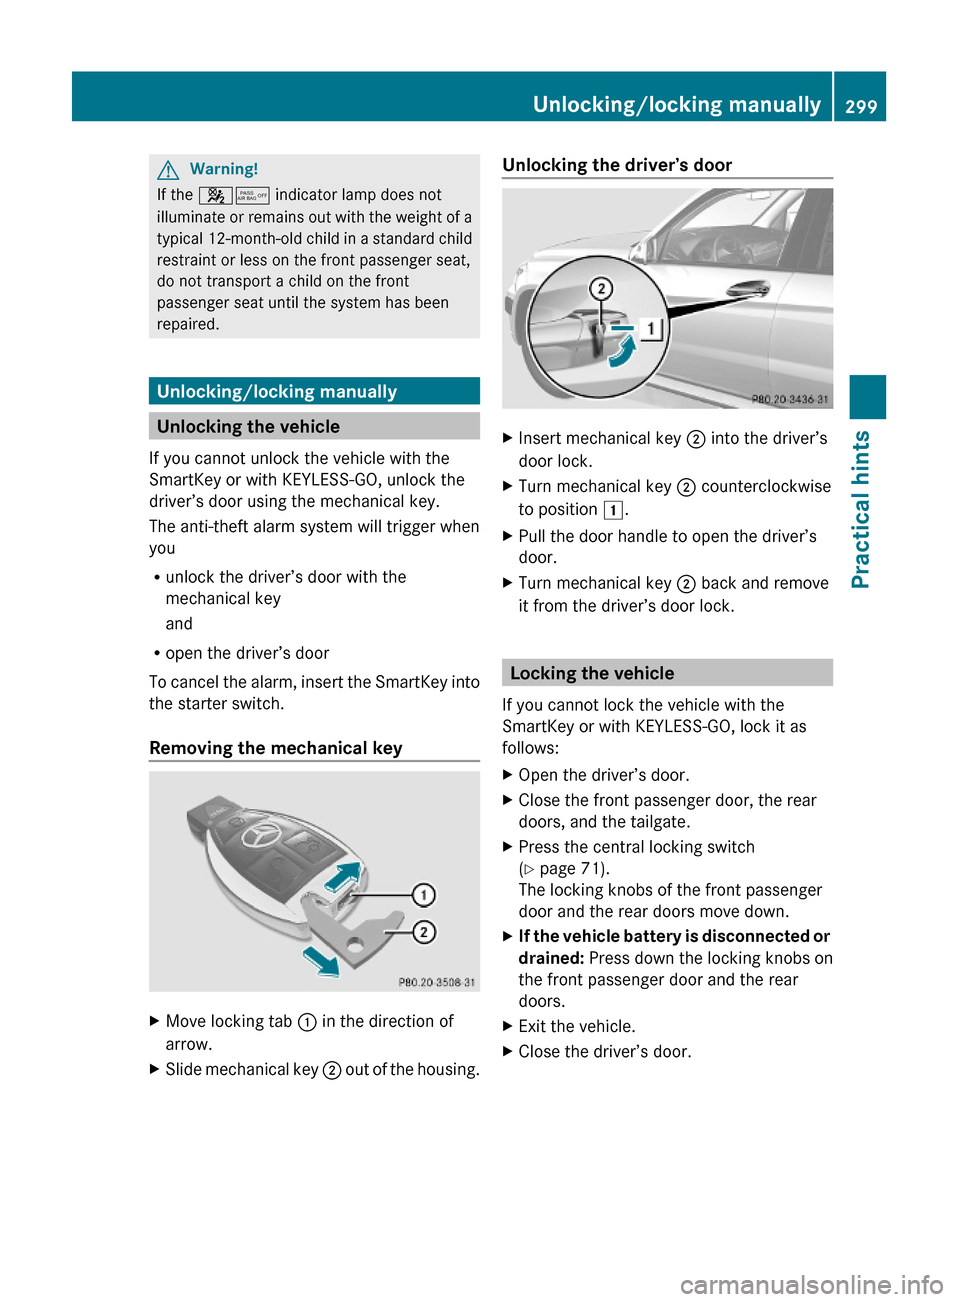
XMove locking tab : in the direction of
arrow.
XSlide mechanical key ; out of the housing.Unlocking the driver’s doorXInsert mechanical key ; into the driver’s
door lock.
XTurn mechanical key ; counterclockwise
to position 1.
XPull the door handle to open the driver’s
door.
XTurn mechanical key ; back and remove
it from the driver’s door lock.
Locking the vehicle
If you cannot lock the vehicle with the
SmartKey or with KEYLESS-GO, lock it as
follows:
XOpen the driver’s door.XClose the front passenger door, the rear
doors, and the tailgate.
XPress the central locking switch
(Y page 71).
The locking knobs of the front passenger
door and the rear doors move down.
XIf the vehicle battery is disconnected or
drained: Press down the locking knobs on
the front passenger door and the rear
doors.
XExit the vehicle.XClose the driver’s door.Unlocking/locking manually299Practical hintsX204_AKB; 3; 23, en-USd2ureepe,Version: 2.11.8.12009-07-16T19:16:58+02:00 - Seite 299Z
Page 302 of 344
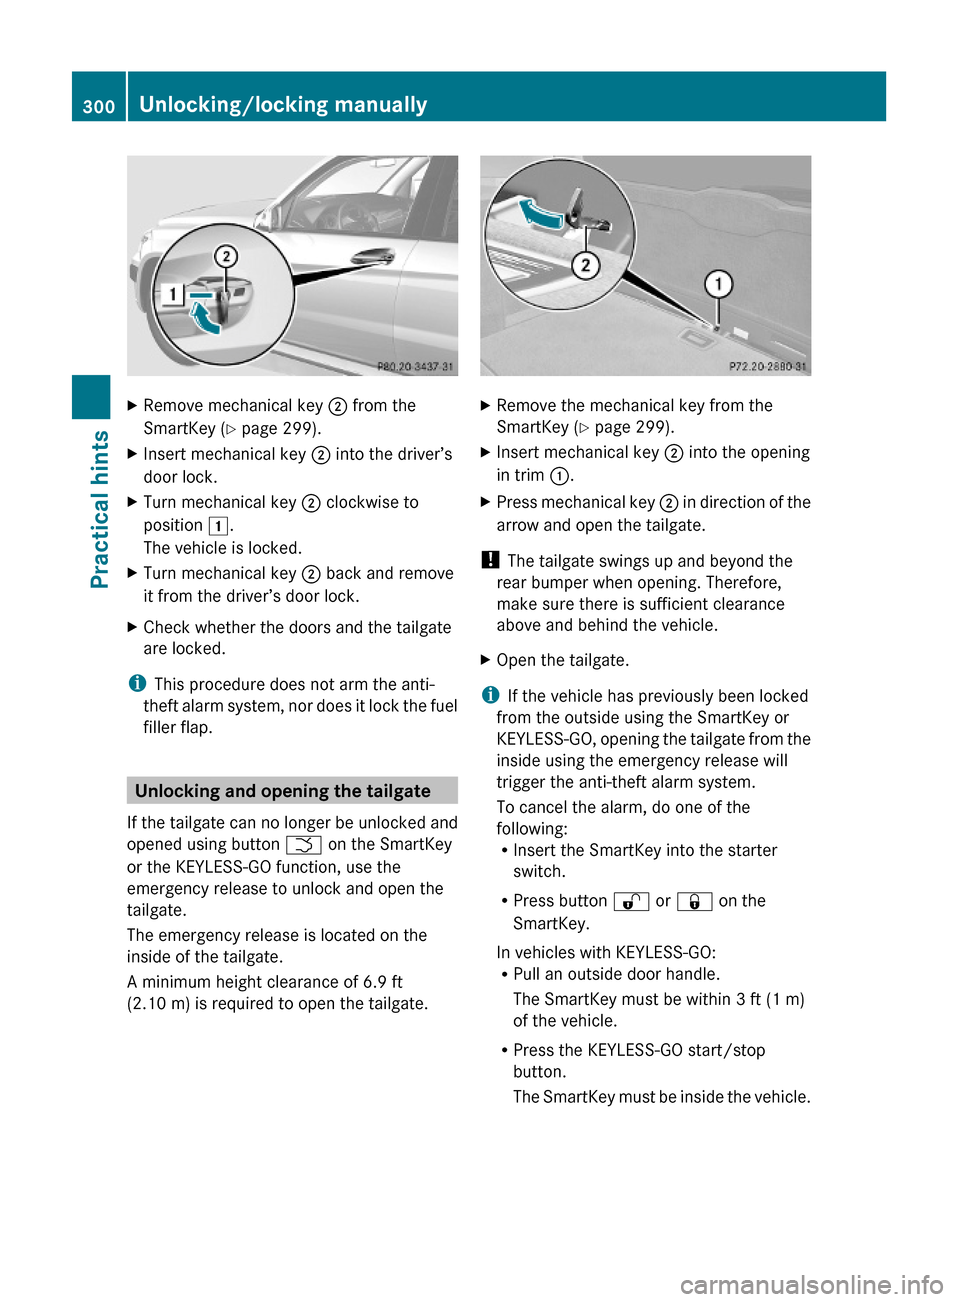
XRemove mechanical key ; from the
SmartKey (Y page 299).
XInsert mechanical key ; into the driver’s
door lock.
XTurn mechanical key ; clockwise to
position 1.
The vehicle is locked.
XTurn mechanical key ; back and remove
it from the driver’s door lock.
XCheck whether the doors and the tailgate
are locked.
iThis procedure does not arm the anti-
theft alarm system, nor does it lock the fuel
filler flap.
Unlocking and opening the tailgate
If the tailgate can no longer be unlocked and
opened using button F on the SmartKey
or the KEYLESS-GO function, use the
emergency release to unlock and open the
tailgate.
The emergency release is located on the
inside of the tailgate.
A minimum height clearance of 6.9 ft
(2.10 m) is required to open the tailgate.
XRemove the mechanical key from the
SmartKey (Y page 299).
XInsert mechanical key ; into the opening
in trim :.
XPress mechanical key ; in direction of the
arrow and open the tailgate.
! The tailgate swings up and beyond the
rear bumper when opening. Therefore,
make sure there is sufficient clearance
above and behind the vehicle.
XOpen the tailgate.
iIf the vehicle has previously been locked
from the outside using the SmartKey or
KEYLESS-GO, opening the tailgate from the
inside using the emergency release will
trigger the anti-theft alarm system.
To cancel the alarm, do one of the
following:RInsert the SmartKey into the starter
switch.
RPress button % or & on the
SmartKey.
In vehicles with KEYLESS-GO:RPull an outside door handle.
The SmartKey must be within 3 ft (1 m)
of the vehicle.
RPress the KEYLESS-GO start/stop
button.
The SmartKey must be inside the vehicle.
300Unlocking/locking manuallyPractical hints
X204_AKB; 3; 23, en-USd2ureepe,Version: 2.11.8.12009-07-16T19:16:58+02:00 - Seite 300
Page 308 of 344
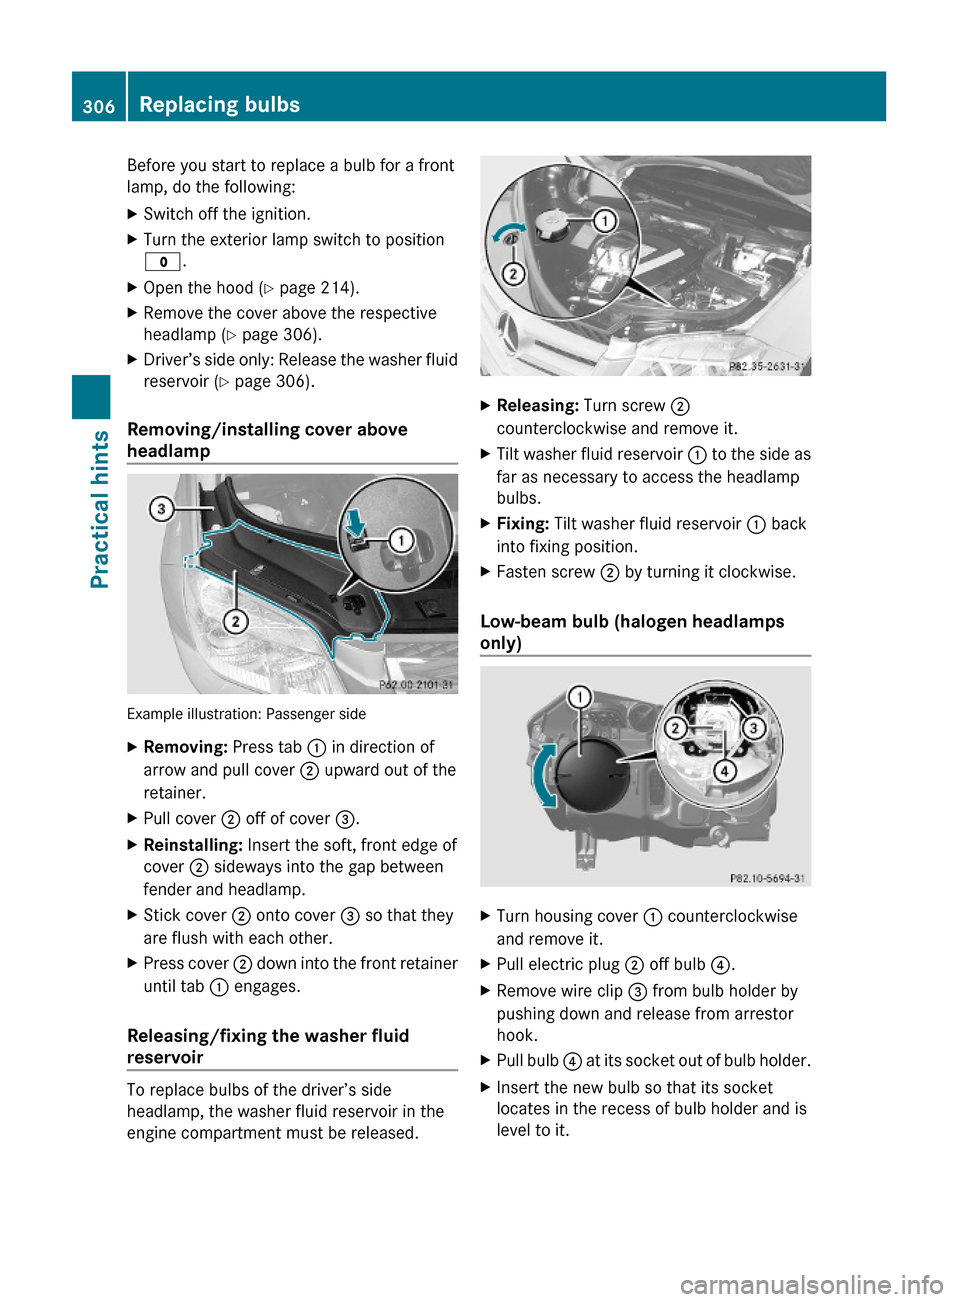
Before you start to replace a bulb for a front
lamp, do the following:
XSwitch off the ignition.XTurn the exterior lamp switch to position
$.
XOpen the hood (Y page 214).XRemove the cover above the respective
headlamp (Y page 306).
XDriver’s side only: Release the washer fluid
reservoir (Y page 306).
Removing/installing cover above
headlamp
Example illustration: Passenger side
XRemoving: Press tab : in direction of
arrow and pull cover ; upward out of the
retainer.
XPull cover ; off of cover =.XReinstalling: Insert the soft, front edge of
cover ; sideways into the gap between
fender and headlamp.
XStick cover ; onto cover = so that they
are flush with each other.
XPress cover ; down into the front retainer
until tab : engages.
Releasing/fixing the washer fluid
reservoir
To replace bulbs of the driver’s side
headlamp, the washer fluid reservoir in the
engine compartment must be released.
XReleasing: Turn screw ;
counterclockwise and remove it.
XTilt washer fluid reservoir : to the side as
far as necessary to access the headlamp
bulbs.
XFixing: Tilt washer fluid reservoir : back
into fixing position.
XFasten screw ; by turning it clockwise.
Low-beam bulb (halogen headlamps
only)
XTurn housing cover : counterclockwise
and remove it.
XPull electric plug ; off bulb ?.XRemove wire clip = from bulb holder by
pushing down and release from arrestor
hook.
XPull bulb ? at its socket out of bulb holder.XInsert the new bulb so that its socket
locates in the recess of bulb holder and is
level to it.
306Replacing bulbsPractical hints
X204_AKB; 3; 23, en-USd2ureepe,Version: 2.11.8.12009-07-16T19:16:58+02:00 - Seite 306
Page 309 of 344
XFold wire clip = back and press it down on
bulb holder to engage it in the arrestor
hook.
XConnect electric plug ; on bulb ?.XAlign housing cover : and turn it
clockwise.
XDriver’s side only: Fix the washer fluid
reservoir (Y page 306).
XInstall the cover above the headlamp
(Y page 306).
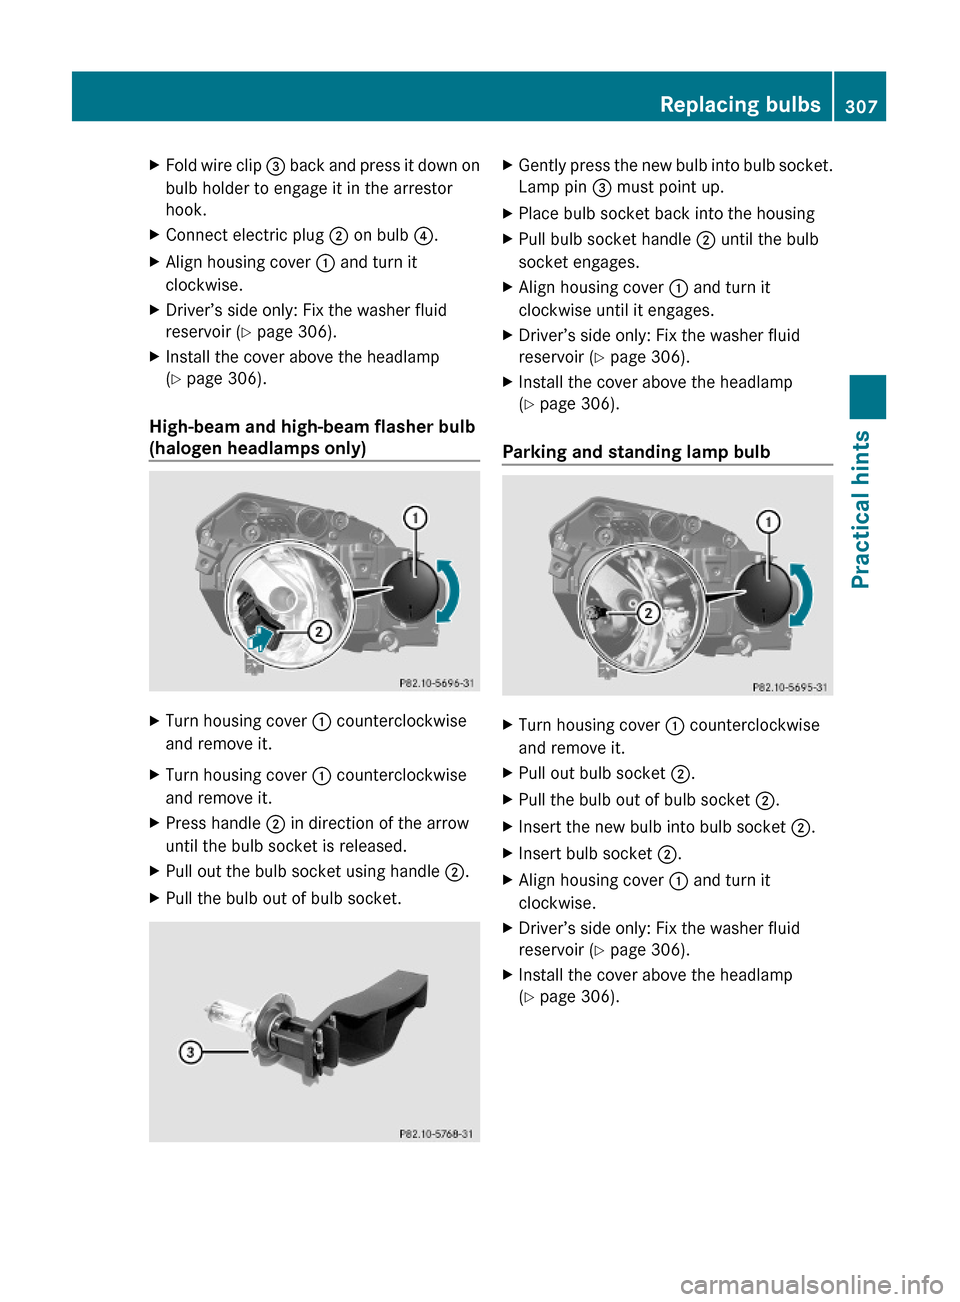
High-beam and high-beam flasher bulb
(halogen headlamps only)
XTurn housing cover : counterclockwise
and remove it.
XTurn housing cover : counterclockwise
and remove it.
XPress handle ; in direction of the arrow
until the bulb socket is released.
XPull out the bulb socket using handle ;.XPull the bulb out of bulb socket.XGently press the new bulb into bulb socket.
Lamp pin = must point up.
XPlace bulb socket back into the housingXPull bulb socket handle ; until the bulb
socket engages.
XAlign housing cover : and turn it
clockwise until it engages.
XDriver’s side only: Fix the washer fluid
reservoir (Y page 306).
XInstall the cover above the headlamp
(Y page 306).
Parking and standing lamp bulb
XTurn housing cover : counterclockwise
and remove it.
XPull out bulb socket ;.XPull the bulb out of bulb socket ;.XInsert the new bulb into bulb socket ;.XInsert bulb socket ;.XAlign housing cover : and turn it
clockwise.
XDriver’s side only: Fix the washer fluid
reservoir (Y page 306).
XInstall the cover above the headlamp
(Y page 306).
Replacing bulbs307Practical hintsX204_AKB; 3; 23, en-USd2ureepe,Version: 2.11.8.12009-07-16T19:16:58+02:00 - Seite 307Z
Page 310 of 344
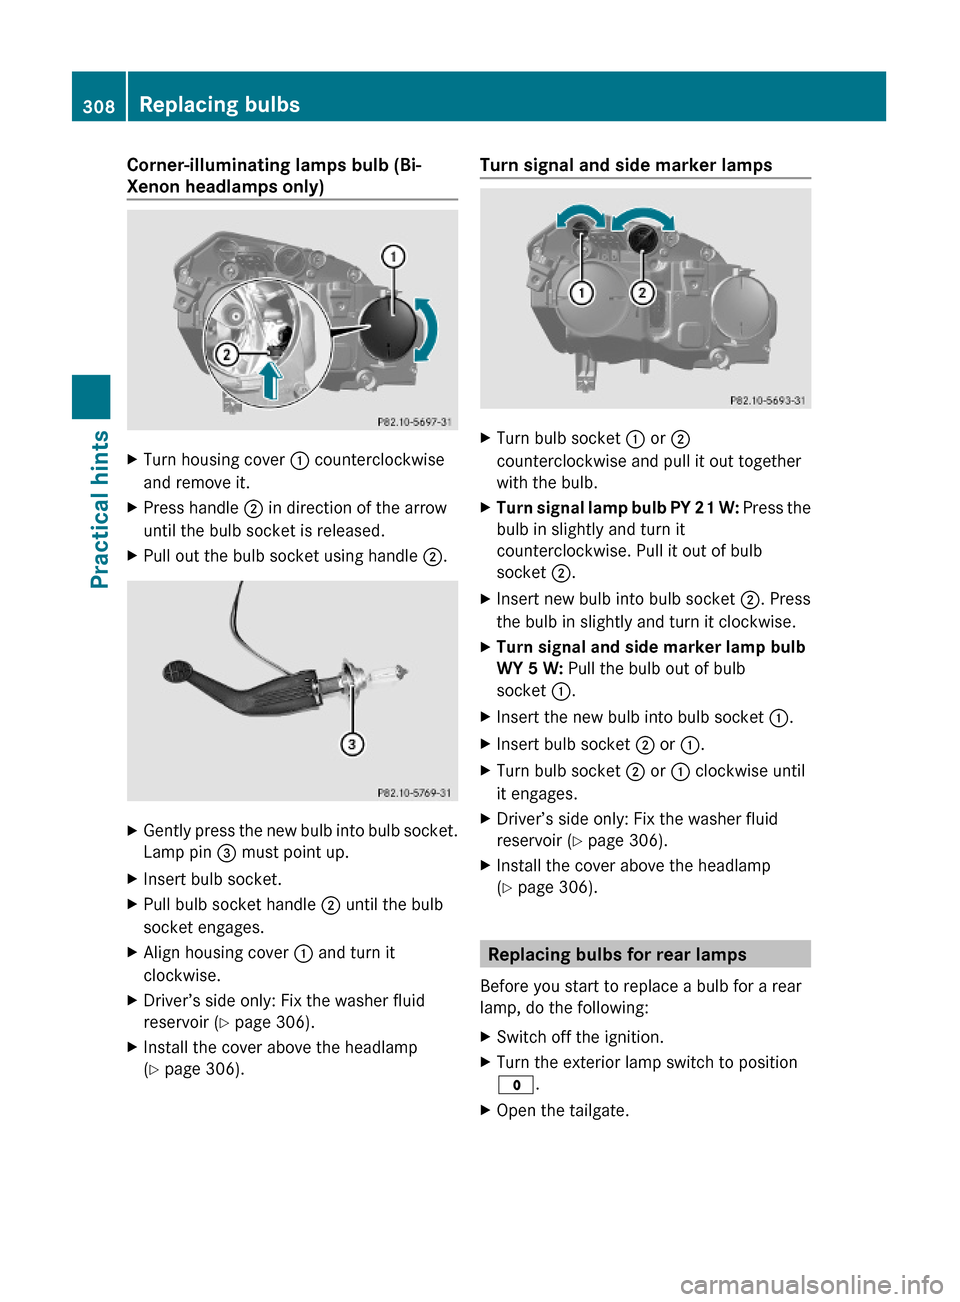
Corner-illuminating lamps bulb (Bi-
Xenon headlamps only)
XTurn housing cover : counterclockwise
and remove it.
XPress handle ; in direction of the arrow
until the bulb socket is released.
XPull out the bulb socket using handle ;.XGently press the new bulb into bulb socket.
Lamp pin = must point up.
XInsert bulb socket.XPull bulb socket handle ; until the bulb
socket engages.
XAlign housing cover : and turn it
clockwise.
XDriver’s side only: Fix the washer fluid
reservoir (Y page 306).
XInstall the cover above the headlamp
(Y page 306).
Turn signal and side marker lampsXTurn bulb socket : or ;
counterclockwise and pull it out together
with the bulb.
XTurn signal lamp bulb PY 21 W: Press the
bulb in slightly and turn it
counterclockwise. Pull it out of bulb
socket ;.
XInsert new bulb into bulb socket ;. Press
the bulb in slightly and turn it clockwise.
XTurn signal and side marker lamp bulb
WY 5 W: Pull the bulb out of bulb
socket :.
XInsert the new bulb into bulb socket :.XInsert bulb socket ; or :.XTurn bulb socket ; or : clockwise until
it engages.
XDriver’s side only: Fix the washer fluid
reservoir (Y page 306).
XInstall the cover above the headlamp
(Y page 306).
Replacing bulbs for rear lamps
Before you start to replace a bulb for a rear
lamp, do the following:
XSwitch off the ignition.XTurn the exterior lamp switch to position
$.
XOpen the tailgate.308Replacing bulbsPractical hints
X204_AKB; 3; 23, en-USd2ureepe,Version: 2.11.8.12009-07-16T19:16:58+02:00 - Seite 308
Page 311 of 344
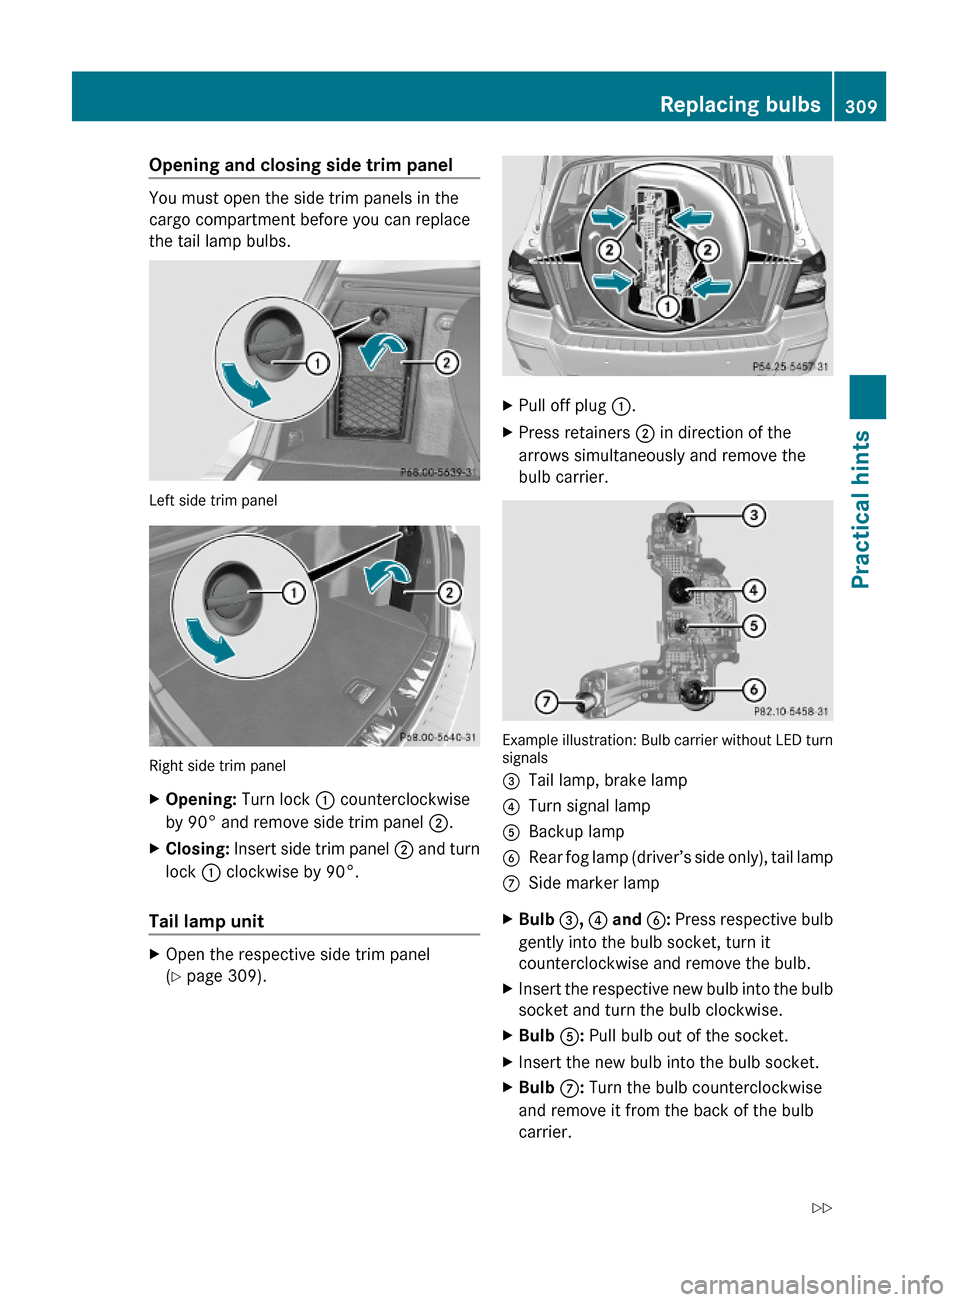
Opening and closing side trim panel
You must open the side trim panels in the
cargo compartment before you can replace
the tail lamp bulbs.
Left side trim panel
Right side trim panel
XOpening: Turn lock : counterclockwise
by 90° and remove side trim panel ;.
XClosing: Insert side trim panel ; and turn
lock : clockwise by 90°.
Tail lamp unit
XOpen the respective side trim panel
(Y page 309).
XPull off plug :.XPress retainers ; in direction of the
arrows simultaneously and remove the
bulb carrier.
Example illustration: Bulb carrier without LED turnsignals
=Tail lamp, brake lamp?Turn signal lampABackup lampBRear fog lamp (driver’s side only), tail lampCSide marker lampXBulb =, ? and B: Press respective bulb
gently into the bulb socket, turn it
counterclockwise and remove the bulb.
XInsert the respective new bulb into the bulb
socket and turn the bulb clockwise.
XBulb A: Pull bulb out of the socket.XInsert the new bulb into the bulb socket.XBulb C: Turn the bulb counterclockwise
and remove it from the back of the bulb
carrier.
Replacing bulbs309Practical hintsX204_AKB; 3; 23, en-USd2ureepe,Version: 2.11.8.12009-07-16T19:16:58+02:00 - Seite 309Z