Page 249 of 272

recommended towing methods can be
employed.
! Before towing the vehicle observe the
following instructions:
R Do not tow-start the vehicle. You could
otherwise seriously damage the
automatic transmission which is not
covered by the Mercedes-Benz Limited
Warranty.
R Do not tow with sling-type equipment.
Towing with sling-type equipment over
bumpy roads will damage radiator and
supports.
R Towing of the vehicle should only be
done using the towing eye. Never attach
a tow cable, tow rope or tow rod to the
vehicle chassis, frame or suspension
parts.
! When towing the vehicle with all wheels
on the ground, the gear selector lever must
be in neutral position N and the SmartKey
must be in starter switch position 2.
When towing the vehicle with all wheels on
the ground, the vehicle may be towed only
for distances up to 30 miles (50 km) and at
a speed not to exceed 30 mph (50 km/h).
If the vehicle is towed with one axle raised
(observe instructions regarding flexible
drive shaft and propeller shafts), the engine
must be shut off and the SmartKey must be
in starter switch position 1. Otherwise, the
4-ETS may become engaged which may
cause loss of towing control.GWarning!
If circumstances require towing the vehicle
with all wheels on the ground, always tow with
a tow bar if:
R the engine will not run
R there is a malfunction in the brake system
R there is a malfunction in the power supply
or in the vehicle’s electrical system
This is necessary to adequately control the
towed vehicle.
Prior to towing the vehicle with all wheels on
the ground, make sure the SmartKey is in
starter switch position 2.
If the SmartKey is left in the starter switch
position 0 for an extended period of time, it
can no longer be turned in the switch. In this
case, the steering is locked. To unlock,
remove SmartKey from starter switch and
reinsert.GWarning!
With the engine not running, there is no power
assistance for the brake and steering
systems. In this case, it is important to keep
in mind that a considerably higher degree of
effort is necessary to brake and steer the
vehicle. Adapt your driving accordingly.
! Avoid pulling the vehicle abruptly or
diagonally, since it could result in damage
to the chassis alignment.
! Do not use the towing eye bolt for
recovery, as this could damage the vehicle.
If in doubt, recover the vehicle with a crane.
i If the battery is disconnected or
discharged
R the SmartKey will not turn in the starter
switch
R the automatic transmission will remain in
park position P
For more information see “Battery”
( Y page 243) or “Jump starting”
( Y page 244).
For information on manually unlocking the
gear selector lever, see ( Y page 230).
i When towing the vehicle with all wheels
on the ground, note the following:
With the automatic central locking
activated and the SmartKey in starter
switch position 2, the vehicle doors lock if
Towing the vehicle247Practical hints463_AKB; 3; 35, en-USd2ureepe,Version: 2.11.8.12009-07-16T20:59:56+02:00 - Seite 247Z
Page 250 of 272

a wheel is turning at vehicle speeds of
approximately 9 mph (15 km/h) or above.
To prevent the vehicle doors from locking,
deactivate the automatic central locking
(Y page 111).
iTo signal turns while being towed with
hazard warning flasher in use, turn the
SmartKey in starter switch to position 2
and activate combination switch for left or
right turn signal in usual manner – only the
selected turn signal will operate. Upon
canceling the turn signal, the hazard
warning flasher will operate again.
Towing eyes
Front towing eyes
:Towing eyes
Rear towing eye
The rear towing eye is located on the driver’s
side under the rear bumper.
:Towing eyeTransporting the vehicle
When transporting the vehicle, you can use
the towing eyes for pulling the vehicle onto a
trailer or transporter.
XMove the gear selector lever to neutral
position N.
XShift the transfer case to neutral
position N.
XTo avoid damaging the vehicle, it should
only be tied down on the wheels/wheel
rims, not on chassis components such as
the transverse link or trailing arm.
Towing the vehicle - various problem
scenarios
! When removing drive shaft, place M10
nuts on bolts as distance sleeves and
tighten using M8 nuts.
Always install new self-locking nuts when
reinstalling the drive shaft.
XComply with all towing information
(Y page 246).
In case of engine damage, transmission
damage or malfunctions in electrical
equipment
XMove the gear selector lever to neutral
position N.
XShift the transfer case to neutral
position N.
In case of transfer case damage or for
towing vehicle distances exceeding 30
miles (50 km)
The propeller shafts to the drive axles must
be removed.
In case of front axle damage
Raise the front axle when towing. The
propeller shaft between the rear axle and the
transfer case must be removed.
248Towing the vehiclePractical hints
463_AKB; 3; 35, en-USd2ureepe,Version: 2.11.8.12009-07-16T20:59:56+02:00 - Seite 248
Page 251 of 272

In case of rear axle damage
When the rear axle is raised, the vehicle can
only be towed with a wheel lift or a dolly
placed under its front wheels.
Stranded vehicle
Freeing a stranded vehicle, on which the
wheels are dug into sand or mud, should be
done with the greatest of care, especially if
the vehicle is heavily loaded.
Note the following when freeing a stranded
vehicle:
RAvoid pulling the vehicle abruptly or
diagonally, since it could result in damage
to the chassis alignment.
RNever try to free a vehicle that is still
coupled to a trailer.
RIf possible, a vehicle equipped with a trailer
hitch receiver should be pulled backward in
its own previously made tracks.
Fuses
Introduction
The electrical fuses in your vehicle serve to
switch off malfunctioning power circuits.
If a fuse is blown, the components and
systems secured by that fuse will stop
operating.
GWarning!
Only use fuses approved by Mercedes-Benz
with the specified amperage for the system in
question and do not attempt to repair or
bridge a blown fuse. Using other than
approved fuses or using repaired or bridged
fuses may cause an overload leading to a fire,
and/or cause damage to electrical
components and/or systems. Have the cause
determined and remedied by an authorized
Mercedes-Benz Center.
A blown fuse must be replaced by an
appropriate spare fuse (recognizable by its
color or the fuse rating given on the fuse) of
the amperage recommended in the fuse
chart. Any Mercedes-Benz Center will be glad
to advise you on this subject.
iIn case of a blown fuse contact Roadside
Assistance or an authorized Mercedes-
Benz Center.
If a newly inserted fuse blows again, have the
cause determined and rectified by an
authorized Mercedes-Benz Center.
The fuse chart is located in the fuse box in the
passenger compartment. The fuse chart
explains the fuse allocation and fuse
amperages.
Before replacing fuses
XEngage the parking brake.XMake sure the automatic transmission is in
park position P.
XSwitch off all electrical consumers.XTurn off the engine.XRemove the SmartKey from the starter
switch.
Fuse boxes in passenger
compartment
Fuse box in dashbord
Fuses249Practical hints463_AKB; 3; 35, en-USd2ureepe,Version: 2.11.8.12009-07-16T20:59:56+02:00 - Seite 249Z
Page 252 of 272

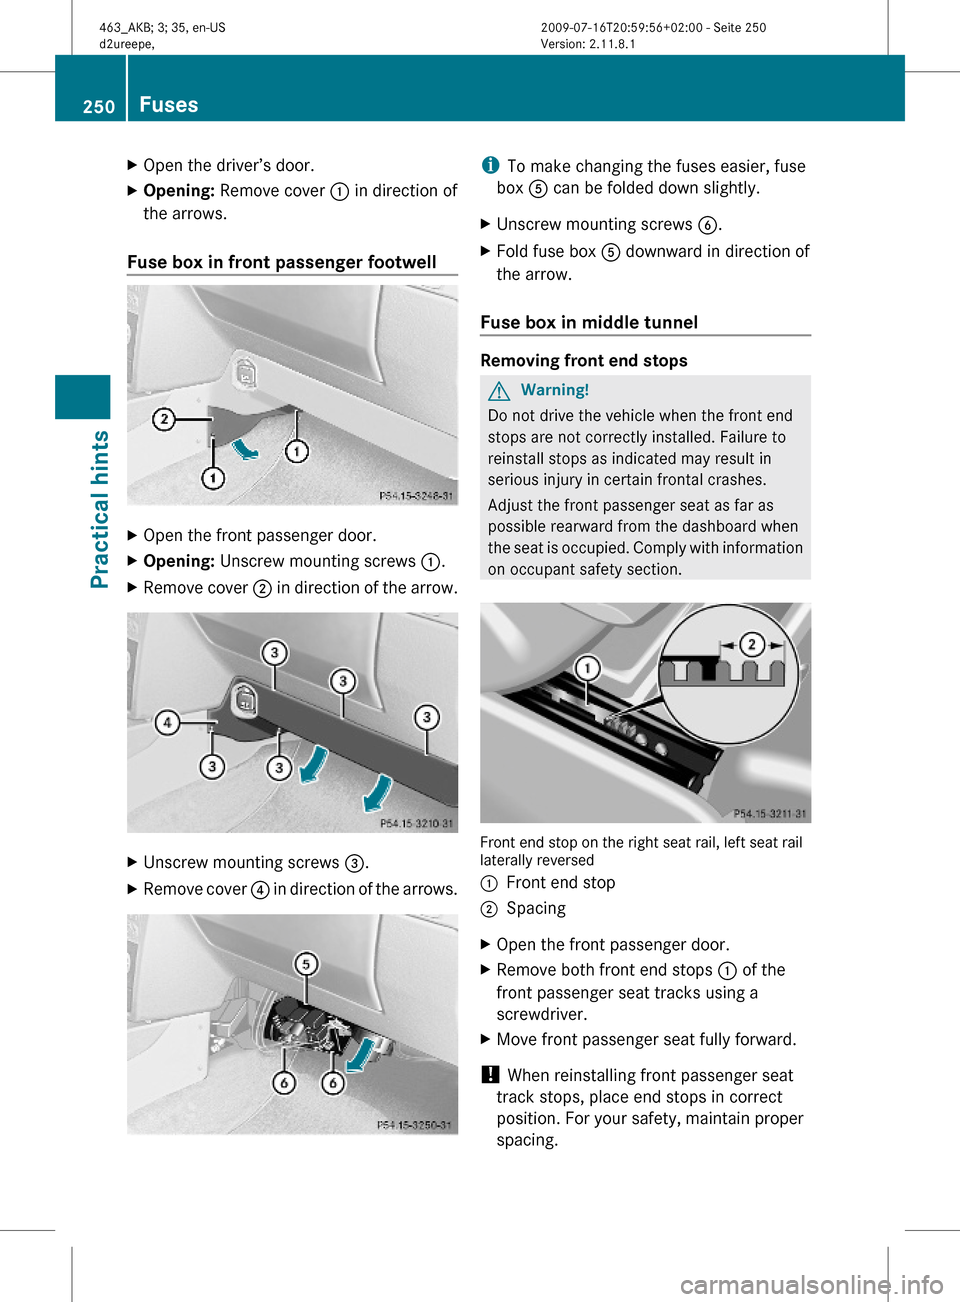
XOpen the driver’s door.XOpening: Remove cover : in direction of
the arrows.
Fuse box in front passenger footwell
XOpen the front passenger door.XOpening: Unscrew mounting screws :.XRemove cover ; in direction of the arrow.XUnscrew mounting screws =.XRemove cover ? in direction of the arrows.iTo make changing the fuses easier, fuse
box A can be folded down slightly.
XUnscrew mounting screws B.XFold fuse box A downward in direction of
the arrow.
Fuse box in middle tunnel
Removing front end stops
GWarning!
Do not drive the vehicle when the front end
stops are not correctly installed. Failure to
reinstall stops as indicated may result in
serious injury in certain frontal crashes.
Adjust the front passenger seat as far as
possible rearward from the dashboard when
the seat is occupied. Comply with information
on occupant safety section.
Front end stop on the right seat rail, left seat raillaterally reversed
:Front end stop;SpacingXOpen the front passenger door.XRemove both front end stops : of the
front passenger seat tracks using a
screwdriver.
XMove front passenger seat fully forward.
! When reinstalling front passenger seat
track stops, place end stops in correct
position. For your safety, maintain proper
spacing.
250FusesPractical hints
463_AKB; 3; 35, en-USd2ureepe,Version: 2.11.8.12009-07-16T20:59:56+02:00 - Seite 250
Page 253 of 272
Opening fuse boxXUnscrew mounting screws :.XRemove cover ; in direction of the arrow.
Fuse box in battery box
The battery box is located under a cover in
the rear footwell.
Replacement of fuses can only be performed
at a Mercedes-Benz Center.
! A fuse box cover must be properly
positioned as described. Otherwise,
moisture or dirt could enter a fuse box and
possibly impair fuse operation.
Fuses251Practical hints463_AKB; 3; 35, en-USd2ureepe,Version: 2.11.8.12009-07-16T20:59:56+02:00 - Seite 251Z
Page 254 of 272
252463_AKB; 3; 35, en-USd2ureepe,Version: 2.11.8.12009-07-16T20:59:56+02:00 - Seite 252
Page 255 of 272
Vehicle equipment ............................254
Parts service .....................................254
Warranty coverage ...........................254
Identification labels ..........................254
Vehicle specification G 550
(463.237) ...........................................256
Vehicle specification G 55 AMG
(463.271) ...........................................257
Rims and tires ...................................258
Fuels, coolants, lubricants, etc. ......260
253Technical data463_AKB; 3; 35, en-USd2ureepe,Version: 2.11.8.12009-07-16T20:59:56+02:00 - Seite 253
Page 256 of 272

Vehicle equipment
iThis Operator’s Manual describes all
features, standard or optional, potentially
available for your vehicle at the time of
purchase. Please be aware that your
vehicle might not be equipped with all
features described in this manual.
Parts service
All authorized Mercedes-Benz Centers
maintain a stock of Genuine Mercedes-Benz
Parts required for maintenance and repair
work. In addition, strategically located parts
distribution centers provide quick and
reliable parts service.
More than 300 000 different parts for
Mercedes-Benz models are available.
Genuine Mercedes-Benz Parts are subjected
to stringent quality inspections. Each part has
been specifically developed, manufactured or
selected for and adapted to Mercedes-Benz
vehicles.
Therefore, Genuine Mercedes-Benz Parts
should be installed.
! Do not use non-genuine Mercedes-Benz
parts and accessories not authorized by
Mercedes-Benz. Doing so could damage
the vehicle, which is not covered by the
Mercedes-Benz Limited Warranty. Also, it
could compromise the vehicle’s durability
or safety.
Warranty coverage
Your vehicle is covered under the terms of the
warranties printed in the Service and
Warranty Information booklet.
Your authorized Mercedes-Benz Center will
exchange or repair any defective parts
originally installed in the vehicle in
accordance with the terms of the following
warranties:
RNew Vehicle Limited Warranty
REmission System Warranty
REmission Performance Warranty
RCalifornia, Connecticut, Maine,
Massachusetts, New York, Pennsylvania,
Rhode Island, and Vermont Emission
Control Systems Warranty
RState Warranty Enforcement Laws (Lemon
Laws)
Replacement parts and accessories are
covered by the Mercedes-Benz Parts and
Accessories warranties, copies of which are
available at any authorized Mercedes-Benz
Center.
Loss of Service and Warranty
Information booklet
Should you lose your Service and Warranty
Information booklet, have an authorized
Mercedes-Benz Center arrange for a
replacement. It will be mailed to you.
Identification labels
254Identification labelsTechnical data
463_AKB; 3; 35, en-USd2ureepe,Version: 2.11.8.12009-07-16T20:59:56+02:00 - Seite 254