2010 MERCEDES-BENZ G55AMG fuse
[x] Cancel search: fusePage 10 of 272

ETD (Emergency Tensioning
Device) ................................................. 45
Safety guidelines ............................. 34
Express operation
Power windows ................................ 84
Tilt/sliding sunroof ........................128
Exterior lamp switch ........................... 74
Exterior rear view mirrors .................. 72
Parking position ............................... 73
Exterior view of vehicle ...................... 24
F
Fastening the seat belts ..................... 41
First aid kit ......................................... 200
Flat tire ............................................... 239
Lowering the vehicle ......................242
Mounting the spare wheel .............240
Preparing the vehicle .....................240
Spare wheel ........................... 239, 259
Floormats ........................................... 147
Fluids
Automatic transmission fluid .........260
Brake fluid ..................................... 261
Capacities ...................................... 260
Engine coolant ............................... 261
Engine oil ....................................... 260
Power steering fluid .......................260
Washer and headlamp cleaning
system ........................................... 261
Fog lamps ............................................. 76
Messages in the multifunction
display ................................... 215, 217
Four-wheel drive
see All-wheel drive (4MATIC)
Front air bags
see Air bags
Front axle oil ...................................... 260
Front lamps see Headlamps
Front passenger front air bag ............ 35
Front passenger front air bag off
indicator lamp ............................. 37, 227
Fuel ..................................................... 150
Additives ........................................ 263
Capacity, fuel tank .........................261
Drive sensibly–safe fuel .................181
Fuel consumption statistics ...........112
Fuel filler flap and cap ...................151
Fuel tank reserve warning
lamp ........................................ 26, 224
Premium unleaded gasoline ...........262
Refueling ........................................ 150
Requirements ................................ 263
Fuel filler flap ..................................... 151
Opening manually ..........................230
Fuel gauge ............................................ 26
Fuels, coolants, lubricants etc. ........ 260
Fuel tank
Capacity ........................................ 261
Fuel filler flap and cap ...................151
Refueling ........................................ 150
Fuses .................................................. 249
G
Garage door opener .......................... 143
Gasoline see Fuel
GAWR (Gross Axle Weight Rating) ... 178
Gear range ........................................... 92
Indicator .......................................... 92
Limiting ............................................ 92
Shifting into optimal ........................93
Transfer case ................................... 93
Gear selector lever .............................. 89
Cleaning ......................................... 196
Gearshift pattern ............................. 89
Lock ........................................... 86, 90
Shifting procedure ...........................90
Transmission position indicator .......90
Transmission positions ....................90
Generator
see Alternator
Global locking/unlocking
see Key, SmartKey
Glove box ........................................... 132
Gross Axle Weight Rating see GAWR
Gross Trailer Weight
see GTW
Gross Vehicle Weight
see GVW
Gross Vehicle Weight Rating
see GVWR
GTW (Gross Trailer Weight) .............. 178
8Index463_AKB; 3; 35, en-USd2ureepe,Version: 2.11.8.12009-07-16T20:59:56+02:00 - Seite 8
Page 193 of 272

Service A Due Now
Refer to Maintenance Booklet for a listing of
maintenance services and intervals they need
to be performed at.
Clearing the maintenance service
indicator message
The maintenance service indicator message
is cleared automatically
Rafter approximately 10 seconds when you
switch on the ignition
Rafter approximately 10 seconds when
reaching the service threshold while driving
Rafter approximately 30 seconds, once the
suggested maintenance service term has
passed
XClearing the maintenance service
indicator message manually: Press reset
button : on the instrument cluster.
The standard display appears in the
multifunction display.
Maintenance service term exceeded
If you have exceeded the suggested
maintenance service term, you will see the
following message in the multifunction
display:
Service A Exceeded By XXXXX Miles
(Km)
In addition, a signal sounds when the
message appears.
Any authorized Mercedes-Benz Center will
reset the maintenance service indicator
following a completed maintenance service.
Calling up the maintenance service
indicator display
iThe menu overview can be found on
(Y page 102).
You can call up the maintenance service
indicator display at any time to check when
the next maintenance service is required.
XSwitch on the ignition.XPress button V or U on the
multifunction steering wheel repeatedly
until the standard display (Y page 102)
appears in the multifunction display.
XPress button * or & on the
multifunction steering wheel until the
maintenance service indicator display with
the service symbol ¯ or ± and the
maintenance service deadline appears in
the multifunction display.
iIf the battery was disconnected, the days
of disconnection will not be included in the
count shown by the maintenance service
indicator. To arrive at the true maintenance
service deadline, you will need to subtract
these days from the days shown in the
maintenance service indicator message or
maintenance service indicator display.
Do not confuse the maintenance service
indicator with the engine oil level indicator
4.
Maintenance191Operation463_AKB; 3; 35, en-USd2ureepe,Version: 2.11.8.12009-07-16T20:59:56+02:00 - Seite 191Z
Page 196 of 272

Vehicle washing
In the winter, thoroughly remove all traces of
road salt as soon as possible.
When washing the vehicle underbody, do not
forget to clean the inner sides of the wheels.
Hand-wash
XDo not use hot water or wash your vehicle
in direct sunlight.XOnly use a soft, wet cloth or sponge to
clean the vehicle.XOnly use a mild vehicle wash detergent,
such as Mercedes-Benz approved Car
Shampoo.XThoroughly spray the vehicle with a
diffused jet of water.XDo not spray directly towards the
ventilation intake.XUse plenty of water and rinse the sponge
and chamois frequently.XRinse with clean water and dry with a
chamois thoroughly.
Do not allow cleaning agents to dry on the
finish.
Automatic car wash
You can have your vehicle washed in an
automatic car wash from the start. Brushless
car washes are preferable.
XTo protect the filter system, activate the air
recirculation mode using button g on
the climate control panel.
! Do not clean your vehicle in an automatic
touchless car wash which uses caustic
spray. Caustic spray will damage the paint
or ornamental moldings.
If the vehicle is very dirty, prewash it before
running it through the automatic car wash.
! Make sure the combination switch is set
to wiper setting 0. Otherwise, the rain
sensor could activate and cause the wipers
to move unintentionally. This may lead to
vehicle damage.
Due to the width of the vehicle, fold in
exterior rear view mirrors prior to running
the vehicle through an automatic car wash
to prevent damage to the mirrors.XWhen taking the vehicle through an
automatic conveyor-type car wash:
Make sure the automatic transmission
remains in neutral position N.
When leaving the automatic car wash, make
sure the mirrors are folded out.
After running the vehicle through an
automatic car wash, wipe any wax off of the
windshield and the wiper blade inserts. This
will prevent smears and reduce wiping noise
which can be caused by residual wax on the
windshield.
Ornamental moldings
XFor regular cleaning and care of ornamental
moldings, use a damp cloth.
! Do not use chrome cleaner on ornamental
moldings. Although ornamental moldings
may have chrome appearance, they could
be made of anodized aluminum that will be
damaged when cleaned with chrome
cleaner. Instead, use a damp cloth to clean
those ornamental moldings.
For very dirty ornamental moldings of
which you are sure are chrome-plated, use
a chrome cleaner. If in doubt whether an
ornamental molding is chrome-plated,
contact an authorized Mercedes-Benz
Center.
Headlamps, brake lamps, tail lamps,
side markers, turn signal lenses
XUse a mild vehicle wash detergent, such as
Mercedes-Benz approved Car Shampoo,
with plenty of water.
! Only use window cleaning solutions that
are suitable for plastic lamp lenses.
Window cleaning solutions which are not
suitable may damage the plastic lamp
lenses of the headlamps. Therefore, do not
194Vehicle careOperation
463_AKB; 3; 35, en-USd2ureepe,Version: 2.11.8.12009-07-16T20:59:56+02:00 - Seite 194
Page 201 of 272

Vehicle equipment ............................200
Where will I find ...? ..........................200
Vehicle status messages in the
multifunction display .......................203
What to do if … ..................................219
Unlocking/locking manually ...........228
Opening/closing manually ..............231
Brush guard (USA only) ....................232
Replacing SmartKey batteries .........232
Replacing bulbs .................................233
Replacing wiper blades ....................238
Flat tire ..............................................239
Battery ...............................................243
Jump starting ....................................244
Towing the vehicle ............................246
Fuses ..................................................249
199Practical hints463_AKB; 3; 35, en-USd2ureepe,Version: 2.11.8.12009-07-16T20:59:56+02:00 - Seite 199
Page 202 of 272

Vehicle equipment
iThis Operator’s Manual describes all
features, standard or optional, potentially
available for your vehicle at the time of
purchase. Please be aware that your
vehicle might not be equipped with all
features described in this manual.
Where will I find ...?
First aid kit
iCheck expiration dates and contents for
completeness at least once a year and
replace missing/expired items.
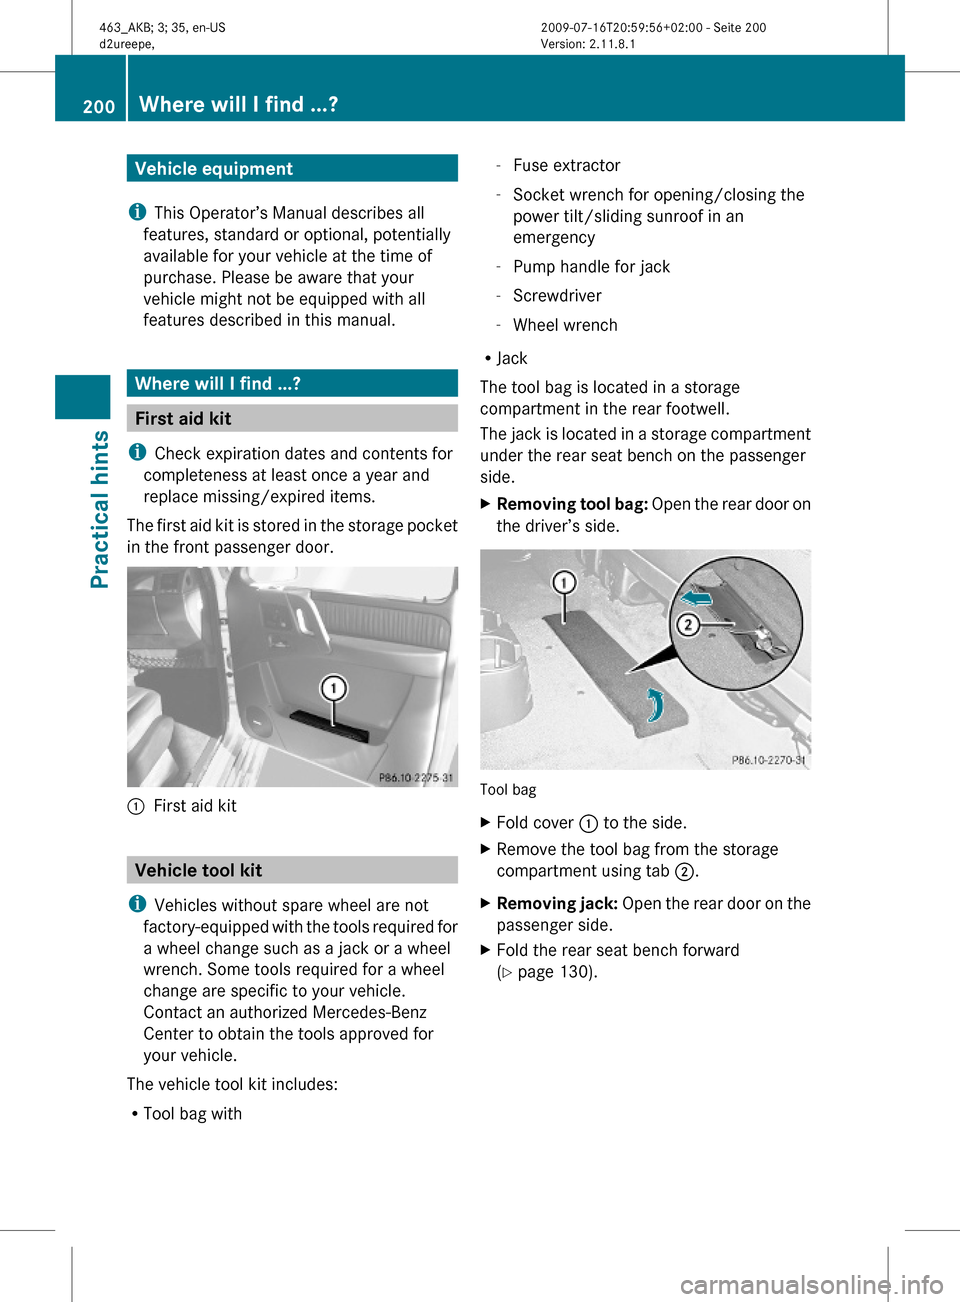
The first aid kit is stored in the storage pocket
in the front passenger door.
:First aid kit
Vehicle tool kit
iVehicles without spare wheel are not
factory-equipped with the tools required for
a wheel change such as a jack or a wheel
wrench. Some tools required for a wheel
change are specific to your vehicle.
Contact an authorized Mercedes-Benz
Center to obtain the tools approved for
your vehicle.
The vehicle tool kit includes:
RTool bag with
-Fuse extractor
-Socket wrench for opening/closing the
power tilt/sliding sunroof in an
emergency
-Pump handle for jack
-Screwdriver
-Wheel wrench
RJack
The tool bag is located in a storage
compartment in the rear footwell.
The jack is located in a storage compartment
under the rear seat bench on the passenger
side.
XRemoving tool bag: Open the rear door on
the driver’s side.
Tool bag
XFold cover : to the side.XRemove the tool bag from the storage
compartment using tab ;.
XRemoving jack: Open the rear door on the
passenger side.
XFold the rear seat bench forward
(Y page 130).
200Where will I find ...?Practical hints
463_AKB; 3; 35, en-USd2ureepe,Version: 2.11.8.12009-07-16T20:59:56+02:00 - Seite 200
Page 251 of 272

In case of rear axle damage
When the rear axle is raised, the vehicle can
only be towed with a wheel lift or a dolly
placed under its front wheels.
Stranded vehicle
Freeing a stranded vehicle, on which the
wheels are dug into sand or mud, should be
done with the greatest of care, especially if
the vehicle is heavily loaded.
Note the following when freeing a stranded
vehicle:
RAvoid pulling the vehicle abruptly or
diagonally, since it could result in damage
to the chassis alignment.
RNever try to free a vehicle that is still
coupled to a trailer.
RIf possible, a vehicle equipped with a trailer
hitch receiver should be pulled backward in
its own previously made tracks.
Fuses
Introduction
The electrical fuses in your vehicle serve to
switch off malfunctioning power circuits.
If a fuse is blown, the components and
systems secured by that fuse will stop
operating.
GWarning!
Only use fuses approved by Mercedes-Benz
with the specified amperage for the system in
question and do not attempt to repair or
bridge a blown fuse. Using other than
approved fuses or using repaired or bridged
fuses may cause an overload leading to a fire,
and/or cause damage to electrical
components and/or systems. Have the cause
determined and remedied by an authorized
Mercedes-Benz Center.
A blown fuse must be replaced by an
appropriate spare fuse (recognizable by its
color or the fuse rating given on the fuse) of
the amperage recommended in the fuse
chart. Any Mercedes-Benz Center will be glad
to advise you on this subject.
iIn case of a blown fuse contact Roadside
Assistance or an authorized Mercedes-
Benz Center.
If a newly inserted fuse blows again, have the
cause determined and rectified by an
authorized Mercedes-Benz Center.
The fuse chart is located in the fuse box in the
passenger compartment. The fuse chart
explains the fuse allocation and fuse
amperages.
Before replacing fuses
XEngage the parking brake.XMake sure the automatic transmission is in
park position P.
XSwitch off all electrical consumers.XTurn off the engine.XRemove the SmartKey from the starter
switch.
Fuse boxes in passenger
compartment
Fuse box in dashbord
Fuses249Practical hints463_AKB; 3; 35, en-USd2ureepe,Version: 2.11.8.12009-07-16T20:59:56+02:00 - Seite 249Z
Page 252 of 272

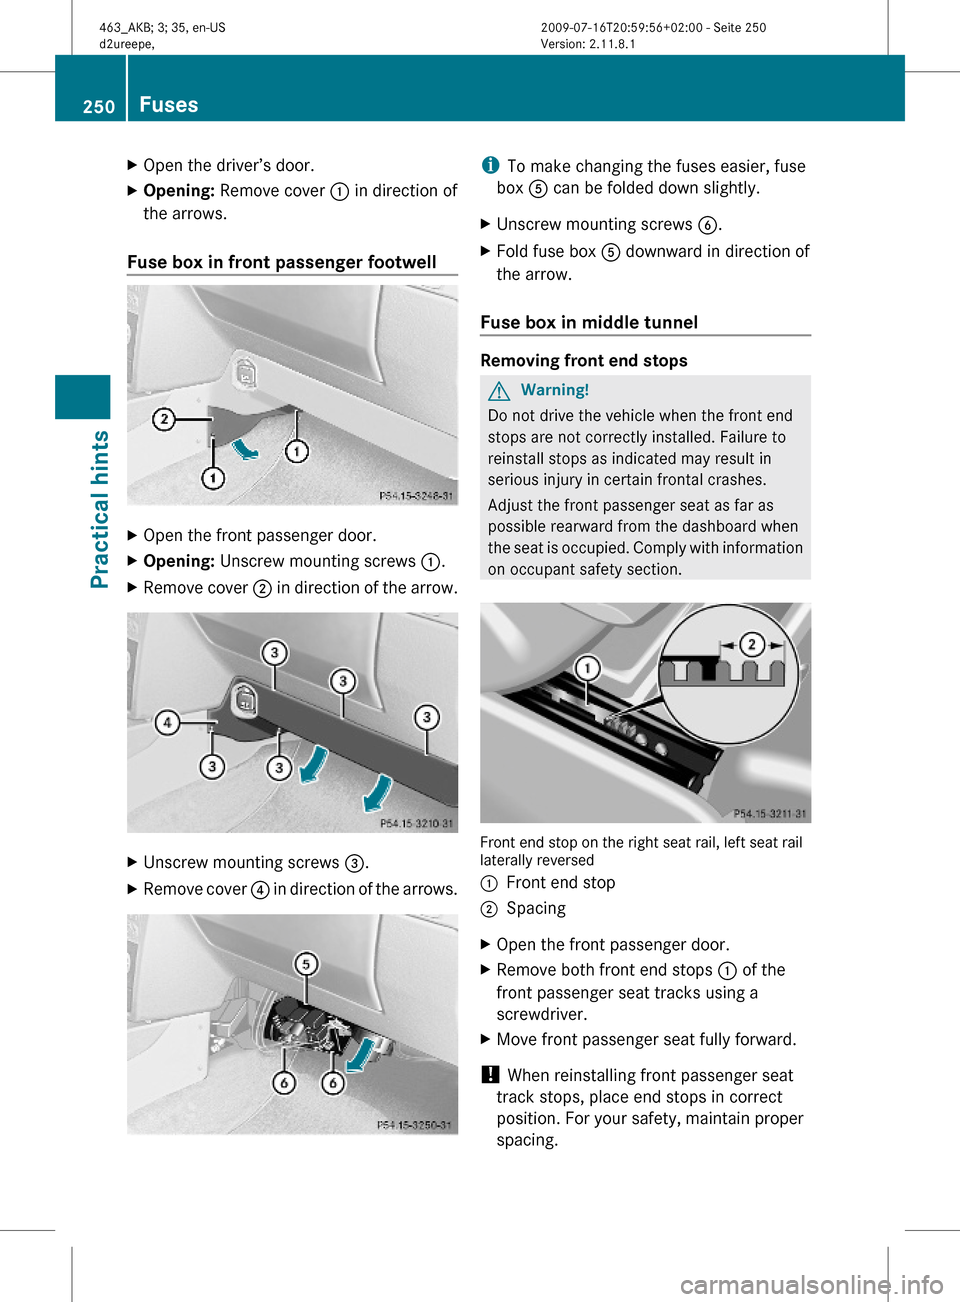
XOpen the driver’s door.XOpening: Remove cover : in direction of
the arrows.
Fuse box in front passenger footwell
XOpen the front passenger door.XOpening: Unscrew mounting screws :.XRemove cover ; in direction of the arrow.XUnscrew mounting screws =.XRemove cover ? in direction of the arrows.iTo make changing the fuses easier, fuse
box A can be folded down slightly.
XUnscrew mounting screws B.XFold fuse box A downward in direction of
the arrow.
Fuse box in middle tunnel
Removing front end stops
GWarning!
Do not drive the vehicle when the front end
stops are not correctly installed. Failure to
reinstall stops as indicated may result in
serious injury in certain frontal crashes.
Adjust the front passenger seat as far as
possible rearward from the dashboard when
the seat is occupied. Comply with information
on occupant safety section.
Front end stop on the right seat rail, left seat raillaterally reversed
:Front end stop;SpacingXOpen the front passenger door.XRemove both front end stops : of the
front passenger seat tracks using a
screwdriver.
XMove front passenger seat fully forward.
! When reinstalling front passenger seat
track stops, place end stops in correct
position. For your safety, maintain proper
spacing.
250FusesPractical hints
463_AKB; 3; 35, en-USd2ureepe,Version: 2.11.8.12009-07-16T20:59:56+02:00 - Seite 250
Page 253 of 272

Opening fuse boxXUnscrew mounting screws :.XRemove cover ; in direction of the arrow.
Fuse box in battery box
The battery box is located under a cover in
the rear footwell.
Replacement of fuses can only be performed
at a Mercedes-Benz Center.
! A fuse box cover must be properly
positioned as described. Otherwise,
moisture or dirt could enter a fuse box and
possibly impair fuse operation.
Fuses251Practical hints463_AKB; 3; 35, en-USd2ureepe,Version: 2.11.8.12009-07-16T20:59:56+02:00 - Seite 251Z