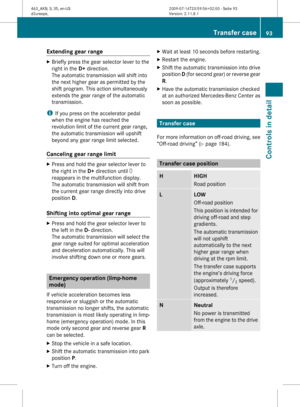
Page 97 of 272

XPress lower half (“HIGH”) of the transfer
case switch.
Once the shift is complete, transfer case
position H appears in transfer case
indicator :.
If the shifting procedure does not take place,
press lower half (“HIGH”) of the transfer case
switch once more.
XShift the automatic transmission into drive
position D.
Messages in the multifunction display
If a shift was not completed and one of the
following messages appears in the
multifunction display:
R TC Shift Conditions Not Fulfilled
The shift did not take place. At least one
shift condition was not met.
XRepeat the shifting procedure.
R TC in Neutral
The shift did not take place. The transfer
case is in neutral. Transfer case position N
appears in transfer case indicator :.
XRepeat the shifting procedure.GWarning!
If the transfer case is in Neutral, the park
position P of the automatic transmission will
not hold the vehicle. The parking brake must
be engaged to hold the vehicle in place.
R TC shift Procedure Canceled
The shift did not take place.
XRepeat the shifting procedure.
R Transfer Case Services Required
There may be a malfunction in the system.
XRepeat the shifting procedure.
If the shifting procedure still does not take
place:
XHave the vehicle checked at an
authorized Mercedes-Benz Center as
soon as possible.i If the SmartKey is in starter switch
position 0 or 1, an alarm will sound if the
transfer case is in Neutral and the driver’s
door is opened.
Switch the transfer case to gear position
HIGH or LOW .
Differential locks
Differential locks improve the vehicle’s
tractive power off-road. Switch differential
locks
R for off-road driving
R to switch the ABS off during off-road driving
R for driving through water
R when driving on deep snow and icy or
fouled surfaces
! Do not switch the front axle differential
lock when driving around tight corners. This
restricts steering ability.
! When driving off-road, apply only
moderate pressure to the accelerator pedal
if the differential locks are switched on.
When operating the vehicle on a single-axle
dynamometer – no matter how briefly – you
must
R raise the axle not being driven
or
R disconnect the drive shaft
and
R switch the transfer case differential lock.
Otherwise the transfer case can be
damaged, which is not covered by the
Mercedes-Benz Limited Warranty.
GWarning!
Never drive on pavement with differential
locks switched.
Steering control will be strongly affected with
the differential locks activated.
Differential locks95Controls in detail463_AKB; 3; 35, en-USd2ureepe,Version: 2.11.8.12009-07-16T20:59:56+02:00 - Seite 95Z
Page 98 of 272

The ABS, BAS, and ESP® are switched off
automatically when the transfer case
differential lock is activated.
For more information on off-road driving, see
“Off-road driving” (Y page 184).
A few words about differentials and
differential locks
When a vehicle negotiates a turn, wheels on
the outside of the curve must travel farther
and rotate faster than the inside wheels. The
differential, the operation of a set of gears
that allows the powered wheels in a vehicle
to turn at different speeds, makes this
essential function possible.
The drawback is that the differential also
sends most of the engine’s power to the
wheel with the least load or strain on it. For
example, if one of a vehicle’s powered wheels
sits on a patch of snow and spins because
there is no traction, all of the engine’s power
will go to that wheel because the power will
take the path of least resistance. Meanwhile,
the opposite wheel, sitting on dry pavement
where it could get enough grip to start the
vehicle moving, sits idle because it receives
no power.
The 4-ETS addresses this problem and
provides for good control and steering ability
by automatically slowing the slipping wheel
and thus increasing the power to the other
non-slipping drive wheels to get the vehicle
moving. The ESP® and the 4-ETS in this
vehicle feature such intelligent limited-slip
differential technology, ideally suited for on-
road and light off-road driving. Transfer case
position LOW (Y page 93) also enhances off-
road driving capabilities.
More extreme off-road conditions may call for
another solution, engaging a differential lock
or preventing the differential from operating
altogether. This vehicle comes with three
differential locks: front, transfer case
(center), and rear. Each can be engaged
simply by pushing dashboard-mounted
switches in sequential order (center, rear,
front) (Y page 96). When the transfer case
(center) differential is locked, half of the
engine’s power is automatically distributed to
the front wheels and half to the rear wheels.
When the rear differential is locked, power
going to the rear wheels is equally distributed,
so that both rear wheels turn at the same
speed and torque. Please be aware that
engaging the differential locks will
significantly reduce the steering ability of the
vehicle.
For your safety and the safety of others and
to prevent damage to the vehicle, the
differential locks must not be engaged when
driving on paved roads. It is important to
understand that during on-road/paved
driving, differentials are absolutely necessary
for providing the essential control and
steering ability of the vehicle. The differential
locks, therefore, must not be engaged when
driving on paved roads and should only be
used to the extent necessary to negotiate off-
road conditions which cannot be handled by
the systems (the 4-ETS, the ESP®, and the
manual switch position “LOW” of transfer
case) this vehicle comes equipped with.
Switching differential locks on and off
The switches are located on the upper part of
the center console.
:Transfer case (center) differential lock;Rear axle differential lock=Front differential lock96Differential locksControls in detail
463_AKB; 3; 35, en-USd2ureepe,Version: 2.11.8.12009-07-16T20:59:56+02:00 - Seite 96
Page 99 of 272

?Engagement indicator lamps (yellow)AFunction indicator lamps (red)
The differential locks can only be switched on
in the sequence :, ; , = .
Switching differential locks on
! To avoid damage to the transfer case and
differential locks:
R Engage the differential locks only at low
speed (walking speed, not more than
5 mph [8 km/h]).
R Do not engage the differential locks if the
driving wheels are spinning due to lack
of traction.
R Do not engage the differential locks on
paved roads.
Transfer case differential lock
XPress switch :.
Yellow engagement indicator lamp ? for
the transfer case differential lock comes
on.
The ESP ®
warning lamp d in the
instrument cluster comes on.
When the differential lock engagement
operation has been completed, the red
function indicator lamp A comes on.
The message ABS not available
Differential Locked appears in the
multifunction display.
The ESP ®
warning lamp d and the !
indicator lamp in the instrument cluster come
on.
Once the transfer case differential lock is
switched on, you can now, if needed, switch
on rear axle differential lock ;, or switch on
rear axle differential lock ; and front
differential lock =.
Rear axle differential lockXPress switch ;.
Yellow engagement indicator lamp ?
comes on first, followed by red function
indicator lamp A.
The rear axle differential lock is switched
on.
Front differential lock
XPress switch =.
Yellow engagement indicator lamp ?
comes on first, followed by red function
indicator lamp A.
The front differential lock is switched on.
Switching differential locks off
There are two different methods to disengage
differential locks:
R You can switch the differential locks off in
reverse order ( =, ; , : ).
R To switch off all differential locks at the
same time:
XPress switch :.
Yellow engagement indicator
lamps ? go out first. Red function
indicator lamps A go out when the
switching process has been carried
out in the differential.
To activate the ESP ®
, BAS, and ABS systems,
drive again for 3 seconds using a constant
driving style.
All messages in the multifunction display
disappear. The ESP ®
warning lamp d and
the ! indicator lamp in the instrument
cluster go out.
i If red function indicator lamps A do not
go out when the differential locks are
disengaged, bring vehicle to a stop and
then continue driving. Changing the vehicle
load can help to disengage the differential
locks.
Differential locks97Controls in detail463_AKB; 3; 35, en-USd2ureepe,Version: 2.11.8.12009-07-16T20:59:56+02:00 - Seite 97Z
Page 100 of 272

GWarning!
Always remember to disengage the
differential locks when returning to drive on
paved roads, see “A few words about
differentials and differential locks”.
Instrument cluster
Introduction
For a full view illustration of the instrument
cluster, see “Instrument cluster”
(Y page 26).
GWarning!
No messages will be displayed if either the
instrument cluster or the multifunction
display is inoperative.
As a result, you will not be able to see
information about your driving conditions,
such as
Rspeed
Routside temperature
Rwarning/indicator lamps
Rmalfunction/warning messages
Rfailure of any systems
Driving characteristics may be impaired.
If you must continue to drive, do so with added
caution. Contact an authorized Mercedes-
Benz Center as soon as possible.
:Reset button For information on changing the instrument
cluster settings, e.g. the language, see
(Y page 107).
Activating the instrument cluster
The instrument cluster is activated when you
Ropen the driver’s door
Rswitch on the ignition
Rpress reset button :
Rswitch on the exterior lamps
Adjusting the instrument cluster
illumination
Use reset button : to adjust the illumination
brightness for the instrument cluster and the
switches on the center console.
XTo brighten illumination: Turn reset
button : clockwise until the desired level
of illumination is reached.
XTo dim illumination: Turn reset
button : counterclockwise until the
desired level of illumination is reached.
iThe instrument cluster illumination is
dimmed or brightened automatically to suit
ambient light conditions.
The instrument cluster illumination will also
be adjusted automatically when you switch
on the vehicle’s exterior lamps.
Coolant temperature gauge
The coolant temperature gauge is located on
the left side in the instrument cluster
(Y page 26).
GWarning!
Driving when your engine is overheated can
cause some fluids which may have leaked into
the engine compartment to catch fire. You
could be seriously burned.
98Instrument clusterControls in detail
463_AKB; 3; 35, en-USd2ureepe,Version: 2.11.8.12009-07-16T20:59:56+02:00 - Seite 98
Page 101 of 272

Steam from an overheated engine can cause
serious burns which can occur just by opening
the engine hood. Stay away from the engine
if you see or hear steam coming from it.
Stop the vehicle in a safe location away from
other traffic. Turn off the engine, get out of the
vehicle and do not stand near the vehicle until
the engine has cooled down.
During severe operating conditions, e.g. stop-
and-go traffic, the coolant temperature may
rise close to 248‡ (120†).
! Excessive coolant temperature triggers a
warning in the multifunction display.
The engine should not be operated with a
coolant temperature above 248‡ (120†),
i.e. in the red zone of the coolant
temperature gauge. Doing so may cause
serious engine damage which is not
covered by the Mercedes-Benz Limited
Warranty.
Resetting trip odometer
XMake sure you are viewing the standard
display ( Y page 102) in the multifunction
display.XPress and hold the reset button in the
instrument cluster (Y page 98) until the trip
odometer is reset.
Tachometer
The red marking on the tachometer
( Y page 26) denotes excessive engine speed.
! Avoid driving at excessive engine speeds,
as it may result in serious engine damage
that is not covered by the Mercedes-Benz
Limited Warranty.
To help protect the engine, the fuel supply is
interrupted if the engine is operated within
the red marking.
Control system
Introduction
The control system is activated as soon as the
starter switch is in position 1.
The control system enables you to call up
information about your vehicle and to change
vehicle settings.
For example, you can use the control system
to find out when your vehicle is next due for
maintenance service, to set the language for
messages in the instrument cluster display,
and much more.
GWarning!
A driver’s attention to the road and traffic
conditions must always be his/her primary
focus when driving.
For your safety and the safety of others,
selecting features through the multifunction
steering wheel should only be done by the
driver when traffic and road conditions permit
it to be done safely.
Bear in mind that at a speed of just 30 mph
(approximately 50 km/h), your vehicle is
covering a distance of 44 feet (approximately
14 m) every second.
The control system relays information to the
multifunction display.
Multifunction steering wheel
The displays in the multifunction display and
the settings in the control system are
controlled by using the buttons on the
multifunction steering wheel.
Control system99Controls in detail463_AKB; 3; 35, en-USd2ureepe,Version: 2.11.8.12009-07-16T20:59:56+02:00 - Seite 99Z
Page 102 of 272

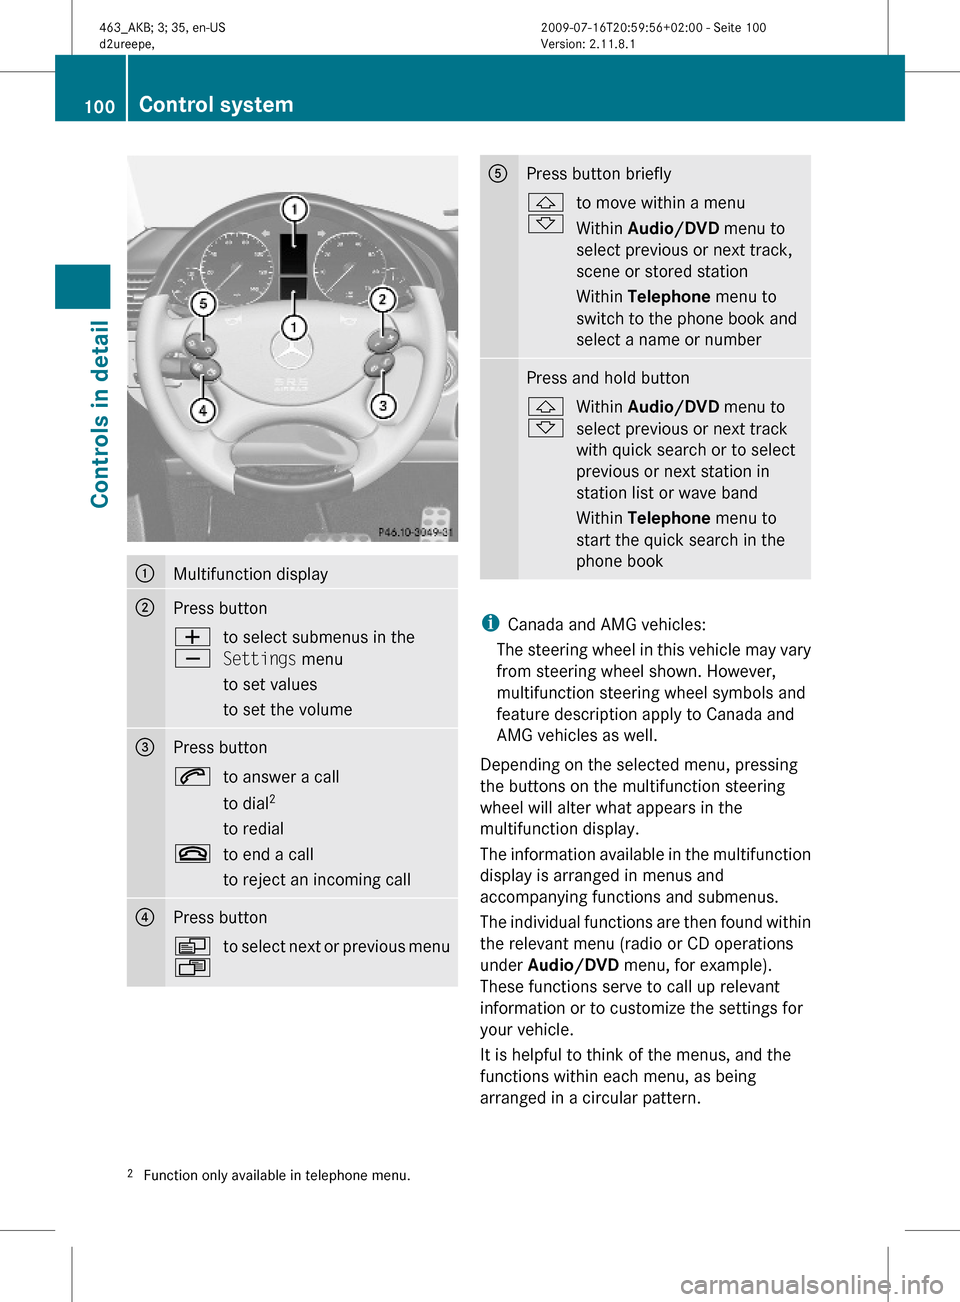
:Multifunction display;Press buttonW
X
to select submenus in the
Settings menu
to set values
to set the volume
=Press button6to answer a call
to dial2
to redial
~to end a call
to reject an incoming call
?Press buttonV
U
to select next or previous menuAPress button briefly&
*
to move within a menu
Within Audio/DVD menu to
select previous or next track,
scene or stored station
Within Telephone menu to
switch to the phone book and
select a name or number
Press and hold button&
*
Within Audio/DVD menu to
select previous or next track
with quick search or to select
previous or next station in
station list or wave band
Within Telephone menu to
start the quick search in the
phone book
iCanada and AMG vehicles:
The steering wheel in this vehicle may vary
from steering wheel shown. However,
multifunction steering wheel symbols and
feature description apply to Canada and
AMG vehicles as well.
Depending on the selected menu, pressing
the buttons on the multifunction steering
wheel will alter what appears in the
multifunction display.
The information available in the multifunction
display is arranged in menus and
accompanying functions and submenus.
The individual functions are then found within
the relevant menu (radio or CD operations
under Audio/DVD menu, for example).
These functions serve to call up relevant
information or to customize the settings for
your vehicle.
It is helpful to think of the menus, and the
functions within each menu, as being
arranged in a circular pattern.
2Function only available in telephone menu.100Control systemControls in detail
463_AKB; 3; 35, en-USd2ureepe,Version: 2.11.8.12009-07-16T20:59:56+02:00 - Seite 100
Page 103 of 272
XPress button V or U repeatedly to
pass through each menu one after the
other.
XPress button * or & repeatedly to
pass through each function display, one
after the other, in the current menu.
In the Settings menu, instead of functions,
you will find a number of submenus for calling
up and changing settings. For instructions on
using these submenus, see “Settings menu”
(Y page 106).
The number of menus available in the system
depends on which optional equipment is
installed in your vehicle.
Multifunction display
:Trip odometer;Main odometer =Transfer case indicator?Transmission position/gear range
indicator
ADigital clockBOutside temperature/digital
speedometer
For more information on menus displayed in
the multifunction display, see “Menus and
submenus” (Y page 102).
Control system101Controls in detail463_AKB; 3; 35, en-USd2ureepe,Version: 2.11.8.12009-07-16T20:59:56+02:00 - Seite 101Z
Page 104 of 272

Menus and submenusiThe headings used in the menus table are
designed to facilitate navigation within the
system and are not necessarily identical to
those shown in the multifunction display.
The first function displayed in each menu
will automatically show you which part of
the system you are in.
Function:Standard display menu
(Y page 102)
;Audio/DVD menu (Y page 103)=Navigation menu (Y page 105)?Vehicle status message memory3
menu (Y page 105)
ASettings menu (Y page 106)BTrip computer menu (Y page 112)CTelephone menu (Y page 113)Standard display menu
Standard display
In the standard display, trip odometer : and
main odometer ; appear in the
multifunction display.
XIf you see another display, press button
V or U repeatedly until the standard
display appears.
XPress button & or * to select the
functions in the Standard display menu.3The vehicle status message memory menu is only displayed if there is a message stored.102Control systemControls in detail
463_AKB; 3; 35, en-USd2ureepe,Version: 2.11.8.12009-07-16T20:59:56+02:00 - Seite 102