2010 MERCEDES-BENZ CLS COUPE transmission
[x] Cancel search: transmissionPage 238 of 337
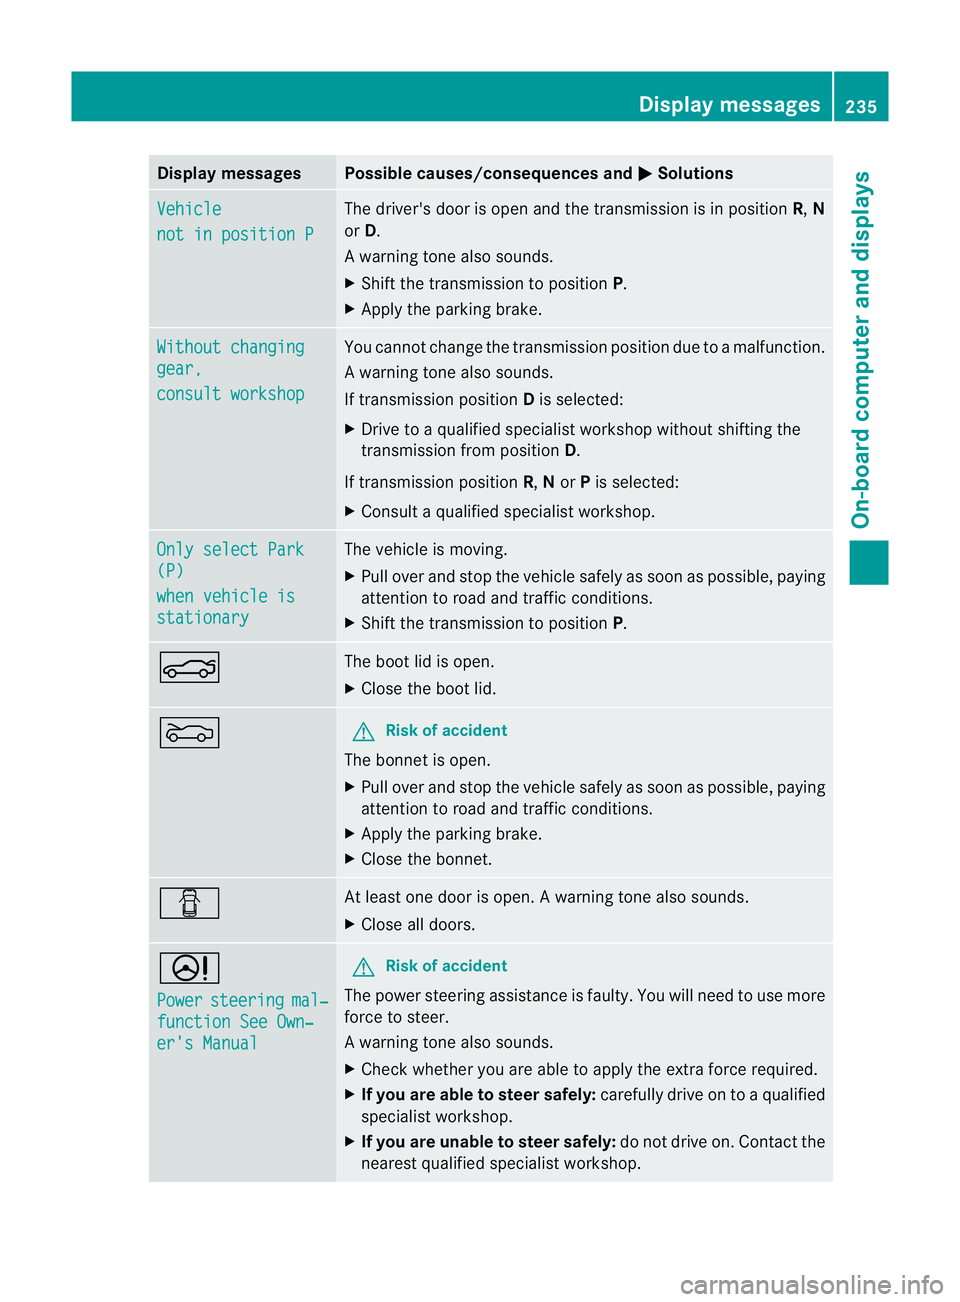
Display messages Possible causes/consequences and
M Solutions
Vehicle
not in position P The driver's doo
ris open and the transmission is in position R,N
or D.
Aw arning tone also sounds.
X Shift the transmission to position P.
X Apply the parking brake. Without changing
gear,
consult workshop You canno
tchange the transmission position due to a malfunction.
Aw arning tone also sounds.
If transmission position Dis selected:
X Drive to a qualified specialist workshop without shifting the
transmission from position D.
If transmission position R,Nor Pis selected:
X Consult a qualified specialist workshop. Only select Park
(P)
when vehicle is
stationary The vehicle is moving.
X
Pull ove rand stop the vehicle safely as soo nas possible, paying
attention to road and traffic conditions.
X Shift the transmission to position P.N The boot lid is open.
X
Close the boot lid. M G
Risk of accident
The bonnet is open.
X Pull over and stop the vehicle safely as soon as possible, paying
attention to road and traffic conditions.
X Apply the parking brake.
X Close the bonnet. C At least one door is open.
Awarning tone also sounds.
X Close all doors. D
Power
steering mal‐
function See Own‐
er's Manual G
Ris
kofa ccident
The power steering assistance is faulty. You will need to use more
force to steer.
Aw arning tone also sounds.
X Chec kwhether you are able to apply the extra force required.
X If you are able to steer safely: carefully drive on to a qualified
specialist workshop.
X If you are unable to steer safely: do not drive on. Contact the
nearest qualified specialist workshop. Display messages
235On-board computer and displays Z
Page 263 of 337
qualified specialist workshop, e.g. a
Mercedes-Benz Service Centre.
The functions and services available when
you use the phone depend on your mobile
phone model and service provider.
Further information about the mobile
phone brackets supported can also be
found on the Internet at: http://
www.mercedes-benz.com/connec t.
Inserting the mobile phone
X Open the telephone compartment
(Y page 249).
X Depending on the model of the mobile
phone bracket, install the sliding adapter
(Y page 260).
X Insert the mobile phone into the mobile
phone bracket; see the separate mobile
phone bracket installation instructions.
If the mobile phone is inserted in the mobile
phone bracket, you can speakt o the person
you are calling using the hands-free system.
You can operate the telephone using the
6 and~ buttons on the multifunction
steering wheel. You can operate other mobile
phone functions via the on-board computer
(Y page 201).
If you are making a call and you would like to
take the key out of the ignition lock, first
remove the mobile phone from the bracket.
Otherwise, the call will be ended.
Sliding adapter for mobile phone
bracket 36 Certain mobile phone brackets require a slid-
ing adapter so the bracket can be installed
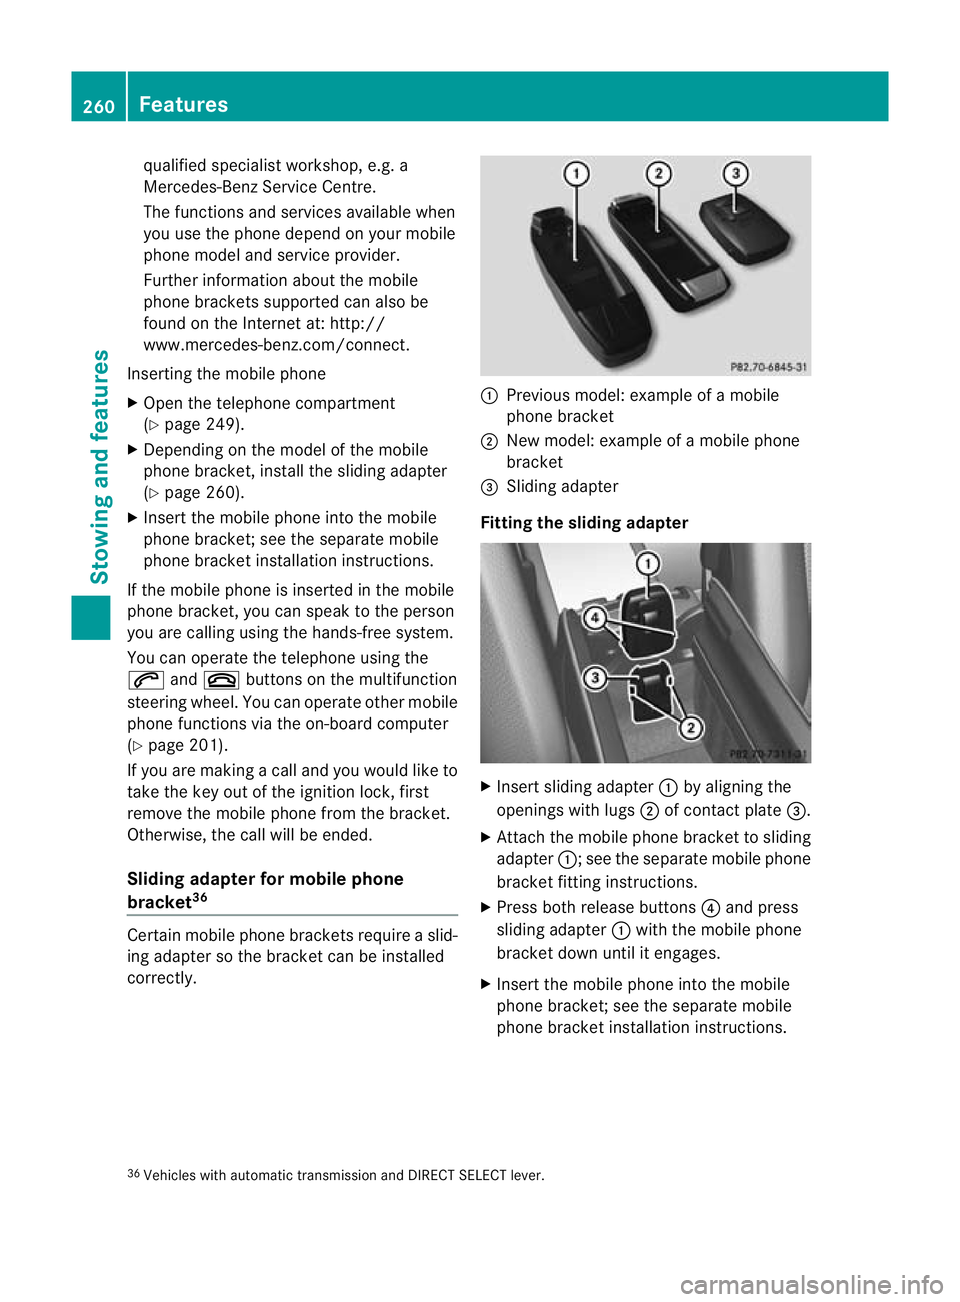
correctly. :
Previous model: example of a mobile
phone bracket
; New model: example of a mobile phone
bracket
= Sliding adapter
Fitting the sliding adapter X
Insert sliding adapter :by aligning the
openings with lugs ;of contact plate =.
X Attach the mobile phone bracket to sliding
adapter :; see the separate mobile phone
bracket fitting instructions.
X Press both release buttons 4and press
sliding adapter :with the mobile phone
bracket down until it engages.
X Insert the mobile phone into the mobile
phone bracket; see the separate mobile
phone bracket installation instructions.
36 Vehicles with automatic transmission and DIRECT SELECT lever. 260
FeaturesStowing and features
Page 265 of 337
once a second after 20 seconds have
elapsed.
X Keep the transmitter button depressed.
X Point transmitter button Bof garage door
remote control Atowards the transmitter
buttons on the rear-view mirror at a dis-
tance of 5 to 20 cm.
i The required distance between garage
door remote control Aand the integrated
door opener depends on the garage door
drive system. You might require several
attempts. You should test every position for
at least 20 seconds before trying another
position.
X Press and hold transmitter button Bon
garage door remote control Auntil the
indicator lamp :starts to flash rapidly.
The programming has been successful if
indicator lamp :flashes rapidly.
X Release transmitter button ;,=or? on
the integrated garage door opener and
transmitter button Bon garage door
remote control A.
If indicator lamp :goes out after approx-
imately 20 seconds and has not flashed rap-
idly:
X Repeat the programming procedure for the
transmitter button. This time, change the
distance between the garage door remote
control and the rear-view mirror.
i If the garage door system works with a
rolling code, you must synchronise the
remote control integrated in the rear-view
mirror with the garage door system
receiver after programming.
You will find further information in the
garage door opening system's operating
instructions, e.g. the sections on "Synchro-
nising the transmitter" or "Registering a
new transmitter". You can also call the hot-
line mentioned above. Problems when programming
If you experience problems when program-
ming the garage door opener integrated in the
rear-view mirror, note the following:
R
check the transmitter frequency of garage
door remote control A(this can usually be
found on the rear of the remote control).
R change the batteries in garage door remote
control A.This increases the likelihood
that garage door remote control Awill
send a strong and precise signal to the
integrated remote control in the rear-view
mirror.
R when programming, hold garage door
remote control Aat different distances
and angles from the transmitter button that
you are programming. Try various angles at
distances from 5 to 30 cm or the same
angle but varying distances.
R If there is another remote control for the
same garage door drive, perform the pro-
gramming steps again using the other
remote control. Before performing these
steps, make sure that new batteries have
been fitted in the garage door remote con-
trol.
R Align the aerial cable of the garage door
opener unit. This can improve signal recep-
tion/transmission.
Opening or closing the garage door Once programmed, the integrated remote
control will assume the function of the garage
door system's remote control. Please also
read the operating instructions for the garage
door system.
X
Turn the key to position 2in the ignition
lock.
X Press transmitter button ;,=or? in the
overhead control panel that you have pro-
grammed to operate the garage door.
Garage door system with a fixed code: indi-
cator lamp :lights up green. 262
FeaturesStowing and features
Page 266 of 337
Garage door system with a rolling code:
indicator lamp :flashes green.
i The transmitte rwill transmit a signal for
as long as the transmitter button is
pressed. The transmission is halted after a
maximum of 10 seconds, and indicator
lamp :flashes yellow. Press the transmit-
ter button again, if necessary.
Clearing the memory of the integrated
garage door opener in the rear-view mir-
ror X
Turn the key to position 2in the ignition
lock.
X Press the transmitter buttons ;and ?.
The indicator lamp lights up yellow.
X Press and hold transmitter buttons ;
and ?until the indicator lamp turns green.
i Make sure that you clear the memory of
the integrated garage door opener before
selling the vehicle. Features
263Stowing and features Z
Page 274 of 337
scraper. You could otherwise scratch or
damage the surfaces and protective film. H
Environmental note
Dispose of empty packaging and cleaning
cloths in an environmentally responsible man-
ner.
! Do not park up the vehicle for an extended
period straight after cleaning it, particularly
after having cleaned the wheels with wheel
cleaner. Wheel cleaners could cause
increased corrosion of the brake discs and
brake pads/linings. For this reason, you
should drive for a few minutes after clean-
ing. Braking heats the brake discs and
brake pads, thus drying them. The vehicle
can then be parked up. Care of the exterior
Automatic car wash G
Risk of accident
Braking efficiency is reduced after washing
the vehicle. This could cause an accident. For
this reason, following a car wash, drive with
particular care until the brakes are dry. G
Risk of accident
The vehicle is braked when the HOLD function
or DISTRONIC PLUS is activated. Therefore,
deactivate the HOLD function and DISTRONIC
PLUS before the vehicle is washed in an auto-
matic car wash.
You can wash the vehicle in an automatic car
wash from the very start.
If the vehicle is very dirty, pre-wash it before
cleaning it in an automatic car wash.
! In car washes with a towing mechanism,
make sure that the automatic transmission
is in transmission position N, otherwise the
vehicle could be damaged.
R Vehicles with a key:
do not remove the key from the ignition
lock. Do not open the driver's door or front-passenger door when the engine is
switched off. Otherwise, the automatic
transmission selects park position
P
automatically and locks the wheels. You
can prevent this by shifting the auto-
matic transmission to Nbeforehand.
R Vehicles with KEYLESS-GO:
do not open the driver's door or front-
passenger door when the engine is
switched off. Otherwise, the automatic
transmission selects park position P
automatically and locks the wheels.
Observe the following to make sure that the
automatic transmission stays in position N:
X Make sure the vehicle is stationary and the
ignition is switched off.
X Turn the key to position 2(Y page 129) in
the ignition lock.
Use the key instead of the Start/Stop but-
ton on vehicles with KEYLESS-GO.
X Depress and hold the brake pedal.
X Shift the automatic transmission to posi-
tion N.
X Release the brake pedal.
X Release the parking brake.
X Switch off the ignition and leave the key in
the ignition lock.
! Make sure that:
R the side windows and sliding sunroof are
closed completely.
R the blower for the ventilation/heating is
switched off (OFF button is depressed).
R the windscreen wiper switch is at posi-
tion 0.
The vehicle could otherwise be damaged.
After using an automatic car wash, wipe off
wax from the windscreen and the wiper
blades. This will prevent smears and reduce
wiping noises caused by residue on the wind-
screen. Care
271Maintenance and care Z
Page 294 of 337
recycled in an environmen-
tally responsible manner.
Dispose of batteries in an
environmentally responsible
manner. Take discharged
batteries to a qualified spe-
cialist workshop, e.g. a
Mercedes-Benz Service
Centre, or to a special col-
lection point for old batter-
ies.
G
Risk of injury
For safety reasons, Mercedes-Benz recom-
mends that you only use batteries which have
been tested and approved for yourv ehicle by
Mercedes-Benz .These batteries provide
increased impact protection to prevent vehi-
cle occupants from suffering acid burns
should the battery be damaged in the event
of an accident.
To prevent acid burns, observe the following
safety notes when handling batteries:
R do not lean over the battery.
R do not place any metal objects on a battery.
Otherwise, you could cause a short circuit
and the battery's gas mixture could ignite.
R make sure that you do not create an elec-
trostatic charge, e.g. by wearing synthetic
clothing or as a result of friction on fabrics.
Therefore, you should not pull or slide the
battery over carpets or other synthetic
materials.
R never touch the battery first. To discharge
a possible electrostatic charge, step out of
the vehicle first and touch the bodywork.
R do not wipe the battery using a cloth. The
battery may explode as a result of electro-
static charge or due to flying sparks.
! Switch off the engine and remove the key
before disconnecting the terminal clamps
from the battery. On vehicles with KEY-
LESS-GO, make sure that the ignition is
switched off. Check that all the indicator
lamps in the instrumentc luster are off.You may otherwise destroy electronic compo-
nents, such as the alternator.
i Remove the key if you park the vehicle
and do not require any electrical consum-
ers. The vehicle will then use very little
energy, thus conserving battery power.
Mercedes-Benz recommends that you do not
carry out work on batteries yourself, e.g.
removing, charging or replacing. Always have
this work performed at aqualified specialist
workshop, e.g. a Mercedes-Ben zService
Centre. Installation location of the battery
Your vehicle is equipped with a battery in the
engine compartment .Itis located on the front
bulkhead under the filter box on the right-
hand side of the vehicle when viewed in the
direction of travel.
X Firmly depress the parking brake and move
the transmission to position P.
X Switch off all electrical consumers (e.g.
radio, blower, etc.).
X Turn the key to position 0(Y page 129) in
the ignition lock and remove it, or, on vehi-
cles with KEYLESS-GO, make sure that the
ignition has been switched off
(Y page 129). All indicator lamps in the
instrument cluster must be off.
X Open the bonnet (Y page 266). X
Release clamps ;on filter box :.
X Remove filter box :. Battery
291Breakdown assistance Z
Page 295 of 337
i
Information on disconnecting the battery
(Y page 292). Disconnecting the battery
G
Risk of accident
If the battery is disconnected:
R the brake boosting effect will not be avail-
able. Greater braking force will then be
required and brake pedal travel will be lon-
ger. If necessary, depress the brake pedal
with maximum force.
R the transmission is locked in position P.
! Always disconnect the battery in the
order described below. Never mix up the
terminal clamp disconnection/connection
order and never mix up the terminal
clamps. You may otherwise damage the
vehicle electronics. :
Battery
; Positive terminal
= Negative terminal
? Breather hose
X Remove the negative terminal clamp from
the battery.
X Remove the cover from the positive termi-
nal clamp.
X Remove the positive terminal clamp from
the battery.
X Disconnect the breather hose. Removing/fitting the battery
X To remove: disconnect the battery
(Y page 292).
X Loosen the bolt which holds the battery in
place.
X Remove the battery.
X To fit: follow the steps described in "To
remove" in reverse order. Charging the battery
G
Risk of injury
Only charge the battery in a well-ventilated
area.A s the battery is being charged, gases
can escape and generate minor explosions.
This could injure you and other persons or
cause damage to the paintwork or acid cor-
rosion on the vehicle.
You can obtain information about battery
chargers which allow the battery to be
charged while still installed from a qualified
specialist workshop, e.g. aMercedes-Benz
Service Centre. G
Risk of injury
There is a risk of acid burns during the charg-
ing process due to the gases which escape
from the battery. Do not lean over the battery
during the charging process. G
Risk of injury
Battery acid is caustic. Avoid contact with the
skin, eyes or clothing.
! Only charge the installed battery with a
battery charger which has been tested and
approved by Mercedes-Benz .These battery
chargers allow the battery to be charged
while still installed.
! Only use battery chargers with a maxi-
mum charging voltage of 14.8 V.
! Only charge the battery using the jump-
start connection point. 292
BatteryBreakdown assistance
Page 297 of 337
Jump-starting
G
Risk of injury
There is a risk of acid burns when jump-starting a vehicle due to the gases which escape from
the battery. Do not lean over the battery while the engine is being jump-started. G
Risk of explosion
Gases escaping from the battery during jump-starting may cause minor explosions. Avoid cre-
ating sparks. Keep naked flames away from the battery, and do not smoke.
Comply with safety precautions when handling batteries. You will find these under "Battery" in
the index.
! Avoid repeated and lengthy starting attempts. Otherwise, non-combusted fuel may dam-
age the catalytic converter 39
and create a risk of fire.
Do not use a rapid-charging device to start the engine.
Make sure the jump leads are not damaged.
Make sure the jump leads are not touching any other metal objects when they are connected
to the battery.
If your vehicle's battery is discharged, the engine can be jump-started from another vehicle
or from a second battery using jump leads.
Observe the following points:
X The battery is not accessible in all vehicles. If the other vehicle's battery is not accessible,
jump-start the vehicle using a second battery or ajump-starting device.
X Only jump-start the vehicle when the engine is cold and the catalyti cconverter system has
cooled down 40
.
X Do not start the engine if the battery is frozen. Let the battery thaw first.
X Jump-starting may only be performed from batteries with a nominal voltage of 12 V.
X Only use jump leads that have a sufficient cross-section and insulated terminal clamps.
X Make sure that the jump leads cannot come into contact with parts, such as the pulley or
the fan. These parts move when the engine is started and while it is running.
X If the battery is fully discharged, leave the battery that is being used to jump-start connected
for a few minutes before attempting to start.T his charges the empty battery a little.
i Jump leads and further information about jump-starting can be obtained from any
Mercedes-Benz Service Centre.
X Make sure that the two vehicles do not touch.
X Apply the parking brake firmly.
X Shift the transmission to position P.
X Switch off all electrical consumers (e.g. radio, blower, etc.).
X Open the bonnet (Y page 266).
39 Only vehicles with a petrol engine.
40 Only vehicles with a petrol engine. 294
Jump-startingBreakdown assistance