2010 MERCEDES-BENZ CLS COUPE navigation system
[x] Cancel search: navigation systemPage 202 of 337
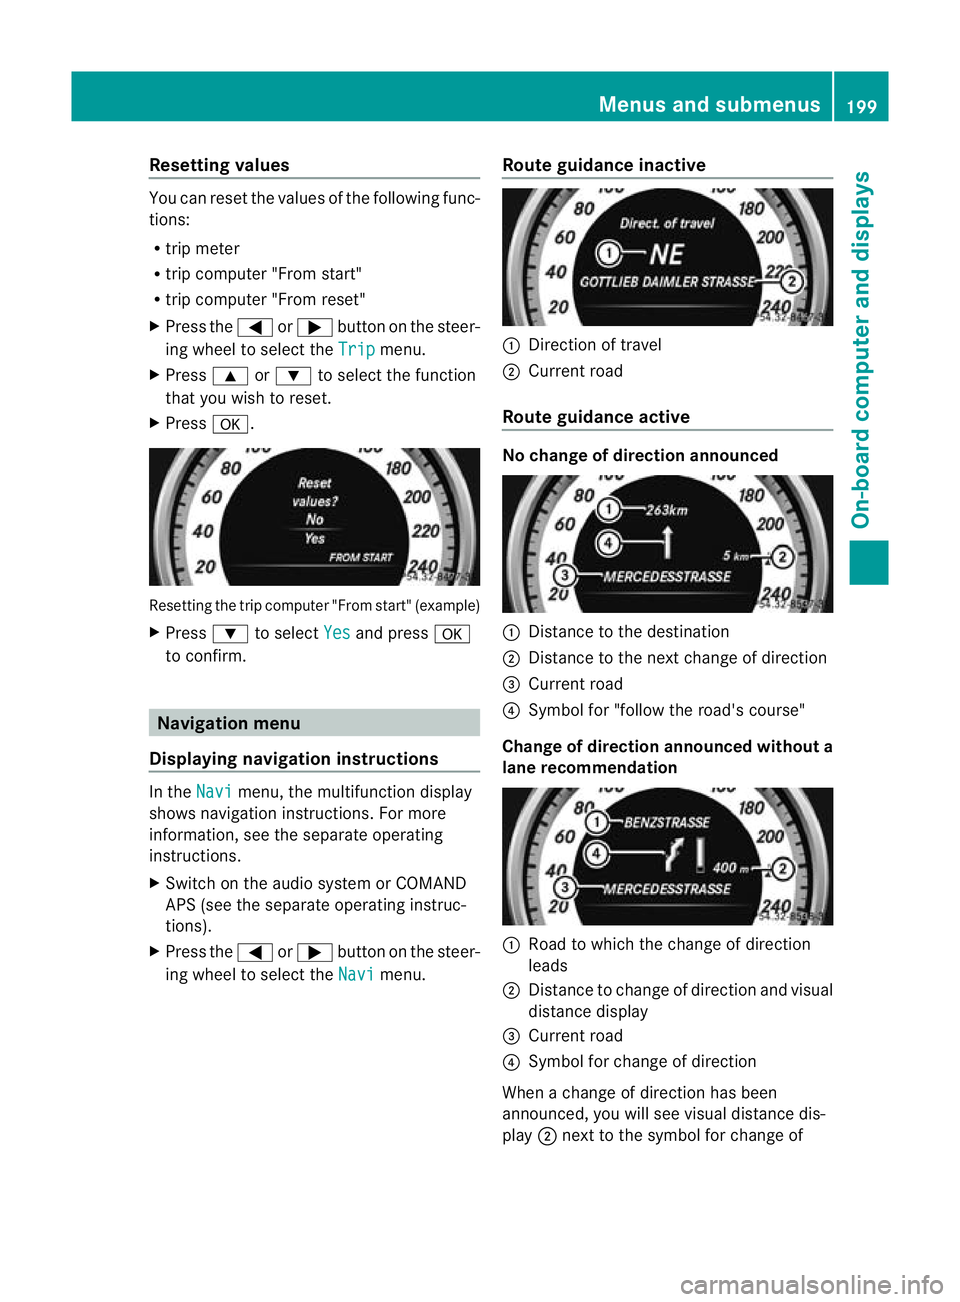
Resetting values
You can reset the values of the following func-
tions:
R trip meter
R trip computer "From start"
R trip computer "From reset"
X Press the =or; button on the steer-
ing wheel to select the Trip menu.
X Press 9or: to select the function
that you wish to reset.
X Press a. Resetting the trip compute
r"From start" (example)
X Press :to select Yes and press
a
to confirm. Navigation menu
Displaying navigation instructions In the
Navi menu, the multifunction display
shows navigation instructions. For more
information, see the separate operating
instructions.
X Switch on the audio system or COMAND
APS (see the separate operating instruc-
tions).
X Press the =or; button on the steer-
ing wheel to select the Navi menu.Route guidance inactive :
Direction of travel
; Current road
Route guidance active No change of direction announced
:
Distance to the destination
; Distance to the next change of direction
= Current road
? Symbol for "follow the road's course"
Change of direction announced without a
lane recommendation :
Road to which the change of direction
leads
; Distance to change of directio nand visual
distance display
= Current road
? Symbol for change of direction
Whe nachange of direction has been
announced, you will see visua ldistance dis-
play ;next to the symbol for change of Menus and submenus
199On-board computer and displays Z
Page 208 of 337
X
Press a.
The curren tselection is displayed.
X To activate/deactivate: pressa
again.
Activating/deactivating Lane Keeping
Assist You can use the
Lane Keep. Asst. function
to activate/deactivate Lane Keeping Assist
(Y page 185) or Active Lane Keeping Assist
(Y page 189).
X Press =or; on the steering wheel
to select the Assist. menu.
X Press 9or: to select Lane Keep.
Asst. .
X Press a.
If the function is activated, the road mark-
ings are shown in red in the multifunction
display.
X To activate/deactivate: pressa
again.
When Lane Keeping Assist or Active Lane
keeping Assist is activated, the multifunction
display shows the Ãsymbol when the igni-
tion is switched on. Service menu
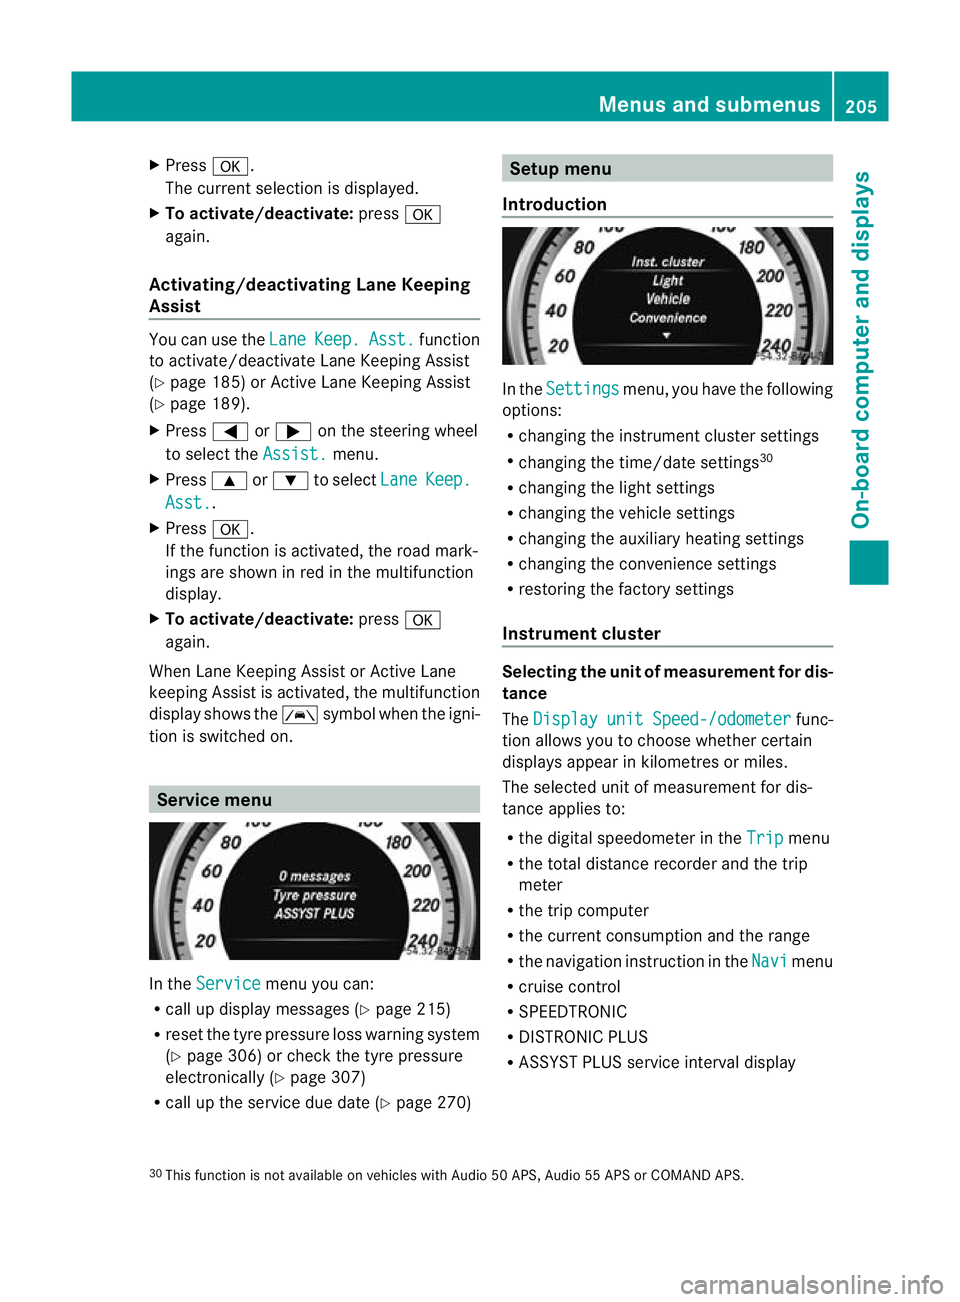
In the
Service menu you can:
R call up display messages ( Ypage 215)
R reset the tyre pressure loss warning system
(Y page 306) or check the tyre pressure
electronically (Y page 307)
R call up the service due date (Y page 270) Setup menu
Introduction In the
Settings menu, you have the following
options:
R changing the instrument cluster settings
R changing the time/date settings 30
R changing the light settings
R changing the vehicle settings
R changing the auxiliary heating settings
R changing the convenience settings
R restoring the factory settings
Instrument cluster Selecting the unit of measurement for dis-
tance
The
Display unit Speed-/odometer func-
tion allows you to choose whether certain
displays appear in kilometres or miles.
The selected unit of measuremen tfor dis-
tance applies to:
R the digital speedometer in the Trip menu
R the total distance recorder and the trip
meter
R the trip computer
R the current consumption and the range
R the navigation instruction in the Navi menu
R cruise control
R SPEEDTRONIC
R DISTRONIC PLUS
R ASSYST PLUS service interval display
30 This function is not available on vehicles with Audio 50 APS, Audio 55 APS or COMAND APS. Menus and submenus
205On-board computer and displays Z
Page 213 of 337
Activating/deactivating the rada
rsensor
system
i You must deactivate the radar sensor sys-
tem in certain countries and near radio
telescope facilities. Further information
(Y page 327).
Vehicles with a navigation system: the radar
sensor system is deactivated automatically if
you are close to radio telescope facilities.
The following systems are switched off when
the radar sensor system is deactivated:
R DISTRONIC PLUS (Y page 154)
R BAS PLUS (Y page 57)
R PRE-SAFE ®
Brake (Y page 61)
R Blind Spo tAssist (Y page 183)
R Active Blind Spot Assist (Y page 186)
X Press the =or; button on the steer-
ing wheel to select the Settings menu.
X Press the :or9 button to select the
Vehicle submenu.
X Press the abutton to confirm.
X Press the 9or: button to select
Radar sensor (See Owner's Man.): .
You will see the selected setting: on or
off .
X Press the abutton to save the setting.
Heating menu Auxiliary heating departure time
This function is only available on vehicles with
auxiliary heating (Y
page 119).
In the Heating submenu, you can select a
stored departure time or change a departure
time.
The auxiliary heating timer function calcu-
lates the switch-on time according to the out-
side temperature so that the vehicle is pre-
heated by the departure time. When the
departure time is reached, the auxiliary heat-
ing continues to heat for a further five
minutes and then switches off. The auxiliary
heating adopts the THERMATIC or THERMA-
TRONIC temperature setting. You can switch off the auxiliary heating by
using the remote control or the auxiliary heat-
ing button on the centre console. G
Risk of poisoning
Exhaust fumes are produced when the auxili-
ary heating is in operation. Inhaling these
exhaust fumes can be poisonous. You should
therefore switch off the auxiliary heating in
confined spaces without an extraction sys-
tem, e.g. a garage. G
Risk of fire
When operating the auxiliary heating parts of
the vehicle can get very hot. Make sure that
the exhaust system does not under any cir-
cumstances come into contact with easily
ignitable material such as dry grass or fuels.
The material could otherwise ignite and set
the vehicle alight. Choose your parking spot
accordingly.
Operating the auxiliary heating is thus pro-
hibited at filling stations or when your vehicle
is being refuelled.Y ou must therefore switch
off the auxiliary heating at filling stations.
! Operating the auxiliary heating/ventila-
tion draws on the vehicle battery. After you
have heated or ventilated the vehicle a
maximum of two times, drive for a longer
distance.
i Switch the auxiliary heating on regularly
once a month for about ten minutes.
Selecting the departure time or deactivat-
ing a selected departure time
X Press the =or; button on the steer-
ing wheel to select the Settings menu.
X Press the :or9 button to select the
Heating submenu.
X Press the abutton to confirm.
You will see the selected setting.
X Press the abutton to confirm. 210
Menus and submenusOn-board computer and displays
Page 231 of 337
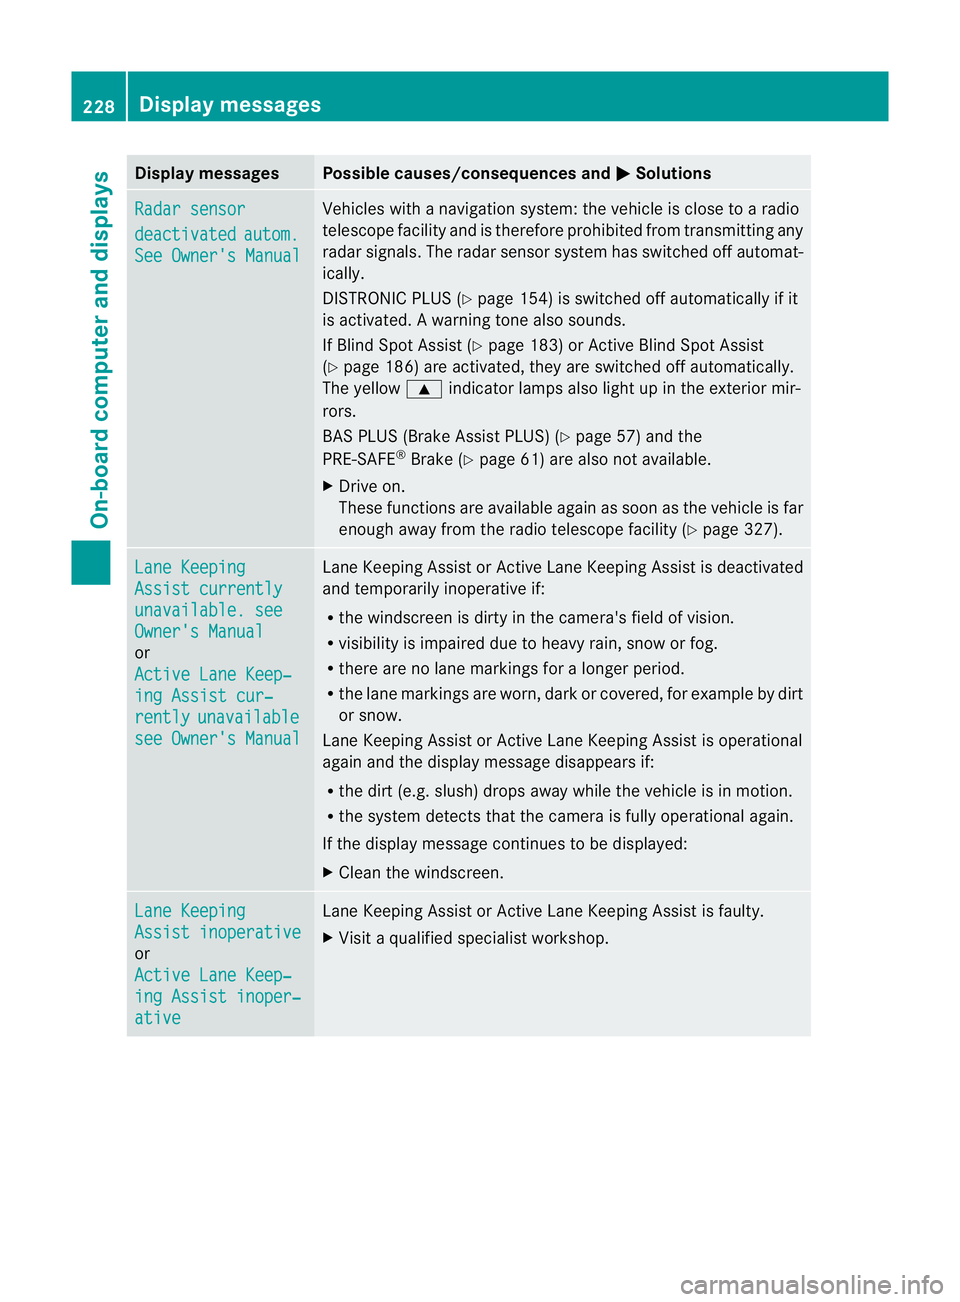
Display messages Possible causes/consequences and
M Solutions
Radar sensor
deactivated autom.
See Owner's Manual Vehicles with a navigation system: the vehicle is close to a radio
telescope facility and is therefore prohibited from transmitting any
rada
rsignals .The radar sensor system has switched off automat-
ically.
DISTRONIC PLUS (Y page 154) is switched off automatically if it
is activated. Awarning tone also sounds.
If Blind Spot Assist (Y page 183) or Active Blind Spot Assist
(Y page 186) are activated, they are switched off automatically.
The yellow 9indicator lamps also light up in the exterior mir-
rors.
BAS PLUS (Brake Assist PLUS) (Y page 57) and the
PRE-SAFE ®
Brake (Y page 61) are also no tavailable.
X Drive on.
These functions are available again as soon as the vehicle is far
enough away from the radio telescope facility (Y page 327).Lane Keeping
Assist currently
unavailable. see
Owner's Manual
or
Active Lane Keep‐
ing Assist cur‐
rently unavailable
see Owner's Manual Lane Keeping Assist or Active Lane Keeping Assist is deactivated
and temporarily inoperative if:
R
the windscreen is dirty in the camera's field of vision.
R visibility is impaired due to heavy rain, snow or fog.
R there are no lane markings for a longer period.
R the lane markings are worn, dark or covered, for example by dirt
or snow.
Lane Keeping Assist or Active Lane Keeping Assist is operational
again and the display message disappears if:
R the dirt (e.g. slush) drops away while the vehicle is in motion.
R the system detects that the camera is fully operational again.
If the display message continues to be displayed:
X Clean the windscreen. Lane Keeping
Assist inoperative
or
Active Lane Keep‐
ing Assist inoper‐
ative Lane Keeping Assist or Active Lane Keeping Assist is faulty.
X
Visi taqualified specialist workshop. 228
Display messagesOn-board computer and displays
Page 330 of 337
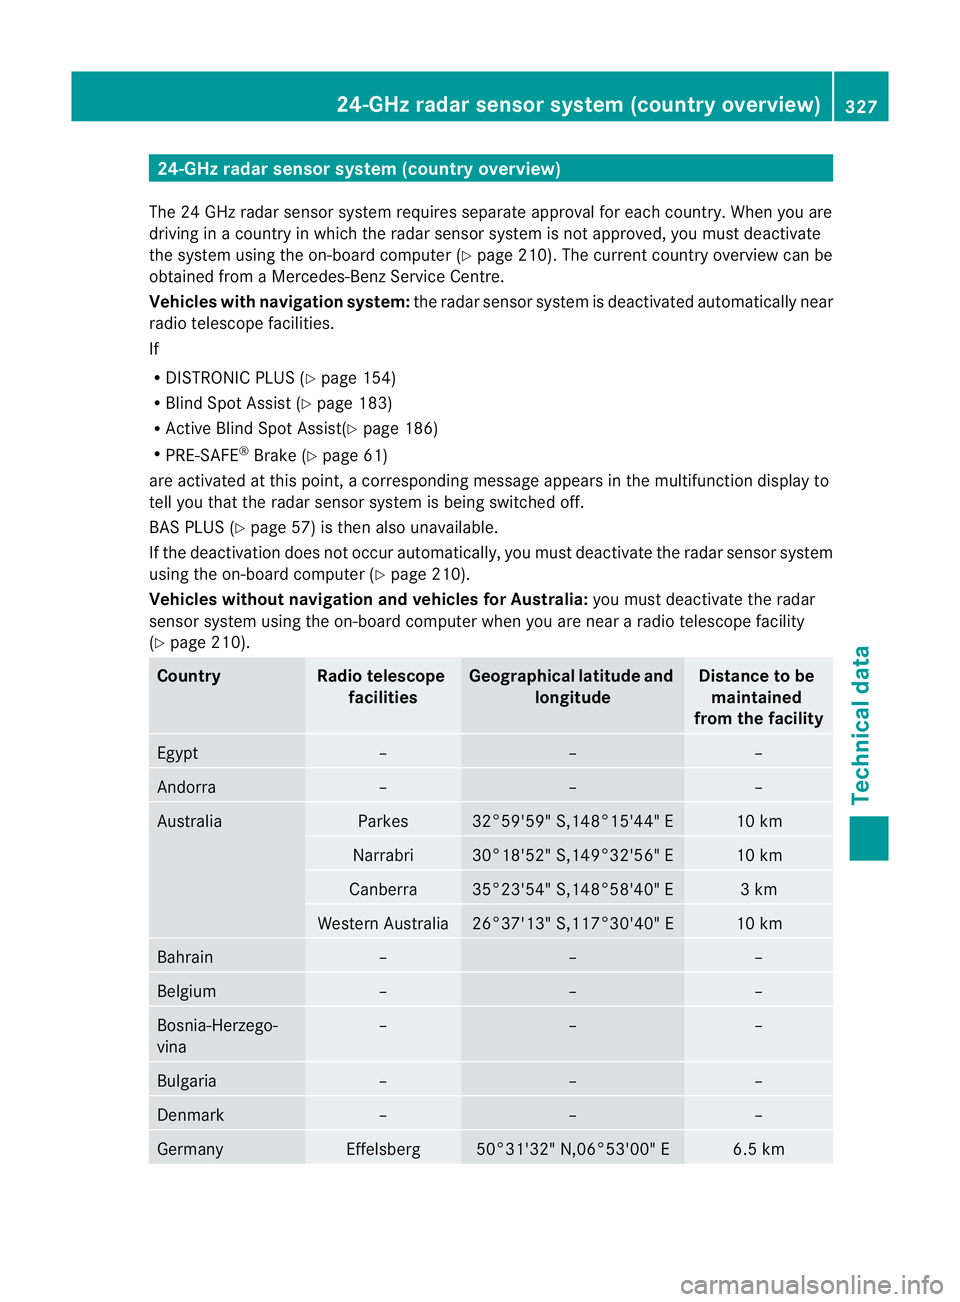
24-GHz radar sensor system (country overview)
The 24 GHz radar senso rsystem requires separate approval fo reach country. When you are
driving in a country in which the radar sensor system is no tapproved, you must deactivate
the system using the on-board computer (Y page 210). The current country overview can be
obtained from a Mercedes-Benz Service Centre.
Vehicles with navigation system: the radar sensorsystem is deactivated automatically near
radio telescope facilities.
If
R DISTRONIC PLUS (Y page 154)
R Blind Spot Assist (Y page 183)
R Active Blind Spot Assist(Y page 186)
R PRE-SAFE ®
Brake (Y page 61)
are activated at this point, a corresponding message appears in the multifunction display to
tell you that the rada rsensor system is being switched off.
BAS PLUS (Y page 57) is then also unavailable.
If the deactivation does not occur automatically, you must deactivate the radar sensor system
using the on-board computer (Y page 210).
Vehicles without navigation and vehicles for Australia: you must deactivate the radar
sensor system using the on-board computer when you are near a radio telescope facility
(Y page 210). Country Radio telescope
facilities Geographical latitude and
longitude Distance to be
maintained
from the facility Egypt – – –
Andorra – – –
Australia Parkes 32°59'59" S,148°15'44" E 10 km
Narrabri 30°18'52" S,149°32'56" E 10 km
Canberra 35°23'54" S,148°58'40" E 3 km
Wester
nAustralia 26°37'13" S,117°30'40" E 10 km
Bahrain – – –
Belgium – – –
Bosnia-Herzego-
vina – – –
Bulgaria – – –
Denmark – – –
Germany Effelsberg 50°31'32" N,06°53'00" E 6.5 km24-GHz radar sensor system (country overview)
327Technical data Z