2010 MERCEDES-BENZ CLS COUPE driver seat adjustment
[x] Cancel search: driver seat adjustmentPage 17 of 337
PRE-SAFE
®
system
Display message ............................ 216
Operation ........................................ .40
Program selector ...............................1 39
Program selector button ..................138
Pulling away Automatic transmission .................131 R
RACE START (AMG vehicles) .............166
RACETIMER (on-board computer) ....212
Radar sensor system Country overview ........................... 327
Display message ............................ 227
Radar system sensors
Switching on/off (on-board com-
puter) ............................................. 210
Radio
Changing a statio n(on-board
computer) ...................................... 200
see separate operating instructions
Rain closing feature
Sliding sunroo f................................. 81
Range (on-board computer) .............198
Rear compartment Setting the airv ents...................... 124
Setting the temperature ................115
Rear-compartment seat belt sta-
tus indicator ........................................ 44
Rear foglamp (display message) ...... 222
Rear-view mirror Anti-dazzle mode (automatic) ..........94
Dipping (manual) .............................. 92
Rear window blind ............................257
Rear window heating Malfunction ................................... .117
Switching on/off ........................... 117
Refuelling ........................................... 142
Remote control Auxiliary heating ............................ 120
Changing the batteries (auxiliary
heating) ......................................... 121
Reserve (fuel tank)
see Fuel
Reserve fuel
Display message ............................ 225
Warning lamp ................................. 244 Residual heat
Switching on/off ........................... 118
Restraint systems
see SRS
Rev counter ........................................ 194
Reversing camera Function/notes ............................. 176
Reversing camera (cleaning
instructions) ...................................... 274
Reversing lamp (display message) ..223
Reversing lamps (changing bulbs) ..106
Roller sunblind Rea rwindow .................................. 257
Roof carrier ........................................ 254
Roof load (maximum) ........................323
Route see Route guidance (on-board
computer)
Route guidance (on-board com-
puter) ................................................. .199 S
Safety Childre ninthe vehicle ..................... 46
Child restraint systems ....................46
Safety systems
see Driving safety systems
Seat
Active multicontour sea t.................. 88
Seat backrest (rear)
Folding forwards/back ..................251
Seat belt
Adjusting the driver's and front-
passenger sea tbelt ......................... 43
Belt force limiter .............................. 45
Belt tensioner .................................. 45
Cleaning ......................................... 276
Display message ............................ 215
Fastening ......................................... 43
Important safety guidelines .............42
Rea rseat belt status indicator .........44
Releasing ......................................... 44
Switching belt adjustment on/off
(on-board computer) ......................211
Warning lamp (function) ................... 44 14
Index
Page 44 of 337
!
Make sure that there are no objects in the
footwell or behind the seats when moving
the seat back. There is a risk that the seats
and/or the objects could be damaged.
More information aboutb elt adjustment, a
convenience function integrated into PRE-
SAFE ®
, can be found in the "Belt adjustment"
section (Y page 43). NECK-PRO head restraints/NECK-
PRO luxury head restraints
NECK-PRO head restraints/NECK-PRO luxury
head restraints increase protection of the
driver’s and front-passenger’s head and neck.
In the event of a rear collision of a certain
severity, the NECK-PRO head restraints/
NECK-PRO luxury head restraints on the driv-
er's and front-passenger seats are moved for-
wards and upwards. This provides better
head support. G
Risk of injury
Head restraint covers prevent NECK-PRO
head restraints/NECK-PRO luxury head
restraints from triggering properly. The NECK-
PRO head restraints/NECK-PRO luxury head
restraints can therefore not provide the inten-
ded protection .Do not use head restraint cov-
ers.
If the NECK-PRO head restraints/NECK-PRO
luxury head restraints have been triggered in
an accident, reset the NECK-PRO head
restraints/NECK-PRO luxury head restraints
on the driver's and front-passenger seats
(Y page 41). Otherwise, the additional pro-
tection will not be available in the event of
another rear-end collision. NECK-PRO head
restraints/NECK-PRO luxury head restraints
that have been triggered are moved forwards
and can no longer be adjusted. Resetting triggered NECK-PRO head
restraints
Important safety guidelines Mercedes-Benz recommends that you have
NECK-PRO head restraints/NECK-PRO luxury
head restraints checked at a qualified spe-
cialist workshop, e.g. a Mercedes-Benz
Service Centre, if your vehicle is involved in a
rear-end collision.
NECK-PRO head restraints
i
Resetting the NECK-PRO head restraints
requires a lot of strength. If you have diffi-
culty resetting the NECK-PRO head
restraints, have this work carried out at a
qualified specialist workshop, e.g. a
Mercedes-Benz Service Centre. X
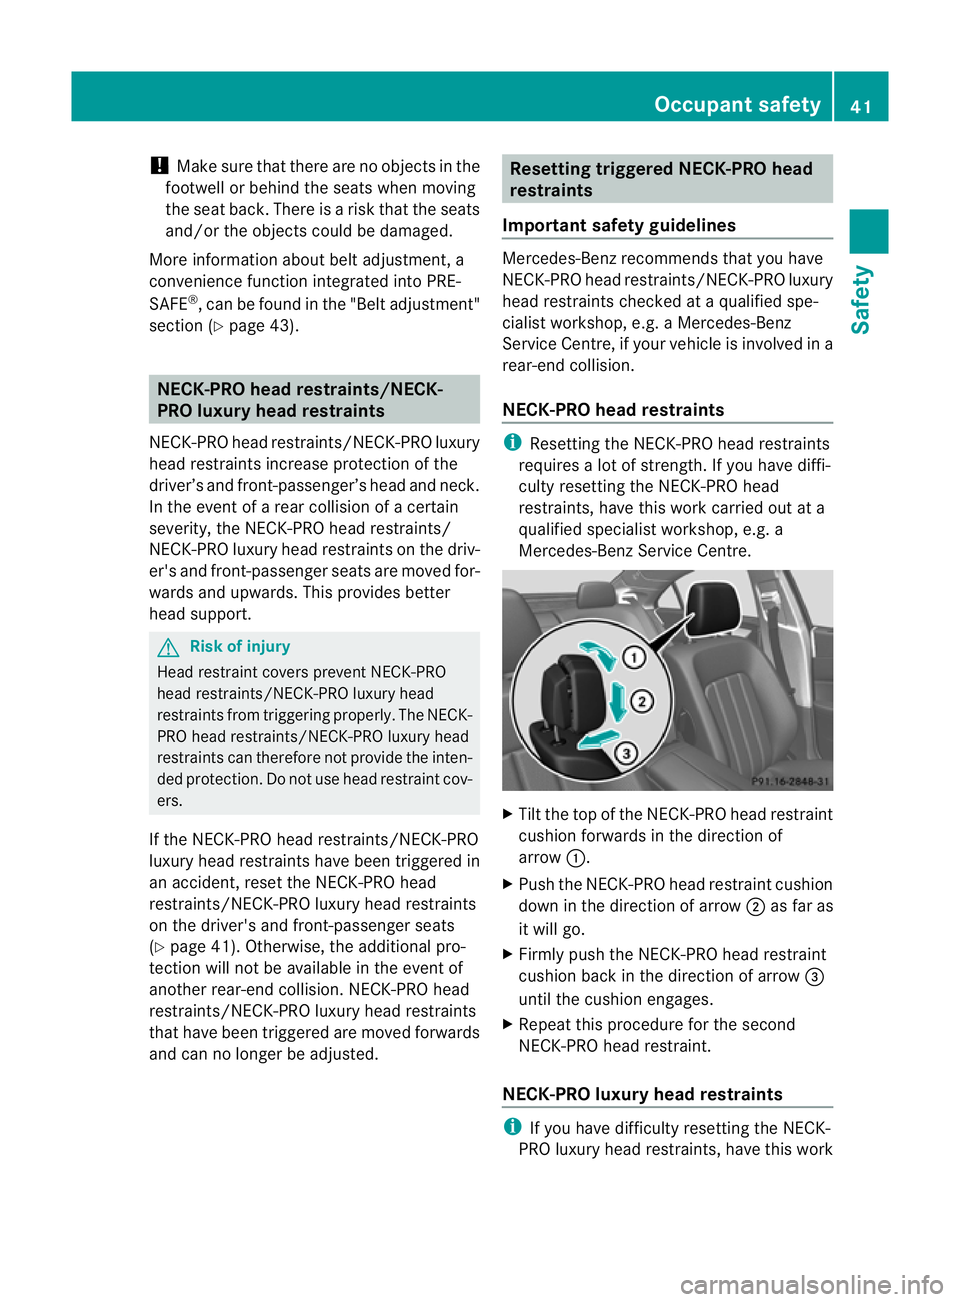
Tilt the top of the NECK-PRO head restraint
cushion forwards in the direction of
arrow :.
X Push the NECK-PRO head restraint cushion
down in the direction of arrow ;as far as
it will go.
X Firmly push the NECK-PRO head restraint
cushion back in the direction of arrow =
until the cushion engages.
X Repeat this procedure for the second
NECK-PRO head restraint.
NECK-PRO luxury head restraints i
If you have difficulty resetting the NECK-
PRO luxury head restraints, have this work Occupant safety
41Safety Z
Page 46 of 337
installation instructions when fitting a child
restraint system.
R Do not secure any objects with a seat belt
if the seat belt is also being used by one of
the vehicle's occupants. G
Risk of injury
The seat belt does not offer the intended level
of protection unless the backrest is almost
vertical. Under certain circumstances, this
could cause severe or even fatal injuries in the
event of an accident.
Before starting a journey, make sure that the
seat is properly adjusted and that the back-
rest is almost vertical. G
Risk of injury
Ad irty or damaged seat belt or a seat belt that
has been subjected to a load in an accident
or which has been modified no longer offers
the intended level of protection. Under certain
circumstances, this could cause severe or
even fatal injuries in the even tofanaccident.
For this reason, check regularly that the seat
belts are not damaged or dirty.
Always have damaged sea tbelts or seat belts
that have been subjected to a load in an acci-
dent replaced at a qualified specialist work-
shop. Consult a qualified specialist workshop
which has the necessary specialist knowledge
and tools to carry out the work required.
Mercedes-Benz recommends that you use a
Mercedes-Benz Service Centre for this pur-
pose.
For safety reasons, Mercedes-Benz recom-
mends that you only use seat belts which have
been approved by Mercedes-Benz for your
vehicle. Fastening seat belts
X
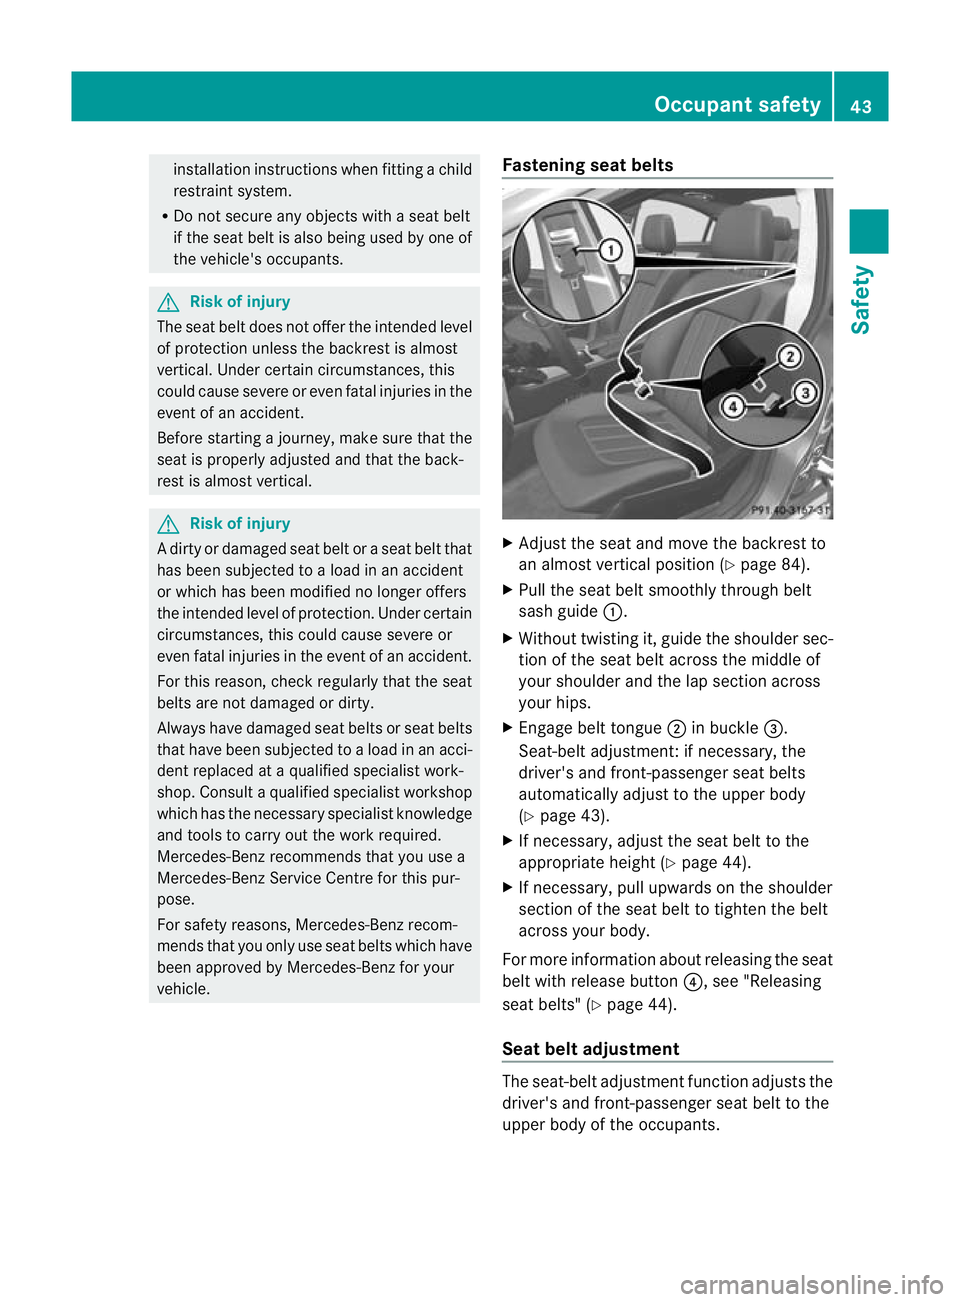
Adjust the seat and move the backrest to
an almost vertical position (Y page 84).
X Pull the seat belt smoothly through belt
sash guide :.
X Without twisting it, guide the shoulder sec-
tion of the seat belt across the middle of
your shoulder and the lap section across
your hips.
X Engage belt tongue ;in buckle =.
Seat-belt adjustment:ifn ecessary, the
driver's and front-passenger seat belts
automatically adjust to the upper body
(Y page 43).
X If necessary, adjust the seat belt to the
appropriate height (Y page 44).
X If necessary, pull upwards on the shoulder
section of the seat belt to tighten the belt
across your body.
For more information about releasing the seat
belt with release button ?, see "Releasing
seat belts" (Y page 44).
Seat belt adjustment The seat-belt adjustment function adjusts the
driver's and front-passenger seat belt to the
upper body of the occupants. Occupant safety
43Safety Z
Page 47 of 337
The belt strap is tightened slightly when:
R you engage the belt tongue in the belt
buckle and you then turn the key to position
2in the ignition lock.
R the key is in position 2in the ignition lock
and you then engage the belt tongue in the
buckle.
The seat-belt adjustmen twill apply a certain
tightening force if any slack is detected
between the occupant and the seat belt. Do
not hold on to the seat belt tightly while it is
adjusting. You can switch the seat-belt
adjustment on and off in the on-board com-
puter (Y page 211).
Belt height adjustment You can adjust the seat belt height on the
driver's seat and the front-passenger seat.
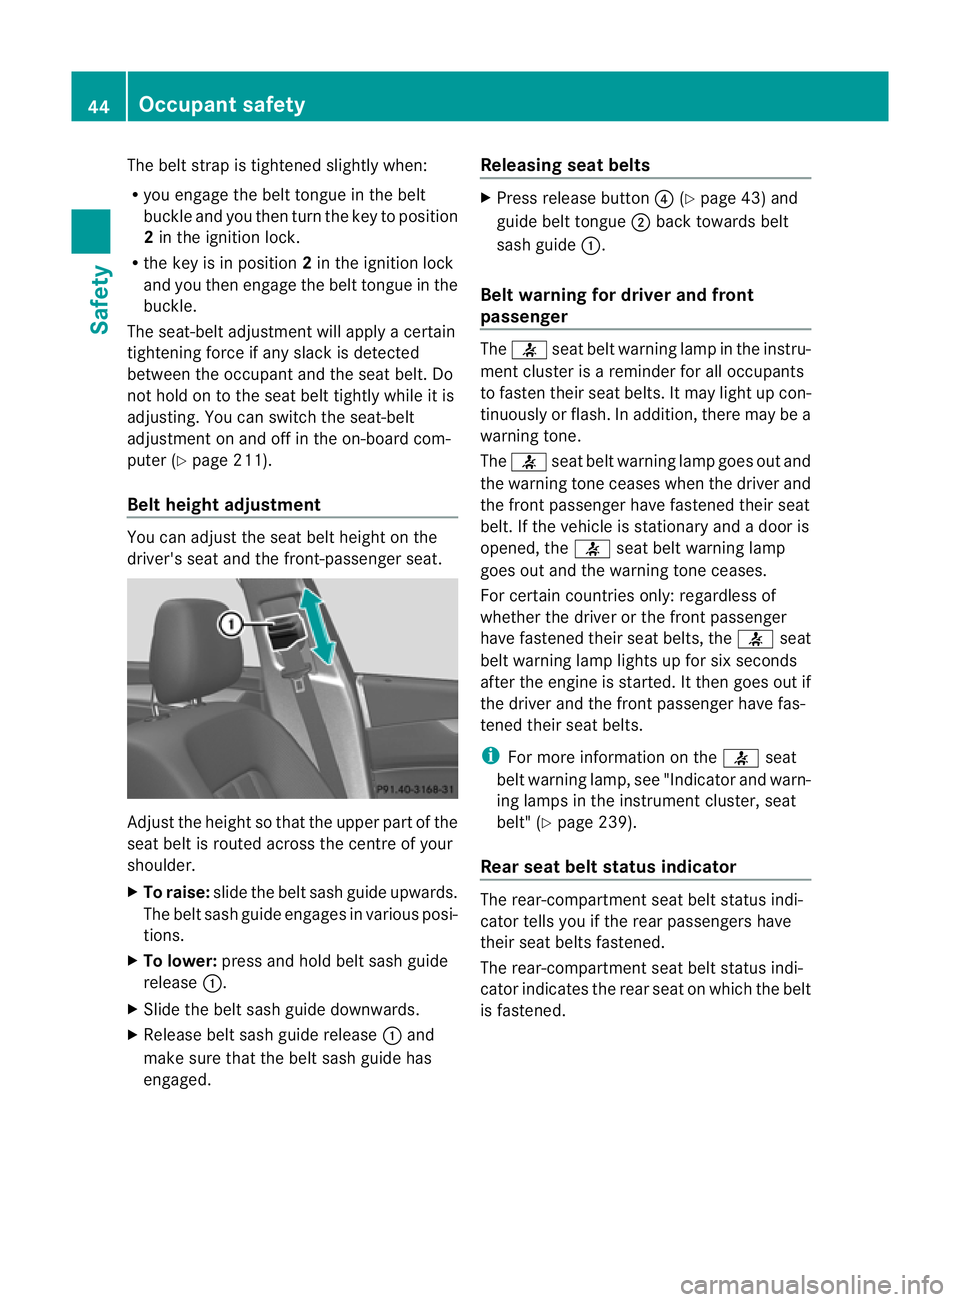
Adjust the height so that the upper part of the
seat belt is routed across the centre of your
shoulder.
X
To raise: slide the belt sash guide upwards.
The belt sash guide engages in various posi-
tions.
X To lower: press and hold belt sash guide
release :.
X Slide the belt sash guide downwards.
X Release belt sash guide release :and
make sure that the belt sash guide has
engaged. Releasing seat belts X
Press release button ?(Ypage 43) and
guide belt tongue ;back towards belt
sash guide :.
Belt warning for driver and front
passenger The
7 seat belt warning lamp in the instru-
ment cluster is a reminder for all occupants
to fasten their seat belts .Itmay light up con-
tinuously or flash. In addition, there may be a
warning tone.
The 7 seat belt warning lamp goes out and
the warning tone ceases when the driver and
the fron tpassenger have fastened their seat
belt .Ift he vehicle is stationary and a door is
opened, the 7seat belt warning lamp
goes out and the warning tone ceases.
For certain countries only: regardless of
whether the driver or the front passenger
have fastened their seat belts, the 7seat
belt warning lamp lights up for six seconds
after the engine is started. It then goes out if
the driver and the front passenger have fas-
tened their seat belts.
i For more information on the 7seat
belt warning lamp, see "Indicator and warn-
ing lamps in the instrumentc luster, seat
belt" (Y page 239).
Rear seat belt status indicator The rear-compartmen
tseat belt status indi-
cator tells you if the rear passengers have
their seat belts fastened.
The rear-compartment seat belt status indi-
cator indicates the rear seat on which the belt
is fastened. 44
Occupant safetySafety
Page 95 of 337
Problems with the steering wheel heat-
ing
If the steering wheel heating indicator lamp
on the lower left lever of the steering column
is flashing, the steering wheel heating has
switched off automatically. The vehicle's
electrical system voltage is too low because
too many electrical consumers are switched
on.
X
Switch off electrical consumers which you
do not need, such as the rear window heat-
ing or interior lighting.
Once the battery is sufficiently charged, the
steering wheel heating will switch back on
automatically. EASY-ENTRY/EXIT system
G
Risk of injury
Make sure that nobody can become trapped
when you activate the EASY-ENTRY/EXIT fea-
ture.
If there is a risk of someone becoming trap-
ped, stop the adjustment procedure. To halt
the procedure:
R move the switch for steering wheel adjust-
ment in the opposite direction to that in
which the steering wheel is moving.
R press one of the memory function position
buttons.
Never leave children unsupervised in the vehi-
cle. They could open the driver's door and
thereby unintentionally activate the EASY-
ENTRY/EXIT feature and become trapped.
The EASY-ENTRY/EXIT feature makes getting
in and out of your vehicle easier.
The steering wheel swings upwards when
you:
R remove the key from the ignition lock
R open the driver's door and KEYLESS-GO is
in position 1
R open the driver's door and the key is in
position 0or 1in the ignition lock i
The steering wheel only moves upwards if
it has not already reached the upper end
stop.
If you insert the key into the ignition lock with
the driver's door closed, the steering wheel is
automatically moved to the previously set
position.
The last position of the steering wheel is
stored after each manual setting or when you
store the setting with the memory function
(Y page 95).
You can activate and deactivate the EASY-
ENTRY/EXIT feature in the on-board com-
puter (Y page 211).
i If the crash-responsive EASY-EXIT feature
is triggered in an accident, the steering col-
umn will move upwards when the driver's
door is opened. This occurs irrespective of
the position of the key in the ignition lock.
This makes it easier to exit the vehicle and
rescue the occupants.
The crash-responsive EASY-EXIT feature is
only operational after an accident if the
EASY-EXIT/ENTRY feature is activated in
the on-board computer. Mirrors
Rear-view mirror
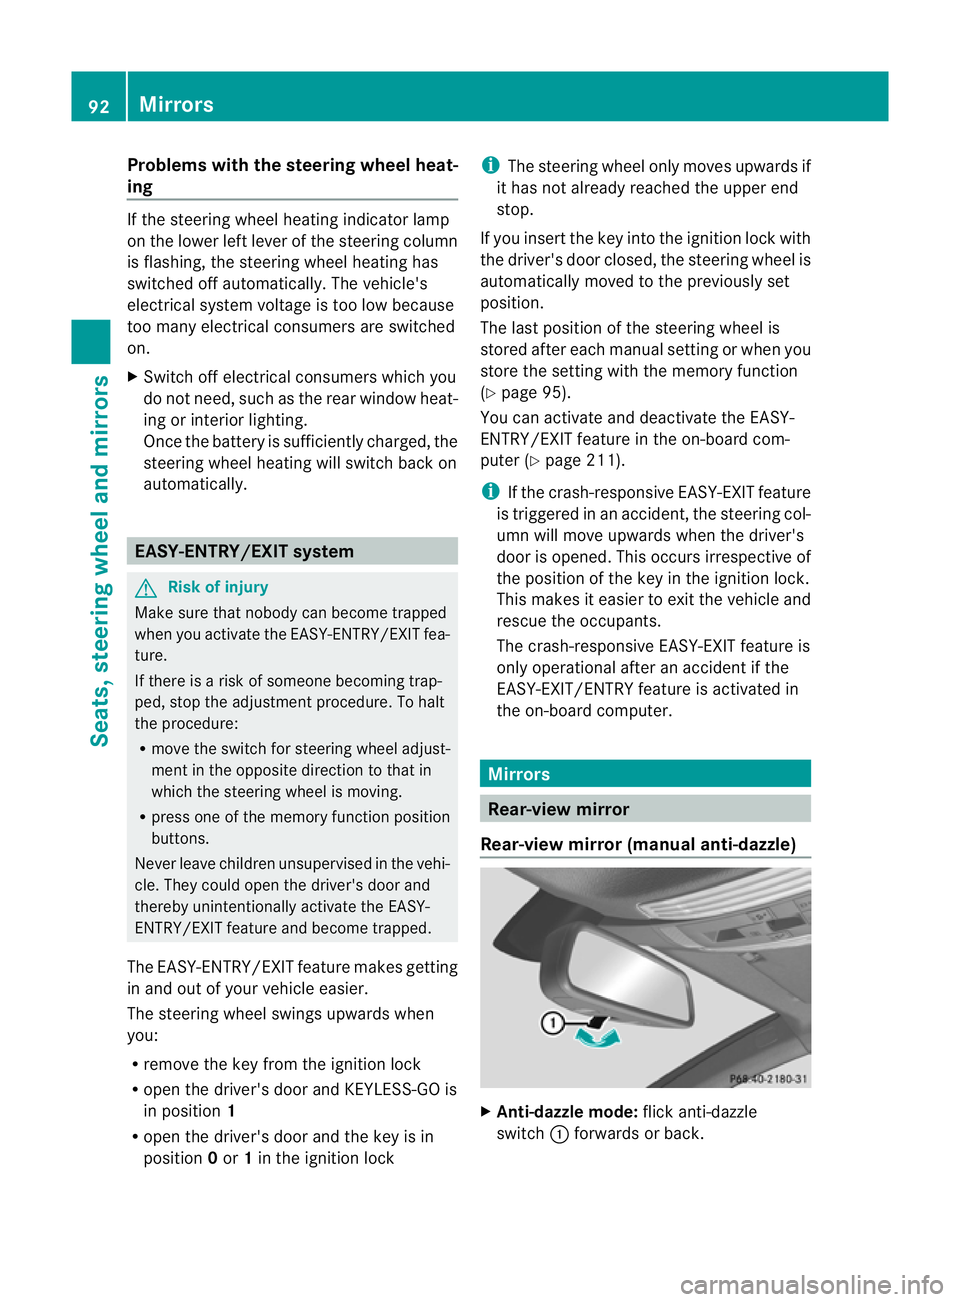
Rear-view mirror (manual anti-dazzle) X
Anti-dazzle mode: flick anti-dazzle
switch :forwards or back. 92
MirrorsSeats, steering wheel and mirrors
Page 96 of 337
Exterior mirrors
Adjusting the exterior mirrors G
Ris
kofa ccident
The exterior mirrors reduce the size of the
image .Objects are actually closer than they
appear. You could misjudge the distance from
vehicles driving behind and cause an acci-
dent, e.g. when changing lane. For this rea-
son, make sure of the actual distance from the
vehicle driving behind by glancing over your
shoulder.
The convex exterior mirrors provide a larger
field of vision.
The exterior mirrors are automatically heated
if the rear window heating is switched on and
the outside temperature is low. X
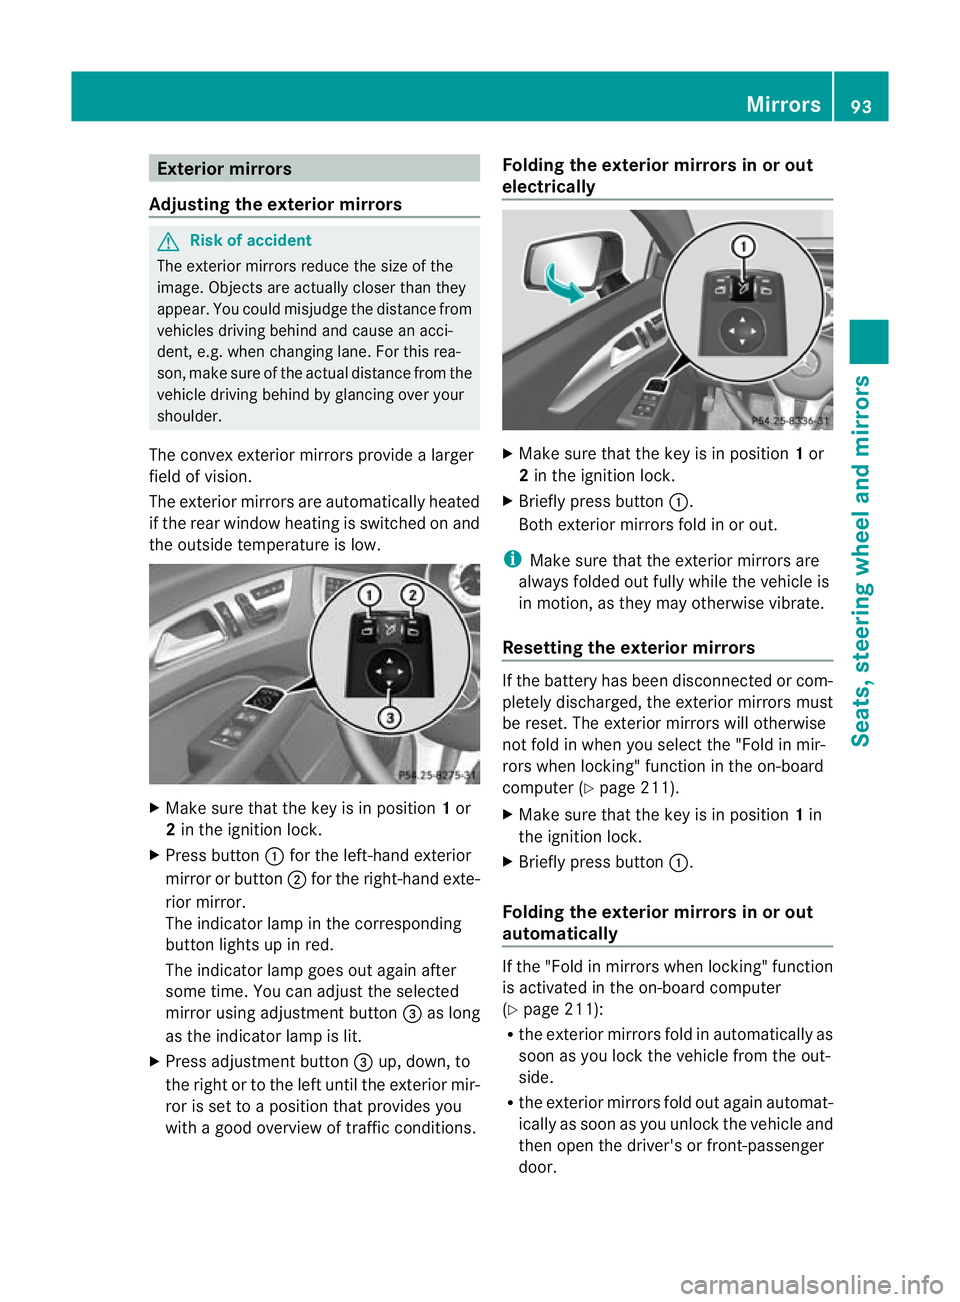
Make sure that the key is in position 1or
2 in the ignition lock.
X Press button :for the left-hand exterior
mirror or button ;for the right-hand exte-
rior mirror.
The indicator lamp in the corresponding
butto nlights up in red.
The indicator lamp goes out again after
some time. You can adjust the selected
mirror using adjustment button =as long
as the indicator lamp is lit.
X Press adjustmen tbutton =up, down, to
the right or to the left until the exterio rmir-
ror is set to a position that provides you
with a good overview of traffic conditions. Folding the exterior mirrors in or out
electrically
X
Make sure that the key is in position 1or
2 in the ignition lock.
X Briefly press button :.
Both exterior mirrors fold in or out.
i Make sure that the exterior mirrors are
always folded out fully while the vehicle is
in motion, as they may otherwise vibrate.
Resetting the exterior mirrors If the battery has been disconnected or com-
pletely discharged, the exterior mirrors must
be reset
.The exterior mirrors will otherwise
not fold in when you select the "Fold in mir-
rors when locking" function in the on-board
computer (Y page 211).
X Make sure that the key is in position 1in
the ignition lock.
X Briefly press button :.
Folding the exterior mirrors in or out
automatically If the "Fold in mirrors when locking" function
is activated in the on-board computer
(Y
page 211):
R the exterior mirrors fold in automatically as
soon as you lock the vehicle from the out-
side.
R the exterior mirrors fold out again automat-
ically as soon as you unlock the vehicle and
then open the driver's or front-passenger
door. Mirrors
93Seats, steering wheel and mirrors Z
Page 97 of 337
i
The mirrors do not fold out if they have
been folded in manually.
Exterior mirror out of position If an exterior mirror has been pushed out of
position, proceed as follows:
X Vehicles without electrically folding
exterior mirrors: move the exterior mirror
into the correc tposition manually.
X Vehicles with electrically folding exte-
rior mirrors: press the mirror-folding but-
ton (Y page 93) repeatedly until you hear
the mirror engage in position.
The mirror housing is engaged again and
you can adjust the exterior mirrors as usual
(Y page 93). Automatic anti-dazzle mirrors
G
Risk of accident
If the incident light from headlamps cannot
strike the sensor in the rear-view mirror, for
instance, when the rear window roller sun-
blind is extended, the mirror's automatic anti-
dazzle function will not operate.
Incident light could then blind you. This may
distract you from the traffic conditions and,
as a result, you may cause an accident .Inthis
case, adjust the rear-view mirror manually.
The rear-view mirror and the exterior mirror
on the driver's side automatically go into anti-
dazzle mode if the ignition is switched on and
incident light from headlamps strikes the sen-
sor in the rear-view mirror.
The mirrors do not go into anti-dazzle mode if
reverse gear is engaged or the interior lighting
is switched on. Parking position for the exterior mir-
ror on the front-passenger side
Setting and storing the parking position You can position the front-passenger side
exterior mirror in such a way that you can see
the rear wheel on that side as soon as you
engage reverse gear. You can store this posi-
tion.
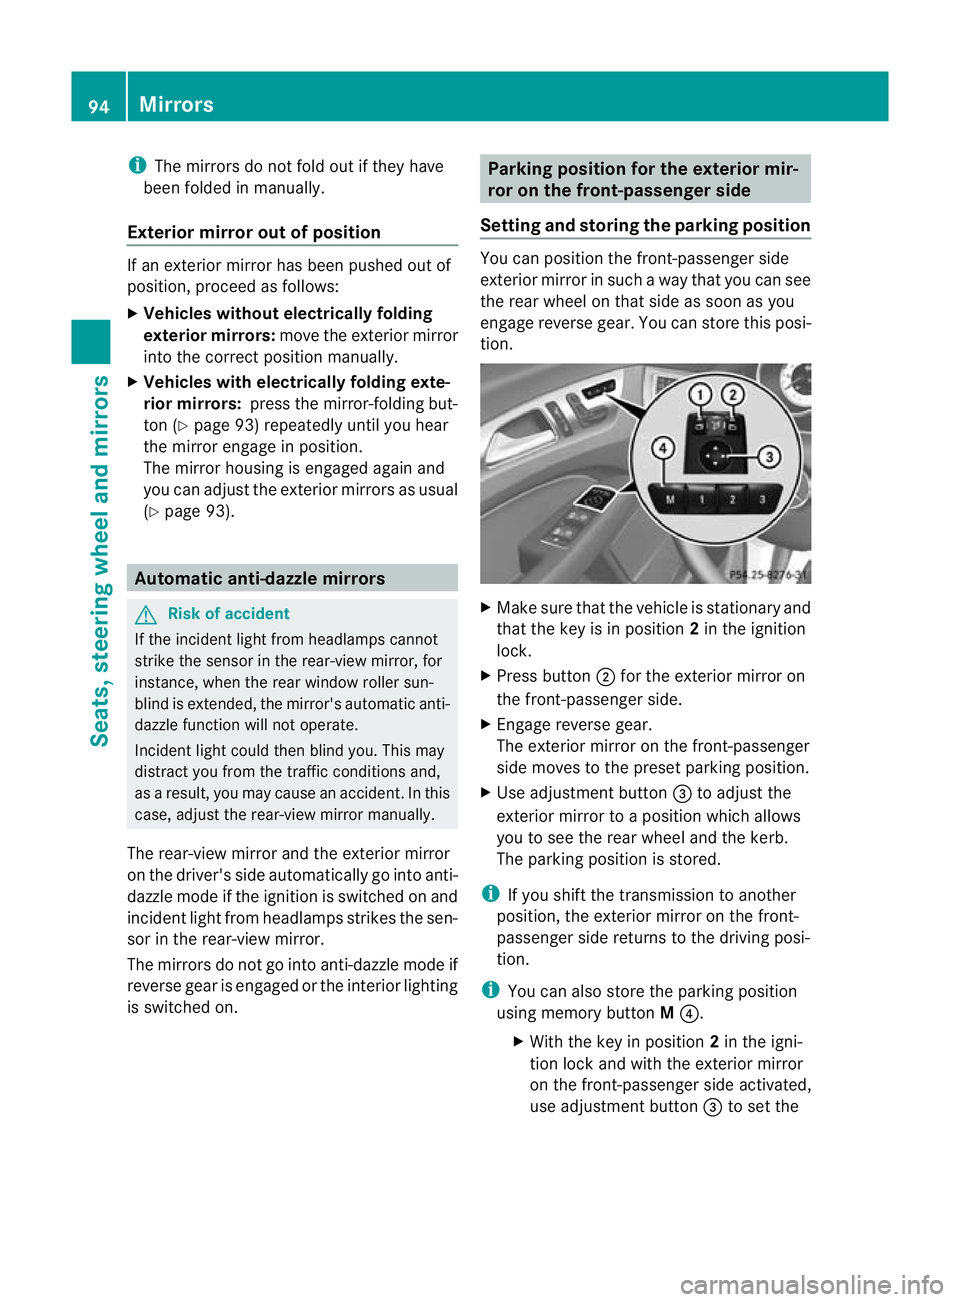
X
Make sure that the vehicle is stationary and
that the key is in position 2in the ignition
lock.
X Press button ;for the exterior mirror on
the front-passenger side.
X Engage reverse gear.
The exterior mirror on the front-passenger
side moves to the preset parking position.
X Use adjustment button =to adjust the
exterior mirror to a position which allows
you to see the rear wheel and the kerb.
The parking position is stored.
i If you shift the transmission to another
position, the exterior mirror on the front-
passenger side returns to the driving posi-
tion.
i You can also store the parking position
using memory button M?.
X With the key in position 2in the igni-
tion lock and with the exterior mirror
on the front-passenger side activated,
use adjustment button =to set the 94
MirrorsSeats, steering wheel and mirrors
Page 98 of 337
exterior mirror such that the rear
wheel and kerb are visible.
X Press memory button M? and one of
the arrows on adjustment button =
within three seconds.
The parking position is stored if the
exterior mirror does not move.
If the mirror moves out of position, repeat
the steps.
Calling up astore dparking position set-
ting X
With the key in position 2in the ignition
lock and the exterior mirror on the front-
passenge rside activated, engage reverse
gear.
The exterior mirror on the front-passenger
side moves to the stored parking position.
The exterior mirror on the front-passenger
side moves back to its original position:
R as soon as you exceed a speed of
10 km/h
R about ten seconds after you have disen-
gaged reverse gear
R if you press button :for the exterior mir-
ror on the driver's side Memory functions
Storing settings
With the memory function, you can store up
to three different settings, e.g. for three dif-
ferent people.
The following settings are stored as a single
memory preset:
R position of the seat, backrest and head
restraint
R active multicontour seat :seat cushion
length, seat backrest side bolsters, contour
of the backrest, dynamic function level set-
ting R
driver's side: steering wheel position
R driver's side: position of the exterior mir-
rors on the driver's and front-passenger
sides G
Risk of injury
The memory function can still be used when
the key has been removed. For this reason,
children should never be left unsupervised in
the vehicle. They could otherwise become
trapped when adjusting the seat or the steer-
ing wheel. G
Risk of accident
Only use the memory function on the driver's
side when the vehicle is stationary. Other-
wise, you could be distracted from the traffic
conditions by the steering wheel and seat
moving of their own accord, and as a result
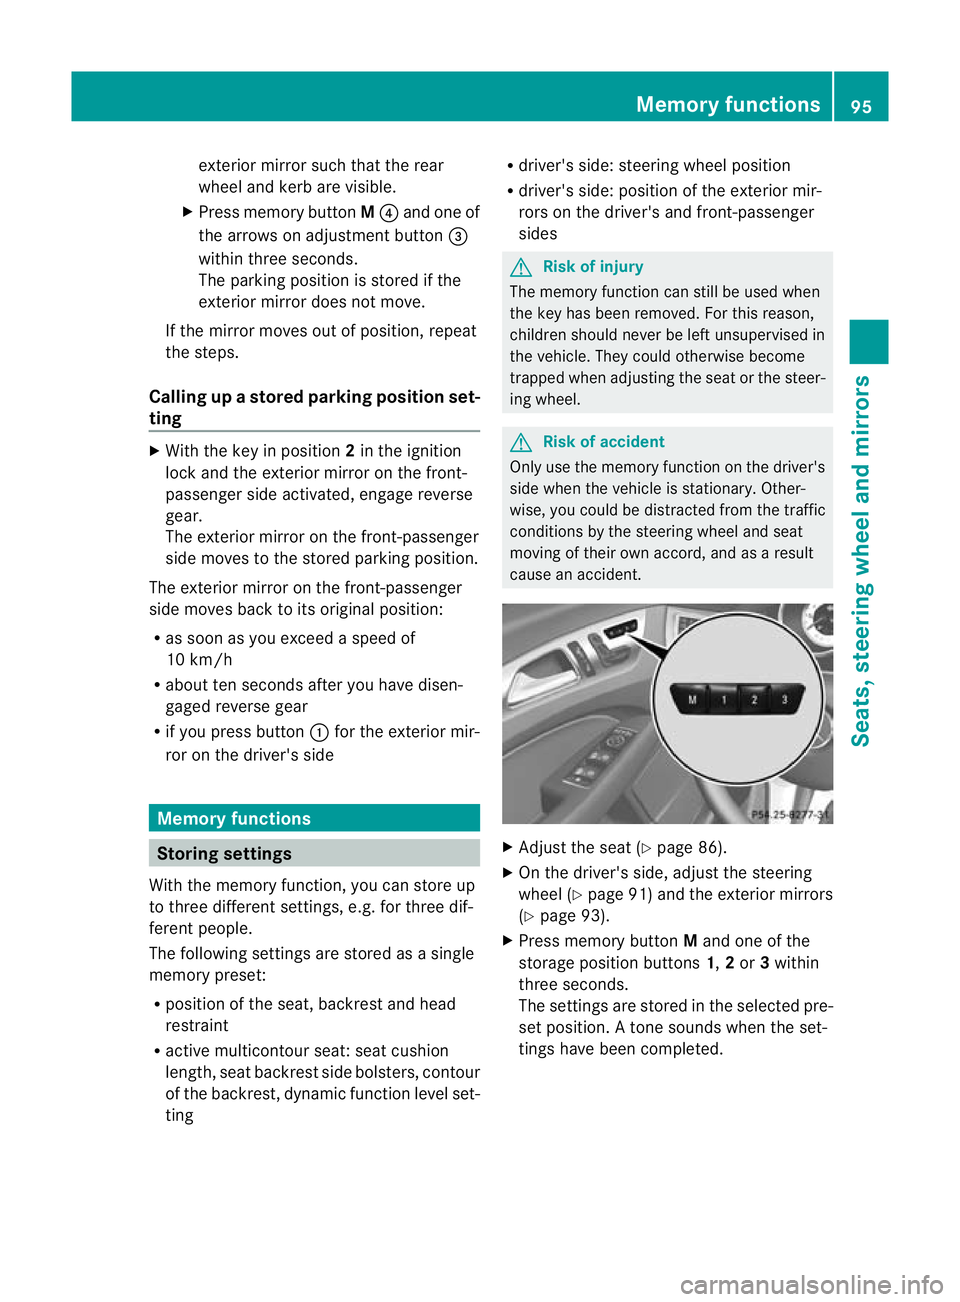
cause an accident. X
Adjust the seat (Y page 86).
X On the driver's side, adjust the steering
wheel (Y page 91) and the exterior mirrors
(Y page 93).
X Press memory button Mand one of the
storage position buttons 1,2or 3within
three seconds.
The settings are stored in the selected pre-
set position .Atone sounds when the set-
tings have been completed. Memory functions
95Seats, steering wheel and mirrors Z