Page 177 of 500

discs which comply with the IEC 60908
standard.
You
can therefore only use discs
with a maximum thickness of 1.3 mm.
If you insert thicker discs, e.g. those that
contain data on both sides (DVD on one
side and audio data on the other), they
cannot be ejected and can damage
COMAND.
Do not use CDs with a diameter of 8 cm.
Attempting to play discs with a diameter of
8 cm or playing such discs with an adapter
may cause damage COMAND.
Such damages are not covered by the
Mercedes-Benz Limited Warranty.
Only use round discs with a diameter of
12 cm.
Notes about handling DVDs For notes about handling DVDs, see
(Y page 165). Functional limitations
Depending on the DVD, it is possible that
certain functions or actions may be
temporarily or permanently unavailable. If
you try to utilize such functions or carry out
such actions, you will see the K symbol in
the display. Inserting or ejecting DVDs
G
Observe Safety notes, see page 162.
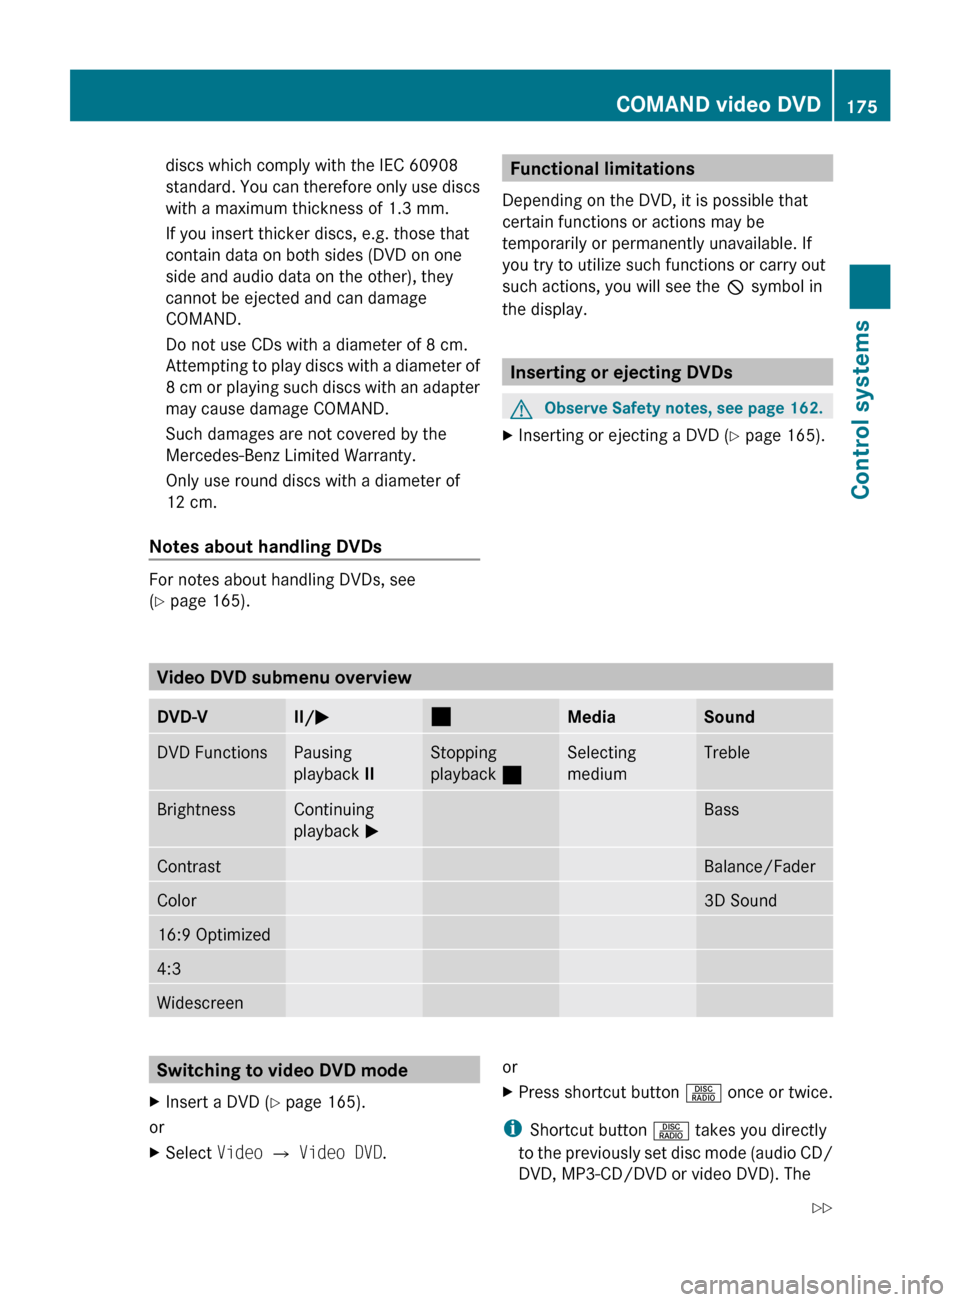
X Inserting or ejecting a DVD (Y page 165). Video DVD submenu overview
DVD-V II/
M ¯
Media Sound
DVD Functions Pausing
playback
II Stopping
playback
¯ Selecting
medium Treble
Brightness Continuing
playback
M Bass
Contrast Balance/Fader
Color 3D Sound
16:9 Optimized
4:3
Widescreen
Switching to video DVD mode
X Insert a DVD (Y page 165).
or
X Select Video Q Video DVD. or
X
Press shortcut button R once or twice.
i Shortcut button R takes you directly
to the
previously set disc mode (audio CD/
DVD, MP3-CD/DVD or video DVD). The COMAND video DVD
175
Control systems
216_AKB; 3; 90, en-US
d2ureepe, Version: 2.11.8.1 2009-05-15T11:47:50+02:00 - Seite 175 Z
Page 178 of 500

number of times you have to press the
shortcut button depends on the previously
set mode.
Showing/hiding the DVD control
menu
X Showing the menu: Slide ZVÆ.
X Hiding the menu: Slide ZVÆ.
or
X Wait for approximately 8 seconds. Control menu
:
Disc type
; Current track
= Current scene
? Elapsed track time
A Show the menu system Showing/hiding the menu system
X Showing the menu: Press W.
X Hiding the menu: Slide ZV to select
Full screen and press W. Menu system
:
Video DVD options
; Pause
= Stop
? Full-screen mode
A Medium selection
B Sound settings Fast forward/rewind
X While in full-screen mode or with activated
control menu, slide XVY and hold until the
desired track part is reached. Selecting the DVD medium
X Select Video Q Video DVD.
X Show the menu system, if necessary
(Y page 176).
X Select Media.
The media list appears. The dot #
indicates the current medium.
X Select a medium.
COMAND changes the medium. Stop playback
X Select Video Q Video DVD.
X Show the menu system, if necessary
(Y page 176).
X Pausing playback: Select ¯.
In the display, II changes to M. 176
COMAND video DVDControl systems
216_AKB; 3; 90, en-US
d2ureepe,
Version: 2.11.8.1 2009-05-15T11:47:50+02:00 - Seite 176
Page 179 of 500

X
Continuing playback: Select M.
Play is
continued from the point at which it
was stopped.
X Stopping playback: Select ¯
again while
playback is stopped.
or
X Select ¯ twice in quick succession during
playback.
X Resuming playback:
Select M.
Playback starts again from the beginning. Pause playback
X Select Video Q Video DVD.
X Show the menu system, if necessary
(Y page 176).
X Pause playback: Select II.
In the display, II changes to M.
X Continue playback: Select M.
Play is
continued from the point at which it
was stopped. Selecting scene/chapter
Entering scene/chapter using the
COMAND controller X
Make sure that the control menu is shown
(Y page 176).
X Skipping forwards or back: Slide X
VY or
turn cVd.
or
X Press button 9 or : on the
multifunction steering wheel 22
. Entering the scene/chapter using the
telephone keypad X
Press button à on the telephone
keypad (
Y page 70).
X Enter scene/chapter using buttons j -
x.
COMAND tunes in to the scene/chapter
entered. Selecting film/track
i This function is only available if the DVD
is comprised of several films/tracks.
X Select Video Q Video DVD.
X Show the menu system, if necessary
(Y page 176).
X Select DVD-V Q DVD Functions Q
Title Selection.
A selection list appears.
X Select a film/track. Screen settings
Setting brightness, contrast and color X
Select Video Q Video DVD.
X Show the menu system, if necessary
(Y page 176).
X Select DVD-V Q Brightness Q
Contrast or Color.
X Changing settings: Slide ZVÆ or turn
cVd until you reach the desired setting.
X Saving settings: Press W.
Changing the picture format X
Select Video Q Video DVD.
X Show the menu system, if necessary
(Y page 176).
22 Function is only available if the Audio menu is selected in the instrument cluster. COMAND video DVD
177
Control systems
216_AKB; 3; 90, en-US
d2ureepe, Version: 2.11.8.1 2009-05-15T11:47:50+02:00 - Seite 177 Z
Page 180 of 500

X
Select DVD-V.
The DVD-V menu appears. The dot # in
front of a menu item - 16:9 Optimized,
4:3 or Widescreen indicates the current
format.
X Changing the format: Slide ZVÆ or turn
cVd, until you reach the desired setting.
X Saving the format: Press W.DVD menu
The DVD menu is the menu stored on the DVD
itself. It is structured in various ways
according to the individual DVD and permits
certain actions and settings.
Calling up the DVD menu X
Select Video Q Video DVD.
X Show the menu system, if necessary
(Y page 176).
X Select DVD-V Q DVD Functions Q
Menu.
The DVD menu appears.
Selecting menu items in the DVD menu X
Slide ZVÆ or XVY.
X Confirming the selection: Press W.
The selection menu appears. X
Reconfirming the selection: Select
Select.
COMAND carries out the action defined by
the selected DVD menu item. i
Depending on the DVD, it is possible the
menu item Play either has no function or
has no function in certain parts of the DVD
menu.
Stopping the movie or skipping to the
beginning/end of a scene X
Select a menu item of your choice from the
DVD menu.
The selection menu appears. :
Stop movie
; Skip to the end of a scene
= Skip to the beginning of a scene
X Stopping the movie: Select Stop.
X Skipping to the end of a scene: Select
F.
X Skipping to the beginning of a scene:
Select E.
i Depending on the DVD, it is possible the
menu items F and E either have no
function or have no function in certain parts
of the DVD menu.
Switching to the next highest DVD
menu level X
Press back button % in the center
console.
or
X Select the corresponding menu item in the
DVD menu. 178
COMAND video DVDControl systems
216_AKB; 3; 90, en-US
d2ureepe,
Version: 2.11.8.1 2009-05-15T11:47:50+02:00 - Seite 178
Page 181 of 500

or
X
Select a menu item of your choice from the
DVD menu.
X Select the menu item Go up
in the selection
menu.
i Depending on the DVD, the menu item
Go up
or the back button % may only be
available in certain DVD menus. On some
DVDs, they may have no function at all.
Back to the movie X
Press back button % until you can see
the movie.
or
X Select the corresponding menu item in the
DVD menu.
or
X Select a menu item of your choice from the
DVD menu.
X Select the menu item Back (to the
movie) in the selection menu.
i Depending on the DVD, the menu item
Back (to
the movie) or the back button
% may be without function. Setting the language
i This function
is not available for all DVDs.
If it is available, you can set the language
for the DVD menu and the audio language.
The number of settings you can make is
determined by the content of the DVD. It
may also be possible to make the settings
in the DVD menu (Y page 178).
X Select Video Q Video DVD.
X Show the menu system, if necessary
(Y page 176).
X Select DVD-V Q DVD Functions.
X Select Audio Language.
In both cases a selection list will appear.
The dot
#
in front of an entry indicates the
current language. X
Changing the setting: Slide ZVÆ or turn
cVd, until you reach the desired setting.
X Saving a setting: Press W.
X Exiting the menu: Slide XVY. Subtitles and camera angles
i This function
is not available for all DVDs.
The number of settings you can make is
determined by the content of the DVD. It
may also be possible to make the settings
in the DVD menu (Y page 178).
X Select Video Q Video DVD.
X Show the menu system, if necessary
(Y page 176).
X Select DVD-V Q DVD Functions.
X Select Subtitles or Camera Angle.
In both cases a selection list will appear.
The dot
#
in front of an entry indicates the
current language.
X Changing the setting: Slide ZVÆ or turn
cVd, until you reach the desired setting.
X Saving a setting: Press W.
X Exiting the menu: Slide XVY. Interactive content
i DVDs may include interactive content
(e.g. a
video game). In a video game you can
control the play by selecting and initiating
actions. The type and number of actions
depends on the DVD.
X Selecting an action: Slide ZVÆ or XVY,
or turn cVd, until you reach the desired
setting.
X Initiating an action: Press W.
A menu appears, the first entry Select is
highlighted.
X Press W. COMAND video DVD
179
Control systems
216_AKB; 3; 90, en-US
d2ureepe, Version: 2.11.8.1 2009-05-15T11:47:50+02:00 - Seite 179 Z
Page 182 of 500

Music Register
G
Observe Safety notes, see page 68.
You can save MP3 or WMA audio files in the
Music Register. The storage capacity is
approximately 7 gigabyte. !
Keep your original music files in a safe
place. A
fault with the COMAND may cause
the music files stored in the Music Register
to be lost. Mercedes-Benz USA, LLC is not
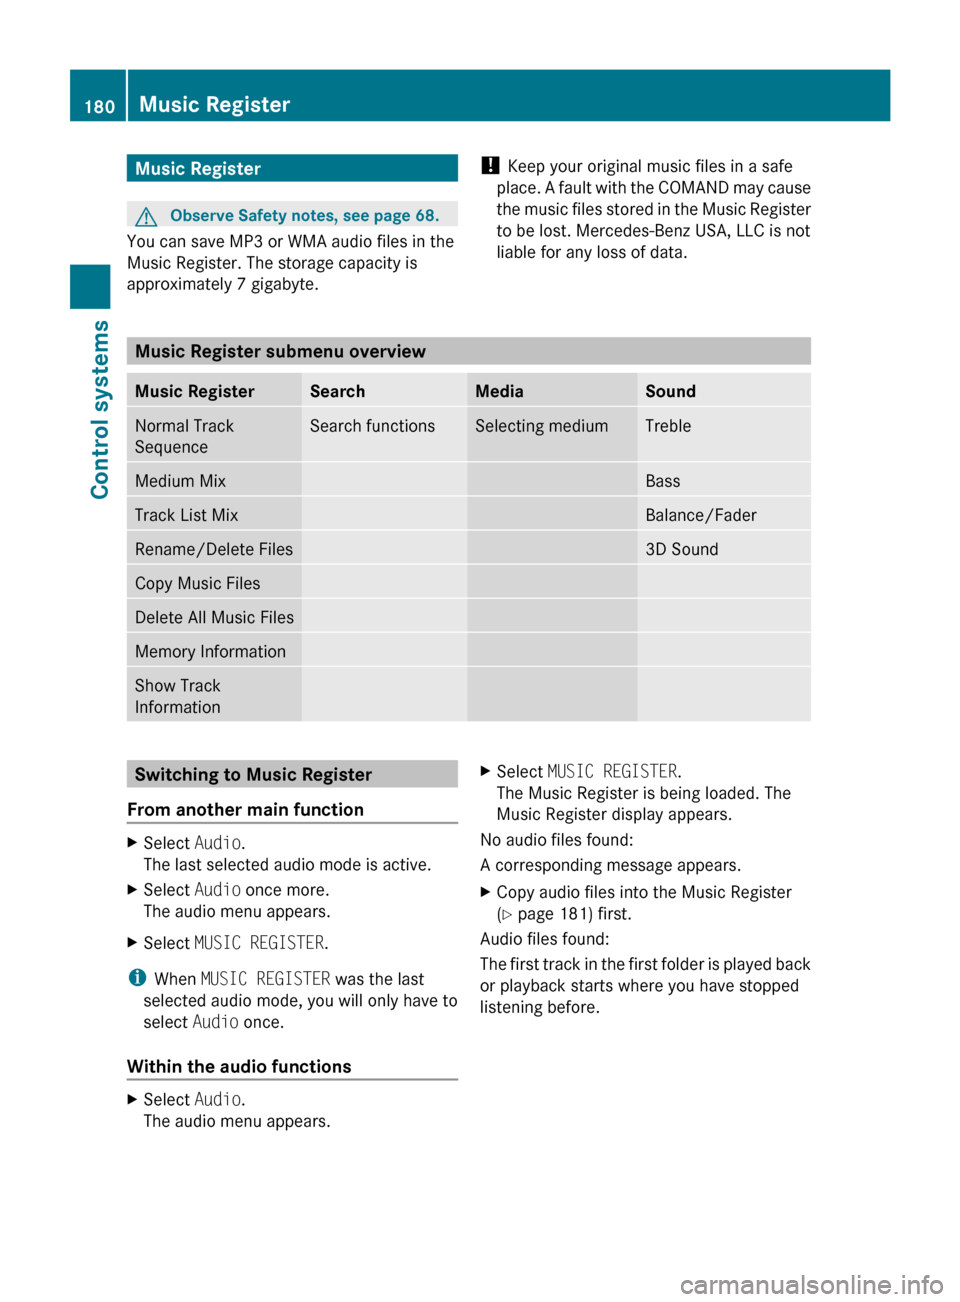
liable for any loss of data. Music Register submenu overview
Music Register Search Media Sound
Normal Track
Sequence Search functions Selecting medium Treble
Medium Mix Bass
Track List Mix Balance/Fader
Rename/Delete Files 3D Sound
Copy Music Files
Delete All Music Files
Memory Information
Show Track
Information
Switching to Music Register
From another main function X
Select Audio.
The last selected audio mode is active.
X Select Audio once more.
The audio menu appears.
X Select MUSIC REGISTER.
i When MUSIC REGISTER was the last
selected audio mode, you will only have to
select Audio once.
Within the audio functions X
Select Audio.
The audio menu appears. X
Select MUSIC REGISTER.
The Music Register is being loaded. The
Music Register display appears.
No audio files found:
A corresponding message appears.
X Copy audio files into the Music Register
(Y page 181) first.
Audio files found:
The first
track in the first folder is played back
or playback starts where you have stopped
listening before. 180
Music Register
Control systems
216_AKB; 3; 90, en-US
d2ureepe,
Version: 2.11.8.1 2009-05-15T11:47:50+02:00 - Seite 180
Page 183 of 500

:
Media type Music Register
; Track number
= Track name
? Elapsed track time
A Elapsed track time (graphical display)
B Current playback option (no display in
“Normal Track Sequence”)
C Sound settings
D Medium selection
E Current folder
F Search functions
G Medium position in media list
H Calling up Music Register menu Copying audio data into the Music
Register
You can copy audio files from storage media
in the DVD changer, a memory card, or from
external USB storage devices that contain
MP3 or WMA audio files. External USB
storage devices must be connected to the
built-in USB socket for that purpose. The
optional media interface is not intended for
this purpose.
i Certain functions are not available while
copying. A corresponding message will
then appear. Selecting medium X
Select MUSIC REGISTER Q Copy Music
Files.
The media list appears. Media with data
that can be copied are highlighted. :
Selected medium
X Selecting medium: Slide ZVÆ or rotate
cVd and confirm with W.
The medium is being loaded.
Selecting audio files X
Select All Music Files.
All audio files of the selected medium are
copied. The symbol in front of All Music
Files filled.
or
X Select individual tracks.
X Select Continue.
The copy menu appears. Music Register
181Control systems
216_AKB; 3; 90, en-US
d2ureepe, Version: 2.11.8.1 2009-05-15T11:47:50+02:00 - Seite 181 Z
Page 184 of 500

Starting copy process
:
Copies from memory card
; Copies to Music Register
= Memory requirements, “Calling up
memory information” (Y page 182)
? Starting copy process
A Name of source medium and target
storage name
B Back without copying
C Medium position in media list
X Select Start.
The copying process starts. The status bar
shows the copying progress.
When the data has been copied, the first track
of the copied album is played. The Music
Register menu is displayed. You can now copy
more audio files into the Music Register.
! Do not remove the memory card from
which you are copying during the process.
Otherwise the copied data in the Music
Register will be corrupt. :
Status bar i
The copying process may take a while
depending on the size of the data.
Depending on the data source, the required
time may vary. If the required storage
space is insufficient, a message appears.
X Aborting copying process: Select
Cancel.
The audio data that have been copied
already are stored in the Music Register.
X Back without copying: Select Back. Deleting audio files
This function will delete all audio files in the
Music Register.
! The deletion process may take several
minutes. Do not operate COMAND during
this time to avoid malfunctions.
X Select MUSIC REGISTER Q Delete All
Music Files.
You will be asked if you really want to
delete. Calling up memory information
X Select MUSIC REGISTER Q Memory
Information.
A window with the following information
opens:
R Storage capacity
R Available memory
R Occupied memory
R Contents (folders, tracks) Folder functions
You can view Music Register contents and
modify and delete files. 182
Music RegisterControl systems
216_AKB; 3; 90, en-US
d2ureepe,
Version: 2.11.8.1 2009-05-15T11:47:50+02:00 - Seite 182