2010 MERCEDES-BENZ C350S light
[x] Cancel search: lightPage 297 of 364

Display messagesPossible causes/consequences and M SolutionsbCheck
Left Tail
Lamp
or
Check
Right
Tail LampThe left or right tail lamp is malfunctioning.XReplace the bulb as soon as possible ( Y page 313).bCheck
Left Tail
and Brake
Lamps
or
Check
Right
Tail and
Brake
LampsThe left or right tail lamp/brake lamp is malfunctioning.XReplace the bulb as soon as possible ( Y page 313).bCheck
Left
Cornering
Light
or
Check
Right
Cornering
LightThe left or right corner-illuminating front fog lamp is
malfunctioning.XContact an authorized Mercedes-Benz Center as soon as
possible.bCheck
Rear Left
Turn
Signal
or
Check
Rear
Right
Turn
SignalThe left or right rear turn signal lamp is malfunctioning.XReplace the bulb as soon as possible ( Y page 313).Vehicle status messages in the multifunction display295Practical hints204_AKB; 5; 23, en-USd2ureepe,Version: 2.11.8.12009-07-16T17:54:06+02:00 - Seite 295Z
Page 315 of 364

Replacing bulbs
Safety notes
Safe vehicle operation depends on proper
exterior lighting and signaling to a large
degree.
Correct headlamp adjustment is extremely
important. Have headlamps checked and
readjusted at regular intervals and when a
bulb has been replaced. Contact an
authorized Mercedes-Benz Center for
headlamp adjustment.
GWarning!
Bulbs and bulb sockets can be very hot. Allow
the lamp to cool down before changing a bulb.
Keep bulbs out of reach of children.
Halogen lamps contain pressurized gas. A
bulb can explode if you
R touch or move it when hot
R drop the bulb
R scratch the bulb
Wear eye and hand protection.
Because of high voltage in Xenon lamps, it is
dangerous to replace the bulb or repair the
lamp and its components. We recommend
that you have such work done by a qualified
technician.
i Since replacing bulbs is a technically
highly demanding process, we recommend
to have them replaced at an authorized
Mercedes-Benz Center.
i If the headlamps or front fog lamps are
fogged up on the inside as a result of high
humidity, driving the vehicle a distance with
the lights on should clear up the fogging.Replacing bulbs313Practical hints204_AKB; 5; 23, en-USd2ureepe,Version: 2.11.8.12009-07-16T17:54:06+02:00 - Seite 313Z
Page 317 of 364

GObserve Safety notes, see page 313.
ROnly use 12-volt bulbs of the same type and
with the specified watt rating.
RSwitch the lights off before changing a bulb
to prevent short circuits.
RAlways use a clean lint-free cloth when
handling bulbs.
RYour hands should be dry and free of oil and
grease.
RIf the newly installed bulb does not come
on, contact an authorized Mercedes-Benz
Center.
iMercedes-Benz recommends using
Longlife (LL) bulbs.
Replacing bulbs for front lamps
XSwitch off the ignition.XTurn the exterior lamp switch to position
$.
XOpen the hood (Y page 224).GWarning!
Do not remove the cover for the Bi-Xenon
headlamp. Because of high voltage in Xenon
lamps, it is dangerous to replace the bulb or
repair the lamp and its components. It is
recommended to have such work done by a
qualified technician.
Low-beam bulb (halogen headlamps
only)
XTurn housing cover : counterclockwise
and remove it.
XPull electric plug ; off the bulb ?.XRemove wire clip = from bulb holder by
pushing down and release from arrestor
hook.
XPull bulb ? at its socket out of bulb holder.XInsert the new bulb so that its socket
locates in the recess of bulb holder and is
level to it.
XFold wire clip = back and press it down on
bulb holder to engage it in the arrestor
hook.
XConnect electric plug ; on bulb ?.XAlign housing cover and turn it clockwise.
Front turn signal lamp bulb
XTurn bulb socket = with handle ;
counterclockwise and remove it.
XPull bulb out of bulb socket =.XGently press the new bulb into bulb socket
= until the bulb engages.
XPlace bulb socket = back into the housing.
Handle ; must be in a horizontal line and
mark : must be on the upper part (driver’s
side headlamp) or lower part (passenger-
side headlamp).
XTurn bulb socket = clockwise until it
engages.
Replacing bulbs315Practical hints204_AKB; 5; 23, en-USd2ureepe,Version: 2.11.8.12009-07-16T17:54:06+02:00 - Seite 315Z
Page 318 of 364
Replacing bulbs for rear lamps
Before you start to replace a bulb for a rear
lamp, do the following:
XSwitch off the ignition.XTurn the exterior lamp switch to position
$.
XOpen the trunk.
Tail lamp unit
XDriver’s side: Lift up the bottom and pull out
the trim panel covering the driver side rear
light.
XPassenger side: Open the fuse box in the
trunk (Y page 329).
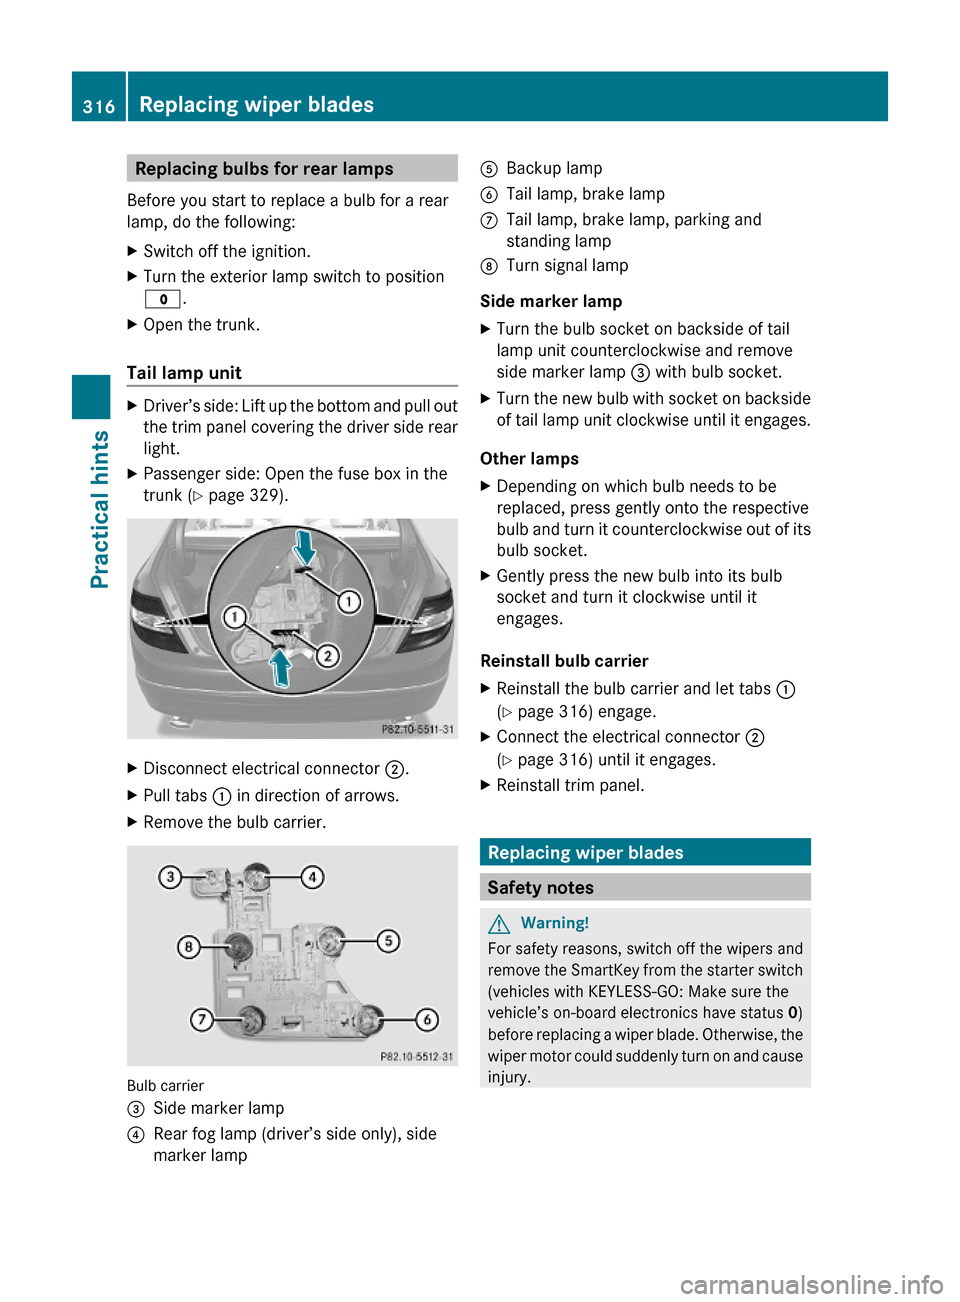
XDisconnect electrical connector ;.XPull tabs : in direction of arrows.XRemove the bulb carrier.
Bulb carrier
=Side marker lamp?Rear fog lamp (driver’s side only), side
marker lamp
ABackup lampBTail lamp, brake lampCTail lamp, brake lamp, parking and
standing lamp
DTurn signal lamp
Side marker lamp
XTurn the bulb socket on backside of tail
lamp unit counterclockwise and remove
side marker lamp = with bulb socket.
XTurn the new bulb with socket on backside
of tail lamp unit clockwise until it engages.
Other lamps
XDepending on which bulb needs to be
replaced, press gently onto the respective
bulb and turn it counterclockwise out of its
bulb socket.
XGently press the new bulb into its bulb
socket and turn it clockwise until it
engages.
Reinstall bulb carrier
XReinstall the bulb carrier and let tabs :
(Y page 316) engage.
XConnect the electrical connector ;
(Y page 316) until it engages.
XReinstall trim panel.
Replacing wiper blades
Safety notes
GWarning!
For safety reasons, switch off the wipers and
remove the SmartKey from the starter switch
(vehicles with KEYLESS-GO: Make sure the
vehicle’s on-board electronics have status 0)
before replacing a wiper blade. Otherwise, the
wiper motor could suddenly turn on and cause
injury.
316Replacing wiper bladesPractical hints
204_AKB; 5; 23, en-USd2ureepe,Version: 2.11.8.12009-07-16T17:54:06+02:00 - Seite 316
Page 321 of 364
away from the area under the lifted vehicle.
Always lower the vehicle onto sufficient
capacity jackstands before working under the
vehicle.
Always engage the parking brake firmly and
block the wheels with wheel chocks or other
sizeable objects before raising the vehicle
with the jack. Do not disengage the parking
brake while the vehicle is raised.
Make sure that the ground on which the
vehicle is standing and where you place the
jack is solid, level and not slippery. If
necessary, use a large underlay. On slippery
surfaces, such as tiled floors, you should use
a non-slip underlay, for example a rubber mat.
Do not use wooden blocks or similar objects
to support the jack. Otherwise the jack may
not be able to achieve its load-bearing
capacity if it is not at its full height.
Never start the engine when the vehicle is
raised.
Also observe the notes on the jack.
XPrevent the vehicle from rolling away by
blocking wheels with wheel chocks or other
sizeable objects.
When your vehicle is equipped with a wheel
chock, it is included with the vehicle tool kit
(Y page 268). For information on setting up
the collapsible wheel chock, see
(Y page 269).
When changing a wheel on a level surface:
XPlace a wheel chock or other sizeable
object in front of and another wheel chock
or other sizeable object behind the wheel
that is diagonally opposite to the wheel
being changed.
Always try lifting the vehicle using the jack on
a level surface. However, should
circumstances require you to do so on a hill:
XPlace wheel chocks or other sizeable
objects on the downhill side in front of both
wheels on the side opposite to the side on
which the wheel is to be changed.
GWarning!
Only jack up the vehicle on level ground or on
slight inclines/declines. Otherwise, the
vehicle could fall off the jack and injure you or
others.
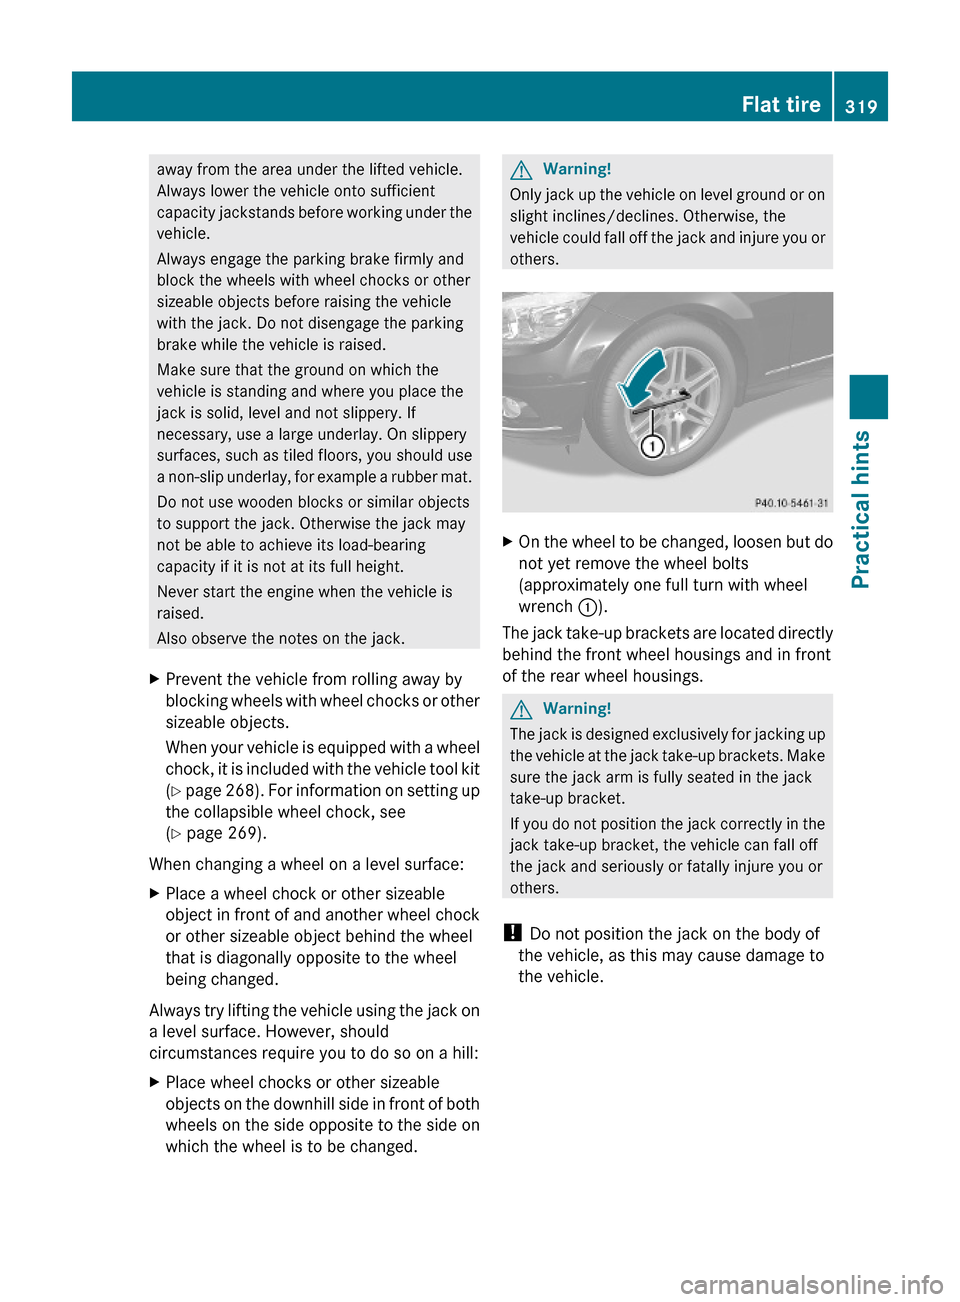
XOn the wheel to be changed, loosen but do
not yet remove the wheel bolts
(approximately one full turn with wheel
wrench :).
The jack take-up brackets are located directly
behind the front wheel housings and in front
of the rear wheel housings.
GWarning!
The jack is designed exclusively for jacking up
the vehicle at the jack take-up brackets. Make
sure the jack arm is fully seated in the jack
take-up bracket.
If you do not position the jack correctly in the
jack take-up bracket, the vehicle can fall off
the jack and seriously or fatally injure you or
others.
! Do not position the jack on the body of
the vehicle, as this may cause damage to
the vehicle.
Flat tire319Practical hints204_AKB; 5; 23, en-USd2ureepe,Version: 2.11.8.12009-07-16T17:54:06+02:00 - Seite 319Z
Page 322 of 364
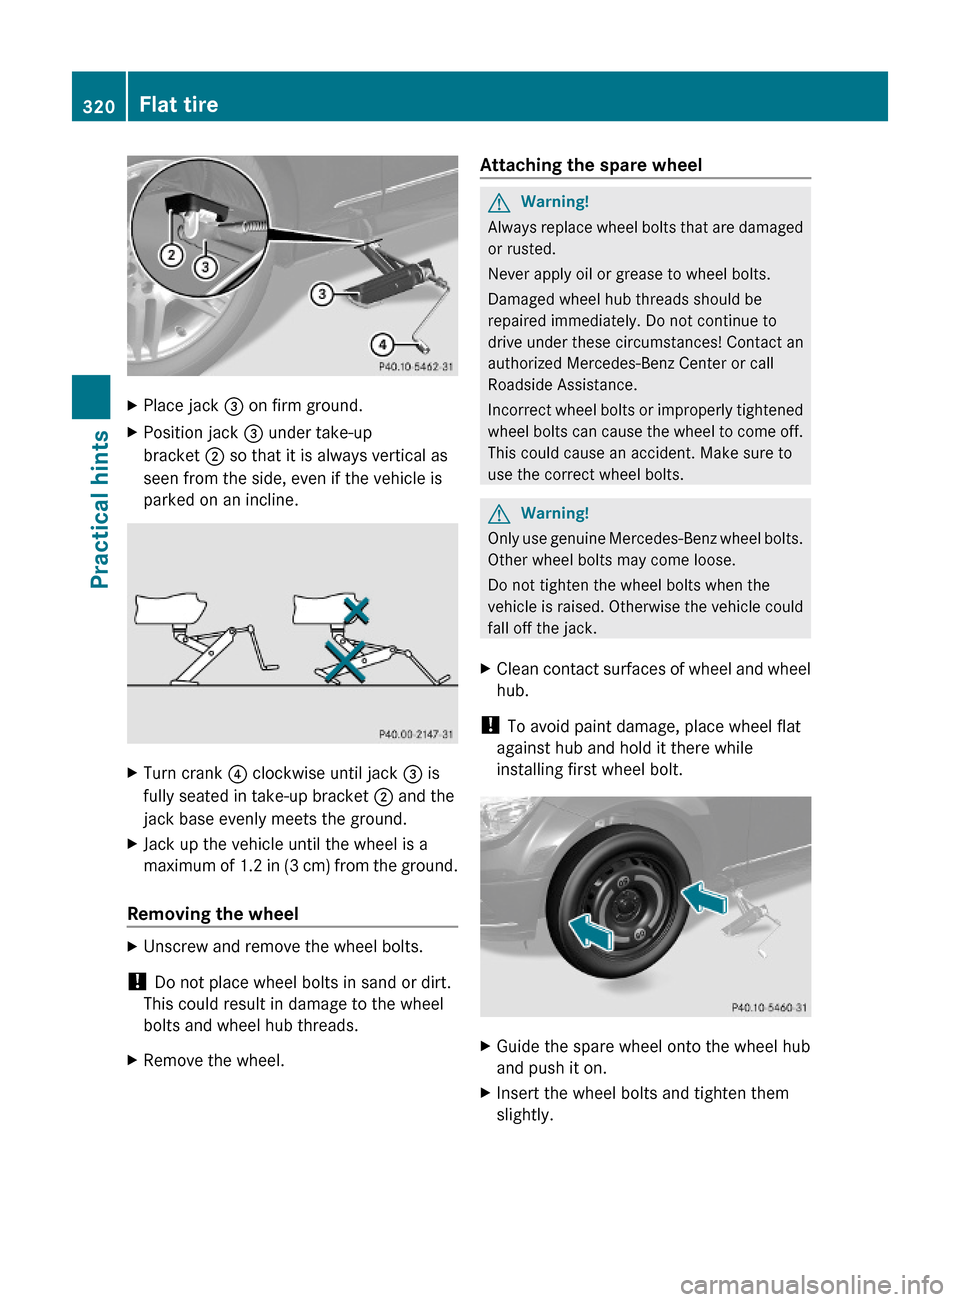
XPlace jack = on firm ground.XPosition jack = under take-up
bracket ; so that it is always vertical as
seen from the side, even if the vehicle is
parked on an incline.
XTurn crank ? clockwise until jack = is
fully seated in take-up bracket ; and the
jack base evenly meets the ground.
XJack up the vehicle until the wheel is a
maximum of 1.2 in (3 cm) from the ground.
Removing the wheel
XUnscrew and remove the wheel bolts.
! Do not place wheel bolts in sand or dirt.
This could result in damage to the wheel
bolts and wheel hub threads.
XRemove the wheel.Attaching the spare wheelGWarning!
Always replace wheel bolts that are damaged
or rusted.
Never apply oil or grease to wheel bolts.
Damaged wheel hub threads should be
repaired immediately. Do not continue to
drive under these circumstances! Contact an
authorized Mercedes-Benz Center or call
Roadside Assistance.
Incorrect wheel bolts or improperly tightened
wheel bolts can cause the wheel to come off.
This could cause an accident. Make sure to
use the correct wheel bolts.
GWarning!
Only use genuine Mercedes-Benz wheel bolts.
Other wheel bolts may come loose.
Do not tighten the wheel bolts when the
vehicle is raised. Otherwise the vehicle could
fall off the jack.
XClean contact surfaces of wheel and wheel
hub.
! To avoid paint damage, place wheel flat
against hub and hold it there while
installing first wheel bolt.
XGuide the spare wheel onto the wheel hub
and push it on.
XInsert the wheel bolts and tighten them
slightly.
320Flat tirePractical hints
204_AKB; 5; 23, en-USd2ureepe,Version: 2.11.8.12009-07-16T17:54:06+02:00 - Seite 320
Page 348 of 364
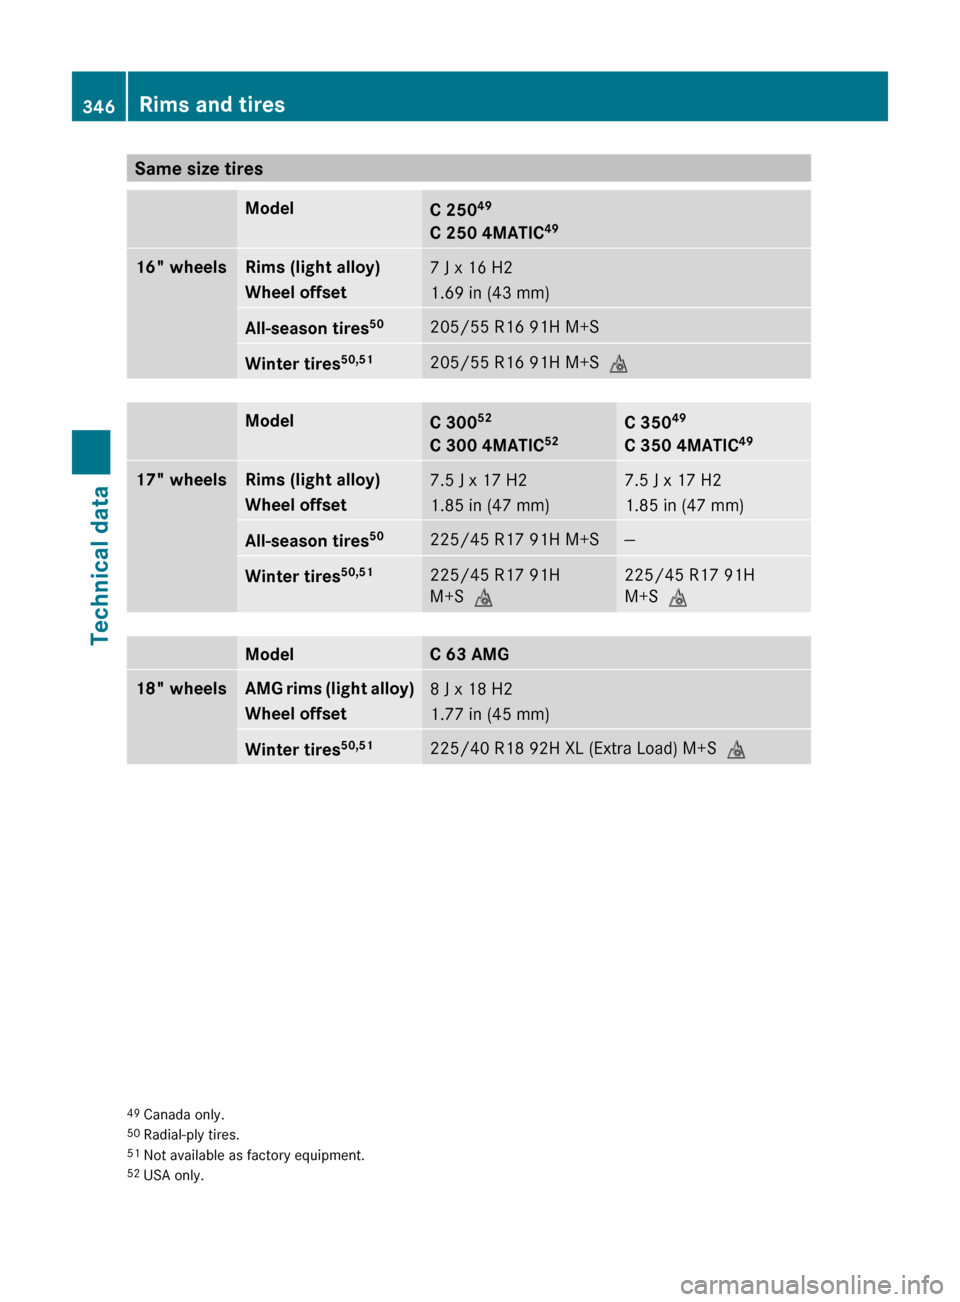
Same size tiresModelC 25049
C 250 4MATIC 4916" wheelsRims (light alloy)
Wheel offset7 J x 16 H2
1.69 in (43 mm)All-season tires 50205/55 R16 91H M+SWinter tires50,51205/55 R16 91H M+S
iModelC 30052
C 300 4MATIC 52C 35049
C 350 4MATIC 4917" wheelsRims (light alloy)
Wheel offset7.5 J x 17 H2
1.85 in (47 mm)7.5 J x 17 H2
1.85 in (47 mm)All-season tires 50225/45 R17 91H M+S—Winter tires50,51225/45 R17 91H
M+S i225/45 R17 91H
M+S iModelC 63 AMG18" wheelsAMG rims (light alloy)
Wheel offset8 J x 18 H2
1.77 in (45 mm)Winter tires 50,51225/40 R18 92H XL (Extra Load) M+S
i49
Canada only.
50 Radial-ply tires.
51 Not available as factory equipment.
52 USA only.346Rims and tiresTechnical data
204_AKB; 5; 23, en-USd2ureepe,Version: 2.11.8.12009-07-16T17:54:06+02:00 - Seite 346
Page 349 of 364
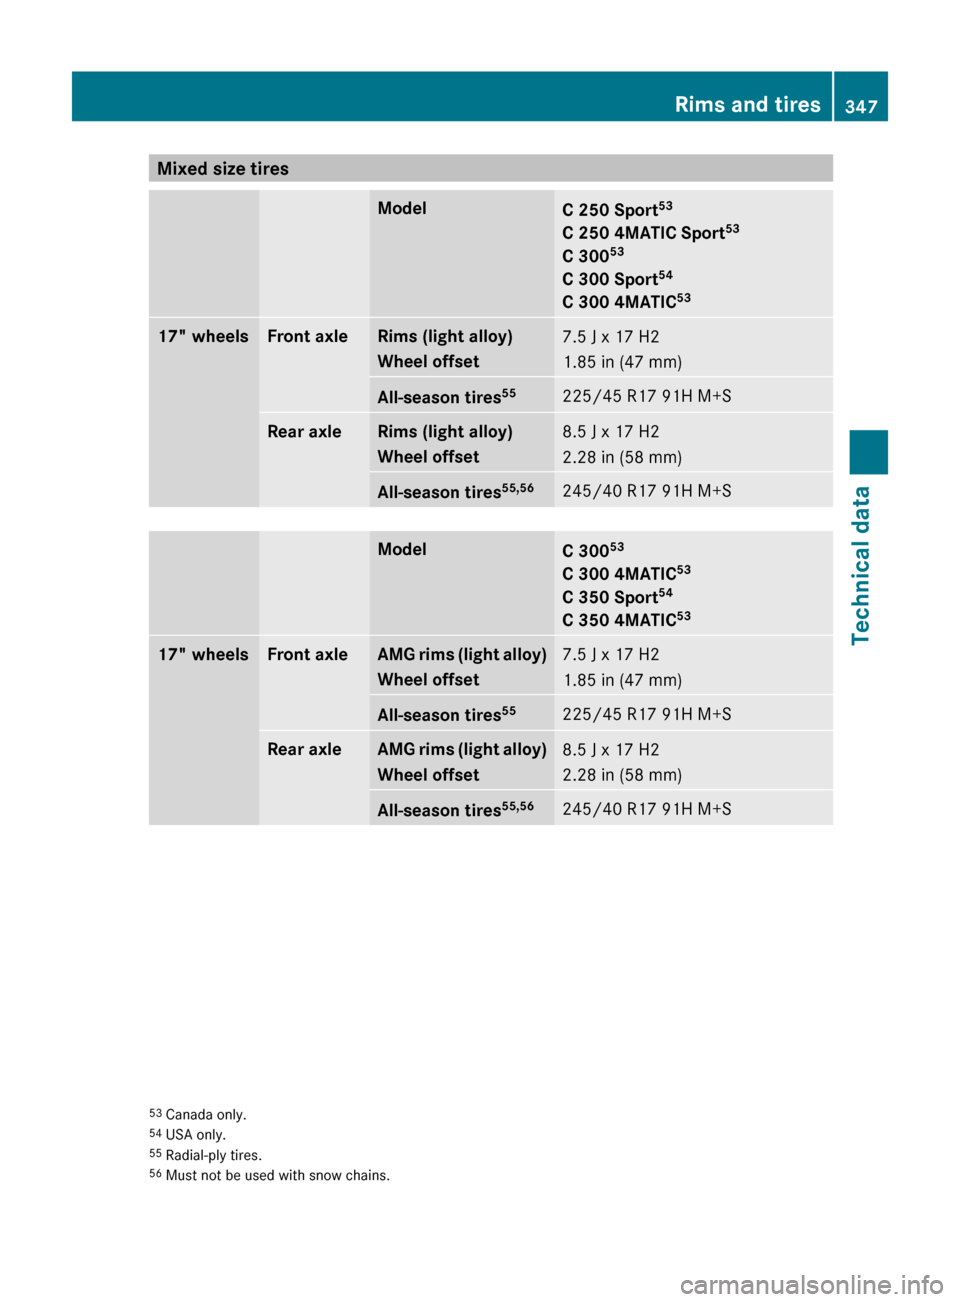
Mixed size tiresModelC 250 Sport53
C 250 4MATIC Sport 53
C 300 53
C 300 Sport 54
C 300 4MATIC 5317" wheelsFront axleRims (light alloy)
Wheel offset7.5 J x 17 H2
1.85 in (47 mm)All-season tires 55225/45 R17 91H M+SRear axleRims (light alloy)
Wheel offset8.5 J x 17 H2
2.28 in (58 mm)All-season tires 55,56245/40 R17 91H M+SModelC 30053
C 300 4MATIC 53
C 350 Sport 54
C 350 4MATIC 5317" wheelsFront axleAMG rims (light alloy)
Wheel offset7.5 J x 17 H2
1.85 in (47 mm)All-season tires 55225/45 R17 91H M+SRear axleAMG rims (light alloy)
Wheel offset8.5 J x 17 H2
2.28 in (58 mm)All-season tires 55,56245/40 R17 91H M+S53
Canada only.
54 USA only.
55 Radial-ply tires.
56 Must not be used with snow chains.Rims and tires347Technical data204_AKB; 5; 23, en-USd2ureepe,Version: 2.11.8.12009-07-16T17:54:06+02:00 - Seite 347Z