2010 MERCEDES-BENZ C350S light
[x] Cancel search: lightPage 149 of 364

deviate from conventional stereo
playback.
SYS menu
System settings menu overview
MenuSystemDisplay (Y page 147)BrightnessDay ModeNight ModeAutomaticActivate Bluetooth®
(Y page 147)
Reset (Y page 147)Language (Y page 148)
Display settings
You can adapt the brightness of the audio
display to the prevailing light conditions.
Setting the display design
Xi Q System Q Display.XSelect Brightness, Day Mode, Night
Mode or Automatic.
iWhen you select Brightness, a scale
appears on which you can set the
brightness manually.
In the Automatic setting, the audio system
analyzes the automatic vehicle light sensor
and switches between the display designs
automatically.
Bluetooth® settings
General information about Bluetooth®
Bluetooth® technology is the standard for
short-range wireless technologies, suitable
for transmitting voice and data. It is possible
to connect Bluetooth® devices wirelessly.
Bluetooth® can be used to exchange vCards
or to make calls using a hands-free device.
Bluetooth® technology uses the freely
available ISM (Industrial Scientific Medical)
wave band that works at 2.45 GHz.
Bluetooth® works within a range of up to 33 ft
(10 m).
Activate or deactivate Bluetooth®
Xi Q System Q Activate
Bluetooth.
You have activated or deactivated
Bluetooth®. A checkmark O appears when
Bluetooth® is activated.
Reset
iYou can reset the audio system back to
its factory settings. In this case, all personal
data (e.g. address book entries, call lists,
paired mobile phones, and presets) are
deleted. We recommend that you reset the
values before selling your vehicle.
Audio system147Controls in detail204_AKB; 5; 23, en-USd2ureepe,Version: 2.11.8.12009-07-16T17:54:06+02:00 - Seite 147Z
Page 157 of 364
XCalling up category list: $
(repeatedly, if necessary) Q Cat .
or
XIn Sat mode, slide XV Y or rotate cV d until
Cat. is highlighted and press W.
The category list appears.XSelecting a category: Slide ZV Æ or rotate
c V d.XSetting the selected category: Press W.
The selected program category
(alphabetical order) will appear in the audio
display. The last tuned channel in the new
category will begin to play.
When searching, tuning in, or selecting
from the channel list, the All Channels
option accesses all of your subscribed
channels.
i When you select the category All
Channels , you have access to all the
channels you subscribed to, regardless of
category.
Tuning in channels
You have the following selection options:
R the channel search function
R the manual channel number entry
R the channel list
R the channel presets
Tuning in channels using channel search
function
XSlide XV Y or rotate cV d when the main
area in the basic menu is active.
Depending on the direction in which the
controller is being slid or rotated, the
system searches upward or downward and
stops at the next subscribed channel.
or
XPress button E or F on audio control
unit.
Depending on the pressed button, the
system searches upward or downward and
stops at the next subscribed channel.i Which channels are available depends on
which channels you have subscribed to and
the program category you have selected
( Y page 154). For tuning in channels you
can also use the buttons on the
multifunction steering wheel, see “Audio
menu” ( Y page 126).
Tuning in channels using manual channel
number entryX$ (repeatedly, if necessary) Q Sat
Q Enter Channel .
The menu for manual channel number entry
appears.
or
XIn Sat mode, press button l on the
keypad in audio control unit briefly.XChannel number entry with keypad:
Enter desired channel number with buttons
k to x with the keypad in audio
control unit briefly.
Further operation depends on whether the
selected channel number is valid or if the
channel is included in your subscription.
XExiting menu without making an entry:
Press button k in the center console
( Y page 141).
Channel number is valid and channel is
included in subscription: The audio system
tunes in the channel entered.
Channel number is invalid: The message
Invalid Channel appears in the audio
display.
XThe message disappears automatically or
press W to close the message.
Channel number is valid, but channel is
not included in subscription: The message
Call SIRIUS to activate: appears
( Y page 153).
XPress W to close the message in the audio
display.Audio system155Controls in detail204_AKB; 5; 23, en-USd2ureepe,Version: 2.11.8.12009-07-16T17:54:06+02:00 - Seite 155Z
Page 161 of 364
! Do not affix stickers or labels to the CDs,
they can become warped due to the heat
that develops in the CD drive or CD
changer.
In certain situations, the CDs can then no
longer be ejected and cause damage to the
drive. Such damage is not covered by the
Mercedes-Benz Limited Warranty.
! Your CD drive or CD changer has been
designed to play CDs which correspond to
the IEC 60908 standard. You can therefore
only use CDs with a maximum thickness of
1.3 mm.
If you insert thicker discs, e.g. ones that
have data on both sides (one side with DVD
data, the other side with audio data), they
cannot be ejected and will damage the
drive.
Do not use CDs with a diameter of 8 cm.
Attempting to play CDs with a diameter of
8 cm or playing such CDs with an adapter may
cause damage to the CD drive. Such damage
is not covered by the Mercedes-Benz Limited
Warranty.
Only use round discs with a diameter of
12 cm.
Should excessively high or low temperatures
occur while in CD changer mode, a message
will appear in the display, and the CD will be
muted until the temperature has reached an
acceptable level for the system to continue
operation.
Tips on handling CDs
R Only touch the CDs at the edges.
R Handle CDs carefully to prevent
interference during playback.
R Avoid scratches, fingerprints and dust on
the CDs.
R The CDs must only be labeled using pens
specially designed for this purpose.
R Clean CDs from time to time with a
commercially available cleaning cloth.
Never wipe the CD in a circular motion;instead, wipe it in a straight line starting in
the center and moving outward. Do not use
solvents, anti-static sprays, etc. for
cleaning.
R Replace the CD in its case after use.
R Protect CDs from heat and direct sunlight.
Notes about MP3 mode
The single CD player and the CD changer can
play audio CDs as well as CDs with MP3/
WMA files.
i Due to the branched data structure,
playback of the first track may be delayed
slightly.
Permissible media for MP3/WMA files
R CD-R
R CD-RW
Permissible file systems
R ISO9660/Joliet for CDs
Multisession CDs
For multisession CDs, the first session type
of the CD determines how the audio system
will process the CD.
For example, if the first session type is
according to the audio CD standard and the
second session type is according to the data
CD standard containing MP3/WMA tracks,
the audio system will treat the CD as a
conventional audio CD. This means that it is
only possible to access the audio CD tracks.
Access to the MP3/WMA tracks is not
possible.
Similarly, if the first session type is according
to the data CD standard containing MP3/
WMA tracks and the second session type is
according to the audio CD standard, the audio
system will treat the CD as a data CD. This
means that it is only possible to access the
MP3/WMA tracks. Access to the audio CD
tracks is not possible.
Audio system159Controls in detail204_AKB; 5; 23, en-USd2ureepe,Version: 2.11.8.12009-07-16T17:54:06+02:00 - Seite 159Z
Page 165 of 364
XPress button h, or load/eject
button ; (Y page 161) on the audio
control unit to finish the loading process.
The CD changer plays the disc if it has been
inserted correctly and is permissible.
XInterrupting loading procedure: Press
load/eject button ; again.
or
XPress button k in the center console
(Y page 141).
XFilling an empty magazine
compartment: Press load/eject
button ;.
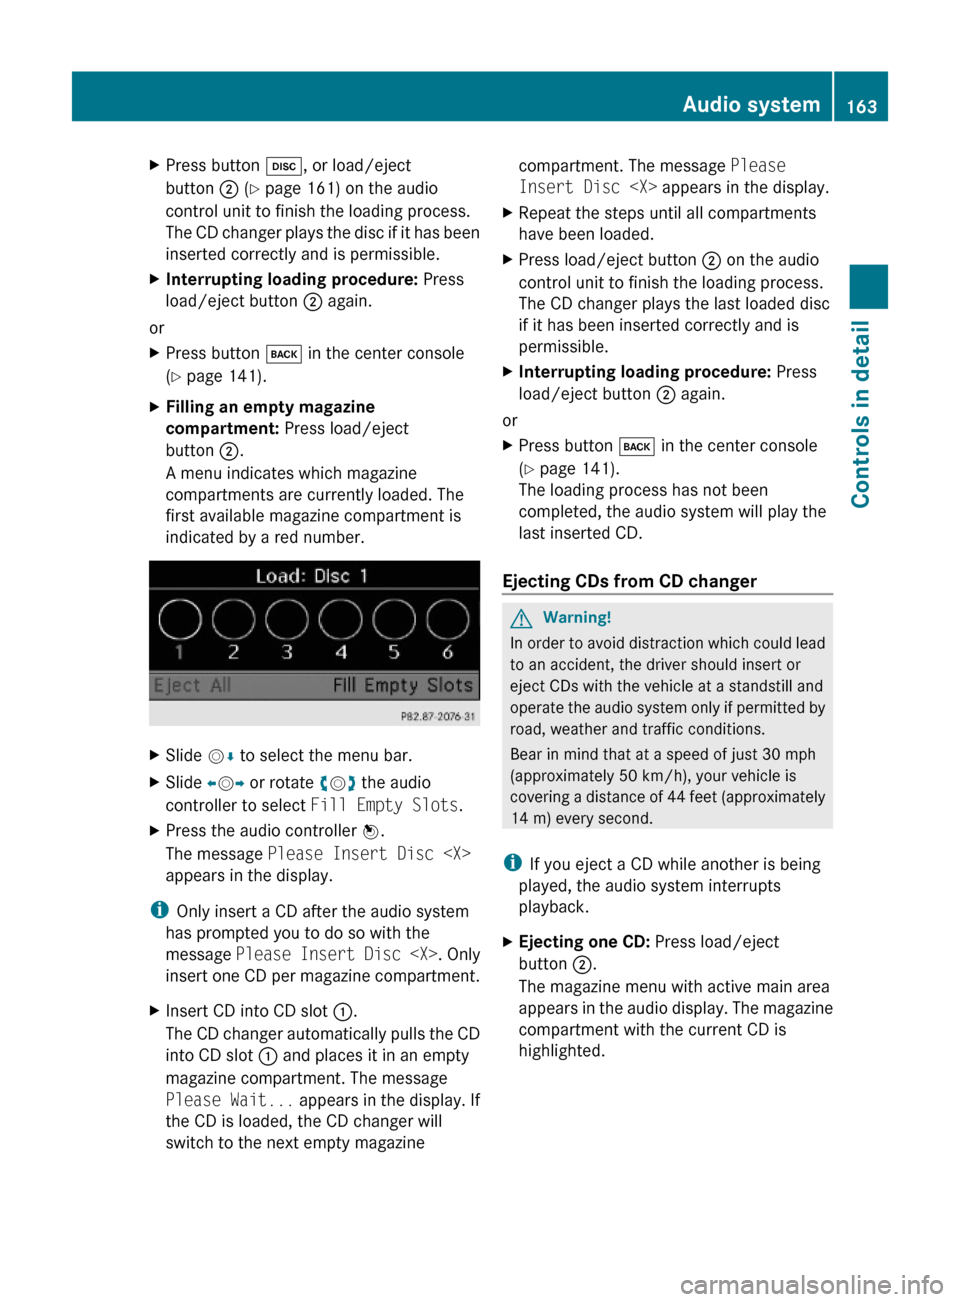
A menu indicates which magazine
compartments are currently loaded. The
first available magazine compartment is
indicated by a red number.
XSlide VÆ to select the menu bar.XSlide XVY or rotate cVd the audio
controller to select Fill Empty Slots.
XPress the audio controller W.
The message Please Insert Disc
appears in the display.
iOnly insert a CD after the audio system
has prompted you to do so with the
message Please Insert Disc
insert one CD per magazine compartment.
XInsert CD into CD slot :.
The CD changer automatically pulls the CD
into CD slot : and places it in an empty
magazine compartment. The message
Please Wait... appears in the display. If
the CD is loaded, the CD changer will
switch to the next empty magazine
compartment. The message Please
Insert Disc
XRepeat the steps until all compartments
have been loaded.
XPress load/eject button ; on the audio
control unit to finish the loading process.
The CD changer plays the last loaded disc
if it has been inserted correctly and is
permissible.
XInterrupting loading procedure: Press
load/eject button ; again.
or
XPress button k in the center console
(Y page 141).
The loading process has not been
completed, the audio system will play the
last inserted CD.
Ejecting CDs from CD changer
GWarning!
In order to avoid distraction which could lead
to an accident, the driver should insert or
eject CDs with the vehicle at a standstill and
operate the audio system only if permitted by
road, weather and traffic conditions.
Bear in mind that at a speed of just 30 mph
(approximately 50 km/h), your vehicle is
covering a distance of 44 feet (approximately
14 m) every second.
iIf you eject a CD while another is being
played, the audio system interrupts
playback.
XEjecting one CD: Press load/eject
button ;.
The magazine menu with active main area
appears in the audio display. The magazine
compartment with the current CD is
highlighted.
Audio system163Controls in detail204_AKB; 5; 23, en-USd2ureepe,Version: 2.11.8.12009-07-16T17:54:06+02:00 - Seite 163Z
Page 166 of 364
XPress desired button k to p in the
keypad to select a magazine compartment.
or
XSlide XVY or rotate cVd the audio
controller to select the desired CD.
XPress W to confirm.
The CD is ejected.
XRemove the CD from CD slot :.
If you do not remove the CD from the CD
slot, the CD changer will automatically pull
the CD back in after a short while.
iIf audio source is changed during eject
procedure (e.g. pressing button $) the
eject procedure will be aborted and any
CDs being ejected will be drawn back into
the unit.
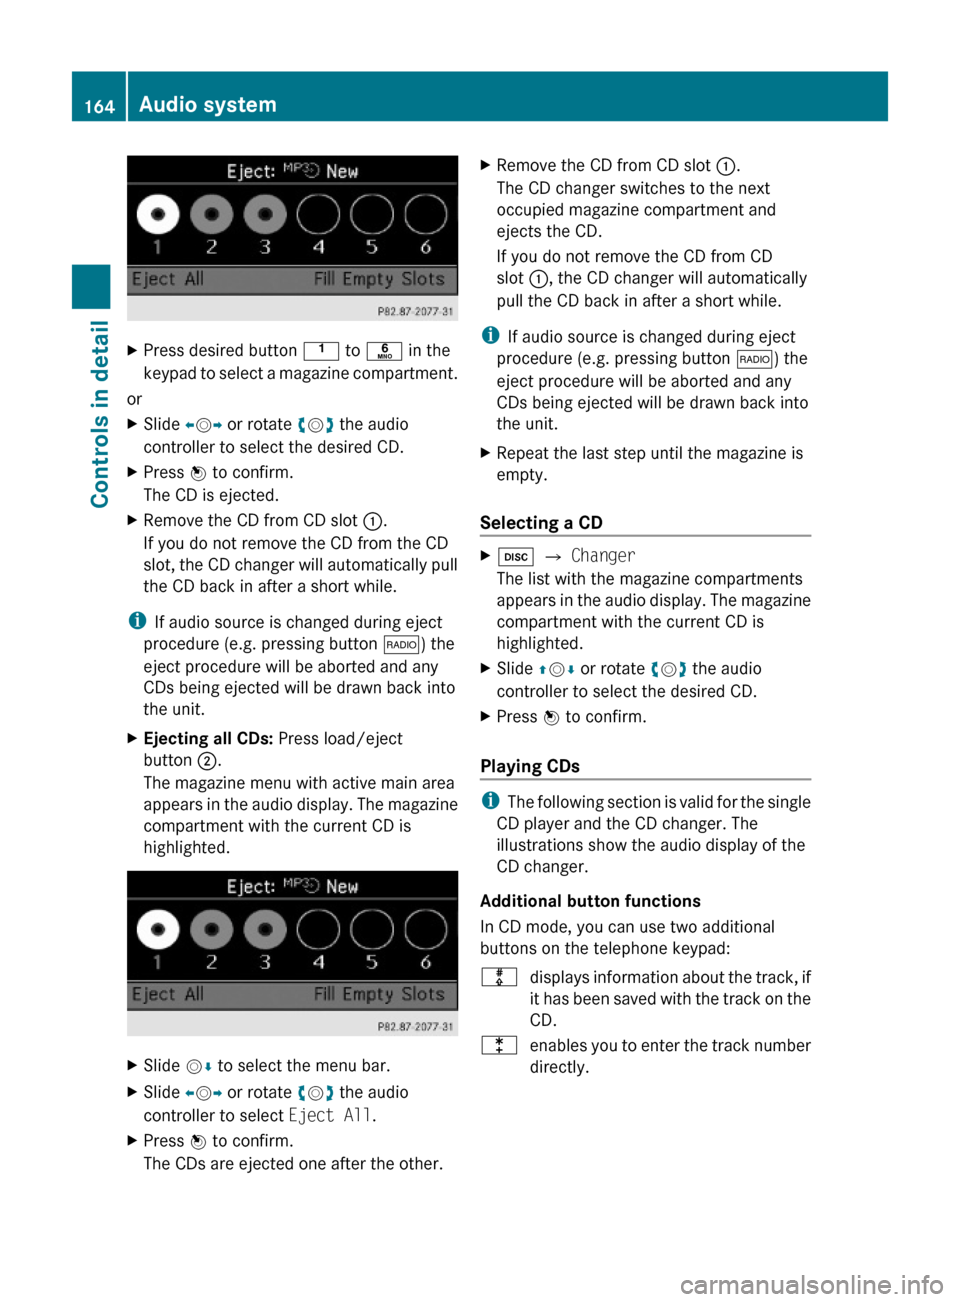
XEjecting all CDs: Press load/eject
button ;.
The magazine menu with active main area
appears in the audio display. The magazine
compartment with the current CD is
highlighted.
XSlide VÆ to select the menu bar.XSlide XVY or rotate cVd the audio
controller to select Eject All.
XPress W to confirm.
The CDs are ejected one after the other.
XRemove the CD from CD slot :.
The CD changer switches to the next
occupied magazine compartment and
ejects the CD.
If you do not remove the CD from CD
slot :, the CD changer will automatically
pull the CD back in after a short while.
iIf audio source is changed during eject
procedure (e.g. pressing button $) the
eject procedure will be aborted and any
CDs being ejected will be drawn back into
the unit.
XRepeat the last step until the magazine is
empty.
Selecting a CD
Xh Q Changer
The list with the magazine compartments
appears in the audio display. The magazine
compartment with the current CD is
highlighted.
XSlide ZVÆ or rotate cVd the audio
controller to select the desired CD.
XPress W to confirm.
Playing CDs
iThe following section is valid for the single
CD player and the CD changer. The
illustrations show the audio display of the
CD changer.
Additional button functions
In CD mode, you can use two additional
buttons on the telephone keypad:
mdisplays information about the track, if
it has been saved with the track on the
CD.
lenables you to enter the track number
directly.
164Audio systemControls in detail
204_AKB; 5; 23, en-USd2ureepe,Version: 2.11.8.12009-07-16T17:54:06+02:00 - Seite 164
Page 177 of 364
XSwitching from the search speller to
the list: Slide ZV repeatedly.
or
XSelect ¬.XSwitching from the list to the search
speller: Press button k.
Selecting an entry
Selecting via search speller
XIf necessary, switch from the list to the
search speller.
XSwitching search speller character
set: Select C.
Depending on the previous setting, this
switches the search speller to letters with
special characters or numbers with special
characters.
XEntering characters: Slide XVY or rotate
cVd the audio controller to select the
characters for the required entry.
The first letters you enter determine the
first letters of the name you are looking for.
XPress W to confirm.
The first entry containing the selected
initial letters is highlighted in the list. If
there are a number of similar entries, the
next different character is displayed.
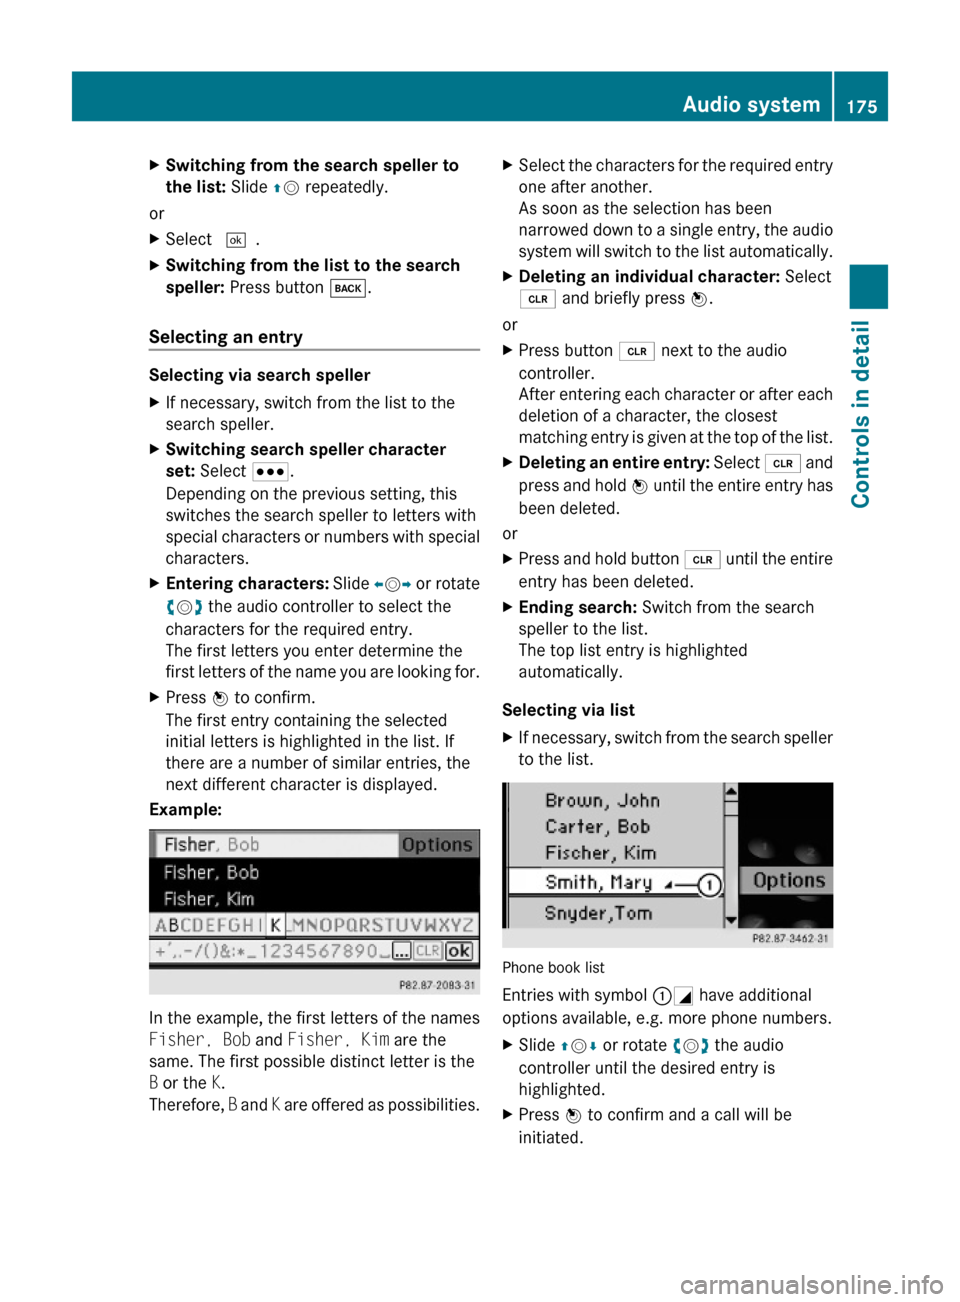
Example:
In the example, the first letters of the names
Fisher, Bob and Fisher, Kim are the
same. The first possible distinct letter is the
B or the K.
Therefore, B and K are offered as possibilities.
XSelect the characters for the required entry
one after another.
As soon as the selection has been
narrowed down to a single entry, the audio
system will switch to the list automatically.
XDeleting an individual character: Select
2 and briefly press W.
or
XPress button 2 next to the audio
controller.
After entering each character or after each
deletion of a character, the closest
matching entry is given at the top of the list.
XDeleting an entire entry: Select 2 and
press and hold W until the entire entry has
been deleted.
or
XPress and hold button 2 until the entire
entry has been deleted.
XEnding search: Switch from the search
speller to the list.
The top list entry is highlighted
automatically.
Selecting via list
XIf necessary, switch from the search speller
to the list.
Phone book list
Entries with symbol :G have additional
options available, e.g. more phone numbers.
XSlide ZVÆ or rotate cVd the audio
controller until the desired entry is
highlighted.
XPress W to confirm and a call will be
initiated.
Audio system175Controls in detail204_AKB; 5; 23, en-USd2ureepe,Version: 2.11.8.12009-07-16T17:54:06+02:00 - Seite 175Z
Page 178 of 364
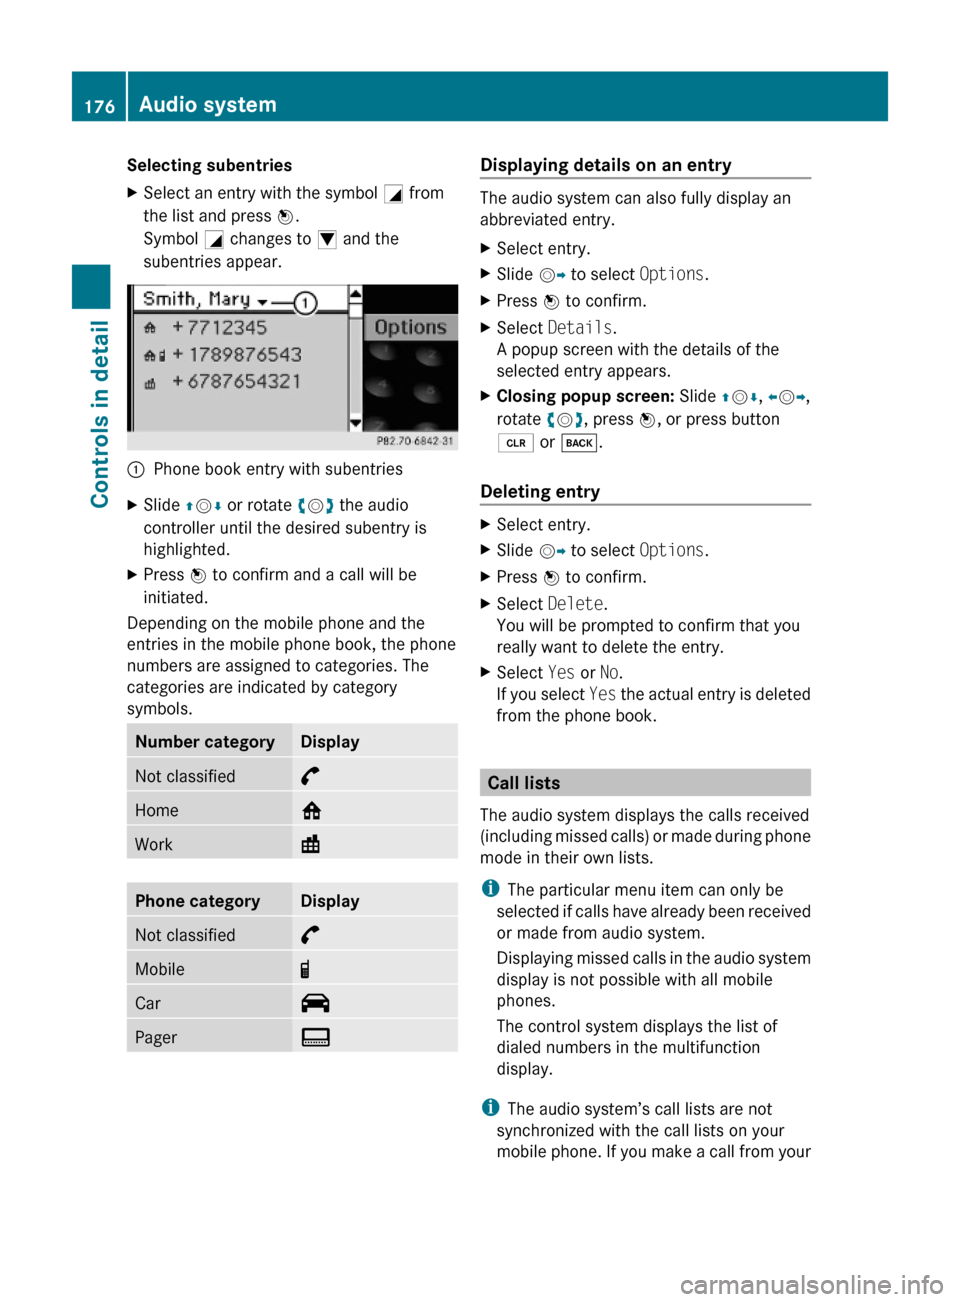
Selecting subentriesXSelect an entry with the symbol G from
the list and press W.
Symbol G changes to I and the
subentries appear.
:Phone book entry with subentriesXSlide ZVÆ or rotate cVd the audio
controller until the desired subentry is
highlighted.
XPress W to confirm and a call will be
initiated.
Depending on the mobile phone and the
entries in the mobile phone book, the phone
numbers are assigned to categories. The
categories are indicated by category
symbols.
Number categoryDisplayNot classified°Home@Work\Phone categoryDisplayNot classified°Mobile¢Car^PagerïDisplaying details on an entry
The audio system can also fully display an
abbreviated entry.
XSelect entry.XSlide VY to select Options.XPress W to confirm.XSelect Details.
A popup screen with the details of the
selected entry appears.
XClosing popup screen: Slide ZVÆ, XVY,
rotate cVd, press W, or press button
2 or k.
Deleting entry
XSelect entry.XSlide VY to select Options.XPress W to confirm.XSelect Delete.
You will be prompted to confirm that you
really want to delete the entry.
XSelect Yes or No.
If you select Yes the actual entry is deleted
from the phone book.
Call lists
The audio system displays the calls received
(including missed calls) or made during phone
mode in their own lists.
iThe particular menu item can only be
selected if calls have already been received
or made from audio system.
Displaying missed calls in the audio system
display is not possible with all mobile
phones.
The control system displays the list of
dialed numbers in the multifunction
display.
iThe audio system’s call lists are not
synchronized with the call lists on your
mobile phone. If you make a call from your
176Audio systemControls in detail
204_AKB; 5; 23, en-USd2ureepe,Version: 2.11.8.12009-07-16T17:54:06+02:00 - Seite 176
Page 179 of 364
mobile phone and only use the audio
system’s hands-free device, these calls will
not be listed.
Calling up the list
X% Q Call Lists.XSelect Calls Received or Calls
Dialed.
The appropriate list appears.
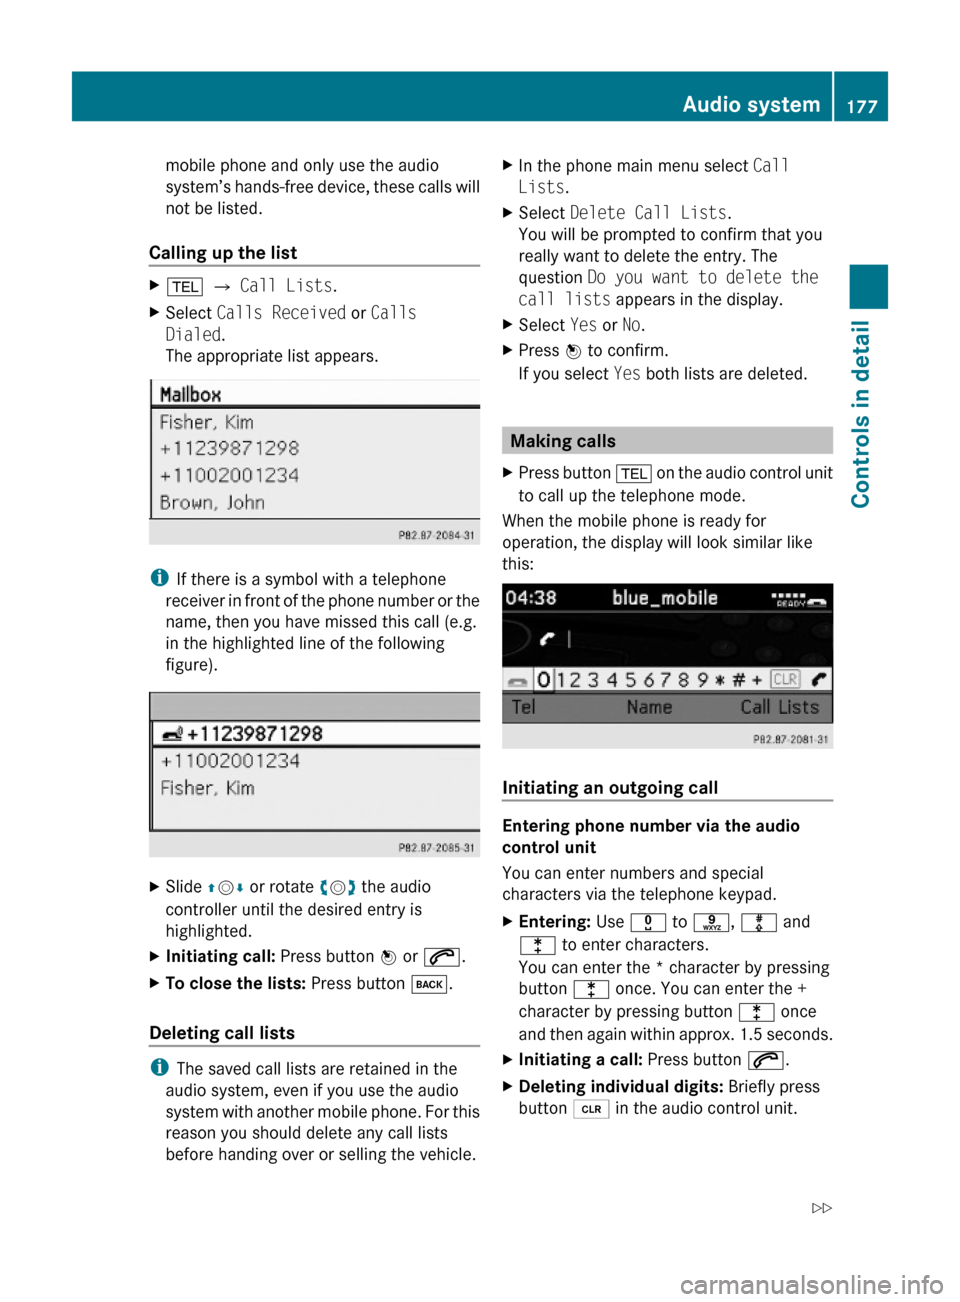
iIf there is a symbol with a telephone
receiver in front of the phone number or the
name, then you have missed this call (e.g.
in the highlighted line of the following
figure).
XSlide ZVÆ or rotate cVd the audio
controller until the desired entry is
highlighted.
XInitiating call: Press button W or 6.XTo close the lists: Press button k.
Deleting call lists
iThe saved call lists are retained in the
audio system, even if you use the audio
system with another mobile phone. For this
reason you should delete any call lists
before handing over or selling the vehicle.
XIn the phone main menu select Call
Lists.
XSelect Delete Call Lists.
You will be prompted to confirm that you
really want to delete the entry. The
question Do you want to delete the
call lists appears in the display.
XSelect Yes or No.XPress W to confirm.
If you select Yes both lists are deleted.
Making calls
XPress button % on the audio control unit
to call up the telephone mode.
When the mobile phone is ready for
operation, the display will look similar like
this:
Initiating an outgoing call
Entering phone number via the audio
control unit
You can enter numbers and special
characters via the telephone keypad.
XEntering: Use x to s, m and
l to enter characters.
You can enter the * character by pressing
button l once. You can enter the +
character by pressing button l once
and then again within approx. 1.5 seconds.
XInitiating a call: Press button 6.XDeleting individual digits: Briefly press
button 2 in the audio control unit.
Audio system177Controls in detail204_AKB; 5; 23, en-USd2ureepe,Version: 2.11.8.12009-07-16T17:54:06+02:00 - Seite 177Z