Page 9 of 50
 9
Before Use
Ifnecessary
Rear View
Monitor
Names and Functions
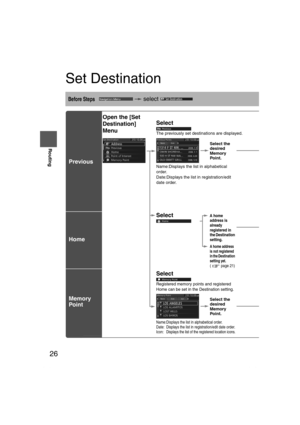
Steering Switch
The navigation system can be operated by pressing the steering switches.
Left switch: Press the switch while the select")
9
Before Use
Ifnecessary
Rear View
Monitor
Names and Functions
Steering Switch
The navigation system can be operated by pressing the steering switches.
Left switch: Press the switch while the selection cursor is displayed. The
selection cursor can be moved to the left.
Press the switch while the map scroll cursor is displayed. The
Map screen can be scrolled to the left.
Pressing the switch while in map mode switches the screen in
the order of Map, Compass, and Course List screens. To
switch back to the Map screen, press the switch on the Course
List screen.
Right switch: Press the switch while the selection cursor is displayed. The
selection cursor can be moved to the right.
Press the switch while the map scroll cursor is displayed. The
Map screen can be scrolled to the right.
Pressing the switch while in map mode switches the screen in
the order of Map, Course list, and Compass screens. To switch
back to the Map screen, press the switch on the Compass
screen.
Note
The Course List screen is displayed only when the destination is set and the vehicle is on
route.
1
2
Map screen Course list screen Compass screen
<00320025003a00110038003a0039001500290012004600530053004f0004000400340045004b00490004001d00040004002a0056004d00480045005d001000040028004900470049005100460049005600040015001d00100004001600140014001c000400
040015001e0018001a000400340031>
Page 10 of 50
 10
Before Use
Navigation
Set Up
RDM-TMCIf
necessary
Rear View
Monitor
Enter (up/down) switch:Press the Enter (up/down) switch.
Press the Enter (up/down) switch to select the desired item.
The navig")
10
Before Use
Navigation
Set Up
RDM-TMCIf
necessary
Rear View
Monitor
Enter (up/down) switch:Press the Enter (up/down) switch.
Press the Enter (up/down) switch to select the desired item.
The navigation menu is displayed by pressing the Enter (up/
down) switch while the Map screen is displayed.
Press the Enter (up/down) switch up or down.
To move the selection cursor up or down, press the Enter (up/
down) switch up or down while the selection cursor is
displayed.
Press the Enter (up/down) switch up or down while the map
scroll cursor is displayed. The Map screen scrolls up or down.
Press the Enter (up/down) switch up or down while the Map
screen is displayed to zoom in/out of the Map screen.
Navi switch: Used to switch to the navigation mode. Pressing the switch
while the Navigation Menu screen or Map Scroll screen is
displayed switches the display to the Map screen.
Pressing the switch after the voice guidance has finished
repeats the voice guidance. ( page 43)
BACK switch: Used to undo the previous screen operation.
INFO switch: Used to switch to the multi information display.3
4
5
6
�2�%�:���8�:�9���)���F�S�S�O�����4�E�K�I�����������*�V�M�H�E�]�����(�I�G�I�Q�F�I�V���������������������������������4�1
Page 11 of 50
11
Getting Started
Activation
The following operation procedure is for activating the navigation system.
Note
While on the Map screen, press the Enter (up/down) switch up or down to change the map
scale.
Activating the Navigation System
1
With the ignition switched to ACC or ON, press the Navi switch on the steering
switch.
2
After a moment, the CAUTION screen is displayed.
*1 :Press the Enter (up/down) switch up or down.
*2 :Press the Enter (up/down) switch.
lIf you are in agreement with the CAUTION
statement, press the Enter (up/down) switch up or
down to set the cursor to
*1.
Press the Enter (up/down) switch to switch to the
Map screen
*2.
l To change the language, set the cursor to
*1. Press the Enter (up/down)
switch to switch the screen to LANGUAGE
SELECTION
*2. ( page 12)
�2�%�:���8�:�9���)���F�S�S�O�����4�E�K�I�����������*�V�M�H�E�]�����(�I�G�I�Q�F�I�V���������������������������������4�1
Page 12 of 50
 12
RoutingAddress
Book
Getting Started
The language can be changed using the Language setting displayed in the upper
part of the screen.
Before activating the navigation system
After activating the")
12
RoutingAddress
Book
Getting Started
The language can be changed using the Language setting displayed in the upper
part of the screen.
Before activating the navigation system
After activating the navigation system
1. Press the INFO switch to display the SETTINGS screen.
2. Select PREFERENCES and press the Enter (up/down) switch.
3. Select SELECT LANGUAGE and press the Enter (up/down) switch.
4. Select the desired language from the list.
nThe following feature settings are possible, refer to the “Multi Information
Display” in the owner’s manual.
lClock: Constant display of time.
lOutside Temperature Display: Constant display of ambient temperature.
lSettings: Used to change the multi information display settings. (Distance unit, Display
language)
The map information version can be upgraded. If you require the latest SD card of
Navigation Map data, consult an Expert Dealer, we recommend an Authorized
Mazda Dealer.
Setting the Language
Select the desired language from the list.
Press the Enter (up/down) switch to switch the screen to
CAUTION. ( page 11)
Setting the Clock, Outside Temperature Display and Other Settings
Upgrading the Map Information Version
1
With the ignition switched to ACC OFF, insert a finger into the depression
above the lid housing SD card of Navigation Map data (next to the navigation
display), and open it.
�2�%�:���8�:�9���)���F�S�S�O�����4�E�K�I�����������*�V�M�H�E�]�����(�I�G�I�Q�F�I�V���������������������������������4�1
Page 13 of 50
13
Getting Started
Notes
lAfter inserting the SD card of Navigation Map data, firmly close all of the lids.
lIf the inner lid is not firmly closed, the navigation system will not function.
2
Slide the notch of the inner lid sideways with your finger to open the inner lid.
3
The SD card of Navigation Map data will be visible. Press in the currently
inserted SD card of Navigation Map data with a finger. After pressing in the SD
card, it will eject partially. Grab the card with your fingers to pull it out.
4
Insert the new SD card of Navigation Map data all the way in and close all the
lids.
If the inner lid is closed while the SD card of Navigation Map data is not inserted
all the way, the card could be damaged.
Caution
�2�%�:���8�:�9���)���F�S�S�O�����4�E�K�I�����������*�V�M�H�E�]�����(�I�G�I�Q�F�I�V���������������������������������4�1
Page 14 of 50
14
RoutingAddress
Book
Getting Started
Menu
Menu is displayed by pressing the Enter (up/down) switch while the Map
screen is displayed.
Navigation Menu Screen
Set Destination ( page 22)
Find Local POI ( page 32)
Browse Map & Mark ( page 40)
Cancel/Edit Route ( page 34)
Navigation Setup ( page 15)
�2�%�:���8�:�9���)���F�S�S�O�����4�E�K�I�����������;�I�H�R�I�W�H�E�]�����(�I�G�I�Q�F�I�V���������������������������������4�1
Page 15 of 50
 15
Getting Started
Navigation Set Up
lYou can alter the map display conditions, the route guidance conditions and show the
system information.
nStop your vehicle before performing the following opera")
15
Getting Started
Navigation Set Up
lYou can alter the map display conditions, the route guidance conditions and show the
system information.
nStop your vehicle before performing the following operations. Do not change the settings and destination locations while driving. Minimize the time
spent viewing the monitor screen and listening to the voice guidance while driving.
Operating the system will distract the driver from looking ahead of the vehicle and may
cause an accident.
Always stop the vehicle in a safe location and set the parking brake before operating the
system.
Before Stepsselect
Warning
Open the
[Navigation
Setup]
nAuto ZoomThe Auto Zoom function automatically switches the map scale depending
on the distance between the next guidance point and the current position.
Used to switch the Auto Zoom function.
nMap ColorUsed to switch the map mode.
nMap DirectionUsed to switch the map direction.
nShow POI IconsUsed to display the selected POI icons on the Map screen.
nGuidance VolumeUsed to adjust the guidance volume.
Also adjustable using the audio volume knob during
transmission of the voice guidance.
Day: To switch to the daytime screen.
Night: To switch to the nighttime screen.
Auto: The screen switches between
daytime and nighttime displays in
conjunction with the on/off of the
vehicle’s exterior lights.
North Up: Geographic north is up.
Head Up: The direction you are heading is up.
�2�%�:���8�:�9���)���F�S�S�O�����4�E�K�I�����������1�S�R�H�E�]�����.�E�R�Y�E�V�]���������������������������������4�1
Page 16 of 50
16
RoutingAddress
Book
Getting Started
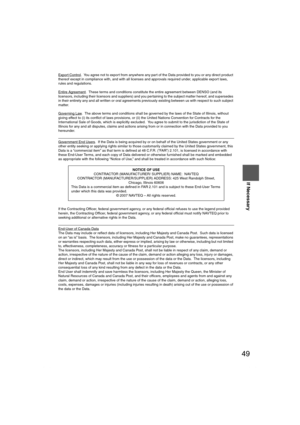
Navigation Set Up
Open the
[Navigation
Setup]
nArrival TimeThe time which is displayed until reaching the destination or a
way point can be set as an estimated arrival time or the
remaining time.
Select to display the estimated arrival time, or to
display the remaining time.
nAverage SpeedSet the average speed for each road to be driven.
(This function sets the standard speed (average vehicle speed
for each route) used for calculating the estimated arrival time
when calculating the route time.)
nEdit Memory PointUsed to edit the memory point or Home setting.( page 36, 38)
nDelete Previous PointUsed to delete the previously set destination.
nOperation GuideUsed to switch the operating guide display.
Operation Guide
�2�%�:���8�:�9���)���F�S�S�O�����4�E�K�I�����������1�S�R�H�E�]�����.�E�R�Y�E�V�]���������������������������������4�1


 11
Getting Started
Activation
The following operation procedure is for activating the navigation system.
Note
While on the Map screen, press the Enter (up/down) switch up or down to change the map
sc")
 13
Getting Started
Notes
lAfter inserting the SD card of Navigation Map data, firmly close all of the lids.
lIf the inner lid is not firmly closed, the navigation system will not function.
2
Slide the")
 14
RoutingAddress
Book
Getting Started
Menu
Menu is displayed by pressing the Enter (up/down) switch while the Map
screen is displayed.
Navigation Menu Screen
Set Destination ( page 22)
Find Local")
![MAZDA MODEL CX-7 2010 Navigation Manual (in English) 16
RoutingAddress
Book
Getting Started
Navigation Set Up
Open the
[Navigation
Setup]
nArrival TimeThe time which is displayed until reaching the destination or a
way point can be set as an estimate](/manual-img/28/13898/w960_13898-15.png "MAZDA MODEL CX-7 2010 Navigation Manual (in English) 16
RoutingAddress
Book
Getting Started
Navigation Set Up
Open the
[Navigation
Setup]
nArrival TimeThe time which is displayed until reaching the destination or a
way point can be set as an estimate")