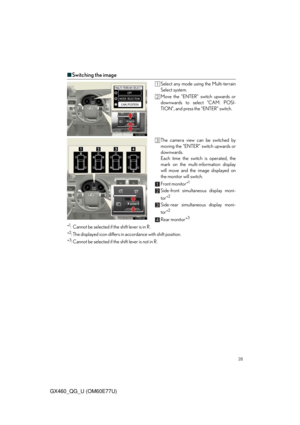
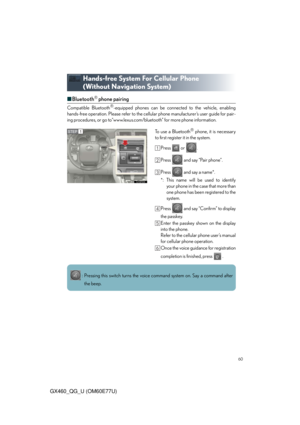
Page 57 of 94
57
GX460_QG_U (OM60E77U)
Front Air Conditioning System
(With Navigation System)
Vehicles without a rear automatic air conditioning system
“CLIMATE” button
Outside temperature display
Air flow control buttons
Fan speed control buttons
Windshield wiper de-icer button
Micro dust and pollen filter button
“PASSENGER TEMP” button
Air intake control button
Passenger side temperature display“DUAL”
Rear window defogger button
Windshield air flow button
“OFF” button
Driver side temperature display
“A U T O ” b u t t o n s
“TEMP” buttons
“A / C ”
Page 58 of 94
58
GX460_QG_U (OM60E77U)
■Using the automatic mode
Press to turn on the airflow and to adjust the temperature.
■Adjusting the temperature
■To simultaneously adjust the driver’s side and passenger’s side temperature settings
Press to turn the “DUAL” indicator off and then press .
■To individually adjust the driver’s side and passenger’s side temperature settings
Press or to turn the “DUAL” indicator on and then press or .
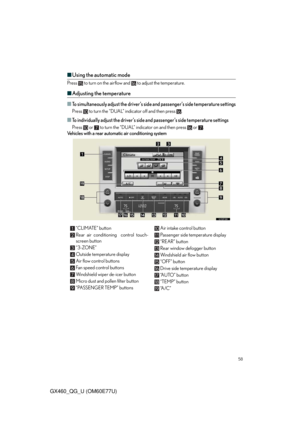
Vehicles with a rear automatic air conditioning system
“CLIMATE” button
Rear air conditioning control touch-
screen button
“3-ZONE”
Outside temperature display
Air flow control buttons
Fan speed control buttons
Windshield wiper de-icer button
Micro dust and pollen filter button
“PASSENGER TEMP” buttonsAir intake control button
Passenger side temperature display
“REAR” button
Rear window defogger button
Windshield air flow button
“OFF” button
Drive side temperature display
“A U T O ” b u t t o n
“TEMP” button
“A / C ”
Page 59 of 94
59
GX460_QG_U (OM60E77U)
■Using the automatic mode
Press to turn on the air flow and to adjust the temperature.
■Adjusting the temperature
■
To simultaneously adjust the driver’s side, passenger’s side and rear seats tem-
perature settings
Touch on the operation screen if its indicator is on and then press .
■To individually adjust the driver’s side, passenger’s side and rear seats tempera-
ture settings
Touch on the operation screen if its indicator is off and the press and . To adjust
the temperature for the rear seats, see below.
Rear Air Conditioning System
(With Navigation System)
Refer to Rear Air Conditioning System (Without Navigation System) about rear controller
operation. (P. 7 1 )
■Front controller (touch screen)
To display the rear air conditioning opera-
tion screen, touch the on the oper-
ation screen.
“REAR OFF” button
Temperature control
Fa n spe ed co nt ro l
“REAR AUTO” button
Page 60 of 94
60
GX460_QG_U (OM60E77U)
Hands-free System For Cellular Phone
(Without Navigation System)
■Bluetooth® phone pairing
Compatible Bluetooth®-equipped phones can be connected to the vehicle, enabling
hands-free operation. Please refer to the cellular phone manufacturer’s user guide for pair-
ing procedures, or go to“www.lexus.com/bluetooth” for more phone information.
To use a Bluetooth
® phone, it is necessary
to first register it in the system.
Press or .
Press and say “Pair phone”.
Press and say a name*.
*: This name will be used to identify
your phone in the case that more than
one phone has been registered to the
system.
Press and say “Confirm” to display
the passkey.
Enter the passkey shown on the display
into the phone.
Refer to the cellular phone user’s manual
for cellular phone operation.
Once the voice guidance for registration
completion is finished, press .STEP1
: Pressing this switch turns the voice command system on. Say a command after
the beep.
Page 61 of 94
61
GX460_QG_U (OM60E77U)
■Calling by number
Press and say “Dial by number”.
Press and say the phone number.
Dialing
a. Press .
b. Press and say “Dial”.
■Calling by name
You can call by saying a voice tag registered in the phonebook. For setting the voice recog-
nition, refer to the “Owner’s Manual”.
Press and say “Dial by name”.
Press and say a contact name.
Dialing
a. Press .
b. Press and say “Dial”.
STEP1
STEP1
: Pressing this switch turns the voice command system on. Say a command after
the beep.
Page 62 of 94
62
GX460_QG_U (OM60E77U)
■Calling by speed dial
Press .
Press the desired preset button.
Press .STEP1
STEP2
Page 63 of 94
63
GX460_QG_U (OM60E77U)
■Phonebook transfer
Press .
Press and say “Phone book”.
Press and say “Add entry”.
Press and say “By phone”.
Press and say “Confirm”.
Transfer the phonebook data to the sys-
tem using the cellular phone.
Refer to the cellular phone user’s manual
for cellular phone operation.
Press and say “Previous” or “Next”
until the desired data is displayed.
Press and say “Confirm”.
Press and say the desired name.
Press and say “Confirm”.
Press and say “Confirm” again.STEP1
Phonebook transfer may not be possible depending on phone model.
: Pressing this switch turns the voice command system on. Say a command after
the beep.
Page 64 of 94
64
GX460_QG_U (OM60E77U)
■Changing the registered name
Press .
Press and say “Phone book”.
Press and say “Change name”.
Press and say the desired name.
Press and say “Confirm”.
Press and say the new name.
Press and say “Confirm”.STEP1
: Pressing this switch turns the voice command system on. Say a command after
the beep.


 57
GX460_QG_U (OM60E77U)
Front Air Conditioning System
(With Navigation System)
Vehicles without a rear automatic air conditioning system
“CLIMATE” button
Outside temperature display
Air flow con")
 58
GX460_QG_U (OM60E77U)
■Using the automatic mode
Press to turn on the airflow and to adjust the temperature.
■Adjusting the temperature
■To simultaneously adjust the driver’s side and p")
 59
GX460_QG_U (OM60E77U)
■Using the automatic mode
Press to turn on the air flow and to adjust the temperature.
■Adjusting the temperature
■
To simultaneously adjust the driver’s side, pas")
 60
GX460_QG_U (OM60E77U)
Hands-free System For Cellular Phone
(Without Navigation System)
■Bluetooth® phone pairing
Compatible Bluetooth®-equipped phones can be connected to the vehicle, enabling")
 61
GX460_QG_U (OM60E77U)
■Calling by number
Press and say “Dial by number”.
Press and say the phone number.
Dialing
a. Press .
b. Press and say “Dial”.
■Calling by name
You can call")
 62
GX460_QG_U (OM60E77U)
■Calling by speed dial
Press .
Press the desired preset button.
Press .STEP1
STEP2")
 63
GX460_QG_U (OM60E77U)
■Phonebook transfer
Press .
Press and say “Phone book”.
Press and say “Add entry”.
Press and say “By phone”.
Press and say “Confirm”.
Transfer the ph")
 64
GX460_QG_U (OM60E77U)
■Changing the registered name
Press .
Press and say “Phone book”.
Press and say “Change name”.
Press and say the desired name.
Press and say “Confirm”.
P")