Page 93 of 371
Knowing your vehicle
84
3
1
2
3
4
5
6
7
8
9
Outside rearview mirror
Be sure to adjust mirror angles
before driving.
Your vehicle is equipped with both
left-hand and right-hand outside
rearview mirrors. The mirrors can be
adjusted remotely with the control
levers or remote switch, depending
on the type of mirror control installed.
The mirror heads can be folded back
to prevent damage during an auto-
matic car wash or when passing in a
narrow street.
✽ ✽
NOTICE
Do not scrape ice off the mirror
face; this may damage the surface of
the glass. If ice should restrict move-
ment of the mirror, do not force the
mirror for adjustment. To remove
ice, use a deicer spray, or a sponge
or soft cloth with very warm water.
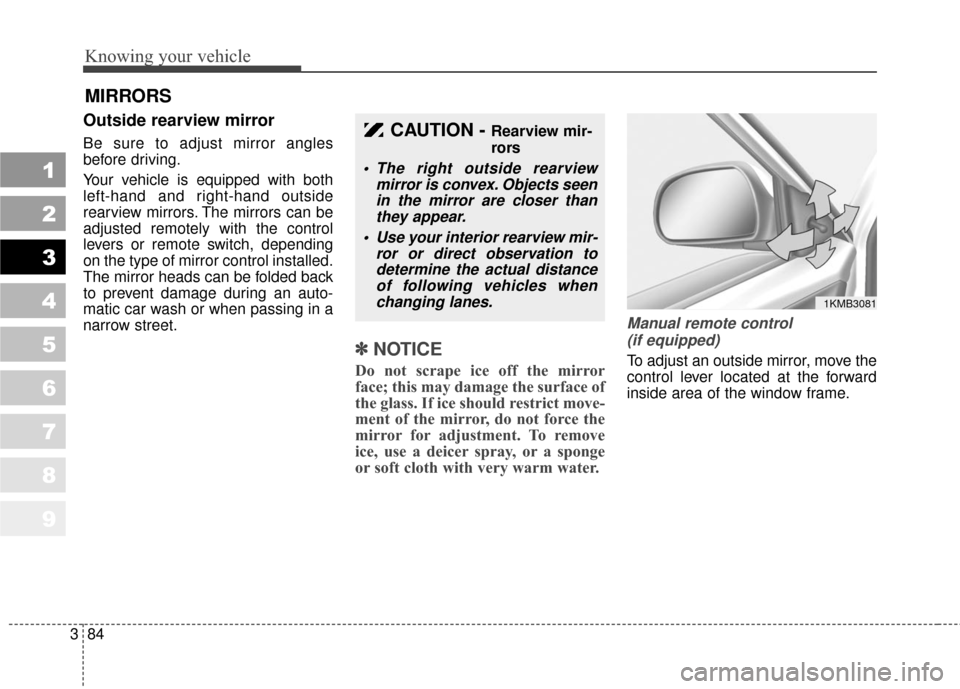
Manual remote control
(if equipped)
To adjust an outside mirror, move the
control lever located at the forward
inside area of the window frame.
MIRRORS
CAUTION - Rearview mir-
rors
The right outside rearview mirror is convex. Objects seenin the mirror are closer thanthey appear.
Use your interior rearview mir- ror or direct observation todetermine the actual distanceof following vehicles whenchanging lanes.
1KMB3081
Page 94 of 371
385
1
2
3
4
5
6
7
8
9
Knowing your vehicle
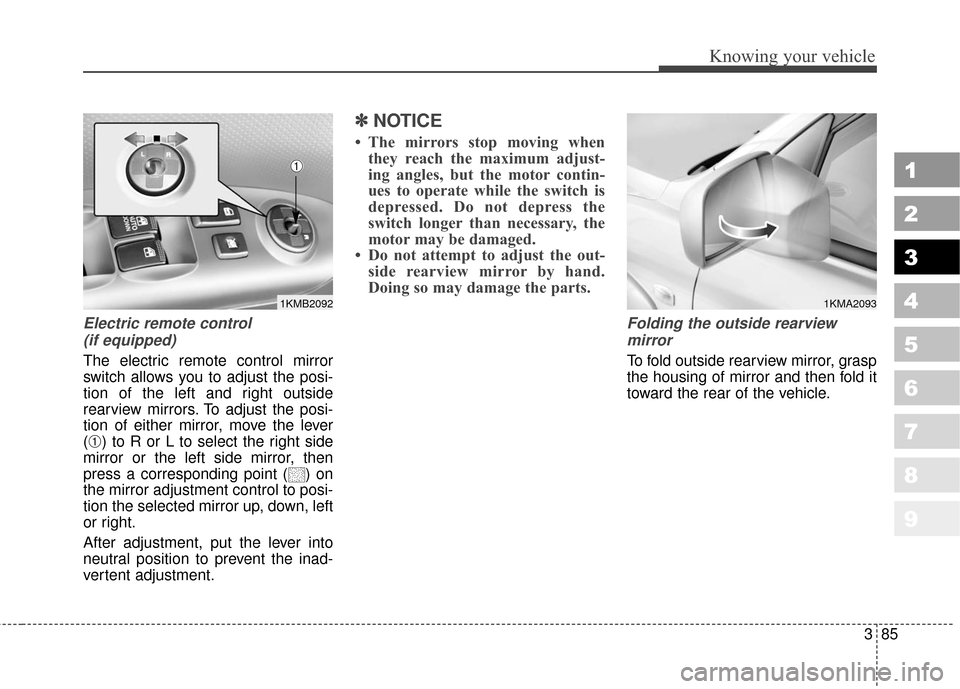
Electric remote control (if equipped)
The electric remote control mirror
switch allows you to adjust the posi-
tion of the left and right outside
rearview mirrors. To adjust the posi-
tion of either mirror, move the lever
(
➀) to R or L to select the right side
mirror or the left side mirror, then
press a corresponding point ( ) on
the mirror adjustment control to posi-
tion the selected mirror up, down, left
or right.
After adjustment, put the lever into
neutral position to prevent the inad-
vertent adjustment.
✽ ✽ NOTICE
• The mirrors stop moving when
they reach the maximum adjust-
ing angles, but the motor contin-
ues to operate while the switch is
depressed. Do not depress the
switch longer than necessary, the
motor may be damaged.
• Do not attempt to adjust the out- side rearview mirror by hand.
Doing so may damage the parts.
Folding the outside rearview
mirror
To fold outside rearview mirror, grasp
the housing of mirror and then fold it
toward the rear of the vehicle.
1KMB2092
➀
1KMA2093
Page 106 of 371
397
1
2
3
4
5
6
7
8
9
Knowing your vehicle
If your vehicle is equipped with this
feature, you can slide or tilt your sun-
roof with the sunroof control buttons
located on the overhead console.
The sunroof can only be opened,
closed, or tilted when the ignition
switch is in the ON position.
➀ SLIDE OPEN (slide) button
➁ TILT UP (tilt) button
➂ CLOSE (close) button
✽ ✽NOTICE
Do not continue to press the sunroof
control button(s) after the sunroof is
in the fully open, closed, or tilt posi-
tion(s). Damage to the motor or sys-
tem components could occur.
Sliding the sunroof
SUNROOF (IF EQUIPPED)
1KMA2024
➀
➁
➂
1KMA2026
1KMA2025
Page 119 of 371
Knowing your vehicle
110
3
1
2
3
4
5
6
7
8
9
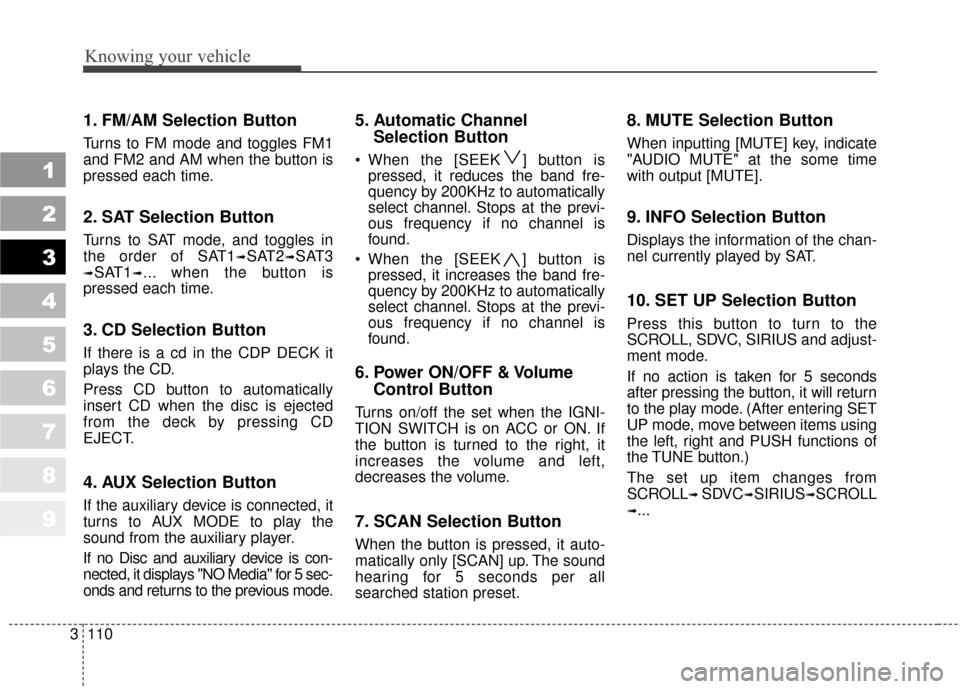
1. FM/AM Selection Button
Turns to FM mode and toggles FM1
and FM2 and AM when the button is
pressed each time.
2. SAT Selection Button
Turns to SAT mode, and toggles in
the order of SAT1
➟SAT2➟SAT3
➟SAT1➟... when the button is
pressed each time.
3. CD Selection Button
If there is a cd in the CDP DECK it
plays the CD.
Press CD button to automatically
insert CD when the disc is ejected
from the deck by pressing CD
EJECT.
4. AUX Selection Button
If the auxiliary device is connected, it
turns to AUX MODE to play the
sound from the auxiliary player.
If no Disc and auxiliary device is con-
nected, it displays "NO Media" for 5 sec-
onds and returns to the previous mode.
5. Automatic Channel Selection Button
When the [SEEK ] button is
pressed, it reduces the band fre-
quency by 200KHz to automatically
select channel. Stops at the previ-
ous frequency if no channel is
found.
When the [SEEK ] button is pressed, it increases the band fre-
quency by 200KHz to automatically
select channel. Stops at the previ-
ous frequency if no channel is
found.
6. Power ON/OFF & Volume Control Button
Turns on/off the set when the IGNI-
TION SWITCH is on ACC or ON. If
the button is turned to the right, it
increases the volume and left,
decreases the volume.
7. SCAN Selection Button
When the button is pressed, it auto-
matically only [SCAN] up. The sound
hearing for 5 seconds per all
searched station preset.
8. MUTE Selection Button
When inputting [MUTE] key, indicate
"AUDIO MUTE" at the some time
with output [MUTE].
9. INFO Selection Button
Displays the information of the chan-
nel currently played by SAT.
10. SET UP Selection Button
Press this button to turn to the
SCROLL, SDVC, SIRIUS and adjust-
ment mode.
If no action is taken for 5 seconds
after pressing the button, it will return
to the play mode. (After entering SET
UP mode, move between items using
the left, right and PUSH functions of
the TUNE button.)
The set up item changes from
SCROLL
➟ SDVC➟SIRIUS➟SCROLL
➟...
Page 132 of 371
3123
Knowing your vehicle
1
2
3
4
5
6
7
8
9
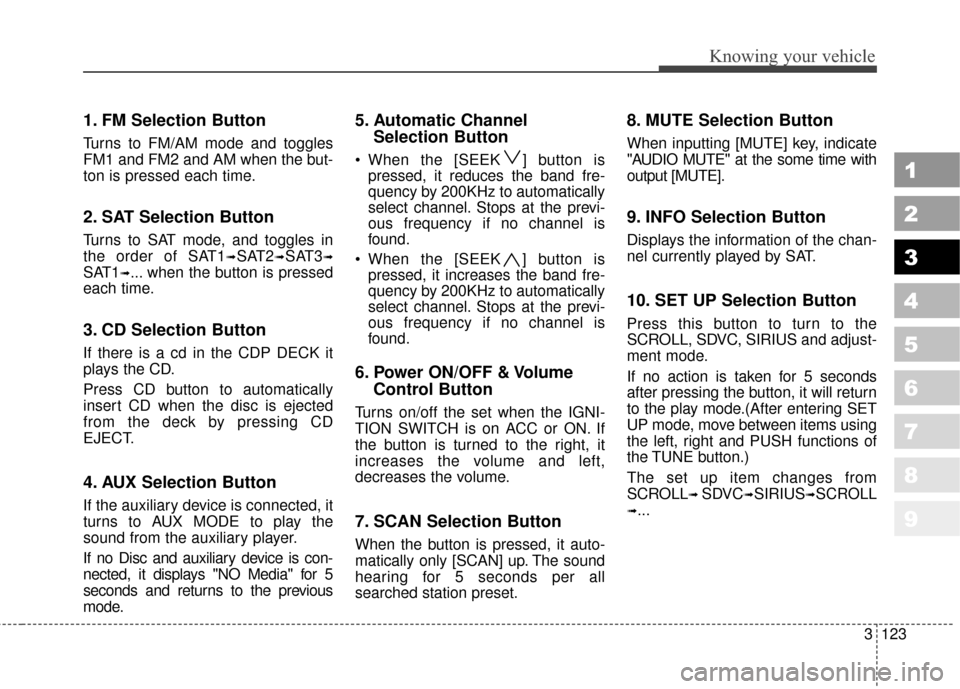
1. FM Selection Button
Turns to FM/AM mode and toggles
FM1 and FM2 and AM when the but-
ton is pressed each time.
2. SAT Selection Button
Turns to SAT mode, and toggles in
the order of SAT1
➟SAT2➟SAT3➟
SAT1➟... when the button is pressed
each time.
3. CD Selection Button
If there is a cd in the CDP DECK it
plays the CD.
Press CD button to automatically
insert CD when the disc is ejected
from the deck by pressing CD
EJECT.
4. AUX Selection Button
If the auxiliary device is connected, it
turns to AUX MODE to play the
sound from the auxiliary player.
If no Disc and auxiliary device is con-
nected, it displays "NO Media" for 5
seconds and returns to the previous
mode.
5. Automatic Channel Selection Button
When the [SEEK ] button is
pressed, it reduces the band fre-
quency by 200KHz to automatically
select channel. Stops at the previ-
ous frequency if no channel is
found.
When the [SEEK ] button is pressed, it increases the band fre-
quency by 200KHz to automatically
select channel. Stops at the previ-
ous frequency if no channel is
found.
6. Power ON/OFF & Volume Control Button
Turns on/off the set when the IGNI-
TION SWITCH is on ACC or ON. If
the button is turned to the right, it
increases the volume and left,
decreases the volume.
7. SCAN Selection Button
When the button is pressed, it auto-
matically only [SCAN] up. The sound
hearing for 5 seconds per all
searched station preset.
8. MUTE Selection Button
When inputting [MUTE] key, indicate
"AUDIO MUTE" at the some time with
output [MUTE].
9. INFO Selection Button
Displays the information of the chan-
nel currently played by SAT.
10. SET UP Selection Button
Press this button to turn to the
SCROLL, SDVC, SIRIUS and adjust-
ment mode.
If no action is taken for 5 seconds
after pressing the button, it will return
to the play mode.(After entering SET
UP mode, move between items using
the left, right and PUSH functions of
the TUNE button.)
The set up item changes from
SCROLL
➟ SDVC➟SIRIUS➟SCROLL
➟...
Page 148 of 371
1
2
3
4
5
6
7
8
9Ignition switch / 4-2
Starting the engine / 4-4
Manual transaxle / 4-5
Automatic transaxle / 4-6
Four wheel drive (4WD) / 4-12
Brake system / 4-18
Steering wheel / 4-24
Cruise control system / 4-26
Electronic stability control / 4-30
Instrument cluster / 4-33
Gauges / 4-34
Warnings and indicators / 4-39
Rear parking assist system / 4-48
Compass / 4-51
Lighting / 4-54
Wipers and washers / 4-58
Defroster / 4-61
Hazard warning flasher / 4-62
Manual climate control system / 4-63
Automatic climate control system / 4-71
Windshield defrosting and defogging / 4-81
Driving your vehicle
10
Page 150 of 371

43
Driving your vehicle
1
2
3
4
5
6
7
8
9
START
Turn the ignition key to the START
position to start the engine. The
engine will crank until you release
the key; then it returns to the ON
position. The brake warning lamp
can be checked in this position.
✽ ✽NOTICE
If difficulty is experienced turning
the ignition switch to the ACC posi-
tion, turn the key while turning the
steering wheel right and left to
release the tension.
Automatic transaxle
When turning the ignition switch to
the LOCK position, the shift lever
must be in the P (Park) position.
WARNING - Ignition key
• Never turn the ignition switch to LOCK or ACC while the
vehicle is moving. This would
result in loss of directional
control and braking function,
which could cause an immedi-
ate accident.
Before leaving the driver’s seat, always make sure the
shift lever is engaged in 1
st
gear for manual transaxle or P
(Park) for automatic transaxle,
set the parking brake fully and
shut the engine off.
Unexpected and sudden vehi-
cle movement may occur if
these precautions are not
taken.
(Continued)
(Continued)
Never reach for the ignitionswitch, or any other controls
through the steering wheel
while the vehicle is in motion.
The presence of your hand or
arm in this area could cause a
loss of vehicle control, an
accident and serious bodily
injury or death.
Do not place any movable objects around the driver’s
seat as they may move while
driving, interfere with the dri-
ver and lead to an accident.
WARNING
When you intend to park or stop
the vehicle with the engine on,
be careful not to depress the
accelerator pedal for a long
period of time. It may overheat
the engine or exhaust system
and cause fire.
Page 174 of 371
427
Driving your vehicle
1
2
3
4
5
6
7
8
9
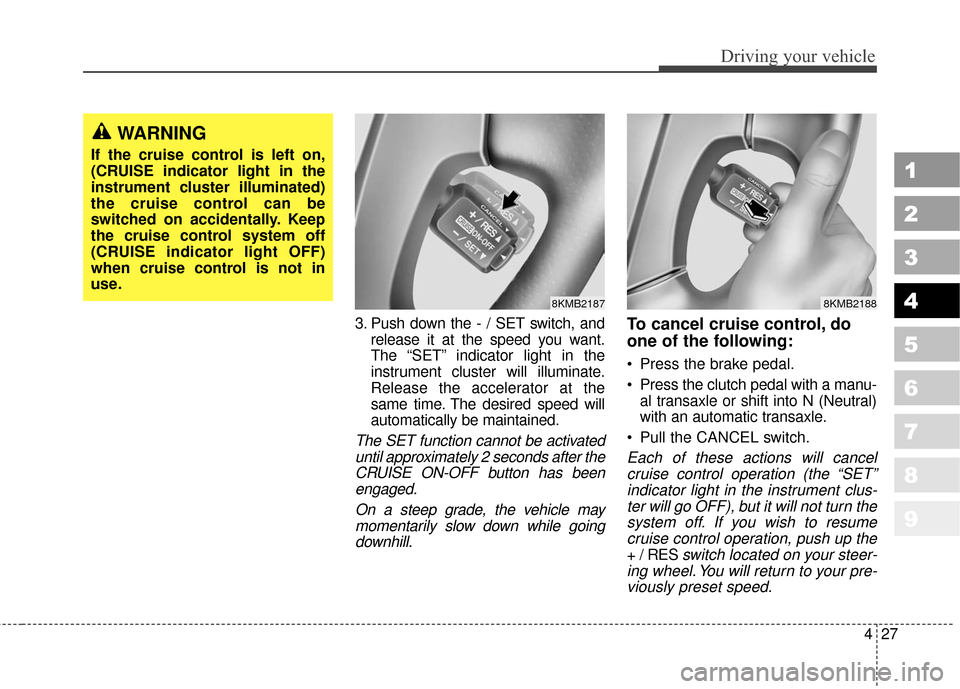
3. Push down the - / SET switch, andrelease it at the speed you want.
The “SET” indicator light in the
instrument cluster will illuminate.
Release the accelerator at the
same time. The desired speed will
automatically be maintained.
The SET function cannot be activateduntil approximately 2 seconds after theCRUISE ON-OFF button has beenengaged.
On a steep grade, the vehicle maymomentarily slow down while goingdownhill.
To cancel cruise control, do
one of the following:
Press the brake pedal.
Press the clutch pedal with a manu- al transaxle or shift into N (Neutral)
with an automatic transaxle.
Pull the CANCEL switch.
Each of these actions will cancel cruise control operation (the “SET”indicator light in the instrument clus-ter will go OFF), but it will not turn thesystem off. If you wish to resumecruise control operation, push up the
+ / RES switch located on your steer-
ing wheel. You will return to your pre- viously preset speed.
WARNING
If the cruise control is left on,
(CRUISE indicator light in the
instrument cluster illuminated)
the cruise control can be
switched on accidentally. Keep
the cruise control system off
(CRUISE indicator light OFF)
when cruise control is not in
use.
8KMB21878KMB2188