2010 JAGUAR XFR wheel
[x] Cancel search: wheelPage 584 of 3039

Symptom Possible Cause Action Electrical circuit
For parking brake control and circuit tests.
REFER to: Parking Brake (206-05, Diagnosis and Testing). Slow or incomplete brake
pedal return
Brake pedal binding
Brake booster/master cylinder GO to Pinpoint Test K. Pinpoint Tests
PINPOINT TEST A : BRAKES NOISY TEST
CONDITIONS DETAILS/RESULTS/ACTIONS A1: INSPECT BRAKE PADS 1 Inspect the condition of the front and rear brake pads. Check for damage to any anti-squeal shims. Are the brake pads OK? Yes
GO to A2. No
Clean/install new front and rear brake pads as required. REFER to:
Brake Pads - Vehicles With: Standard Brakes (206-03A Front Disc Brake - V6 3.0L Petrol, Removal and Installation),
Brake Pads - Vehicles With: High Performance Brakes (206-03A Front Disc Brake - V6 3.0L Petrol, Removal and Installation),
Brake Pads (206-04A Rear Disc Brake - V6 3.0L Petrol, Removal and Installation), Brake Pads - Vehicles With: High Performance Brakes (206-04, Removal and Installation).
Re-test vehicle for brake noise. A2: INSPECT BRAKE DISCS 1 Inspect the brake discs for excessive corrosion, wear or disc thickness variation. Does excessive corrosion, wear or disc thickness variation exist? Yes
Install new front and rear brake discs and brake pads as required. REFER to:
Brake Pads - Vehicles With: Standard Brakes (206-03A Front Disc Brake - V6 3.0L Petrol, Removal and Installation),
Brake Pads - Vehicles With: High Performance Brakes (206-03A Front Disc Brake - V6 3.0L Petrol, Removal and Installation),
Brake Pads (206-04A Rear Disc Brake - V6 3.0L Petrol, Removal and Installation), Brake Pads - Vehicles With: High Performance Brakes (206-04, Removal and Installation),
Brake Disc - Vehicles With: Standard Brakes (206-03A Front Disc Brake - V6 3.0L Petrol, Removal and Installation),
Brake Disc - Vehicles With: High Performance Brakes (206-03A Front Disc Brake - V6 3.0L Petrol, Removal and Installation),
Brake Disc (206-04A Rear Disc Brake - V6 3.0L Petrol, Removal and Installation), Brake Disc - Vehicles With: High Performance Brakes (206-04, Removal and Installation).
Re-test vehicle for brake noise.
No
No action required, vehicle is OK.
PINPOINT TEST B : VIBRATION WHEN BRAKES ARE APPLIED TEST
CONDITIONS DETAILS/RESULTS/ACTIONS B1: ROAD TEST VEHICLE 1 Road test the vehicle between 40-80 km/h (25-50 mph) without applying brakes. Is the vibration present?
Yes
For noise vibration and harshness tests.
REFER to: Noise, Vibration and Harshness (NVH) (100-04 Noise, Vibration and Harshness, Diagnosis and Testing).
No
GO to B2. B2: CHECK FOR BRAKE VIBRATION 1 Road test the vehicle between 40-80 km/h (25-50 mph) with light and medium application on the brake pedal. Is a vibration present?
Yes
Check the brake caliper mounting bolts and wheel hub nuts and tighten to specification as required. Check
the balance of all road wheels and tires and repair as required. Check the brake discs for excessive wear,
runout, thickness variation or cracks. Install new brake discs and brake pads as required. GO to B3. No
No action required, vehicle is OK. B3: IS VIBRATION STILL PRESENT UNDER BRAKE APPLICATION? 1 Road test the vehicle between 40-80 km/h (25-50 mph) with light and medium application on the brake pedal.
Page 585 of 3039

TEST
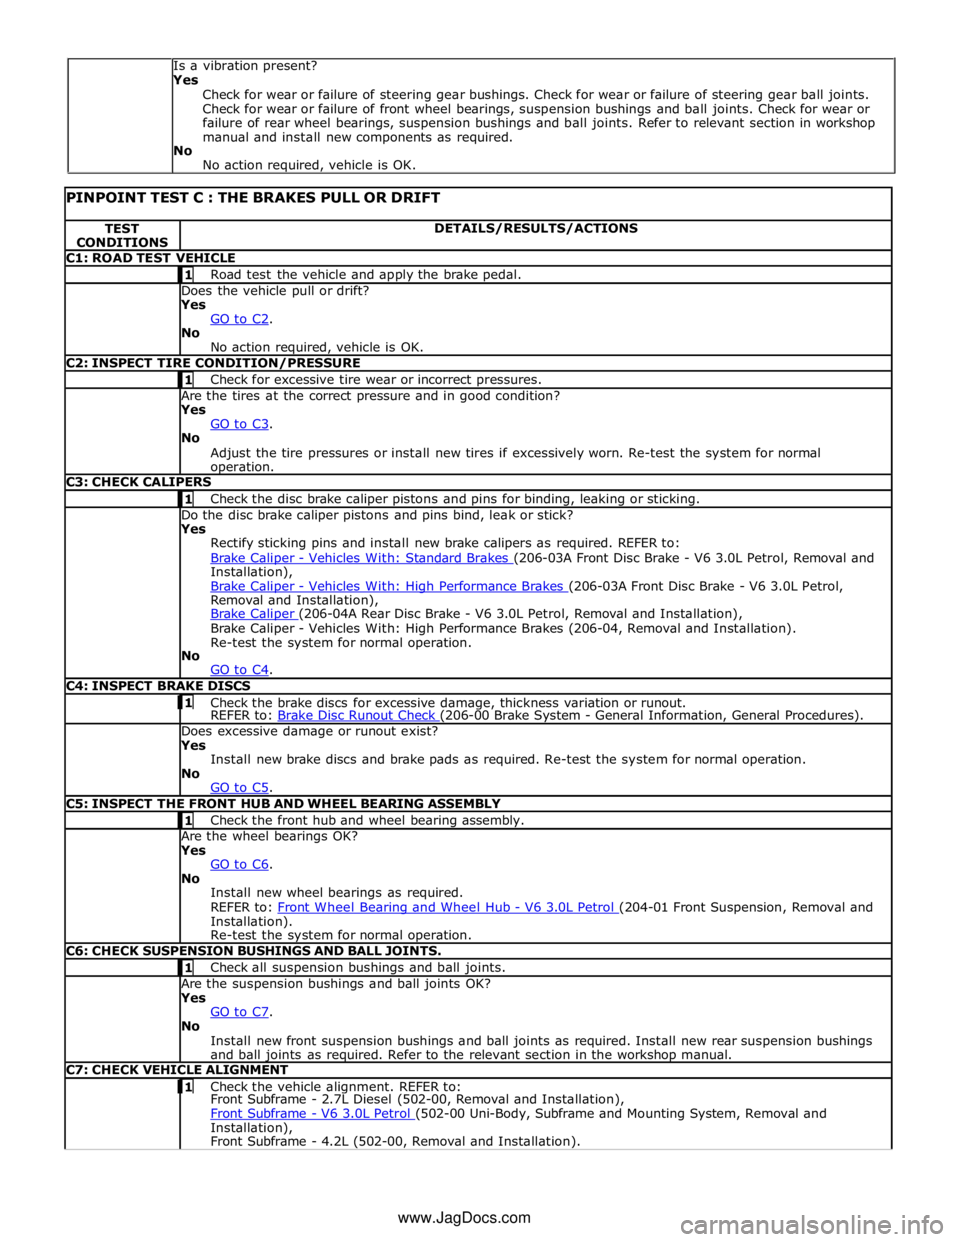
CONDITIONS DETAILS/RESULTS/ACTIONS C1: ROAD TEST VEHICLE 1 Road test the vehicle and apply the brake pedal. Does the vehicle pull or drift?
Yes
GO to C2. No
No action required, vehicle is OK. C2: INSPECT TIRE CONDITION/PRESSURE 1 Check for excessive tire wear or incorrect pressures. Are the tires at the correct pressure and in good condition?
Yes
GO to C3. No
Adjust the tire pressures or install new tires if excessively worn. Re-test the system for normal operation. C3: CHECK CALIPERS 1 Check the disc brake caliper pistons and pins for binding, leaking or sticking. Do the disc brake caliper pistons and pins bind, leak or stick?
Yes
Rectify sticking pins and install new brake calipers as required. REFER to:
Brake Caliper - Vehicles With: Standard Brakes (206-03A Front Disc Brake - V6 3.0L Petrol, Removal and Installation),
Brake Caliper - Vehicles With: High Performance Brakes (206-03A Front Disc Brake - V6 3.0L Petrol, Removal and Installation),
Brake Caliper (206-04A Rear Disc Brake - V6 3.0L Petrol, Removal and Installation), Brake Caliper - Vehicles With: High Performance Brakes (206-04, Removal and Installation).
Re-test the system for normal operation.
No
GO to C4. C4: INSPECT BRAKE DISCS 1 Check the brake discs for excessive damage, thickness variation or runout. REFER to: Brake Disc Runout Check (206-00 Brake System - General Information, General Procedures). Does excessive damage or runout exist?
Yes
Install new brake discs and brake pads as required. Re-test the system for normal operation.
No
GO to C5. C5: INSPECT THE FRONT HUB AND WHEEL BEARING ASSEMBLY 1 Check the front hub and wheel bearing assembly. Are the wheel bearings OK?
Yes
GO to C6. No
Install new wheel bearings as required.
REFER to: Front Wheel Bearing and Wheel Hub - V6 3.0L Petrol (204-01 Front Suspension, Removal and Installation).
Re-test the system for normal operation. C6: CHECK SUSPENSION BUSHINGS AND BALL JOINTS. 1 Check all suspension bushings and ball joints. Are the suspension bushings and ball joints OK?
Yes
GO to C7. No
Install new front suspension bushings and ball joints as required. Install new rear suspension bushings
and ball joints as required. Refer to the relevant section in the workshop manual. C7: CHECK VEHICLE ALIGNMENT 1 Check the vehicle alignment. REFER to: Front Subframe - 2.7L Diesel (502-00, Removal and Installation),
Front Subframe - V6 3.0L Petrol (502-00 Uni-Body, Subframe and Mounting System, Removal and Installation),
Front Subframe - 4.2L (502-00, Removal and Installation). Is a vibration present?
Yes
Check for wear or failure of steering gear bushings. Check for wear or failure of steering gear ball joints.
Check for wear or failure of front wheel bearings, suspension bushings and ball joints. Check for wear or
failure of rear wheel bearings, suspension bushings and ball joints. Refer to relevant section in workshop
manual and install new components as required.
No
No action required, vehicle is OK.
www.JagDocs.com
Page 589 of 3039

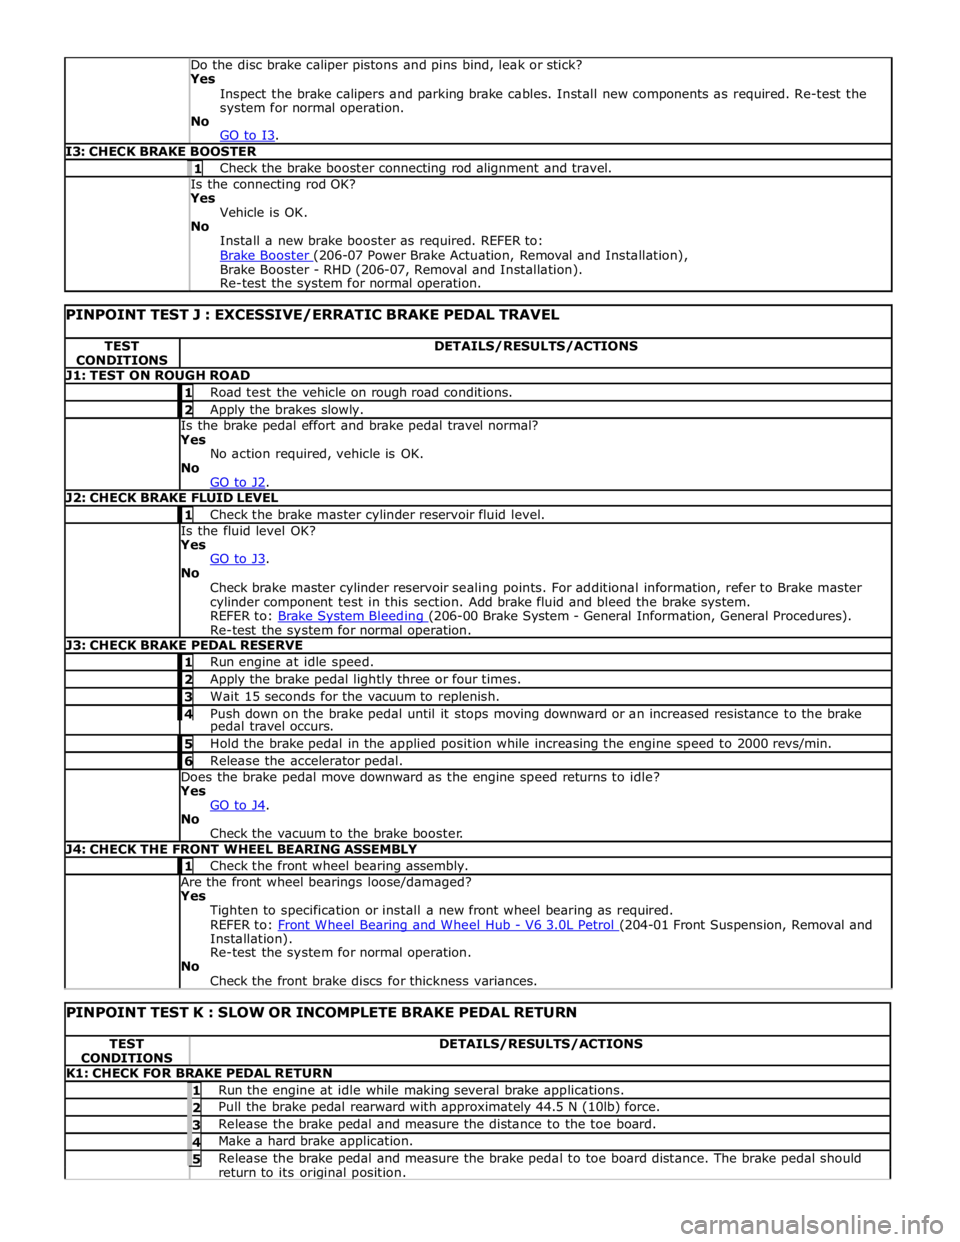
Yes
Inspect the brake calipers and parking brake cables. Install new components as required. Re-test the
system for normal operation.
No
GO to I3. I3: CHECK BRAKE BOOSTER 1 Check the brake booster connecting rod alignment and travel. Is the connecting rod OK? Yes
Vehicle is OK.
No
Install a new brake booster as required. REFER to:
Brake Booster (206-07 Power Brake Actuation, Removal and Installation), Brake Booster - RHD (206-07, Removal and Installation).
Re-test the system for normal operation.
PINPOINT TEST J : EXCESSIVE/ERRATIC BRAKE PEDAL TRAVEL TEST
CONDITIONS DETAILS/RESULTS/ACTIONS J1: TEST ON ROUGH ROAD 1 Road test the vehicle on rough road conditions. 2 Apply the brakes slowly. Is the brake pedal effort and brake pedal travel normal?
Yes
No action required, vehicle is OK.
No
GO to J2. J2: CHECK BRAKE FLUID LEVEL 1 Check the brake master cylinder reservoir fluid level. Is the fluid level OK?
Yes
GO to J3. No
Check brake master cylinder reservoir sealing points. For additional information, refer to Brake master
cylinder component test in this section. Add brake fluid and bleed the brake system.
REFER to: Brake System Bleeding (206-00 Brake System - General Information, General Procedures). Re-test the system for normal operation. J3: CHECK BRAKE PEDAL RESERVE 1 Run engine at idle speed. 2 Apply the brake pedal lightly three or four times. 3 Wait 15 seconds for the vacuum to replenish. 4 Push down on the brake pedal until it stops moving downward or an increased resistance to the brake pedal travel occurs. 5 Hold the brake pedal in the applied position while increasing the engine speed to 2000 revs/min. 6 Release the accelerator pedal. Does the brake pedal move downward as the engine speed returns to idle?
Yes
GO to J4. No
Check the vacuum to the brake booster. J4: CHECK THE FRONT WHEEL BEARING ASSEMBLY 1 Check the front wheel bearing assembly. Are the front wheel bearings loose/damaged?
Yes
Tighten to specification or install a new front wheel bearing as required.
REFER to: Front Wheel Bearing and Wheel Hub - V6 3.0L Petrol (204-01 Front Suspension, Removal and Installation).
Re-test the system for normal operation.
No
Check the front brake discs for thickness variances.
PINPOINT TEST K : SLOW OR INCOMPLETE BRAKE PEDAL RETURN TEST
CONDITIONS DETAILS/RESULTS/ACTIONS K1: CHECK FOR BRAKE PEDAL RETURN 1 Run the engine at idle while making several brake applications. 2 Pull the brake pedal rearward with approximately 44.5 N (10lb) force. 3 Release the brake pedal and measure the distance to the toe board. 4 Make a hard brake application. 5 Release the brake pedal and measure the brake pedal to toe board distance. The brake pedal should return to its original position.
Page 592 of 3039

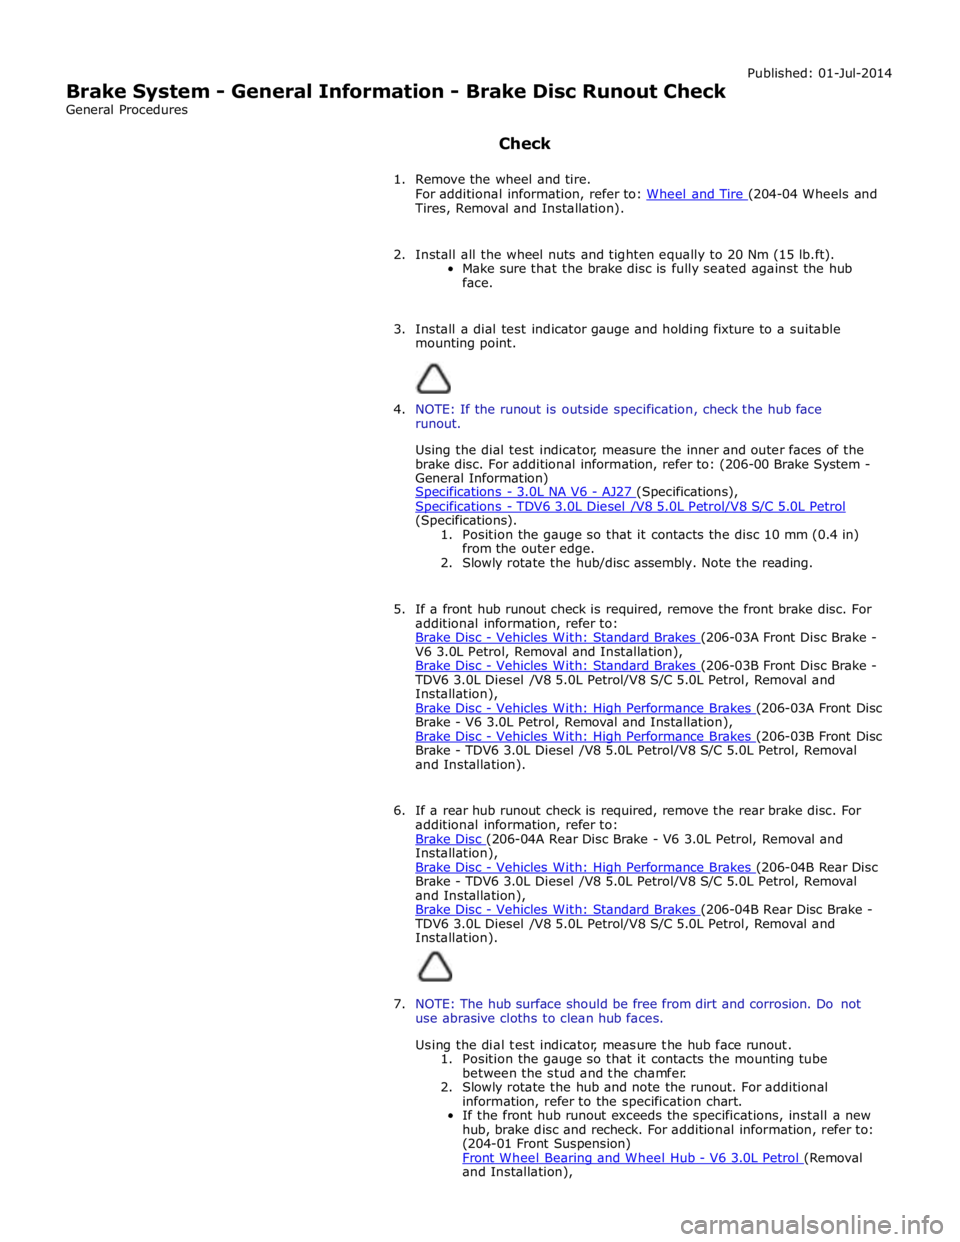
Brake System - General Information - Brake Disc Runout Check
General Procedures
Check Published: 01-Jul-2014
1. Remove the wheel and tire.
For additional information, refer to: Wheel and Tire (204-04 Wheels and Tires, Removal and Installation).
2. Install all the wheel nuts and tighten equally to 20 Nm (15 lb.ft).
Make sure that the brake disc is fully seated against the hub
face.
3. Install a dial test indicator gauge and holding fixture to a suitable
mounting point.
4. NOTE: If the runout is outside specification, check the hub face
runout.
Using the dial test indicator, measure the inner and outer faces of the
brake disc. For additional information, refer to: (206-00 Brake System -
General Information)
Specifications - 3.0L NA V6 - AJ27 (Specifications), Specifications - TDV6 3.0L Diesel /V8 5.0L Petrol/V8 S/C 5.0L Petrol (Specifications).
1. Position the gauge so that it contacts the disc 10 mm (0.4 in)
from the outer edge.
2. Slowly rotate the hub/disc assembly. Note the reading.
5. If a front hub runout check is required, remove the front brake disc. For
additional information, refer to:
Brake Disc - Vehicles With: Standard Brakes (206-03A Front Disc Brake - V6 3.0L Petrol, Removal and Installation),
Brake Disc - Vehicles With: Standard Brakes (206-03B Front Disc Brake - TDV6 3.0L Diesel /V8 5.0L Petrol/V8 S/C 5.0L Petrol, Removal and
Installation),
Brake Disc - Vehicles With: High Performance Brakes (206-03A Front Disc Brake - V6 3.0L Petrol, Removal and Installation),
Brake Disc - Vehicles With: High Performance Brakes (206-03B Front Disc Brake - TDV6 3.0L Diesel /V8 5.0L Petrol/V8 S/C 5.0L Petrol, Removal
and Installation).
6. If a rear hub runout check is required, remove the rear brake disc. For
additional information, refer to:
Brake Disc (206-04A Rear Disc Brake - V6 3.0L Petrol, Removal and Installation),
Brake Disc - Vehicles With: High Performance Brakes (206-04B Rear Disc Brake - TDV6 3.0L Diesel /V8 5.0L Petrol/V8 S/C 5.0L Petrol, Removal
and Installation),
Brake Disc - Vehicles With: Standard Brakes (206-04B Rear Disc Brake - TDV6 3.0L Diesel /V8 5.0L Petrol/V8 S/C 5.0L Petrol, Removal and
Installation).
7. NOTE: The hub surface should be free from dirt and corrosion. Do not
use abrasive cloths to clean hub faces.
Using the dial test indicator, measure the hub face runout.
1. Position the gauge so that it contacts the mounting tube
between the stud and the chamfer.
2. Slowly rotate the hub and note the runout. For additional
information, refer to the specification chart.
If the front hub runout exceeds the specifications, install a new
hub, brake disc and recheck. For additional information, refer to:
(204-01 Front Suspension)
Front Wheel Bearing and Wheel Hub - V6 3.0L Petrol (Removal and Installation),
Page 593 of 3039

Petrol/V8 S/C 5.0L Petrol (Removal and Installation). If the rear hub runout exceeds the specifications, install a new
hub, brake disc and recheck.
For additional information, refer to: Rear Wheel Bearing (204-02 Rear Suspension, Removal and Installation).
8. If the front hub face is within specification, install a new brake disc. For
additional information, refer to:
Brake Disc - Vehicles With: Standard Brakes (206-03A Front Disc Brake - V6 3.0L Petrol, Removal and Installation),
Brake Disc - Vehicles With: Standard Brakes (206-03B Front Disc Brake - TDV6 3.0L Diesel /V8 5.0L Petrol/V8 S/C 5.0L Petrol, Removal and
Installation),
Brake Disc - Vehicles With: High Performance Brakes (206-03A Front Disc Brake - V6 3.0L Petrol, Removal and Installation),
Brake Disc - Vehicles With: High Performance Brakes (206-03B Front Disc Brake - TDV6 3.0L Diesel /V8 5.0L Petrol/V8 S/C 5.0L Petrol, Removal
and Installation).
If the rear hub face is within specification, install a new disc.
9. Install the wheel and tire.
For additional information, refer to: Wheel and Tire (204-04 Wheels and Tires, Removal and Installation).
Page 597 of 3039

Published: 17-Feb-2012
Brake System - General Information - Front Brake Disc Runout Check - With
Wheel On Vehicles With: High Performance Brakes
General Procedures
1. NOTES:
Some variation in the illustrations may occur, but the essential
information is always correct.
RH illustration shown, LH similar
All measurements must taken with the wheel installed.
2. WARNING: Make sure to support the vehicle with axle stands.
Raise the front of the vehicle.
3. Mount the DTI Dial Test Indicator (DTI) gauge to the bolt as shown with tool 100-053.
4. Make sure the DTI is securely mounted.
Page 598 of 3039

5. Position the DTI probe 5 mm from the outer edge of the
disc.
Zero DTI and rotate road wheel one complete
revolution to measure disc runout.
6. Position the DTI probe in the centre of the disc.
Zero DTI and rotate road wheel one complete
revolution to measure disc runout.
Page 599 of 3039

7. Position the DTI probe 5 mm from the inner edge of the
disc.
Zero DTI and rotate road wheel one complete
revolution to measure disc runout.
8. NOTE: The disc runout limit is 0.075 mm.
If the disc runout exceeds the limit check the hub drive flange and
bearing runout.
For additional information, refer to: Front Wheel Bearing and Wheel Hub Runout Check - Vehicles With: High Performance Brakes (204-00 Suspension System - General Information, General Procedures).
9. If hub runout is within the limit replace the brake disc.
10. Install the wheel.
Tighten the road wheel nuts in sequence as shown
above to the following:
Stage 1: 4 Nm.
Stage 2: 60 Nm.
Stage 3: 125 Nm.
11. Re-check the disc runout as detailed above.