2010 INFINITI QX56 check engine
[x] Cancel search: check enginePage 3789 of 4210
TM-94
< COMPONENT DIAGNOSIS >
MAIN POWER SUPPLY AND GROUND CIRCUIT
MAIN POWER SUPPLY AND GROUND CIRCUIT
Diagnosis ProcedureINFOID:0000000005148678
1.CHECK TCM POWER SOURCE STEP 1
1. Turn ignition switch OFF.
2. Disconnect A/T assembly harness connector.
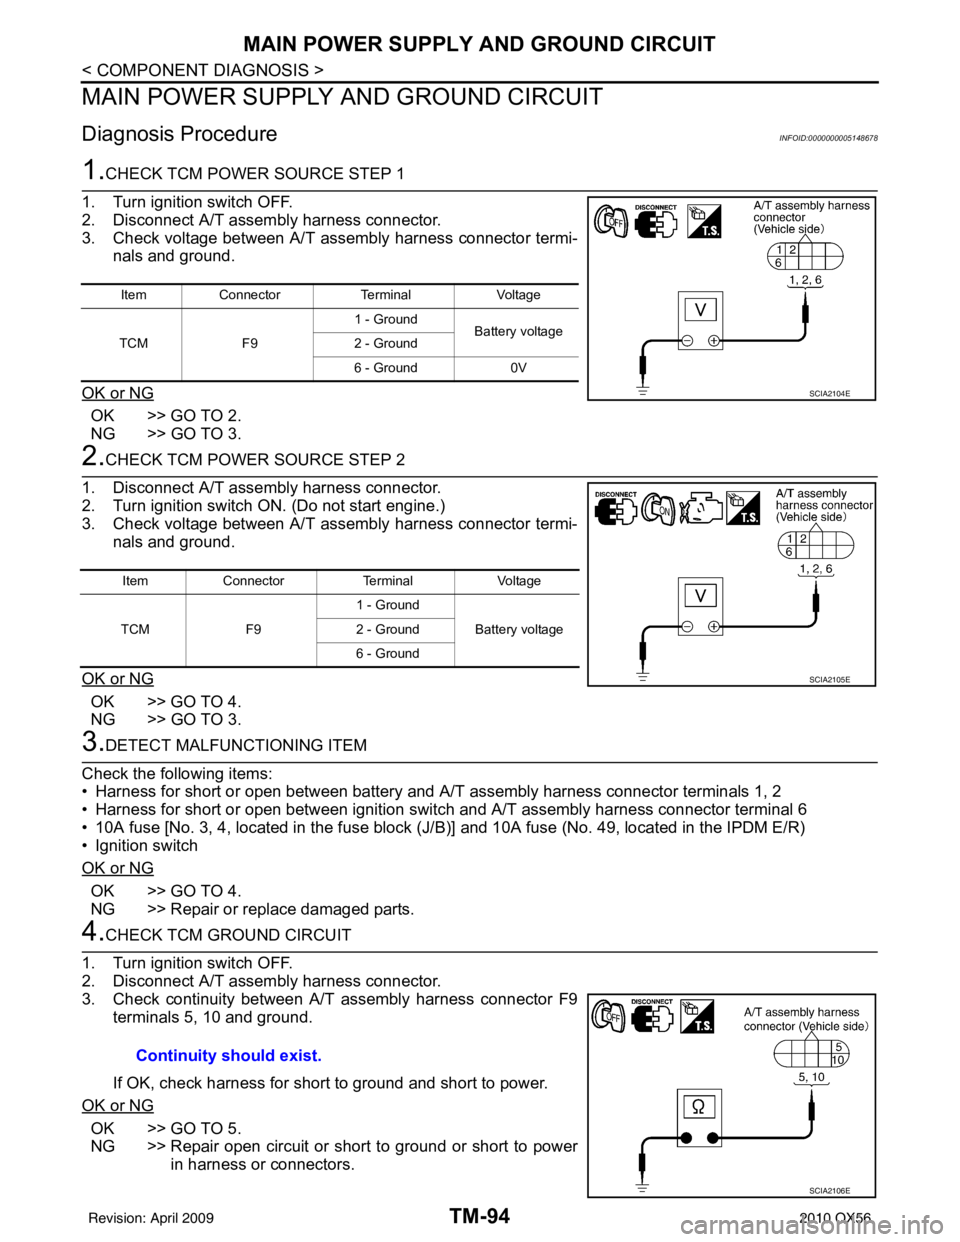
3. Check voltage between A/T assembly harness connector termi- nals and ground.
OK or NG
OK >> GO TO 2.
NG >> GO TO 3.
2.CHECK TCM POWER SOURCE STEP 2
1. Disconnect A/T assembly harness connector.
2. Turn ignition switch ON. (Do not start engine.)
3. Check voltage between A/T assembly harness connector termi- nals and ground.
OK or NG
OK >> GO TO 4.
NG >> GO TO 3.
3.DETECT MALFUNCTIONING ITEM
Check the following items:
• Harness for short or open between battery and A/T assembly harness connector terminals 1, 2
• Harness for short or open between ignition switch and A/T assembly harness connector terminal 6
• 10A fuse [No. 3, 4, located in the fuse block (J /B)] and 10A fuse (No. 49, located in the IPDM E/R)
• Ignition switch
OK or NG
OK >> GO TO 4.
NG >> Repair or replace damaged parts.
4.CHECK TCM GROUND CIRCUIT
1. Turn ignition switch OFF.
2. Disconnect A/T assembly harness connector.
3. Check continuity between A/T assembly harness connector F9 terminals 5, 10 and ground.
If OK, check harness for short to ground and short to power.
OK or NG
OK >> GO TO 5.
NG >> Repair open circuit or short to ground or short to power in harness or connectors.
Item Connector TerminalVoltage
TCM F91 - Ground
Battery voltage
2 - Ground
6 - Ground 0V
SCIA2104E
ItemConnector TerminalVoltage
TCM F91 - Ground
Battery voltage
2 - Ground
6 - Ground
SCIA2105E
Continuity should exist.
SCIA2106E
Revision: April 20092010 QX56
Page 3791 of 4210
TM-96
< COMPONENT DIAGNOSIS >
CLOSED THROTTLE POSITION AND WIDE OPEN THROTTLE POSITION CIR-
CUIT
CLOSED THROTTLE POSITION AND WIDE OPEN THROTTLE POSITION
CIRCUIT
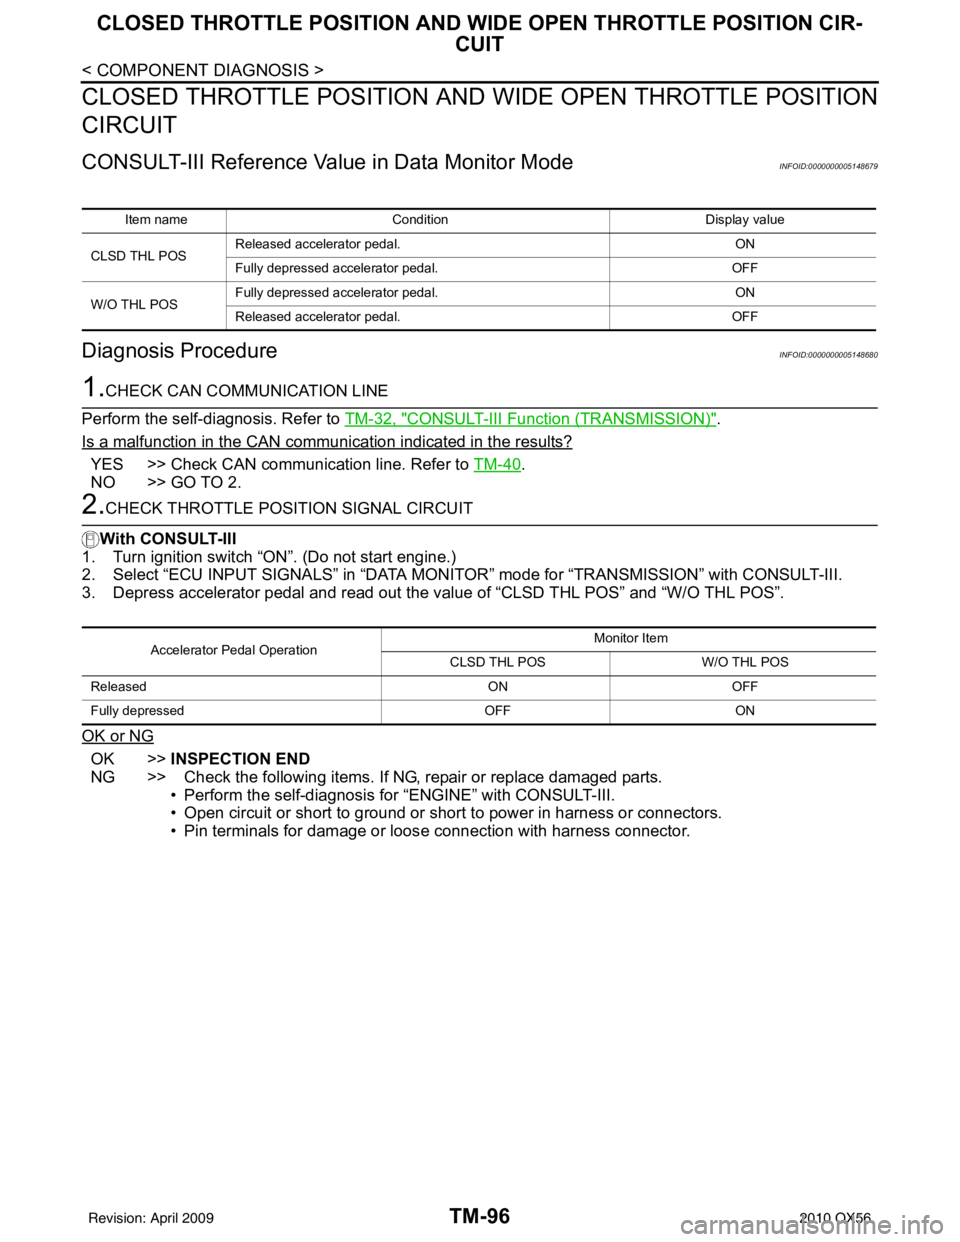
CONSULT-III Reference Value in Data Monitor ModeINFOID:0000000005148679
Diagnosis ProcedureINFOID:0000000005148680
1.CHECK CAN COMMUNICATION LINE
Perform the self-diagnosis. Refer to TM-32, "
CONSULT-III Function (TRANSMISSION)".
Is a malfunction in the CAN communication indicated in the results?
YES >> Check CAN communication line. Refer to TM-40.
NO >> GO TO 2.
2.CHECK THROTTLE POSI TION SIGNAL CIRCUIT
With CONSULT-III
1. Turn ignition switch “ON”. (Do not start engine.)
2. Select “ECU INPUT SIGNALS” in “DATA MONI TOR” mode for “TRANSMISSION” with CONSULT-III.
3. Depress accelerator pedal and read out the value of “CLSD THL POS” and “W/O THL POS”.
OK or NG
OK >> INSPECTION END
NG >> Check the following items. If NG, repair or replace damaged parts. • Perform the self-diagnosis for “ENGINE” with CONSULT-III.
• Open circuit or short to ground or shor t to power in harness or connectors.
• Pin terminals for damage or loos e connection with harness connector.
Item name Condition Display value
CLSD THL POS Released accelerator pedal.
ON
Fully depressed accelerator pedal. OFF
W/O THL POS Fully depressed accelerator pedal.
ON
Released accelerator pedal. OFF
Accelerator Pedal OperationMonitor Item
CLSD THL POS W/O THL POS
Released ONOFF
Fully depressed OFFON
Revision: April 20092010 QX56
Page 3792 of 4210
BRAKE SIGNAL CIRCUITTM-97
< COMPONENT DIAGNOSIS >
CEF
G H
I
J
K L
M A
B
TM
N
O P
BRAKE SIGNAL CIRCUIT
CONSULT-III Reference Val ue in Data Monitor ModeINFOID:0000000005148681
Diagnosis ProcedureINFOID:0000000005148682
1.CHECK CAN COMMUNICATION LINE
Perform the self-diagnosis. Refer to TM-32, "
CONSULT-III Function (TRANSMISSION)".
Is a malfunction in the CAN communication indicated in the results?
YES >> Check CAN communication line. Refer to TM-40, "Diagnosis Procedure".
NO >> GO TO 2.
2.CHECK STOP LAMP SWITCH CIRCUIT
With CONSULT-III
1. Turn ignition switch “ON”. (Do not start engine.)
2. Select “ECU INPUT SIGNALS” in “DATA MONITO R” mode for “TRANSMISSION” with CONSULT-III.
3. Read out ON/OFF switching action of the “BRAKESW”.
OK or NG
OK >> INSPECTION END
NG >> GO TO 3.
3.CHECK STOP LAMP SWITCH
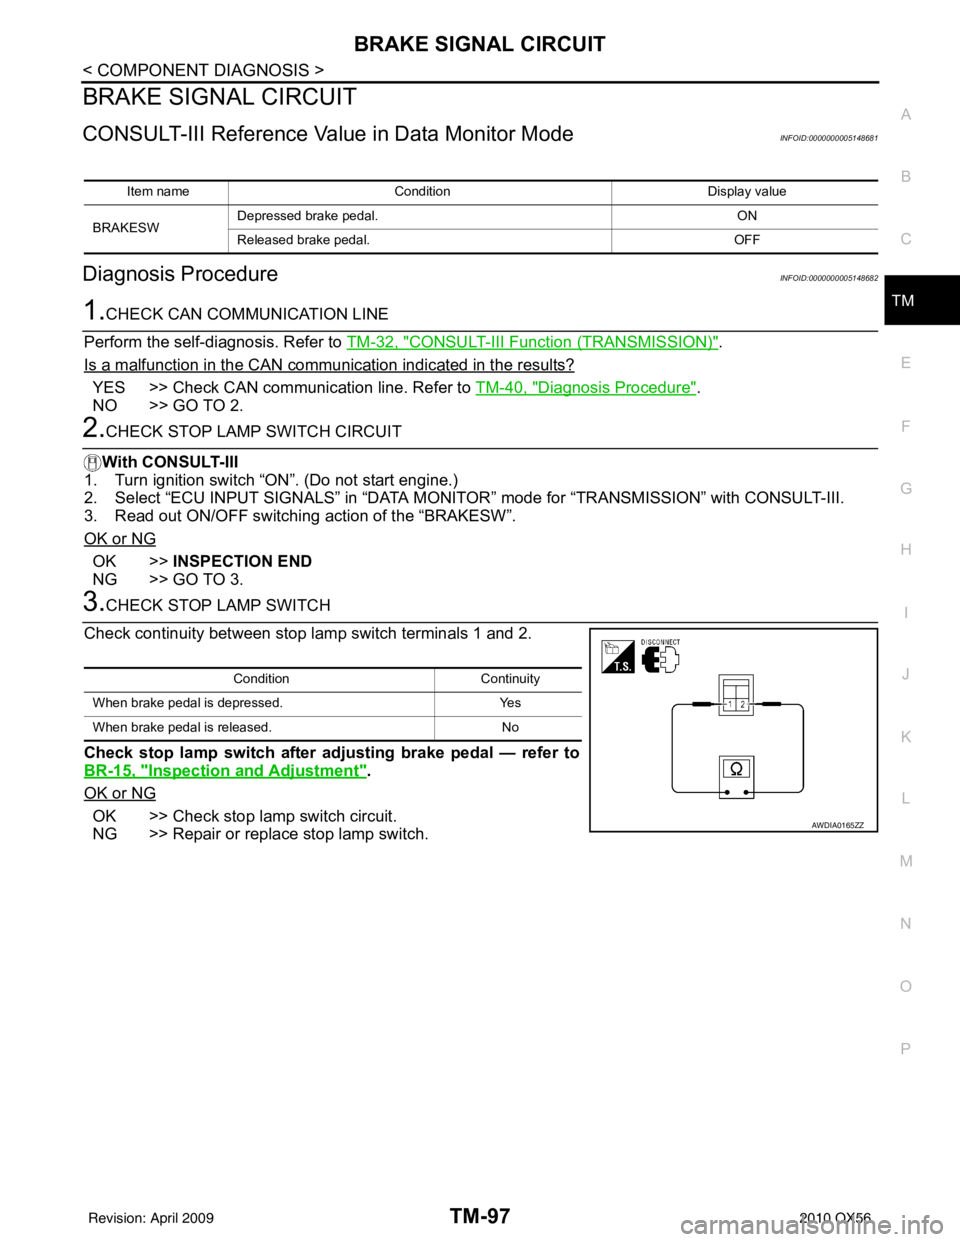
Check continuity between stop lamp switch terminals 1 and 2.
Check stop lamp switch after adjusting brake pedal — refer to
BR-15, "
Inspection and Adjustment".
OK or NG
OK >> Check stop lamp switch circuit.
NG >> Repair or replace stop lamp switch.
Item name Condition Display value
BRAKESW Depressed brake pedal.
ON
Released brake pedal. OFF
ConditionContinuity
When brake pedal is depressed. Yes
When brake pedal is released. No
AWDIA0165ZZ
Revision: April 20092010 QX56
Page 3793 of 4210
TM-98
< COMPONENT DIAGNOSIS >
TOW MODE SWITCH
TOW MODE SWITCH
DescriptionINFOID:0000000005148683
When tow mode switch is “ON”, tow mode switch signals are sent to TCM from combination meter by CAN
communication line.Then it`s a tow mode condition.
Diagnosis ProcedureINFOID:0000000005148684
1.CHECK CAN COMMUNICATION LINE
Perform the self-diagnosis. Refer to TM-32, "
CONSULT-III Function (TRANSMISSION)".
Is any malfunction in the CAN communication indicated in the results?
YES >> Check CAN communication line. Refer to TM-40.
NO >> GO TO 2.
2.CHECK POWER SOURCE
1. Turn ignition switch “ON”. (Do not start engine.)
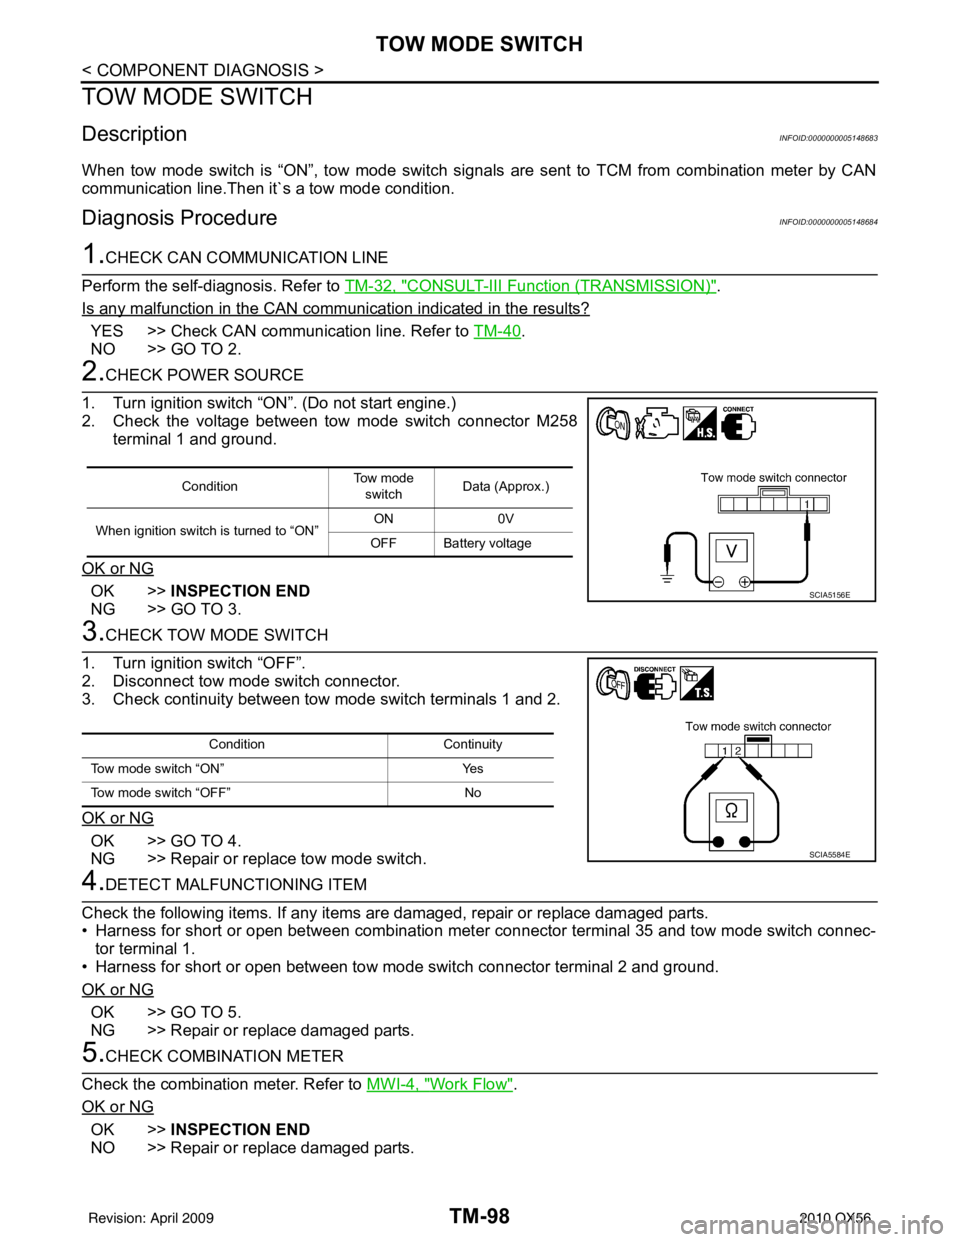
2. Check the voltage between tow mode switch connector M258 terminal 1 and ground.
OK or NG
OK >> INSPECTION END
NG >> GO TO 3.
3.CHECK TOW MODE SWITCH
1. Turn ignition switch “OFF”.
2. Disconnect tow mode switch connector.
3. Check continuity between tow mode switch terminals 1 and 2.
OK or NG
OK >> GO TO 4.
NG >> Repair or replace tow mode switch.
4.DETECT MALFUNCTIONING ITEM
Check the following items. If any items are damaged, repair or replace damaged parts.
• Harness for short or open between combination meter connector terminal 35 and tow mode switch connec- tor terminal 1.
• Harness for short or open between tow mode switch connector terminal 2 and ground.
OK or NG
OK >> GO TO 5.
NG >> Repair or replace damaged parts.
5.CHECK COMBINATION METER
Check the combination meter. Refer to MWI-4, "
Work Flow".
OK or NG
OK >> INSPECTION END
NO >> Repair or replace damaged parts.
Condition To w m o d e
switch Data (Approx.)
When ignition switch is turned to “ON” ON
0V
OFF Battery voltage
SCIA5156E
Condition Continuity
Tow mode switch “ON” Yes
Tow mode switch “OFF” No
SCIA5584E
Revision: April 20092010 QX56
Page 3801 of 4210
TM-106
< ECU DIAGNOSIS >
TCM
ECU DIAGNOSIS
TCM
Reference ValueINFOID:0000000005148688
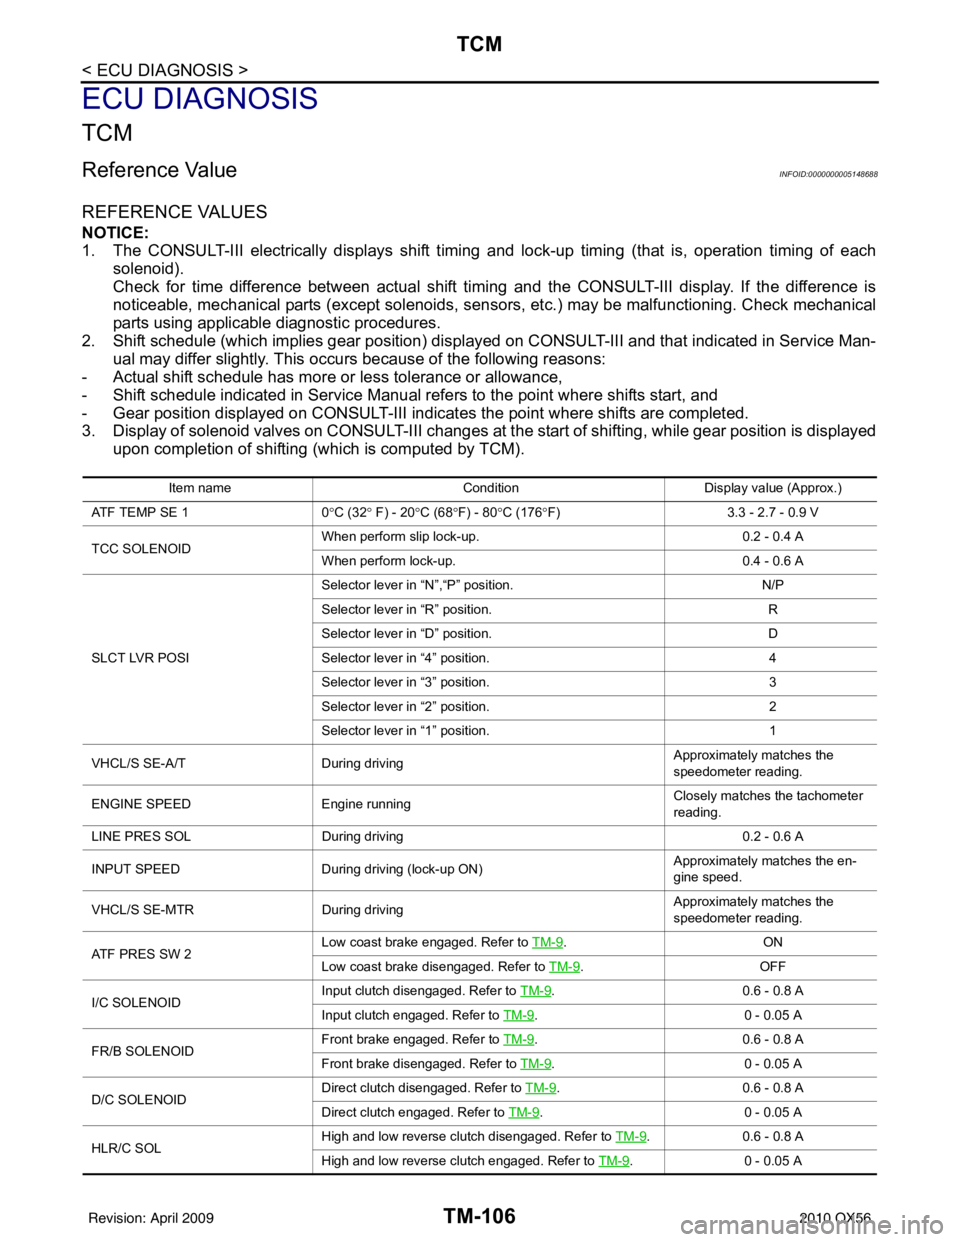
REFERENCE VALUES
NOTICE:
1. The CONSULT-III electrically displays shift timing and lock-up timing (that is, operation timing of eachsolenoid).
Check for time difference between actual shift timi ng and the CONSULT-III display. If the difference is
noticeable, mechanical parts (except solenoids, sens ors, etc.) may be malfunctioning. Check mechanical
parts using applicable diagnostic procedures.
2. Shift schedule (which implies gear position) display ed on CONSULT-III and that indicated in Service Man-
ual may differ slightly. This occurs because of the following reasons:
- Actual shift schedule has more or less tolerance or allowance,
- Shift schedule indicated in Service Manual refers to the point where shifts start, and
- Gear position displayed on CONSULT-III indicates the point where shifts are completed.
3. Display of solenoid valves on CONSULT-III changes at t he start of shifting, while gear position is displayed
upon completion of shifting (which is computed by TCM).
Item name Condition Display value (Approx.)
AT F T E M P S E 1 0°C (32 ° F) - 20 °C (68 °F) - 80 °C (176 °F) 3.3 - 2.7 - 0.9 V
TCC SOLENOID When perform slip lock-up.
0.2 - 0.4 A
When perform lock-up. 0.4 - 0.6 A
SLCT LVR POSI Selector lever in “N”,“P” position.
N/P
Selector lever in “R” position. R
Selector lever in “D” position. D
Selector lever in “4” position. 4
Selector lever in “3” position. 3
Selector lever in “2” position. 2
Selector lever in “1” position. 1
VHCL/S SE-A/T During driving Approximately matches the
speedometer reading.
ENGINE SPEED Engine running Closely matches the tachometer
reading.
LINE PRES SOL During driving 0.2 - 0.6 A
INPUT SPEED During driving (lock-up ON) Approximately matches the en-
gine speed.
VHCL/S SE-MTR During driving Approximately matches the
speedometer reading.
ATF PRES SW 2 Low coast brake engaged. Refer to
TM-9
.ON
Low coast brake disengaged. Refer to TM-9
.OFF
I/C SOLENOID Input clutch disengaged. Refer to
TM-9
.0.6 - 0 .8 A
Input clutch engaged. Refer to TM-9
.0 - 0 .0 5 A
FR/B SOLENOID Front brake engaged. Refer to
TM-9
.0 .6 - 0 .8 A
Front brake disengaged. Refer to TM-9
.0 - 0 .0 5 A
D/C SOLENOID Direct clutch disengaged. Refer to
TM-9
.0.6 - 0 .8 A
Direct clutch engaged. Refer to TM-9
.0 - 0 .0 5 A
HLR/C SOL High and low reverse clutch disengaged. Refer to
TM-9
.0.6 - 0 .8 A
High and low reverse clutch engaged. Refer to TM-9
.0 - 0 .0 5 A
Revision: April 20092010 QX56
Page 3816 of 4210
SYSTEM SYMPTOMTM-121
< SYMPTOM DIAGNOSIS >
CEF
G H
I
J
K L
M A
B
TM
N
O P
SYMPTOM DIAGNOSIS
SYSTEM SYMPTOM
Symptom TableINFOID:0000000005148715
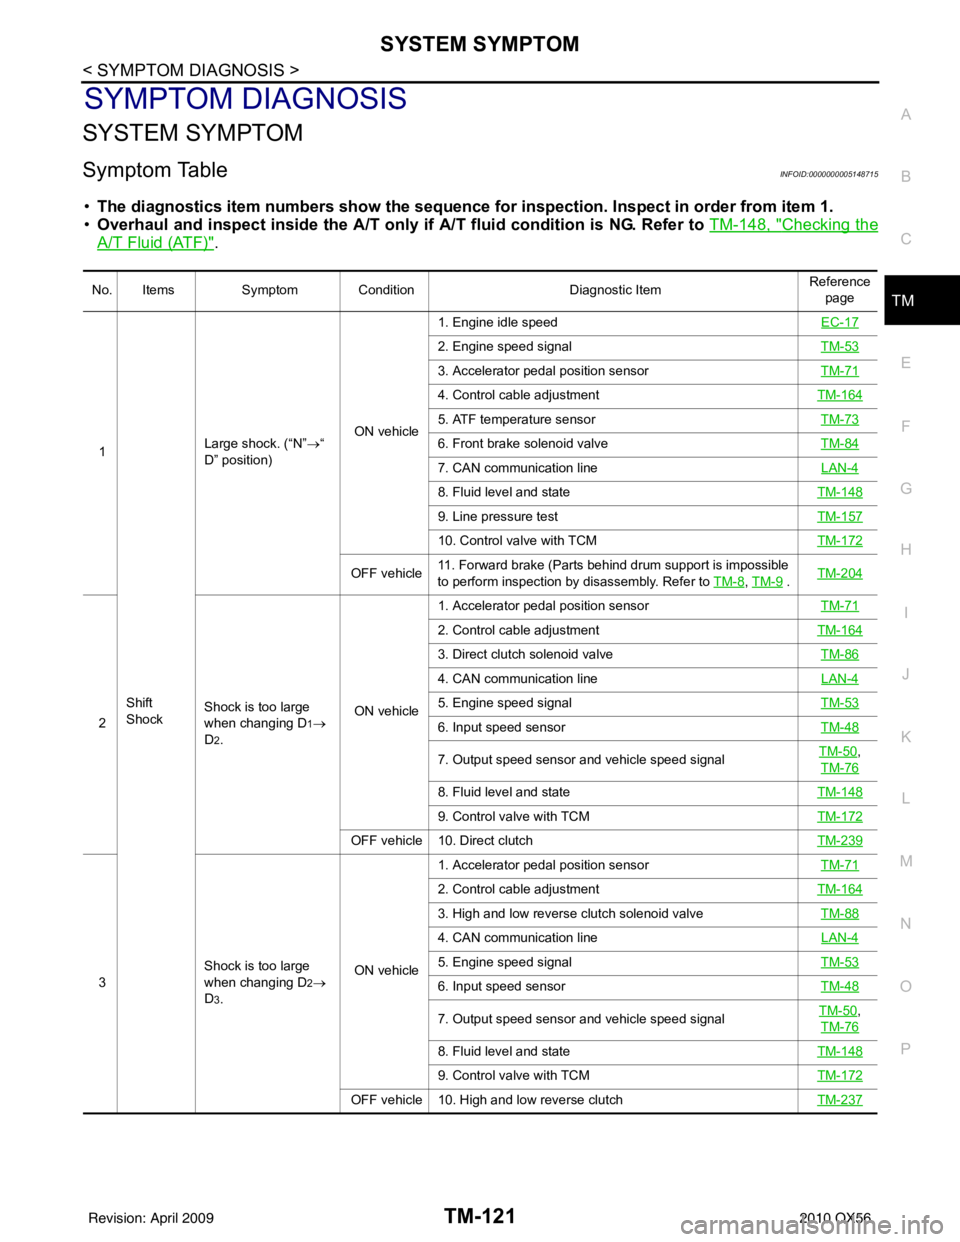
• The diagnostics item numbers s how the sequence for inspection. Inspect in order from item 1.
• Overhaul and inspect inside the A/T only if A/T fluid condition is NG. Refer to TM-148, "
Checking the
A/T Fluid (ATF)".
No. ItemsSymptom Condition Diagnostic ItemReference
page
1
Shift
Shock Large shock. (“N”
→“
D” position) ON vehicle1. Engine idle speed
EC-17
2. Engine speed signalTM-53
3. Accelerator pedal position sensorTM-71
4. Control cable adjustmentTM-164
5. ATF temperature sensor TM-73
6. Front brake solenoid valveTM-84
7. CAN communication line LAN-4
8. Fluid level and stateTM-148
9. Line pressure testTM-157
10. Control valve with TCMTM-172
OFF vehicle11. Forward brake (Parts behind drum support is impossible
to perform inspection by disassembly. Refer to
TM-8, TM-9 . TM-204
2 Shock is too large
when changing D1→
D
2. ON vehicle1. Accelerator pedal position sensor
TM-71
2. Control cable adjustmentTM-164
3. Direct clutch solenoid valve TM-86
4. CAN communication line LAN-4
5. Engine speed signalTM-53
6. Input speed sensorTM-48
7. Output speed sensor and vehicle speed signalTM-50,
TM-76
8. Fluid level and state TM-148
9. Control valve with TCMTM-172
OFF vehicle 10. Direct clutch TM-239
3Shock is too large
when changing D2→
D
3. ON vehicle1. Accelerator pedal position sensor
TM-71
2. Control cable adjustmentTM-164
3. High and low reverse clutch solenoid valve TM-88
4. CAN communication line LAN-4
5. Engine speed signalTM-53
6. Input speed sensorTM-48
7. Output speed sensor and vehicle speed signalTM-50,
TM-76
8. Fluid level and state TM-148
9. Control valve with TCMTM-172
OFF vehicle 10. High and low reverse clutch TM-237
Revision: April 20092010 QX56
Page 3837 of 4210

TM-142
< SYMPTOM DIAGNOSIS >
SYSTEM SYMPTOM
65Others Engine speed does
not return to idle.
ON vehicle1. Fluid level and state
TM-148
2. Direct clutch solenoid valve TM-86
3. Front brake solenoid valveTM-84
4. Accelerator pedal position sensorTM-71
5. Output speed sensor and vehicle speed signalTM-50,
TM-76
6. CAN communication line LAN-4
7. Control valve with TCMTM-172
OFF vehicle8. Front brake (brake band)
TM-1729. Direct clutchTM-172
66A/T CHECK indicator
lamp does not come
on. ON vehicle1. CAN communication line
LAN-42. Combination meterMWI-22
3. TCM power supply TM-94
No. ItemsSymptom Condition Diagnostic ItemReference
page
Revision: April 20092010 QX56
Page 3843 of 4210
TM-148
< ON-VEHICLE MAINTENANCE >
A/T FLUID
ON-VEHICLE MAINTENANCE
A/T FLUID
Checking the A/T Fluid (ATF)INFOID:0000000005148722
CAUTION:
If using the vehicle for towing, the A/T fluid must be replaced as specified. Refer to MA-9, "
Introduc-
tion of Periodic Maintenance".
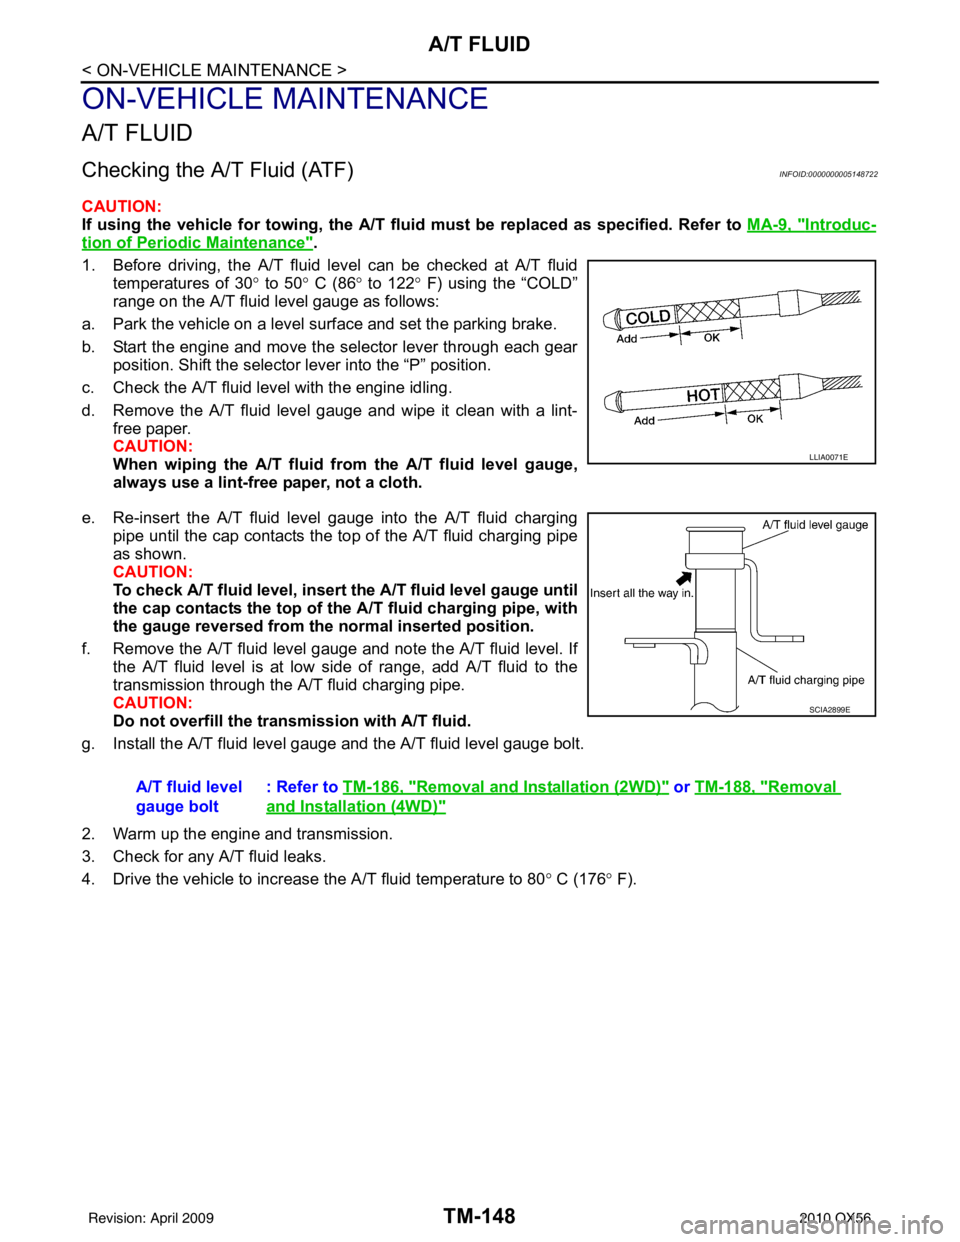
1. Before driving, the A/T fluid level can be checked at A/T fluid temperatures of 30 ° to 50° C (86° to 122° F) using the “COLD”
range on the A/T fluid level gauge as follows:
a. Park the vehicle on a level surface and set the parking brake.
b. Start the engine and move the selector lever through each gear position. Shift the selector lever into the “P” position.
c. Check the A/T fluid level with the engine idling.
d. Remove the A/T fluid level gauge and wipe it clean with a lint- free paper.
CAUTION:
When wiping the A/T fluid from the A/ T fluid level gauge,
always use a lint-free paper, not a cloth.
e. Re-insert the A/T fluid level gauge into the A/T fluid charging pipe until the cap contacts the t op of the A/T fluid charging pipe
as shown.
CAUTION:
To check A/T fluid level, insert th e A/T fluid level gauge until
the cap contacts the top of the A/T fluid charging pipe, with
the gauge reversed from th e normal inserted position.
f. Remove the A/T fluid level gauge and note the A/T fluid level. If the A/T fluid level is at low si de of range, add A/T fluid to the
transmission through the A/T fluid charging pipe.
CAUTION:
Do not overfill the transmission with A/T fluid.
g. Install the A/T fluid level gauge and the A/T fluid level gauge bolt.
2. Warm up the engine and transmission.
3. Check for any A/T fluid leaks.
4. Drive the vehicle to increase the A/T fluid temperature to 80 ° C (176 ° F).
LLIA0071E
A/T fluid level
gauge bolt : Refer to
TM-186, "Removal and Installation (2WD)" or TM-188, "Removal
and Installation (4WD)"
SCIA2899E
Revision: April 20092010 QX56