2010 INFINITI QX56 lock
[x] Cancel search: lockPage 1934 of 4210
ENGINE UNITEM-83
< DISASSEMBLY AND ASSEMBLY >
C
DE
F
G H
I
J
K L
M A
EM
NP
O
Disassembly and AssemblyINFOID:0000000005149015
DISASSEMBLY
NOTE:
Explained here is how to disassemble with engine stand supporting transmission surface. When using differ-
ent type of engine stand, some steps may be different.
1. Remove engine assembly and mount to engine stand. Refer to
EM-78, "
Removal and Installation".
CAUTION:
Before removing the hanging chains, make sure engi ne stand is stable and there is no risk of over-
turning.
2. Drain engine oil. Refer to LU-9, "
Changing Engine Oil".
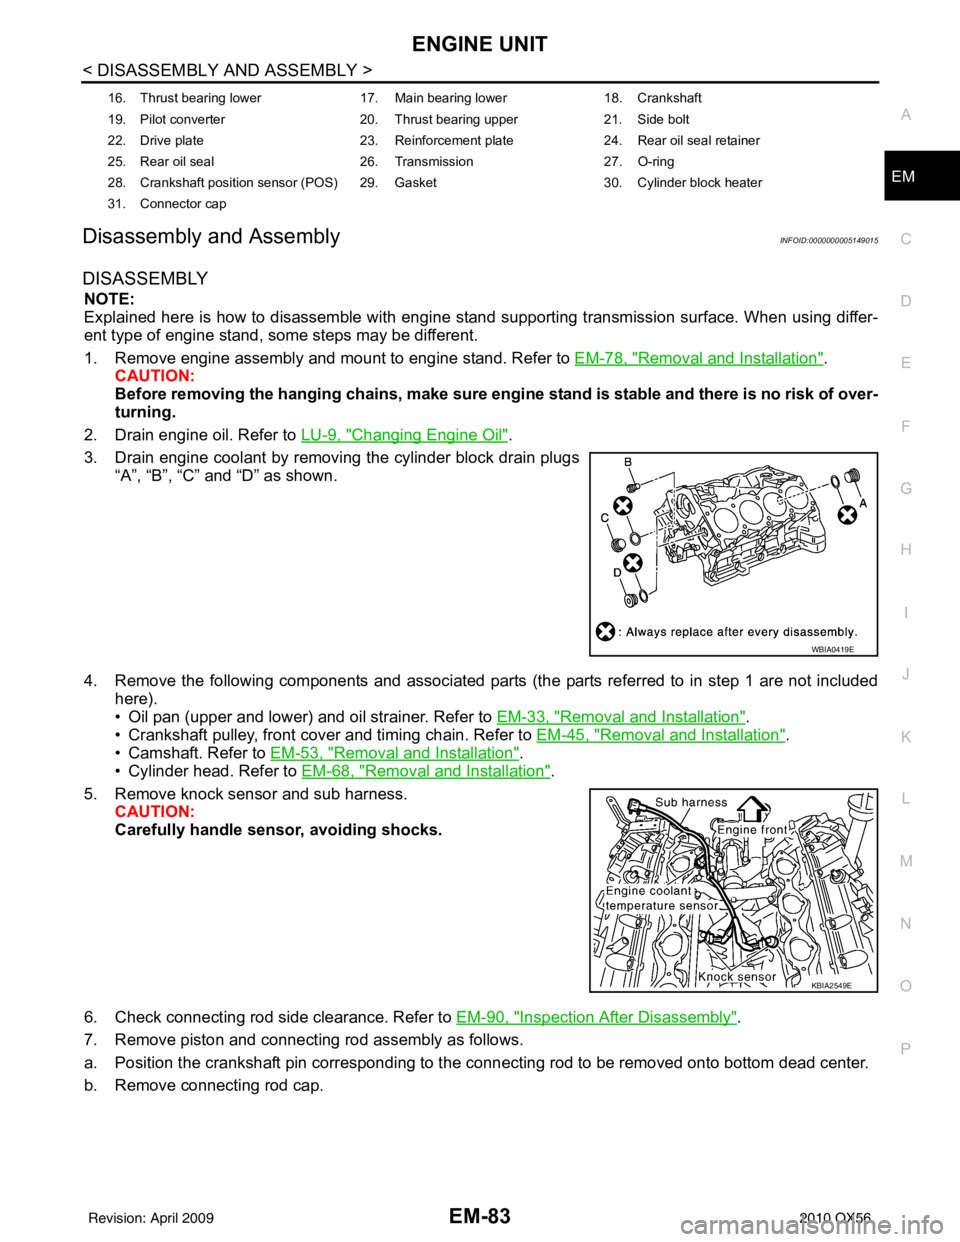
3. Drain engine coolant by removing the cylinder block drain plugs “A”, “B”, “C” and “D” as shown.
4. Remove the following components and associated parts (the parts referred to in step 1 are not included here).
• Oil pan (upper and lower) and oil strainer. Refer to EM-33, "
Removal and Installation".
• Crankshaft pulley, front cover and timing chain. Refer to EM-45, "
Removal and Installation".
• Camshaft. Refer to EM-53, "
Removal and Installation".
• Cylinder head. Refer to EM-68, "
Removal and Installation".
5. Remove knock sensor and sub harness. CAUTION:
Carefully handle sensor, avoiding shocks.
6. Check connecting rod side clearance. Refer to EM-90, "
Inspection After Disassembly".
7. Remove piston and connecting rod assembly as follows.
a. Position the crankshaft pin corresponding to the connecting rod to be removed onto bottom dead center.
b. Remove connecting rod cap.
16. Thrust bearing lower 17. Main bearing lower18. Crankshaft
19. Pilot converter 20. Thrust bearing upper21. Side bolt
22. Drive plate 23. Reinforcement plate24. Rear oil seal retainer
25. Rear oil seal 26. Transmission27. O-ring
28. Crankshaft position sensor (POS) 29. Gasket 30. Cylinder block heater
31. Connector cap
WBIA0419E
KBIA2549E
Revision: April 20092010 QX56
Page 1936 of 4210
ENGINE UNITEM-85
< DISASSEMBLY AND ASSEMBLY >
C
DE
F
G H
I
J
K L
M A
EM
NP
O
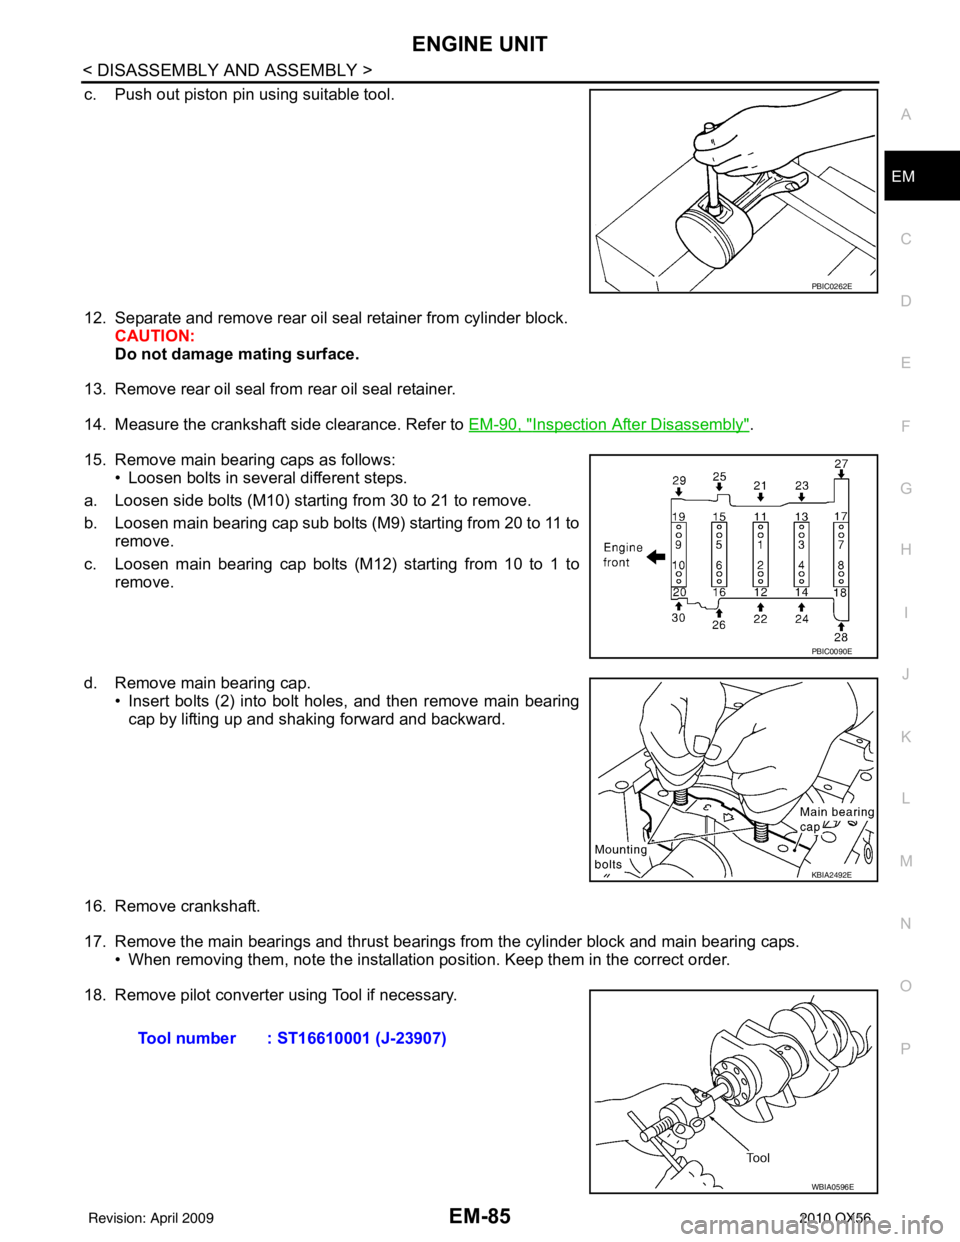
c. Push out piston pin using suitable tool.
12. Separate and remove rear oil seal retainer from cylinder block.
CAUTION:
Do not damage mating surface.
13. Remove rear oil seal from rear oil seal retainer.
14. Measure the crankshaft side clearance. Refer to EM-90, "
Inspection After Disassembly".
15. Remove main bearing caps as follows: • Loosen bolts in several different steps.
a. Loosen side bolts (M10) starting from 30 to 21 to remove.
b. Loosen main bearing cap sub bolts (M9) starting from 20 to 11 to remove.
c. Loosen main bearing cap bolts (M12) starting from 10 to 1 to remove.
d. Remove main bearing cap. • Insert bolts (2) into bolt holes, and then remove main bearing
cap by lifting up and shaking forward and backward.
16. Remove crankshaft.
17. Remove the main bearings and thrust bearings from the cylinder block and main bearing caps. • When removing them, note the installation pos ition. Keep them in the correct order.
18. Remove pilot converter using Tool if necessary.
PBIC0262E
PBIC0090E
KBIA2492E
Tool number : ST16610001 (J-23907)
WBIA0596E
Revision: April 20092010 QX56
Page 1937 of 4210
EM-86
< DISASSEMBLY AND ASSEMBLY >
ENGINE UNIT
ASSEMBLY
1. Fully air-blow the coolant and oil passages in the cylinder block, cylinder bore, and crankcase to removeany foreign material.
WARNING:
Use goggles to protect your eyes.
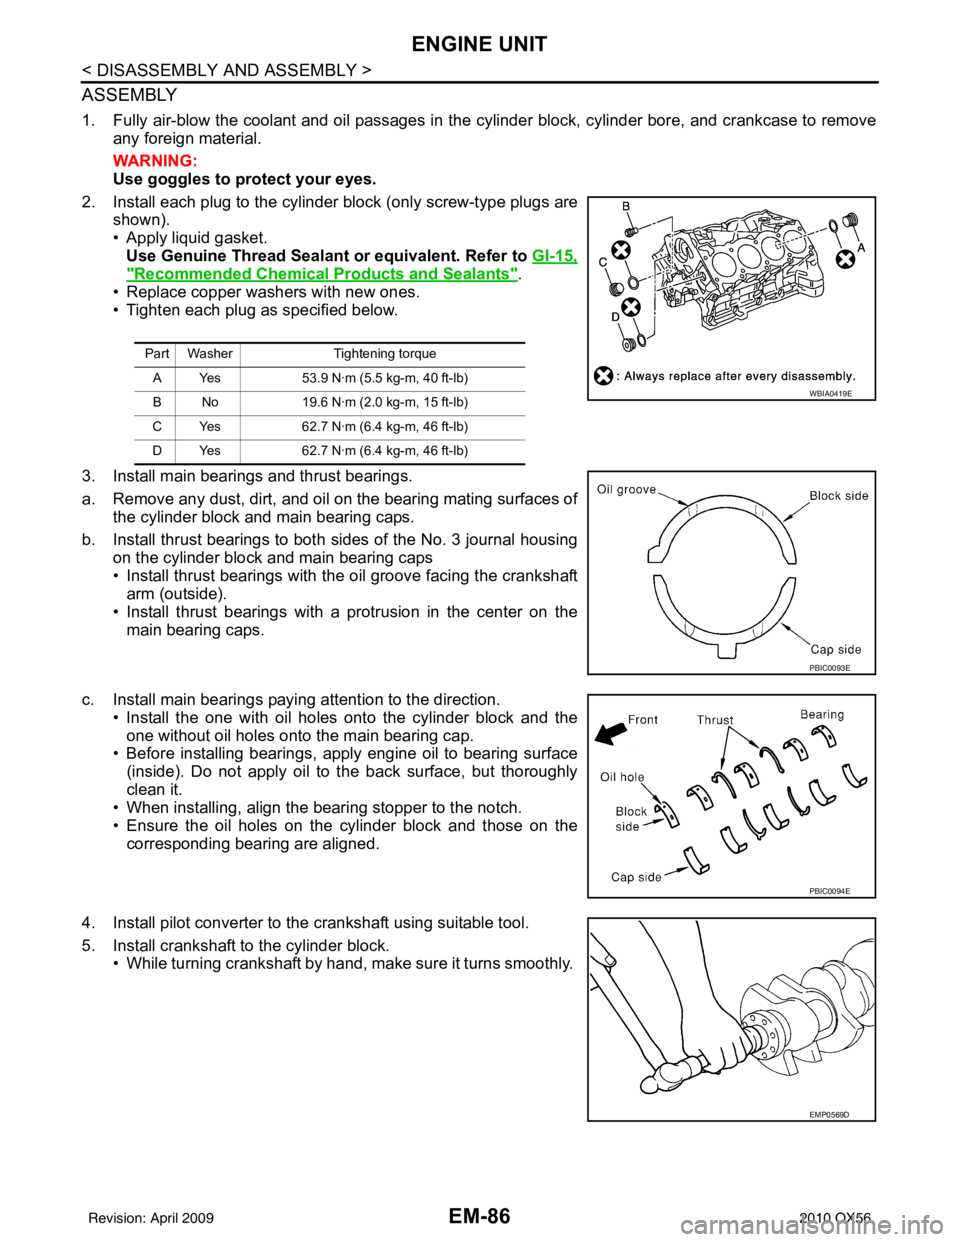
2. Install each plug to the cylinder block (only screw-type plugs are shown).
• Apply liquid gasket. Use Genuine Thread Sealant or equivalent. Refer to GI-15,
"Recommended Chemical Products and Sealants".
• Replace copper washers with new ones.
• Tighten each plug as specified below.
3. Install main bearings and thrust bearings.
a. Remove any dust, dirt, and oil on the bearing mating surfaces of the cylinder block and main bearing caps.
b. Install thrust bearings to both sides of the No. 3 journal housing on the cylinder block and main bearing caps
• Install thrust bearings with the oil groove facing the crankshaft
arm (outside).
• Install thrust bearings with a protrusion in the center on the
main bearing caps.
c. Install main bearings paying attention to the direction. • Install the one with oil holes onto the cylinder block and theone without oil holes onto the main bearing cap.
• Before installing bearings, apply engine oil to bearing surface
(inside). Do not apply oil to the back surface, but thoroughly
clean it.
• When installing, align the bearing stopper to the notch.
• Ensure the oil holes on the cylinder block and those on the
corresponding bearing are aligned.
4. Install pilot converter to the crankshaft using suitable tool.
5. Install crankshaft to the cylinder block. • While turning crankshaft by hand, make sure it turns smoothly.
Part Washer Tightening torque
A Yes 53.9 N·m (5.5 kg-m, 40 ft-lb)
B No 19.6 N·m (2.0 kg-m, 15 ft-lb)
C Yes 62.7 N·m (6.4 kg-m, 46 ft-lb)
D Yes 62.7 N·m (6.4 kg-m, 46 ft-lb)
WBIA0419E
PBIC0093E
PBIC0094E
EMP0569D
Revision: April 20092010 QX56
Page 1940 of 4210
ENGINE UNITEM-89
< DISASSEMBLY AND ASSEMBLY >
C
DE
F
G H
I
J
K L
M A
EM
NP
O
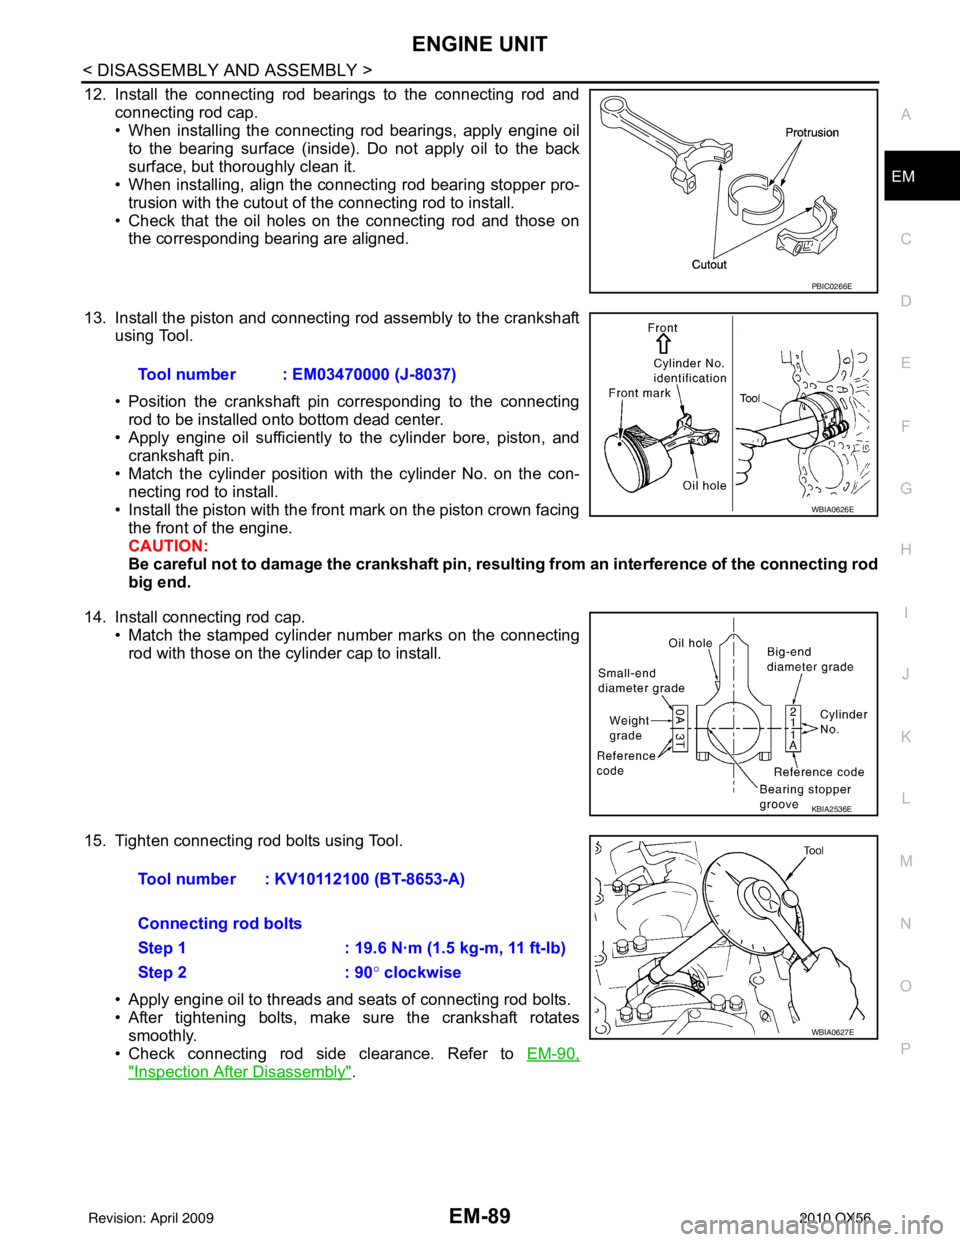
12. Install the connecting rod bearings to the connecting rod and
connecting rod cap.
• When installing the connecting rod bearings, apply engine oilto the bearing surface (inside). Do not apply oil to the back
surface, but thoroughly clean it.
• When installing, align the connecting rod bearing stopper pro-
trusion with the cutout of the connecting rod to install.
• Check that the oil holes on the connecting rod and those on the corresponding bearing are aligned.
13. Install the piston and connecting rod assembly to the crankshaft using Tool.
• Position the crankshaft pin corresponding to the connecting
rod to be installed onto bottom dead center.
• Apply engine oil sufficiently to the cylinder bore, piston, and
crankshaft pin.
• Match the cylinder position with the cylinder No. on the con- necting rod to install.
• Install the piston with the front mark on the piston crown facing the front of the engine.
CAUTION:
Be careful not to damage the crankshaft pin, resu lting from an interference of the connecting rod
big end.
14. Install connecting rod cap. • Match the stamped cylinder number marks on the connectingrod with those on the cylinder cap to install.
15. Tighten connecting rod bolts using Tool. • Apply engine oil to threads and seats of connecting rod bolts.
• After tightening bolts, make sure the crankshaft rotatessmoothly.
• Check connecting rod side clearance. Refer to EM-90,
"Inspection After Disassembly".
PBIC0266E
Tool number : EM03470000 (J-8037)
WBIA0626E
KBIA2536E
Tool number : KV10112100 (BT-8653-A)
Connecting rod bolts
Step 1 : 19.6 N·m (1.5 kg-m, 11 ft-lb)
Step 2: 90° clockwise
WBIA0627E
Revision: April 20092010 QX56
Page 1941 of 4210
EM-90
< DISASSEMBLY AND ASSEMBLY >
ENGINE UNIT
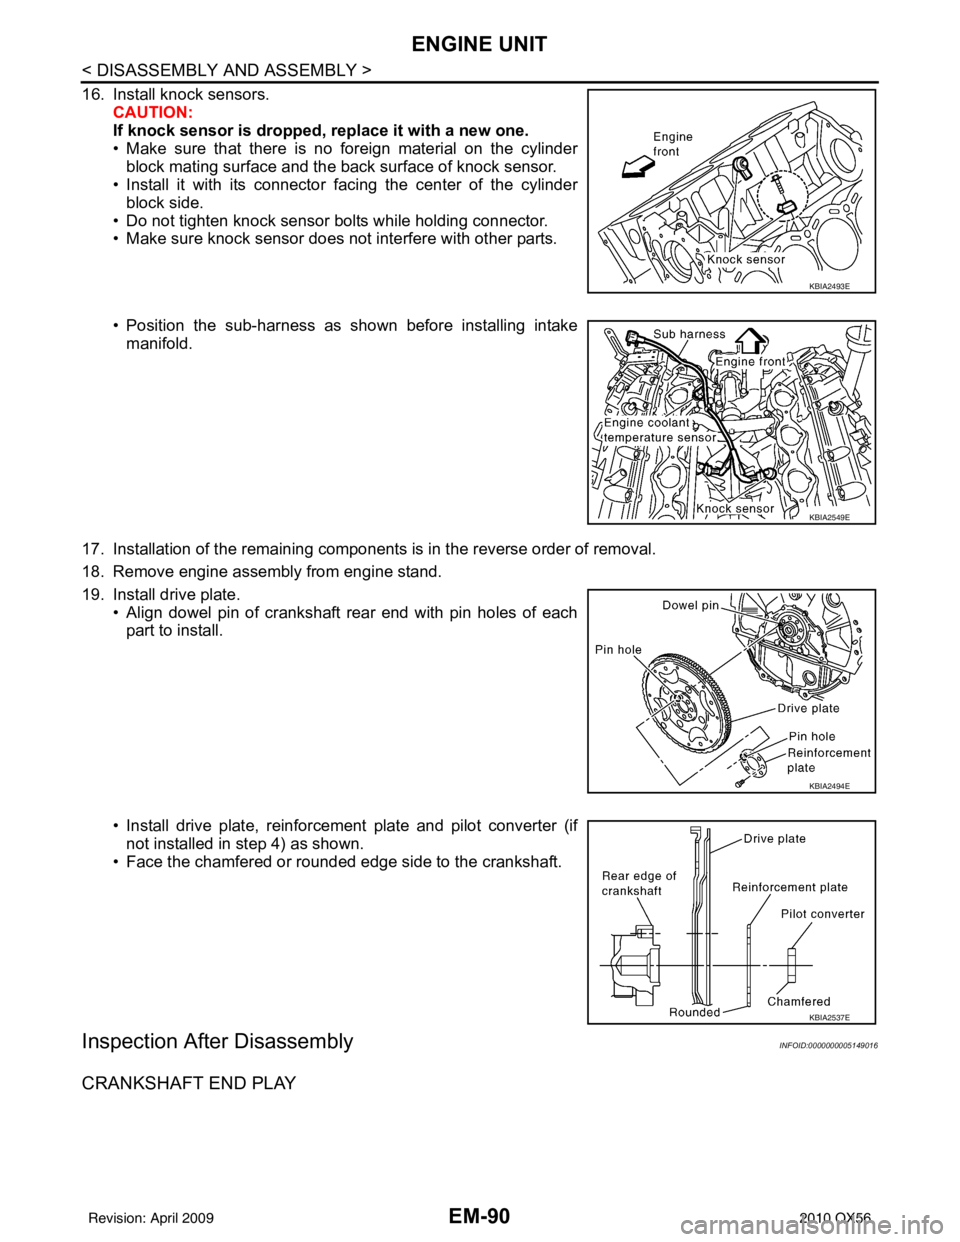
16. Install knock sensors.CAUTION:
If knock sensor is dropped, replace it with a new one.
• Make sure that there is no foreign material on the cylinderblock mating surface and the back surface of knock sensor.
• Install it with its connector facing the center of the cylinder
block side.
• Do not tighten knock sensor bolts while holding connector.
• Make sure knock sensor does not interfere with other parts.
• Position the sub-harness as shown before installing intake manifold.
17. Installation of the remaining components is in the reverse order of removal.
18. Remove engine assembly from engine stand.
19. Install drive plate. • Align dowel pin of crankshaft rear end with pin holes of eachpart to install.
• Install drive plate, reinforcement plate and pilot converter (if not installed in step 4) as shown.
• Face the chamfered or rounded edge side to the crankshaft.
Inspection After DisassemblyINFOID:0000000005149016
CRANKSHAFT END PLAY
KBIA2493E
KBIA2549E
KBIA2494E
KBIA2537E
Revision: April 20092010 QX56
Page 1945 of 4210
EM-94
< DISASSEMBLY AND ASSEMBLY >
ENGINE UNIT
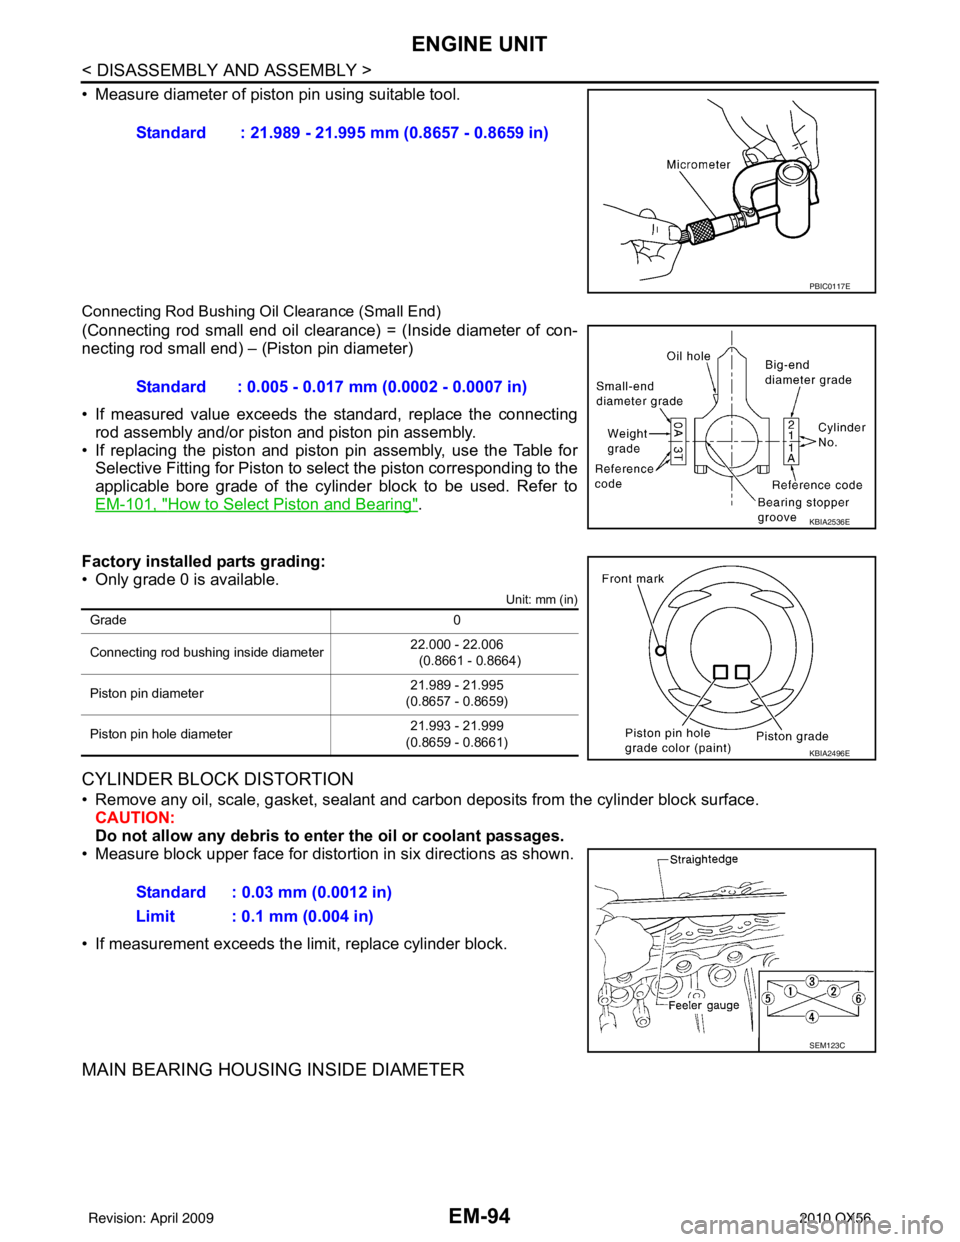
• Measure diameter of piston pin using suitable tool.
Connecting Rod Bushing Oil Clearance (Small End)
(Connecting rod small end oil clearance) = (Inside diameter of con-
necting rod small end) – (Piston pin diameter)
• If measured value exceeds the standard, replace the connectingrod assembly and/or piston and piston pin assembly.
• If replacing the piston and piston pin assembly, use the Table for
Selective Fitting for Piston to select the piston corresponding to the
applicable bore grade of the cylinder block to be used. Refer to
EM-101, "
How to Select Piston and Bearing".
Factory installed parts grading:
• Only grade 0 is available.
Unit: mm (in)
CYLINDER BLOCK DISTORTION
• Remove any oil, scale, gasket, sealant and carbon deposits from the cylinder block surface.
CAUTION:
Do not allow any debris to en ter the oil or coolant passages.
• Measure block upper face for distortion in six directions as shown.
• If measurement exceeds the limit, replace cylinder block.
MAIN BEARING HOUSING INSIDE DIAMETER
Standard : 21.989 - 21.995 mm (0.8657 - 0.8659 in)
PBIC0117E
Standard : 0.005 - 0.017 mm (0.0002 - 0.0007 in)
KBIA2536E
Grade 0
Connecting rod bushing inside diameter 22.000 - 22.006
(0.8661 - 0.8664)
Piston pin diameter 21.989 - 21.995
(0.8657 - 0.8659)
Piston pin hole diameter 21.993 - 21.999
(0.8659 - 0.8661)
KBIA2496E
Standard : 0.03 mm (0.0012 in)
Limit : 0.1 mm (0.004 in)
SEM123C
Revision: April 20092010 QX56
Page 1946 of 4210
ENGINE UNITEM-95
< DISASSEMBLY AND ASSEMBLY >
C
DE
F
G H
I
J
K L
M A
EM
NP
O
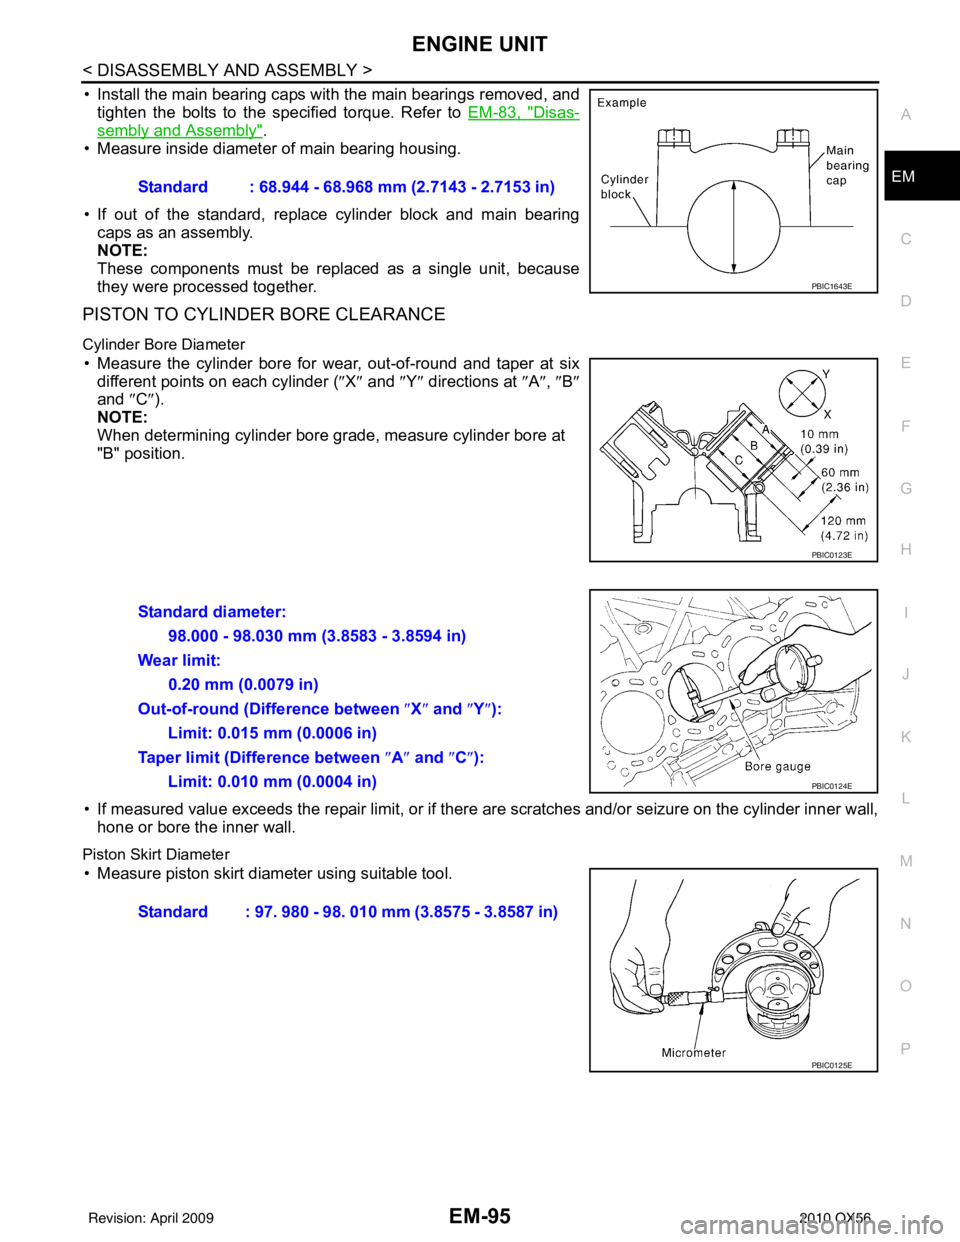
• Install the main bearing caps with the main bearings removed, and
tighten the bolts to the specified torque. Refer to EM-83, "
Disas-
sembly and Assembly".
• Measure inside diameter of main bearing housing.
• If out of the standard, replace cylinder block and main bearing caps as an assembly.
NOTE:
These components must be replaced as a single unit, because
they were processed together.
PISTON TO CYLINDER BORE CLEARANCE
Cylinder Bore Diameter
• Measure the cylinder bore for wear, out-of-round and taper at six
different points on each cylinder ( ″X″ and ″Y″ directions at ″A″ , ″B″
and ″C ″).
NOTE:
When determining cylinder bore grade, measure cylinder bore at
"B" position.
• If measured value exceeds the repair limit, or if ther e are scratches and/or seizure on the cylinder inner wall,
hone or bore the inner wall.
Piston Skirt Diameter
• Measure piston skirt diameter using suitable tool. Standard : 68.944 - 68.968 mm (2.7143 - 2.7153 in)
PBIC1643E
PBIC0123E
Standard diameter:
98.000 - 98.030 mm (3.8583 - 3.8594 in)
Wear limit: 0.20 mm (0.0079 in)
Out-of-round (Difference between ″X″ and ″Y″ ):
Limit: 0.015 mm (0.0006 in)
Taper limit (Difference between ″A ″ and ″C ″):
Limit: 0.010 mm (0.0004 in)
PBIC0124E
Standard : 97. 980 - 98. 010 mm (3.8575 - 3.8587 in)
PBIC0125E
Revision: April 20092010 QX56
Page 1948 of 4210
ENGINE UNITEM-97
< DISASSEMBLY AND ASSEMBLY >
C
DE
F
G H
I
J
K L
M A
EM
NP
O
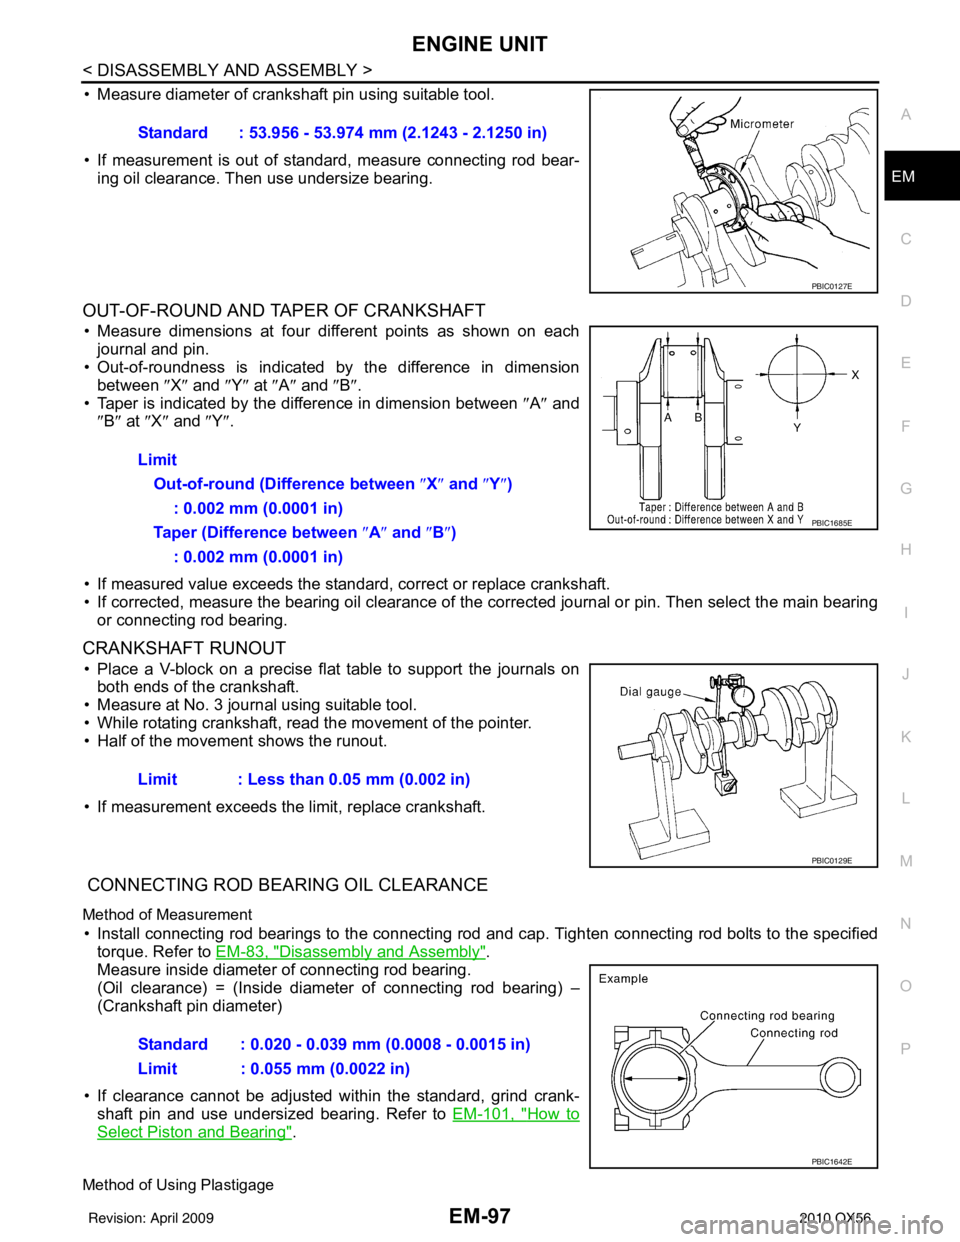
• Measure diameter of crankshaft pin using suitable tool.
• If measurement is out of standard, measure connecting rod bear-
ing oil clearance. Then use undersize bearing.
OUT-OF-ROUND AND TAPER OF CRANKSHAFT
• Measure dimensions at four di fferent points as shown on each
journal and pin.
• Out-of-roundness is indicated by the difference in dimension
between ″X″ and ″Y″ at ″A″ and ″B″ .
• Taper is indicated by the difference in dimension between ″A ″ and
″ B″ at ″X ″ and ″Y″ .
• If measured value exceeds the standard, correct or replace crankshaft.
• If corrected, measure the bearing oil clearance of the corrected journal or pin. Then select the main bearing or connecting rod bearing.
CRANKSHAFT RUNOUT
• Place a V-block on a precise flat table to support the journals onboth ends of the crankshaft.
• Measure at No. 3 journal using suitable tool.
• While rotating crankshaft, read the movement of the pointer.
• Half of the movement shows the runout.
• If measurement exceeds the limit, replace crankshaft.
CONNECTING ROD BEARING OIL CLEARANCE
Method of Measurement
• Install connecting rod bearings to the connecting rod and cap. Tighten connecting rod bolts to the specified
torque. Refer to EM-83, "
Disassembly and Assembly".
Measure inside diameter of connecting rod bearing.
(Oil clearance) = (Inside diameter of connecting rod bearing) –
(Crankshaft pin diameter)
• If clearance cannot be adjusted wit hin the standard, grind crank-
shaft pin and use undersized bearing. Refer to EM-101, "
How to
Select Piston and Bearing".
Method of Using Plastigage
Standard : 53.956 - 53.974 mm (2.1243 - 2.1250 in)
PBIC0127E
Limit
Out-of-round (Difference between ″X ″ and ″ Y″)
: 0.002 mm (0.0001 in)
Taper (Difference between ″ A″ and ″B ″)
: 0.002 mm (0.0001 in)
PBIC1685E
Limit : Less than 0.05 mm (0.002 in)
PBIC0129E
Standard : 0.020 - 0.039 mm (0.0008 - 0.0015 in)
Limit : 0.055 mm (0.0022 in)
PBIC1642E
Revision: April 20092010 QX56