2010 INFINITI QX56 oil filter
[x] Cancel search: oil filterPage 2694 of 4210
LU-8
< ON-VEHICLE MAINTENANCE >
ENGINE OIL
ON-VEHICLE MAINTENANCE
ENGINE OIL
InspectionINFOID:0000000005149025
OIL LEVEL
• Before starting the engine make sure the vehicle is parked on a flatand level surface, then check the oil level. If the engine is already
running, turn it off and allow 10 minutes before checking.
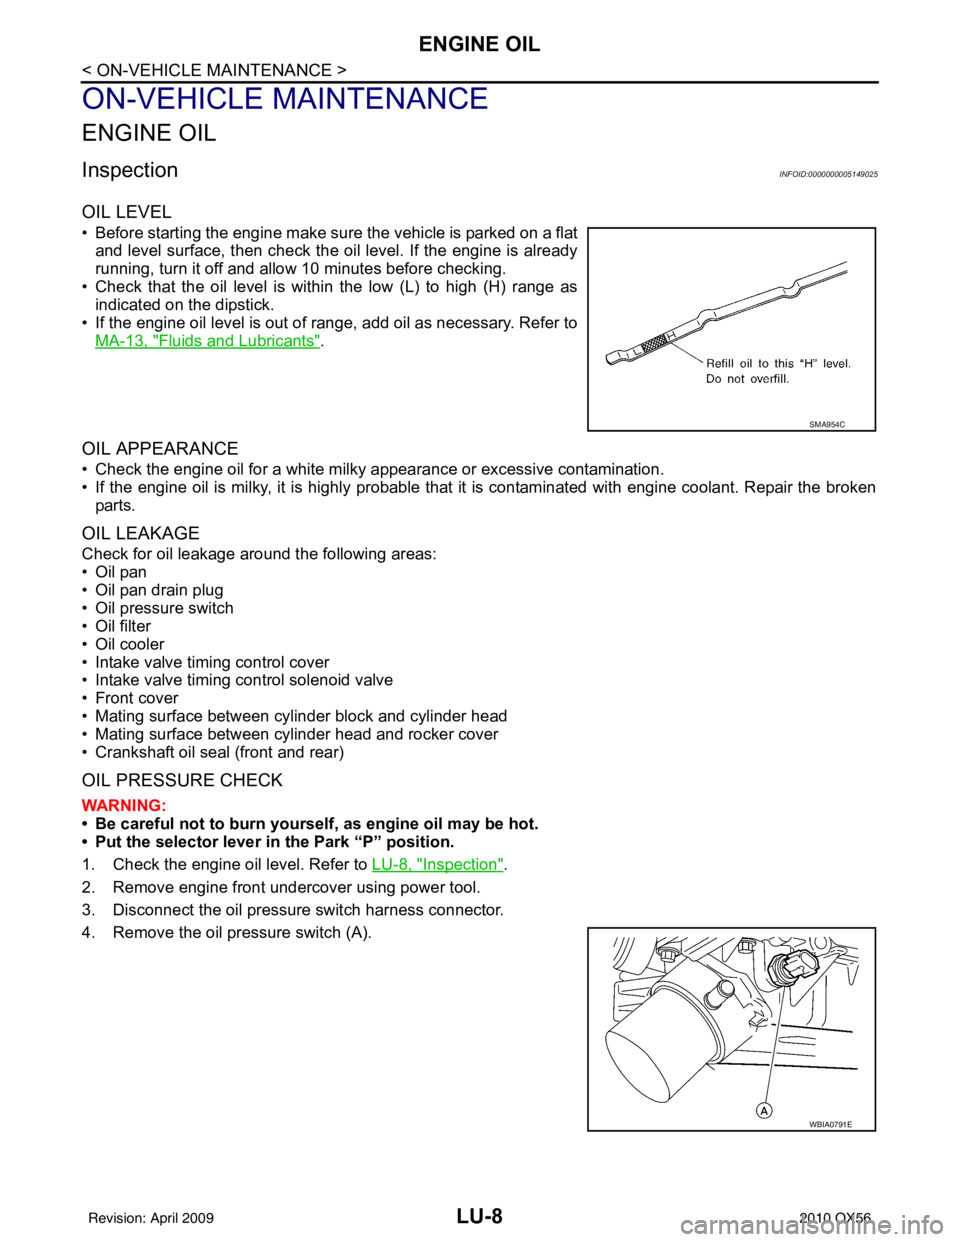
• Check that the oil level is within the low (L) to high (H) range as indicated on the dipstick.
• If the engine oil level is out of range, add oil as necessary. Refer to
MA-13, "
Fluids and Lubricants".
OIL APPEARANCE
• Check the engine oil for a white milky appearance or excessive contamination.
• If the engine oil is milky, it is highly probable that it is contaminated with engine coolant. Repair the broken
parts.
OIL LEAKAGE
Check for oil leakage around the following areas:
•Oil pan
• Oil pan drain plug
• Oil pressure switch
• Oil filter
• Oil cooler
• Intake valve timing control cover
• Intake valve timing control solenoid valve
• Front cover
• Mating surface between cylinder block and cylinder head
• Mating surface between cylinder head and rocker cover
• Crankshaft oil seal (front and rear)
OIL PRESSURE CHECK
WARNING:
• Be careful not to burn yoursel f, as engine oil may be hot.
• Put the selector lever in the Park “P” position.
1. Check the engine oil level. Refer to LU-8, "
Inspection".
2. Remove engine front undercover using power tool.
3. Disconnect the oil pressure switch harness connector.
4. Remove the oil pressure switch (A).
SMA954C
WBIA0791E
Revision: April 20092010 QX56
Page 2696 of 4210
LU-10
< ON-VEHICLE MAINTENANCE >
ENGINE OIL
Unit: (US qt, Imp qt)
CAUTION:
• The refill capacity depends on the engine oil temperature and drain time. Use these specifica-
tions for reference only.
• Always use the oil level gauge to determine when the proper amount of engine oil is in the engine.
8. Warm up engine and check area around drain plug and oil filter for oil leakage.
9. Stop engine and wait for 10 minutes.
10. Check engine oil level. Refer to LU-8, "
Inspection".
Drain and refill With oil filter change
6.5 (6 7/8, 5-3/4)
Without oil filter change 6.2 (6-1/2, 5-1/2)
Dry engine (engine overhaul) 7.6 (8, 6-3/4)
Revision: April 20092010 QX56
Page 2697 of 4210
OIL FILTERLU-11
< ON-VEHICLE MAINTENANCE >
C
DE
F
G H
I
J
K L
M A
LU
NP
O
OIL FILTER
Removal and InstallationINFOID:0000000005149027
REMOVAL
1. Drain the engine oil. Refer to
LU-9, "Changing Engine Oil".
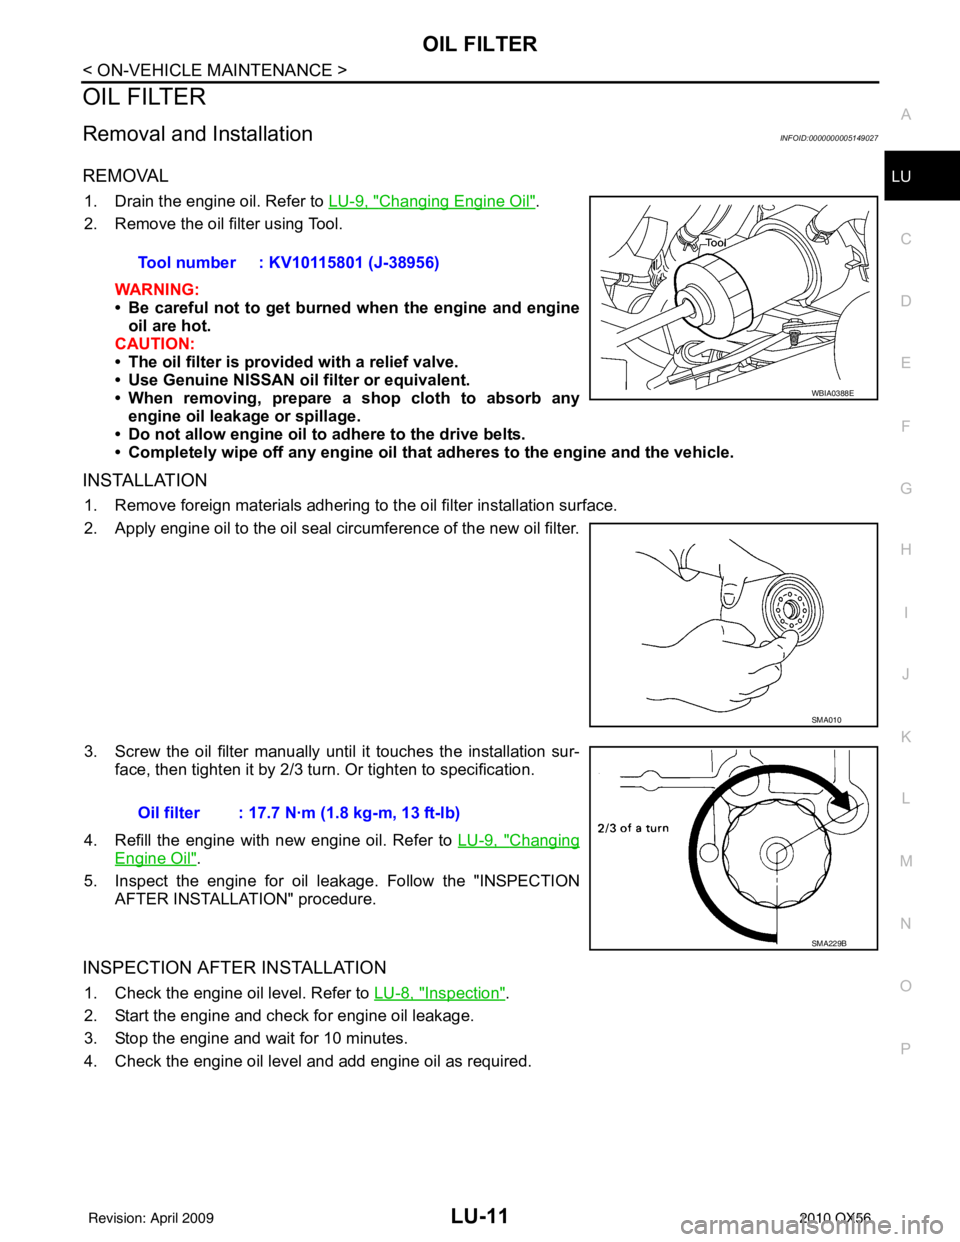
2. Remove the oil filter using Tool.
WARNING:
• Be careful not to get burned when the engine and engine
oil are hot.
CAUTION:
• The oil filter is provided with a relief valve.
• Use Genuine NISSAN oil filter or equivalent.
• When removing, prepare a s hop cloth to absorb any
engine oil leakage or spillage.
• Do not allow engine oil to adhere to the drive belts.
• Completely wipe off any engine oil that adheres to the engine and the vehicle.
INSTALLATION
1. Remove foreign materials adhering to the oil filter installation surface.
2. Apply engine oil to the oil seal circumference of the new oil filter.
3. Screw the oil filter manually until it touches the installation sur-
face, then tighten it by 2/3 turn. Or tighten to specification.
4. Refill the engine with new engine oil. Refer to LU-9, "
Changing
Engine Oil".
5. Inspect the engine for oil leakage. Follow the "INSPECTION AFTER INSTALLATION" procedure.
INSPECTION AFTER INSTALLATION
1. Check the engine oil level. Refer to LU-8, "Inspection".
2. Start the engine and check for engine oil leakage.
3. Stop the engine and wait for 10 minutes.
4. Check the engine oil level and add engine oil as required. Tool number : KV10115801 (J-38956)
WBIA0388E
SMA010
Oil filter : 17.7 N·m (1.8 kg-m, 13 ft-lb)
SMA229B
Revision: April 20092010 QX56
Page 2698 of 4210

LU-12
< ON-VEHICLE REPAIR >
OIL COOLER
ON-VEHICLE REPAIR
OIL COOLER
Exploded ViewINFOID:0000000005149028
Removal and InstallationINFOID:0000000005149029
WARNING:
Be careful not to burn yourself, as the engine oil and engine coolant are hot.
REMOVAL
1. Drain engine coolant from the radiator. Refer to CO-11, "Changing Engine Coolant".
2. Disconnect water hoses from the oil cooler. CAUTION:
Do not spill engine coolant on the drive belt.
3. Remove oil filter. Refer to LU-11, "
Removal and Installation".
CAUTION:
Do not spill engine oil on the drive belt.
4. Remove connector bolt, and remove oil cooler.
INSPECTION AFTER REMOVAL
Oil Cooler
Check oil cooler for cracks. Check oil cooler for clogging by blowing compressed air through engine coolant
inlet. If necessary, replace oil cooler assembly.
1. Oil pan 2. Water hose3. Water pipe
4. Water hose 5. Connector bolt 6. Oil filter
7. Oil cooler 8. O-ring 9. Relief valve
10. Water hose 11. Connector pipe 12. Gasket
A. To thermostat housing B. Refer to LU-11
C. To cylinder block
WBIA0790E
Revision: April 20092010 QX56
Page 2704 of 4210
LU-18
< SERVICE DATA AND SPECIFICATIONS (SDS)
SERVICE DATA AND SPECIFICATIONS (SDS)
SERVICE DATA AND SPECIFICATIONS (SDS)
SERVICE DATA AND SPECIFICATIONS (SDS)
Standard and LimitINFOID:0000000005149033
OIL PRESSURE
Unit: kPa (kg/cm2, psi)
OIL PUMP
Unit: mm (in)
REGULATOR VALVE
Unit: mm (in)
ENGINE OIL CAPACITY (APPROXIMATE)
Unit: (US qt, Imp qt)
Engine speed Approximate discharge oil pressure
Idle speed More than 98 (1.0, 14)
2,000 rpm More than 294 (3.0, 43)
Body to outer rotor radial clearance0.114 - 0.200 (0.0045 - 0.0079)
Inner rotor to outer rotor tip clearance Below 0.180 (0.0071)
Body to inner rotor side clearance 0.030 - 0.070 (0.0012 - 0.0028)
Body to outer rotor side clearance 0.030 - 0.090 (0.0012 - 0.0035)
Inner rotor to brazed portion of housing clearance 0.045 - 0.091 (0.0018 - 0.0036)
Regulator valve to oil pump cover clearance 0.040 - 0.097 (0.0016 - 0.0038)
Drain and refillWith oil filter change 6.5 (6-7/8, 5-3/4)
Without oil filter change
6.2 (6-1/2, 5-1/2)
Dry engine (engine overhaul) 7.6 (8, 6-3/4)
Revision: April 20092010 QX56
Page 2705 of 4210
MA-1
MAINTENANCE
C
DE
F
G H
I
J
K L
M B
MA
SECTION MA
N
O A
CONTENTS
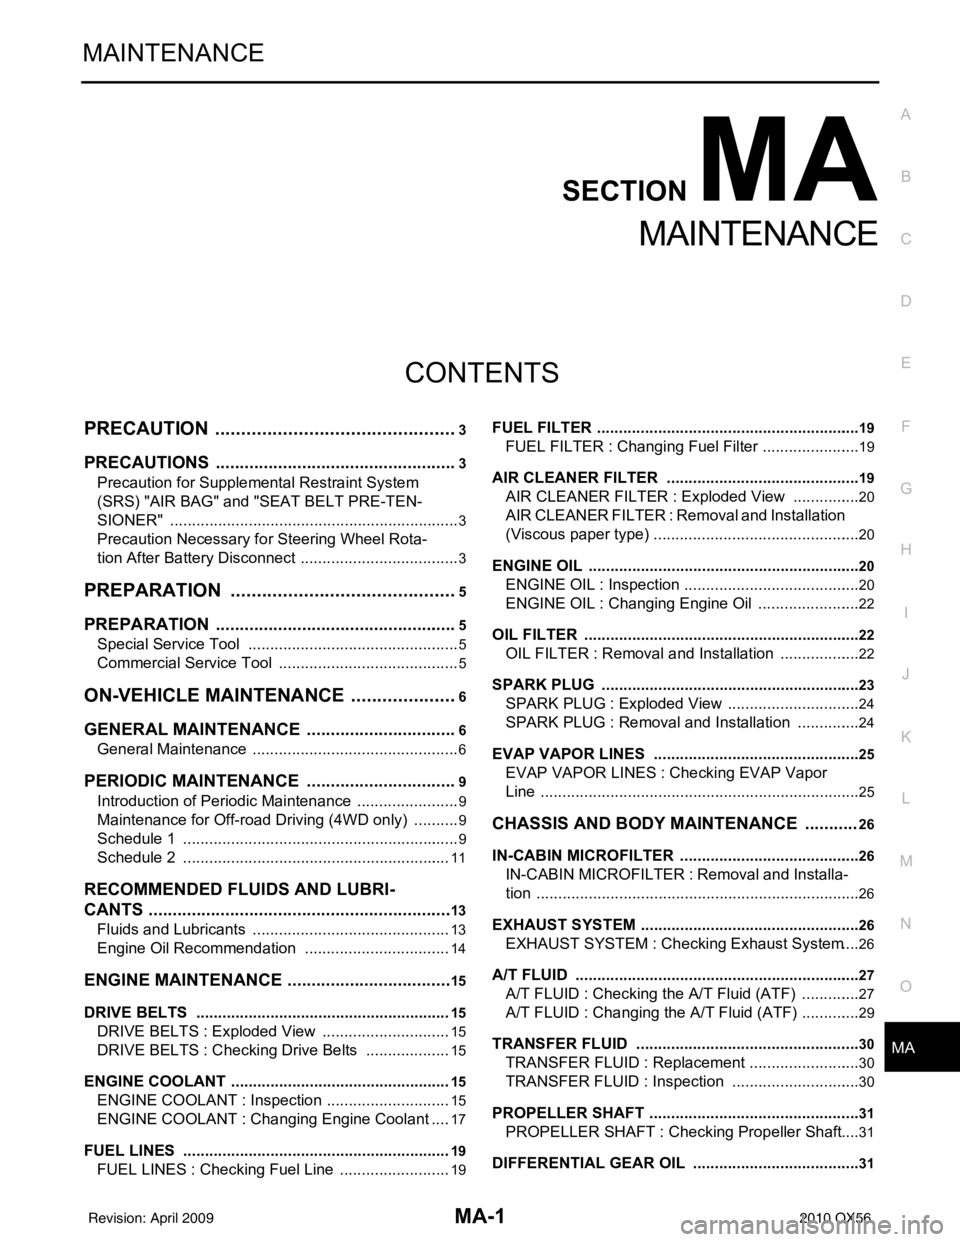
MAINTENANCE
PRECAUTION .......
........................................3
PRECAUTIONS .............................................. .....3
Precaution for Supplemental Restraint System
(SRS) "AIR BAG" and "SEAT BELT PRE-TEN-
SIONER" ............................................................. ......
3
Precaution Necessary for Steering Wheel Rota-
tion After Battery Disconnect ............................... ......
3
PREPARATION ............................................5
PREPARATION .............................................. .....5
Special Service Tool ........................................... ......5
Commercial Service Tool ..........................................5
ON-VEHICLE MAINTENANCE .....................6
GENERAL MAINTE NANCE ........................... .....6
General Maintenance .......................................... ......6
PERIODIC MAINTENANCE ................................9
Introduction of Periodic Maintenance .................. ......9
Maintenance for Off-road Driving (4WD only) ...........9
Schedule 1 ................................................................9
Schedule 2 ..............................................................11
RECOMMENDED FLUIDS AND LUBRI-
CANTS ................................................................
13
Fluids and Lubricants .......................................... ....13
Engine Oil Recommendation ..................................14
ENGINE MAINTENANCE ...................................15
DRIVE BELTS ....................................................... ....15
DRIVE BELTS : Exploded View ..............................15
DRIVE BELTS : Checking Drive Belts ....................15
ENGINE COOLANT ............................................... ....15
ENGINE COOLANT : Inspection .............................15
ENGINE COOLANT : Changing Engine Coolant ....17
FUEL LINES .......................................................... ....19
FUEL LINES : Checking Fuel Line ..........................19
FUEL FILTER ......................................................... ....19
FUEL FILTER : Changing Fuel Filter .......................19
AIR CLEANER FILTER ......................................... ....19
AIR CLEANER FILTER : Exploded View ................20
AIR CLEANER FILTER : Removal and Installation
(Viscous paper type) ................................................
20
ENGINE OIL ........................................................... ....20
ENGINE OIL : Inspection .........................................20
ENGINE OIL : Changing Engine Oil ........................22
OIL FILTER ............................................................ ....22
OIL FILTER : Removal and Installation ...................22
SPARK PLUG ........................................................ ....23
SPARK PLUG : Exploded View ...............................24
SPARK PLUG : Removal and Installation ...............24
EVAP VAPOR LINES ............................................ ....25
EVAP VAPOR LINES : Checking EVAP Vapor
Line ..........................................................................
25
CHASSIS AND BODY MAINTENANCE ...........26
IN-CABIN MICROFILTER ...................................... ....26
IN-CABIN MICROFILTER : Removal and Installa-
tion ....................................................................... ....
26
EXHAUST SYSTEM ...................................................26
EXHAUST SYSTEM : Checking Exhaust System ....26
A/T FLUID .............................................................. ....27
A/T FLUID : Checking the A/T Fluid (ATF) ..............27
A/T FLUID : Changing the A/T Fluid (ATF) ..............29
TRANSFER FLUID ................................................ ....30
TRANSFER FLUID : Replacement ..........................30
TRANSFER FLUID : Inspection ..............................30
PROPELLER SHAFT ............................................. ....31
PROPELLER SHAFT : Checking Propeller Shaft ....31
DIFFERENTIAL GEAR OIL ................................... ....31
Revision: April 20092010 QX56
Page 2709 of 4210
PREPARATIONMA-5
< PREPARATION >
C
DE
F
G H
I
J
K L
M B
MA
N
O A
PREPARATION
PREPARATION
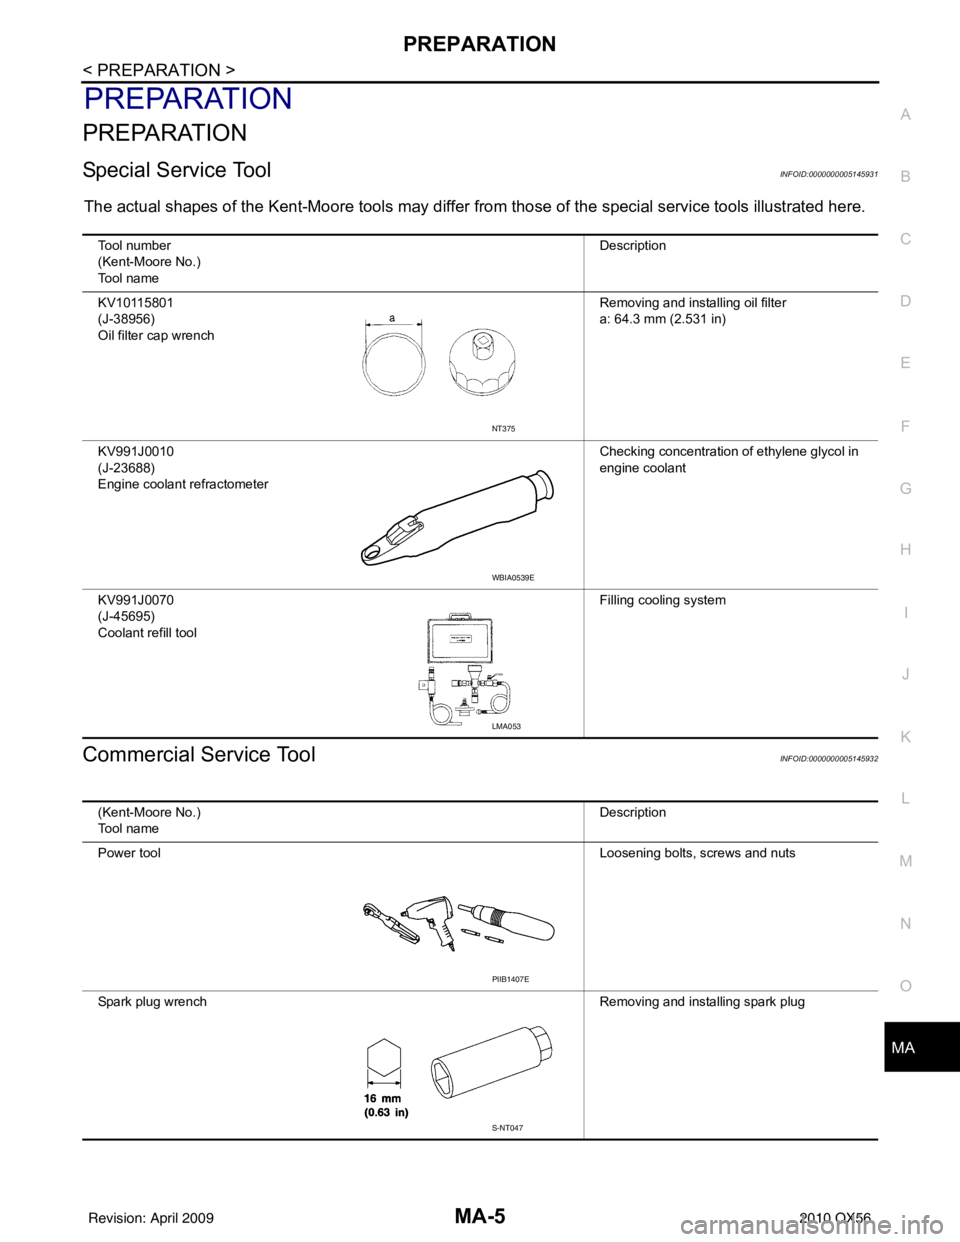
Special Service ToolINFOID:0000000005145931
The actual shapes of the Kent-Moore t
ools may differ from those of the special service tools illustrated here.
Commercial Service ToolINFOID:0000000005145932
Tool number
(Kent-Moore No.)
Tool name Description
KV10115801
(J-38956)
Oil filter cap wrench Removing and installing oil filter
a: 64.3 mm (2.531 in)
KV991J0010
(J-23688)
Engine coolant refractometer Checking concentration of ethylene glycol in
engine coolant
KV991J0070
(J-45695)
Coolant refill tool Filling cooling system
NT375
WBIA0539E
LMA053
(Kent-Moore No.)
Tool name
Description
Power tool Loosening bolts, screws and nuts
Spark plug wrench Removing and installing spark plug
PIIB1407E
S-NT047
Revision: April 20092010 QX56
Page 2713 of 4210
PERIODIC MAINTENANCEMA-9
< ON-VEHICLE MAINTENANCE >
C
DE
F
G H
I
J
K L
M B
MA
N
O A
PERIODIC MAINTENANCE
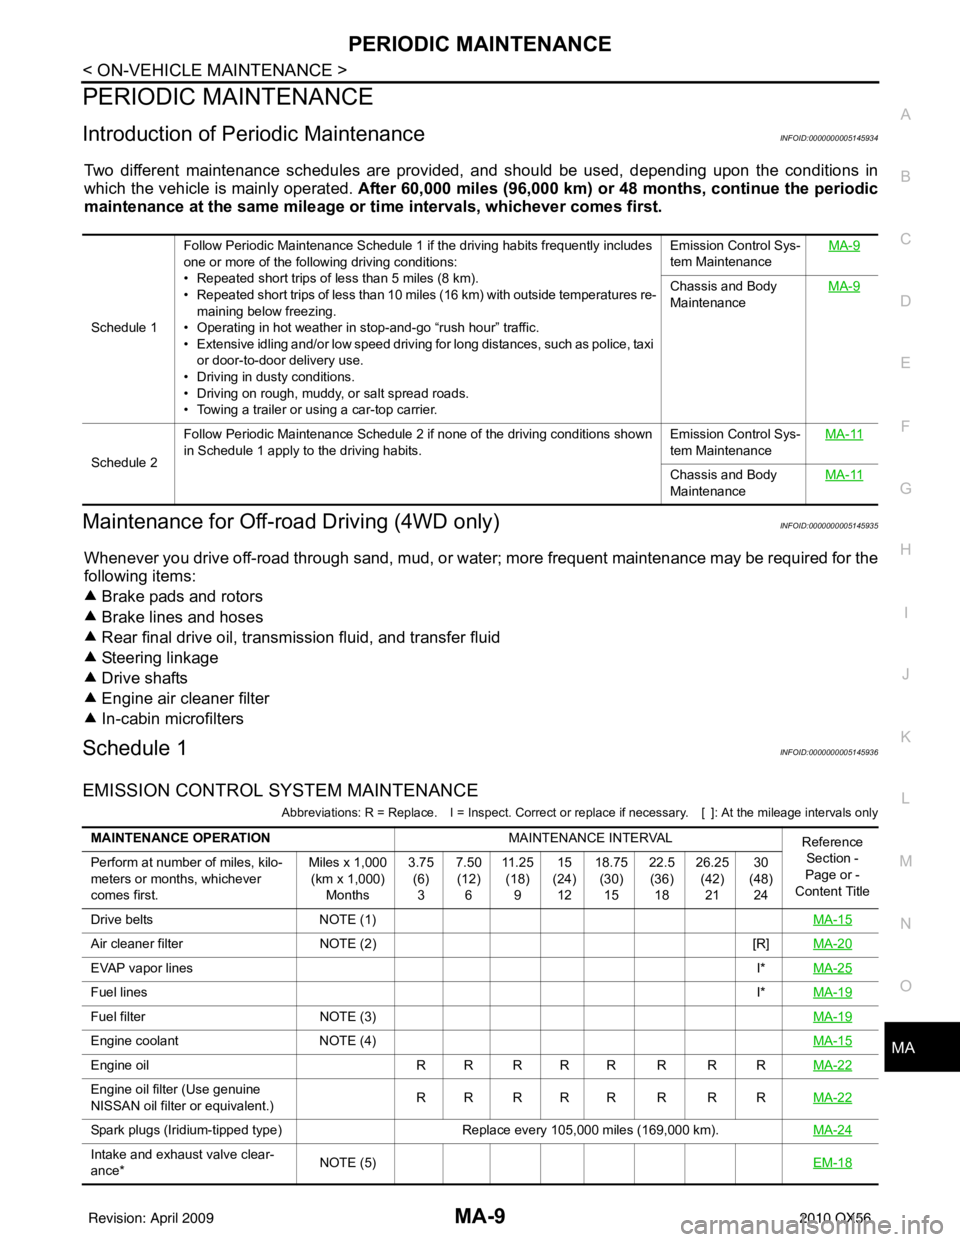
Introduction of Periodic MaintenanceINFOID:0000000005145934
Two different maintenance schedules are provi
ded, and should be used, depending upon the conditions in
which the vehicle is mainly operated. After 60,000 miles (96,000 km) or 48 months, continue the periodic
maintenance at the same mileage or ti me intervals, whichever comes first.
Maintenance for Off-road Driving (4WD only)INFOID:0000000005145935
Whenever you drive off-road through sand, mud, or wa ter; more frequent maintenance may be required for the
following items:
Brake pads and rotors
Brake lines and hoses
Rear final drive oil, transmission fluid, and transfer fluid
Steering linkage
Drive shafts
Engine air cleaner filter
In-cabin microfilters
Schedule 1INFOID:0000000005145936
EMISSION CONTROL SYSTEM MAINTENANCE
Abbreviations: R = Replace. I = Ins pect. Correct or replace if necessary. [ ]: At the mileage intervals only
Schedule 1Follow Periodic Maintenance Schedule 1 if the driving habits frequently includes
one or more of the following driving conditions:
• Repeated short trips of less than 5 miles (8 km).
• Repeated short trips of less than 10 miles (16 km) with outside temperatures re-
maining below freezing.
• Operating in hot weather in stop-and-go “rush hour” traffic.
• Extensive idling and/or low speed driving for long distances, such as police, taxi
or door-to-door delivery use.
• Driving in dusty conditions.
• Driving on rough, muddy, or salt spread roads.
• Towing a trailer or using a car-top carrier. Emission Control Sys-
tem Maintenance
MA-9
Chassis and Body
Maintenance
MA-9
Schedule 2Follow Periodic Maintenance Schedule 2 if none of the driving conditions shown
in Schedule 1 apply to the driving habits.
Emission Control Sys-
tem MaintenanceMA-11Chassis and Body
Maintenance
MA-11
MAINTENANCE OPERATION
MAINTENANCE INTERVAL
Reference
Section -
Page or -
Content Title
Perform at number of miles, kilo-
meters or months, whichever
comes first. Miles x 1,000
(km x 1,000) Months 3.75
(6)3 7.50
(12) 6 11 . 2 5
(18) 9 15
(24) 12 18.75
(30)15 22.5
(36) 18 26.25
(42)21 30
(48) 24
Drive belts NOTE (1) MA-15
Air cleaner filterNOTE (2) [R]MA-20
EVAP vapor lines I*MA-25
Fuel lines I*MA-19
Fuel filter NOTE (3) MA-19
Engine coolantNOTE (4) MA-15
Engine oilR R R R R R R R MA-22
Engine oil filter (Use genuine
NISSAN oil filter or equivalent.)RR RRR R R R
MA-22
Spark plugs (Iridium-tipped type)Replace every 105,000 miles (169,000 km).MA-24
Intake and exhaust valve clear-
ance*NOTE (5)
EM-18
Revision: April 20092010 QX56