2010 INFINITI QX56 engine coolant
[x] Cancel search: engine coolantPage 2456 of 4210
![INFINITI QX56 2010 Factory Service Manual HAC-116
< SYMPTOM DIAGNOSIS >[AUTOMATIC AIR CONDITIONER]
INSUFFICIENT HEATING
INSUFFICIENT HEATING
Component Function CheckINFOID:0000000005147739
SYMPTOM: Insufficient heating
INSPECTION FLOW
1.CONFI INFINITI QX56 2010 Factory Service Manual HAC-116
< SYMPTOM DIAGNOSIS >[AUTOMATIC AIR CONDITIONER]
INSUFFICIENT HEATING
INSUFFICIENT HEATING
Component Function CheckINFOID:0000000005147739
SYMPTOM: Insufficient heating
INSPECTION FLOW
1.CONFI](/manual-img/42/57032/w960_57032-2455.png)
HAC-116
< SYMPTOM DIAGNOSIS >[AUTOMATIC AIR CONDITIONER]
INSUFFICIENT HEATING
INSUFFICIENT HEATING
Component Function CheckINFOID:0000000005147739
SYMPTOM: Insufficient heating
INSPECTION FLOW
1.CONFIRM SYMPTOM BY PERFORMING OPER
ATIONAL CHECK - TEMPERATURE INCREASE
1. Press the AUTO switch.
2. Turn the temperature control dial (driver) clockwise until 32 °C (90° F) is displayed.
3. Check for hot air at discharge air outlets.
Can this symptom be duplicated?
YES >> GO TO 2.
NO >> Perform complete system operational check. Refer to HAC-4, "
Operational Check (Front)".
2.CHECK FOR SERVICE BULLETINS
Check for any service bulletins.
>> GO TO 3.
3.PERFORM SELF-DIAGNOSIS
Perform self-diagnosis. Refer to HAC-23, "
A/C Auto Amp. Self-Diagnosis".
Is the inspection result normal?
YES >> GO TO 4.
NO >> Refer to HAC-24, "
A/C System Self-Diagnosis Code Chart".
4.CHECK ENGINE COOLING SYSTEM
1. Check for proper engine coolant level. Refer to CO-10, "
Inspection".
2. Check hoses for leaks or kinks.
3. Check radiator cap. Refer to CO-10, "
Inspection".
4. Check for air in cooling system.
>> GO TO 5.
5.CHECK AIR MIX DOOR OPERATION
Check the operation of the air mix door.
Is the inspection result normal?
YES >> GO TO 6.
NO >> Check the air mix door motor circuit. Refer to HAC-31, "
Air Mix Door Motor (Driver) Component
Function Check".
6.CHECK AIR DUCTS
Check for disconnected or leaking air ducts.
Is the inspection result normal?
YES >> GO TO 7.
NO >> Repair all disconnected or leaking air ducts.
7.CHECK HEATER HOSE TEMPERATURES
1. Start engine and warm it up to normal operating temperature.
2. Touch both the inlet and outlet heater hoses. The inlet hose should be hot and the outlet hose should be
warm.
Is the inspection result normal?
YES >> Hot inlet hose and a warm outlet hose: GO TO 8.
NO >> • Inlet hose cold: GO TO 11. • Both hoses warm: GO TO 9.
8.CHECK ENGINE COOLANT SYSTEM
Revision: April 20092010 QX56
Page 2457 of 4210
![INFINITI QX56 2010 Factory Service Manual INSUFFICIENT HEATINGHAC-117
< SYMPTOM DIAGNOSIS > [AUTOMATIC AIR CONDITIONER]
C
D
E
F
G H
J
K L
M A
B
HAC
N
O P
Check engine coolant temperature sensor. Refer to EC-123, "Component Inspection".
Is th INFINITI QX56 2010 Factory Service Manual INSUFFICIENT HEATINGHAC-117
< SYMPTOM DIAGNOSIS > [AUTOMATIC AIR CONDITIONER]
C
D
E
F
G H
J
K L
M A
B
HAC
N
O P
Check engine coolant temperature sensor. Refer to EC-123, "Component Inspection".
Is th](/manual-img/42/57032/w960_57032-2456.png)
INSUFFICIENT HEATINGHAC-117
< SYMPTOM DIAGNOSIS > [AUTOMATIC AIR CONDITIONER]
C
D
E
F
G H
J
K L
M A
B
HAC
N
O P
Check engine coolant temperature sensor. Refer to EC-123, "Component Inspection".
Is the inspection result normal?
YES >> System OK.
NO >> Repair or replace as necessary. Retest.
9.CHECK HEATER HOSES
Check heater hoses for proper installation.
Is the inspection result normal?
YES >> System OK.
NO >> 1. Back flush heater core. 2. Drain the water from the system.
3. Refill system with new engine coolant. Refer to CO-11, "
Changing Engine Coolant".
4. GO TO 10 to retest.
10.CHECK HEATER HOSE TEMPERATURES
1. Start engine and warm it up to normal operating temperature.
2. Touch both the inlet and outlet heater hoses. The inlet hose should be hot and the outlet hose should be warm.
Is the inspection result normal?
YES >> System OK.
NO >> Replace heater core. Refer to VTL-24, "
Removal and Installation".
11 .CHECK WATER VALVE
Check the operation of the water valve. Refer to HAC-73, "
Water Valve Diagnosis Procedure".
Is the inspection result normal?
YES >> System OK.
NO >> Replace water valve.
Revision: April 20092010 QX56
Page 2642 of 4210
![INFINITI QX56 2010 Factory Service Manual LAN-44
< FUNCTION DIAGNOSIS >[CAN]
CAN COMMUNICATION SYSTEM
FUNCTION DIAGNOSIS
CAN COMMUNICATION SYSTEM
CAN System Specification ChartINFOID:0000000005146462
Determine CAN system type from the followi INFINITI QX56 2010 Factory Service Manual LAN-44
< FUNCTION DIAGNOSIS >[CAN]
CAN COMMUNICATION SYSTEM
FUNCTION DIAGNOSIS
CAN COMMUNICATION SYSTEM
CAN System Specification ChartINFOID:0000000005146462
Determine CAN system type from the followi](/manual-img/42/57032/w960_57032-2641.png)
LAN-44
< FUNCTION DIAGNOSIS >[CAN]
CAN COMMUNICATION SYSTEM
FUNCTION DIAGNOSIS
CAN COMMUNICATION SYSTEM
CAN System Specification ChartINFOID:0000000005146462
Determine CAN system type from the following specificat
ion chart. Then choose the correct diagnosis sheet.
NOTE:
Refer to LAN-14, "
Trouble Diagnosis Procedure" for how to use CAN system specification chart.
×: Applicable
VEHICLE EQUIPMENT IDENTIFICATION INFORMATION
NOTE:
Check CAN system type from the vehicle shape and equipment.
CAN Communication Signal ChartINFOID:0000000005146463
Refer to LAN-13, "How to Use CAN Communication Signal Chart" for how to use CAN communication signal
chart.
NOTE:
Refer to LAN-36, "
Abbreviation List" for the abbreviations of the connecting units.
T: Transmit R: Receive
Body type Wagon
Axle 2WD4WD
Engine VK56DE
Transmission A/T
Brake control VDC
ICC system ××
CAN system type 12 34
Diagnosis sheet LAN-40
LAN-41LAN-42LAN-43
AWMIA0012GB
Signal name/Connecting unitECM
TCM
LASER ICC
ADP
AV
BCM
HVAC I-KEY M&A
STRG 4WDABS
IPDM-E
Accelerator pedal position signal T RR R R
A/C compressor request signal T R
ASCD CRUISE lamp signal T R
ASCD OD cancel request signal T R
ASCD operation signal T R
ASCD SET lamp signal T R
Battery voltage signal T R
Closed throttle position signal T RR
Cooling fan speed request signal T R
Engine coolant temperature signal T RR
Revision: April 20092010 QX56
Page 2689 of 4210

PRECAUTIONSLU-3
< PRECAUTION >
C
DE
F
G H
I
J
K L
M A
LU
NP
O
5. When the repair work is completed, return the ignition switch to the
″LOCK ″ position before connecting
the battery cables. (At this time, the steering lock mechanism will engage.)
6. Perform a self-diagnosis check of al l control units using CONSULT-III.
Precaution for Liquid GasketINFOID:0000000005149020
REMOVAL OF LIQUID GASKET SEALING
• After removing the bolts and nuts, separate the mating surface and
remove the old liquid gasket sealing using Tool.
CAUTION:
Do not damage the mating surfaces.
• Tap the seal cutter to insert it (1).
• In areas where the Tool is difficult to use, lightly tap to slide it (2).
LIQUID GASKET APPLICATION PROCEDURE
1. Remove the old liquid gasket adhering to the gasket application surface and the mating surface using suitable tool.
• Remove the liquid gasket completely from the groove of the
liquid gasket application surface, bolts, and bolt holes.
2. Thoroughly clean the mating surfaces and remove adhering moisture, grease and foreign material.
3. Attach the liquid gasket tube to the Tool. Use Genuine RTV Silicone Sealant or equivalent. Refer to
GI-15, "
Recommended Chemical Products and Sealants".
4. Apply the liquid gasket without breaks to the specified location.
• If there is a groove for the liquid gasket application, apply theliquid gasket to the groove.
• As for the bolt holes, normally apply the liquid gasket inside
the holes. If specified in the procedure, it should also be
applied outside the holes.
• Within five minutes of liquid gasket application, install the mat-
ing component.
• If the liquid gasket protrudes, wipe it off immediately.
• Do not retighten after the installation.
• Wait 30 minutes or more after installation before refilling the engine with engine oil and engine coolant.
CAUTION:
If there are specific instructions in this manual, observe them.
Tool number : KV10111100 (J-37228)
WBIA0566E
PBIC0003E
Tool number : WS39930000 ( — )
WBIA0567E
SEM159F
Revision: April 20092010 QX56
Page 2694 of 4210

LU-8
< ON-VEHICLE MAINTENANCE >
ENGINE OIL
ON-VEHICLE MAINTENANCE
ENGINE OIL
InspectionINFOID:0000000005149025
OIL LEVEL
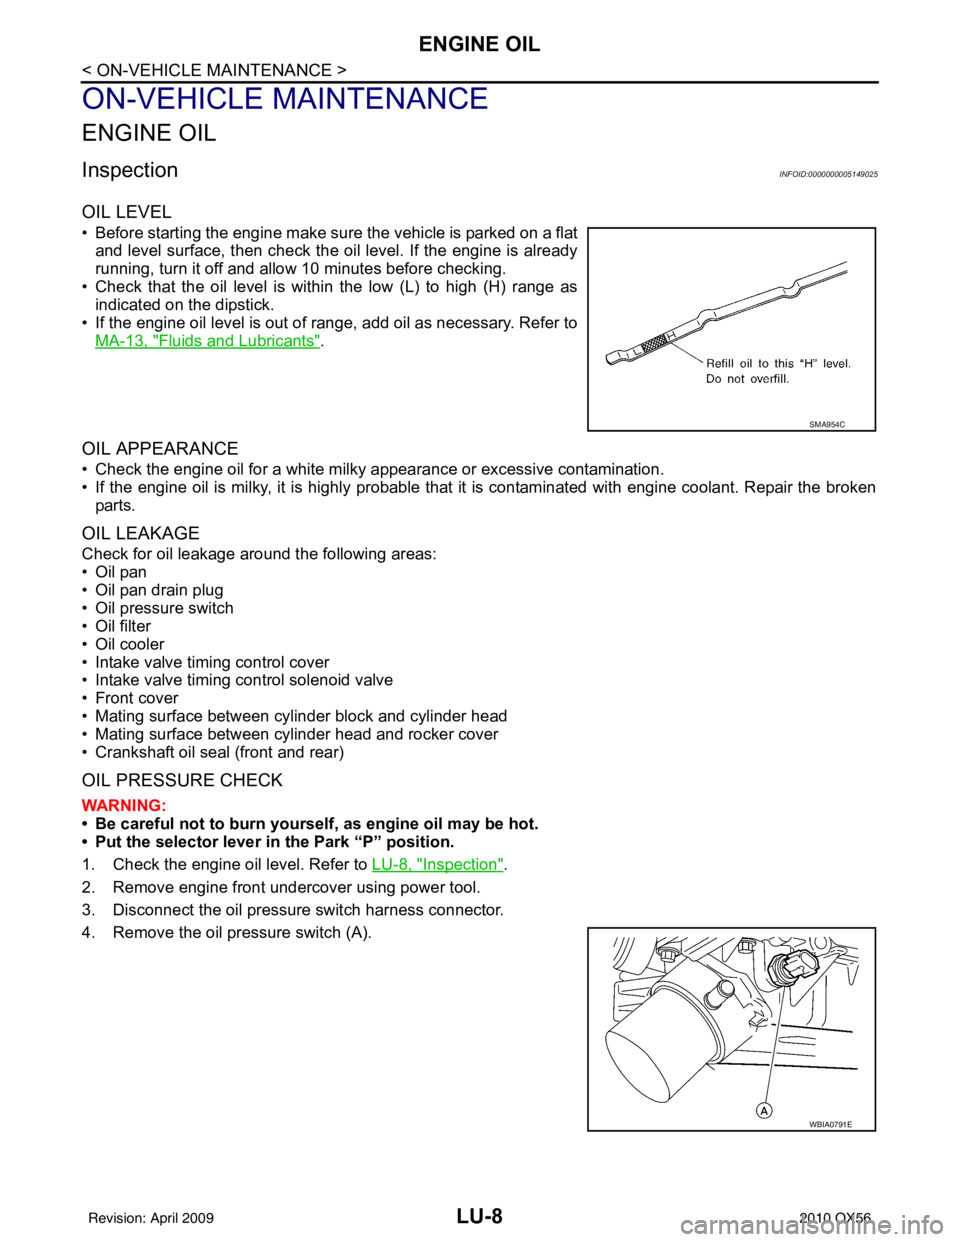
• Before starting the engine make sure the vehicle is parked on a flatand level surface, then check the oil level. If the engine is already
running, turn it off and allow 10 minutes before checking.
• Check that the oil level is within the low (L) to high (H) range as indicated on the dipstick.
• If the engine oil level is out of range, add oil as necessary. Refer to
MA-13, "
Fluids and Lubricants".
OIL APPEARANCE
• Check the engine oil for a white milky appearance or excessive contamination.
• If the engine oil is milky, it is highly probable that it is contaminated with engine coolant. Repair the broken
parts.
OIL LEAKAGE
Check for oil leakage around the following areas:
•Oil pan
• Oil pan drain plug
• Oil pressure switch
• Oil filter
• Oil cooler
• Intake valve timing control cover
• Intake valve timing control solenoid valve
• Front cover
• Mating surface between cylinder block and cylinder head
• Mating surface between cylinder head and rocker cover
• Crankshaft oil seal (front and rear)
OIL PRESSURE CHECK
WARNING:
• Be careful not to burn yoursel f, as engine oil may be hot.
• Put the selector lever in the Park “P” position.
1. Check the engine oil level. Refer to LU-8, "
Inspection".
2. Remove engine front undercover using power tool.
3. Disconnect the oil pressure switch harness connector.
4. Remove the oil pressure switch (A).
SMA954C
WBIA0791E
Revision: April 20092010 QX56
Page 2698 of 4210

LU-12
< ON-VEHICLE REPAIR >
OIL COOLER
ON-VEHICLE REPAIR
OIL COOLER
Exploded ViewINFOID:0000000005149028
Removal and InstallationINFOID:0000000005149029
WARNING:
Be careful not to burn yourself, as the engine oil and engine coolant are hot.
REMOVAL
1. Drain engine coolant from the radiator. Refer to CO-11, "Changing Engine Coolant".
2. Disconnect water hoses from the oil cooler. CAUTION:
Do not spill engine coolant on the drive belt.
3. Remove oil filter. Refer to LU-11, "
Removal and Installation".
CAUTION:
Do not spill engine oil on the drive belt.
4. Remove connector bolt, and remove oil cooler.
INSPECTION AFTER REMOVAL
Oil Cooler
Check oil cooler for cracks. Check oil cooler for clogging by blowing compressed air through engine coolant
inlet. If necessary, replace oil cooler assembly.
1. Oil pan 2. Water hose3. Water pipe
4. Water hose 5. Connector bolt 6. Oil filter
7. Oil cooler 8. O-ring 9. Relief valve
10. Water hose 11. Connector pipe 12. Gasket
A. To thermostat housing B. Refer to LU-11
C. To cylinder block
WBIA0790E
Revision: April 20092010 QX56
Page 2699 of 4210

OIL COOLERLU-13
< ON-VEHICLE REPAIR >
C
DE
F
G H
I
J
K L
M A
LU
NP
O
Relief Valve
Inspect relief valve for movement, cracks and breaks by
pushing the ball. If replacement is necessary, remove
the valve by prying it out using a suitable tool. Install a new valve in place by tapping it.
INSTALLATION
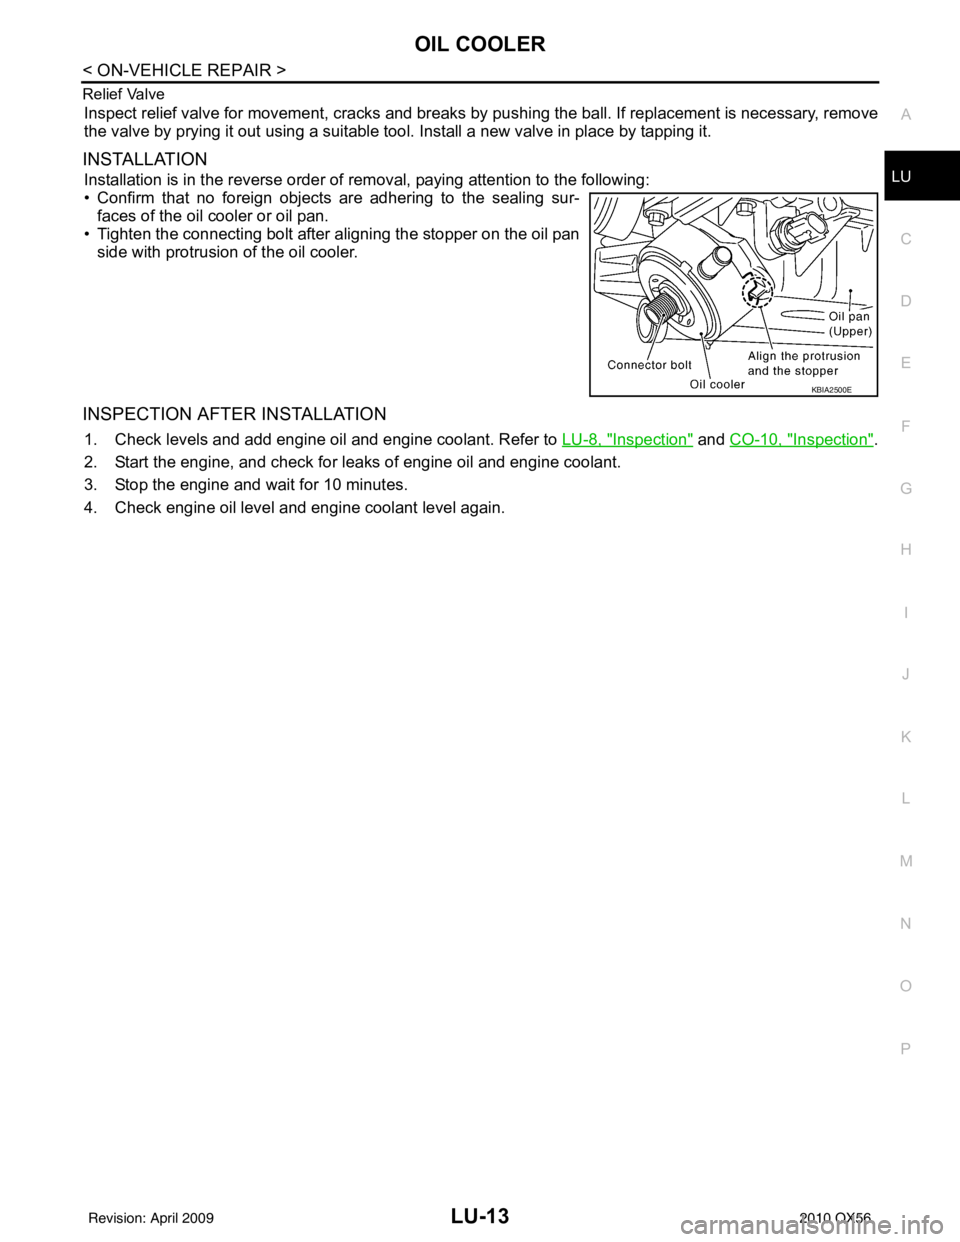
Installation is in the reverse order of removal, paying attention to the following:
• Confirm that no foreign objects are adhering to the sealing sur- faces of the oil cooler or oil pan.
• Tighten the connecting bolt after aligning the stopper on the oil pan side with protrusion of the oil cooler.
INSPECTION AFTER INSTALLATION
1. Check levels and add engine oil and engine coolant. Refer to LU-8, "Inspection" and CO-10, "Inspection".
2. Start the engine, and check for leaks of engine oil and engine coolant.
3. Stop the engine and wait for 10 minutes.
4. Check engine oil level and engine coolant level again.
KBIA2500E
Revision: April 20092010 QX56
Page 2705 of 4210

MA-1
MAINTENANCE
C
DE
F
G H
I
J
K L
M B
MA
SECTION MA
N
O A
CONTENTS
MAINTENANCE
PRECAUTION .......
........................................3
PRECAUTIONS .............................................. .....3
Precaution for Supplemental Restraint System
(SRS) "AIR BAG" and "SEAT BELT PRE-TEN-
SIONER" ............................................................. ......
3
Precaution Necessary for Steering Wheel Rota-
tion After Battery Disconnect ............................... ......
3
PREPARATION ............................................5
PREPARATION .............................................. .....5
Special Service Tool ........................................... ......5
Commercial Service Tool ..........................................5
ON-VEHICLE MAINTENANCE .....................6
GENERAL MAINTE NANCE ........................... .....6
General Maintenance .......................................... ......6
PERIODIC MAINTENANCE ................................9
Introduction of Periodic Maintenance .................. ......9
Maintenance for Off-road Driving (4WD only) ...........9
Schedule 1 ................................................................9
Schedule 2 ..............................................................11
RECOMMENDED FLUIDS AND LUBRI-
CANTS ................................................................
13
Fluids and Lubricants .......................................... ....13
Engine Oil Recommendation ..................................14
ENGINE MAINTENANCE ...................................15
DRIVE BELTS ....................................................... ....15
DRIVE BELTS : Exploded View ..............................15
DRIVE BELTS : Checking Drive Belts ....................15
ENGINE COOLANT ............................................... ....15
ENGINE COOLANT : Inspection .............................15
ENGINE COOLANT : Changing Engine Coolant ....17
FUEL LINES .......................................................... ....19
FUEL LINES : Checking Fuel Line ..........................19
FUEL FILTER ......................................................... ....19
FUEL FILTER : Changing Fuel Filter .......................19
AIR CLEANER FILTER ......................................... ....19
AIR CLEANER FILTER : Exploded View ................20
AIR CLEANER FILTER : Removal and Installation
(Viscous paper type) ................................................
20
ENGINE OIL ........................................................... ....20
ENGINE OIL : Inspection .........................................20
ENGINE OIL : Changing Engine Oil ........................22
OIL FILTER ............................................................ ....22
OIL FILTER : Removal and Installation ...................22
SPARK PLUG ........................................................ ....23
SPARK PLUG : Exploded View ...............................24
SPARK PLUG : Removal and Installation ...............24
EVAP VAPOR LINES ............................................ ....25
EVAP VAPOR LINES : Checking EVAP Vapor
Line ..........................................................................
25
CHASSIS AND BODY MAINTENANCE ...........26
IN-CABIN MICROFILTER ...................................... ....26
IN-CABIN MICROFILTER : Removal and Installa-
tion ....................................................................... ....
26
EXHAUST SYSTEM ...................................................26
EXHAUST SYSTEM : Checking Exhaust System ....26
A/T FLUID .............................................................. ....27
A/T FLUID : Checking the A/T Fluid (ATF) ..............27
A/T FLUID : Changing the A/T Fluid (ATF) ..............29
TRANSFER FLUID ................................................ ....30
TRANSFER FLUID : Replacement ..........................30
TRANSFER FLUID : Inspection ..............................30
PROPELLER SHAFT ............................................. ....31
PROPELLER SHAFT : Checking Propeller Shaft ....31
DIFFERENTIAL GEAR OIL ................................... ....31
Revision: April 20092010 QX56