2010 INFINITI QX56 Ignition switch
[x] Cancel search: Ignition switchPage 2250 of 4210

PRECAUTIONSGI-27
< PRECAUTION >
C
DE
F
G H
I
J
K L
M B
GI
N
O P
system. The connectors should be disconnected only when working according to the WORK FLOW of
TROUBLE DIAGNOSES in EC and TM sections.
Three Way CatalystINFOID:0000000005149593
If a large amount of unburned fuel flows into the catalyst, the catalyst temperature will be excessively high. To
prevent this, follow the instructions.
• Use unleaded gasoline only. Leaded gasoline will seriously damage the three way catalyst.
• When checking for ignition spark or measuring engine compression, make tests quickly and only when nec-
essary.
• Do not run engine when the fuel tank level is low, otherwise the engine may misfire, causing damage to the
catalyst.
Do not place the vehicle on flammable material. Keep flammable material off the exhaust pipe and the three
way catalyst.
Precaution for Fuel (Unlead ed Premium Gasoline Required)INFOID:0000000005149594
Use unleaded premium gasoline with an octane rating of at least 91 AKI (Anti-Knock Index) number (Research
octane number 96).
If unleaded premium gasoline is not available, unleaded regular gasoline with an octane rating of at least 87
AKI number (Research octane number 91) can be us ed, but only under the following precautions:
• have the fuel tank filled only partially with unleaded regular gasoline, and fill up with unleaded premium gas- oline as soon as possible.
• avoid full throttle driving and abrupt acceleration.
However, for maximum vehicle performance, the u se of unleaded premium gasoline is recommended.
CAUTION:
Do not use leaded gasoline. Usin g leaded gasoline will damage the three way catalyst. Using a fuel
other than that specified could adversely affect the emission cont rol devices and systems, and could
also affect the warranty coverage validity.
Multiport Fuel Inje ction System or Engine Control SystemINFOID:0000000005149595
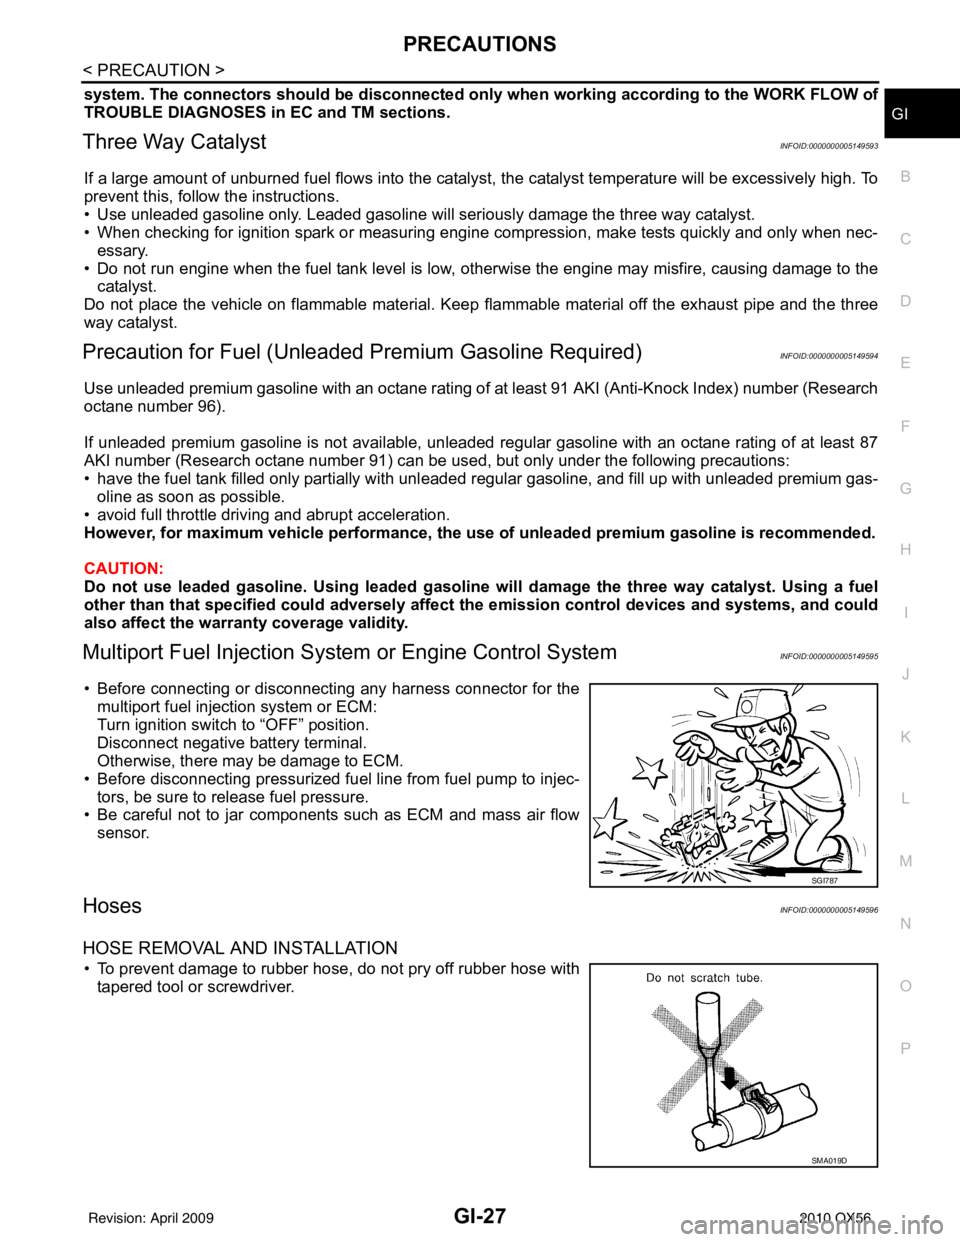
• Before connecting or disconnecting any harness connector for the
multiport fuel injection system or ECM:
Turn ignition switch to “OFF” position.
Disconnect negative battery terminal.
Otherwise, there may be damage to ECM.
• Before disconnecting pressurized fuel line from fuel pump to injec- tors, be sure to release fuel pressure.
• Be careful not to jar components such as ECM and mass air flow
sensor.
HosesINFOID:0000000005149596
HOSE REMOVAL AND INSTALLATION
• To prevent damage to rubber hose, do not pry off rubber hose withtapered tool or screwdriver.
SGI787
SMA019D
Revision: April 20092010 QX56
Page 2279 of 4210

GW-8
< PRECAUTION >
PRECAUTIONS
PRECAUTION
PRECAUTIONS
Precaution for Supplemental Restraint System (SRS) "AIR BAG" and "SEAT BELT
PRE-TENSIONER"
INFOID:0000000005288070
The Supplemental Restraint System such as “A IR BAG” and “SEAT BELT PRE-TENSIONER”, used along
with a front seat belt, helps to reduce the risk or severity of injury to the driver and front passenger for certain
types of collision. This system includes seat belt switch inputs and dual stage front air bag modules. The SRS
system uses the seat belt switches to determine the front air bag deployment, and may only deploy one front
air bag, depending on the severity of a collision and w hether the front occupants are belted or unbelted.
Information necessary to service the system safely is included in the SRS and SB section of this Service Man-
ual.
WARNING:
• To avoid rendering the SRS inopera tive, which could increase the risk of personal injury or death in
the event of a collision which would result in air bag inflation, all maintenance must be performed by
an authorized NISSAN/INFINITI dealer.
• Improper maintenance, including incorrect removal and installation of the SRS can lead to personal
injury caused by unintent ional activation of the system. For re moval of Spiral Cable and Air Bag
Module, see the SRS section.
• Do not use electrical test equipmen t on any circuit related to the SRS unless instructed to in this
Service Manual. SRS wiring harn esses can be identified by yellow and/or orange harnesses or har-
ness connectors.
PRECAUTIONS WHEN USING POWER TOOLS (AIR OR ELECTRIC) AND HAMMERS
WARNING:
• When working near the Airbag Diagnosis Sensor Unit or other Airbag System sensors with the Igni-
tion ON or engine running, DO NOT use air or electri c power tools or strike near the sensor(s) with a
hammer. Heavy vibration could activate the sensor( s) and deploy the air bag(s), possibly causing
serious injury.
• When using air or electric power tools or hammers , always switch the Ignition OFF, disconnect the
battery, and wait at least 3 minu tes before performing any service.
Precaution Necessary for Steering W heel Rotation After Battery Disconnect
INFOID:0000000005384296
NOTE:
• This Procedure is applied only to models with Intelligent Key system and NATS (NISSAN ANTI-THEFT SYS-
TEM).
• Remove and install all control units after disconnecting both battery cables with the ignition knob in the
″LOCK ″ position.
• Always use CONSULT-III to perform self-diagnosis as a part of each function inspection after finishing work.
If DTC is detected, perform trouble diagnosis according to self-diagnostic results.
For models equipped with the Intelligent Key system and NATS, an electrically controlled steering lock mech-
anism is adopted on the key cylinder.
For this reason, if the battery is disconnected or if the battery is discharged, the steering wheel will lock and
steering wheel rotation will become impossible.
If steering wheel rotation is required when battery pow er is interrupted, follow the procedure below before
starting the repair operation.
OPERATION PROCEDURE
1. Connect both battery cables. NOTE:
Supply power using jumper cables if battery is discharged.
2. Use the Intelligent Key or mechanical key to turn the ignition switch to the ″ACC ″ position. At this time, the
steering lock will be released.
3. Disconnect both battery cables. The steering lock will remain released and the steering wheel can be rotated.
4. Perform the necessary repair operation.
Revision: April 20092010 QX56
Page 2280 of 4210

PRECAUTIONSGW-9
< PRECAUTION >
C
DE
F
G H
I
J
L
M A
B
GW
N
O P
5. When the repair work is completed, return the ignition switch to the ″LOCK ″ position before connecting
the battery cables. (At this time, the steering lock mechanism will engage.)
6. Perform a self-diagnosis check of al l control units using CONSULT-III.
Handling for Adhesive and PrimerINFOID:0000000005147156
• Do not use an adhesive which is past its usable date. Shelf life of this product is limited to six months after
the date of manufacture. Carefully adhere to the ex piration or manufacture date printed on the box.
• Keep primers and adhesive in a cool, dry place. I deally, they should be stored in a refrigerator.
• Open the seal of the primer and adhesive just before application. Discard the remainder.
• Before application, be sure to shake the primer container to stir the contents. If any floating material is found,
do not use it.
• If any primer or adhesive contacts the skin, wipe it off with gasoline or equivalent and wash the skin with
soap.
• When using primer and adhesive, always observe the precautions in the instruction manual.
Revision: April 20092010 QX56
Page 2295 of 4210

PRECAUTIONSHA-3
< PRECAUTION >
C
DE
F
G H
J
K L
M A
B
HA
N
O P
PRECAUTION
PRECAUTIONS
Precaution for Supplemental Restraint System (SRS) "AIR BAG" and "SEAT BELT
PRE-TENSIONER"
INFOID:0000000005403104
The Supplemental Restraint System such as “AIR BAG” and “SEAT BELT PRE-TENSIONER”, used along
with a front seat belt, helps to reduce the risk or severi ty of injury to the driver and front passenger for certain
types of collision. This system includes seat belt switch inputs and dual stage front air bag modules. The SRS
system uses the seat belt switches to determine the front air bag deployment, and may only deploy one front
air bag, depending on the severity of a collision and w hether the front occupants are belted or unbelted.
Information necessary to service the system safely is included in the SR and SB section of this Service Man-
ual.
WARNING:
• To avoid rendering the SRS inoper ative, which could increase the risk of personal injury or death in
the event of a collision which would result in air bag inflation, all maintenance must be performed by
an authorized NISSAN/INFINITI dealer.
• Improper maintenance, including in correct removal and installation of the SRS, can lead to personal
injury caused by unintentional act ivation of the system. For removal of Spiral Cable and Air Bag
Module, see the SR section.
• Do not use electrical test equipm ent on any circuit related to the SRS unless instructed to in this
Service Manual. SRS wiring harnesses can be identi fied by yellow and/or orange harnesses or har-
ness connectors.
PRECAUTIONS WHEN USING POWER TOOLS (AIR OR ELECTRIC) AND HAMMERS
WARNING:
• When working near the Airbag Diagnosis Sensor Un it or other Airbag System sensors with the Igni-
tion ON or engine running, DO NOT use air or el ectric power tools or strike near the sensor(s) with a
hammer. Heavy vibration could activate the sensor( s) and deploy the air bag(s), possibly causing
serious injury.
• When using air or electric power tools or hammers, always switch the Ignition OFF, disconnect the battery, and wait at least 3 minutes before performing any service.
Precaution Necessary for Steering Wheel Rotation After Battery Disconnect
INFOID:0000000005403105
NOTE:
• This Procedure is applied only to models with Intelligent Key system and NATS (NISSAN ANTI-THEFT SYS-
TEM).
• Remove and install all control units after disconnecti ng both battery cables with the ignition knob in the
″ LOCK ″ position.
• Always use CONSULT-III to perform self-diagnosis as a part of each function inspection after finishing work.
If DTC is detected, perform trouble diagnosis according to self-diagnostic results.
For models equipped with the Intelligent Key system and NATS , an electrically controlled steering lock mech-
anism is adopted on the key cylinder.
For this reason, if the battery is disconnected or if the battery is discharged, the steering wheel will lock and
steering wheel rotation will become impossible.
If steering wheel rotation is required when battery power is interrupted, follow the procedure below before
starting the repair operation.
OPERATION PROCEDURE
1. Connect both battery cables. NOTE:
Supply power using jumper cables if battery is discharged.
2. Use the Intelligent Key or mechanical key to turn the ignition switch to the ″ACC ″ position. At this time, the
steering lock will be released.
3. Disconnect both battery cables. The steering lock will remain released and the steering wheel can be
rotated.
4. Perform the necessary repair operation.
Revision: April 20092010 QX56
Page 2296 of 4210

HA-4
< PRECAUTION >
PRECAUTIONS
5. When the repair work is completed, return the ignition switch to the ″LOCK ″ position before connecting
the battery cables. (At this time, the steering lock mechanism will engage.)
6. Perform a self-diagnosis check of a ll control units using CONSULT-III.
Precaution for Working with HFC-134a (R-134a)INFOID:0000000005147630
WARNING:
• CFC-12 (R-12) refrigerant and HFC-134a (R-134a) refr igerant are not compatible. If the refrigerants
are mixed compressor failure is likely to occur. Refer to HA-4, "
Contaminated Refrigerant". To deter-
mine the purity of HFC-134a (R-134a) in the vehicle and recovery tank, use recovery/recycling equip-
ment and refrigerant identifier.
• Use only specified oil for the HFC-134a (R-134a) A/C system and HFC-134a (R-134a) components. If
oil other than that specified is used, compressor failure is likely to occur.
• The specified HFC-134a (R-134a) oi l rapidly absorbs moisture from the atmosphere. The following
handling precautions must be observed:
- When removing refrigerant components from a vehicle, immediately cap (seal) the component to
minimize the entry of moisture from the atmosphere.
- When installing refrigerant co mponents to a vehicle, do not remove the caps (unseal) until just
before connecting the components. Connect all refrigerant loop components as quickly as possible
to minimize the entry of moisture into system.
- Only use the specified oil from a sealed container. Immediately reseal containers of oil. Without
proper sealing, oil will become moisture saturat ed and should not be used.
- Avoid breathing A/C refrigerant and oil vapor or mist. Exposure may irrita te eyes, nose and throat.
Remove HFC-134a (R-134a) from the A/C system usin g certified service equipment meeting require-
ments of SAE J2210 [HFC-134a (R-134a) recycling equipment], or J2209 [HFC-134a (R-134a) recovery
equipment]. If accidental system discharge occurs, ventilate work area before resuming service.
Additional health and safety in formation may be obtained from refrigerant and oil manufacturers.
- Do not allow A/C oil to come in contact with styrofoam parts. Damage may result.
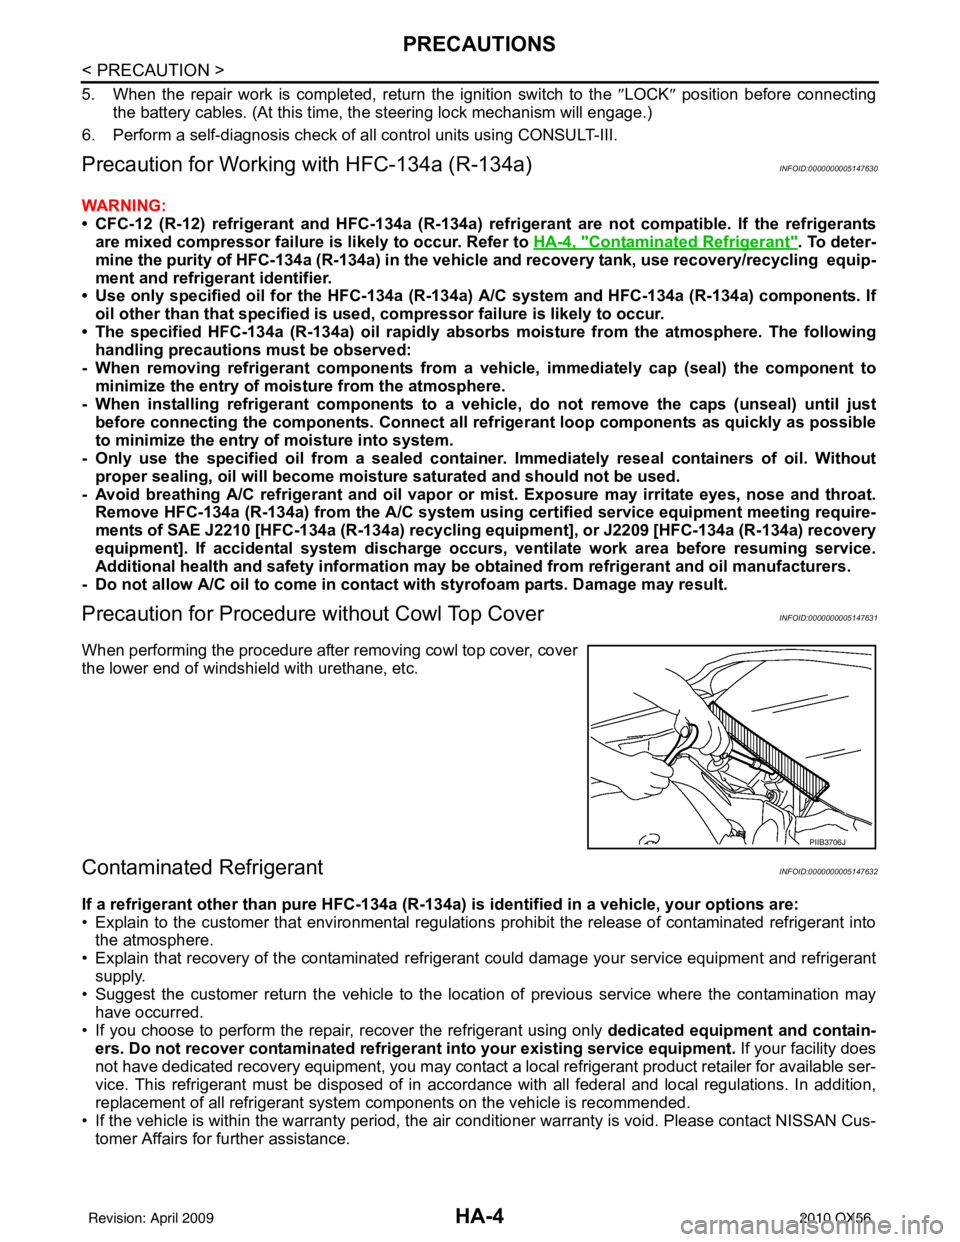
Precaution for Procedure without Cowl Top CoverINFOID:0000000005147631
When performing the procedure after removing cowl top cover, cover
the lower end of windshield with urethane, etc.
Contaminated RefrigerantINFOID:0000000005147632
If a refrigerant other than pure HFC-134a (R-134a) is identified in a vehicle, your options are:
• Explain to the customer that environmental regulations prohibit the release of contaminated refrigerant into
the atmosphere.
• Explain that recovery of the contaminated refri gerant could damage your service equipment and refrigerant
supply.
• Suggest the customer return the vehicle to the location of previous service where the contamination may have occurred.
• If you choose to perform the repair, recover the refrigerant using only dedicated equipment and contain- ers. Do not recover contamin ated refrigerant into your existing service equipment. If your facility does
not have dedicated recovery equipment, you may contact a local refrigerant product retailer for available ser-
vice. This refrigerant must be disposed of in acco rdance with all federal and local regulations. In addition,
replacement of all refrigerant system components on the vehicle is recommended.
• If the vehicle is within the warranty period, the air conditioner warranty is void. Please contact NISSAN Cus- tomer Affairs for further assistance.
PIIB3706J
Revision: April 20092010 QX56
Page 2344 of 4210
![INFINITI QX56 2010 Factory Service Manual HAC-4
< BASIC INSPECTION >[AUTOMATIC AIR CONDITIONER]
INSPECTION AND ADJUSTMENT
INSPECTION AND ADJUSTMENT
Operational Check (Front)INFOID:0000000005147669
The purpose of the operational check is to
c INFINITI QX56 2010 Factory Service Manual HAC-4
< BASIC INSPECTION >[AUTOMATIC AIR CONDITIONER]
INSPECTION AND ADJUSTMENT
INSPECTION AND ADJUSTMENT
Operational Check (Front)INFOID:0000000005147669
The purpose of the operational check is to
c](/manual-img/42/57032/w960_57032-2343.png)
HAC-4
< BASIC INSPECTION >[AUTOMATIC AIR CONDITIONER]
INSPECTION AND ADJUSTMENT
INSPECTION AND ADJUSTMENT
Operational Check (Front)INFOID:0000000005147669
The purpose of the operational check is to
confirm that the system operates properly.
CHECKING MEMORY FUNCTION
1. Set the temperature to 32 ° (90 °F).
2. Press the OFF switch.
3. Turn ignition switch OFF.
4. Turn ignition switch ON.
5. Press the AUTO switch.
6. Confirm that the set temperature remains at previous temperature.
7. Press the OFF switch.
If NG, go to trouble diagnosis procedure for HAC-120, "
Memory Function Check".
If OK, continue with next check.
CHECKING BLOWER
1. Press the blower speed control switch (+) once, blower should operate on low speed. The fan display should have one bar lit (on display).
2. Press the blower speed control switch (+) again, and continue checking blower speed and fan display until
all speeds are checked.
3. Leave blower on maximum speed.
If NG, go to trouble diagnosis procedure for HAC-48, "
Front Blower Motor Diagnosis Procedure".
If OK, continue with next check.
CHECKING DISCHARGE AIR
1. Press MODE switch four times and the DEF switch.
2. Each position indicator should change shape (on display).
3. Confirm that discharge air comes out according to the air distribution table. Refer to HAC-16, "
Discharge
Air Flow (Front)".
Mode door position is checked in the next step.
If NG, go to trouble diagnosis procedure for HAC-26, "
Mode Door Motor (Front) Diagnosis Procedure".
If OK, continue the check.
NOTE:
Confirm that the compressor clutch is engaged (sound or visual inspection) and intake door position is at
fresh when the DEF or D/F is selected.
CHECKING RECIRCULATION ( , ONLY)
1. Press recirculation ( ) switch one time. Recirculation indicator should illuminate.
2. Press recirculation ( ) switch one more time. Recirculation indicator should go off.
3. Listen for intake door position change (blower sound should change slightly).
If NG, go to trouble diagnosis procedure for HAC-40, "
Intake Door Motor Diagnosis Procedure".
If OK, continue the check.
NOTE:
Confirm that the compressor clutch is engaged (sound or vis ual inspection) and intake door position is at fresh
when the DEF or D/F is selected. REC ( ) is not allowed in DEF ( ) D/F ( ) or FOOT ( ).
CHECKING TEMPERATURE DECREASE
1. Rotate temperature control dial (drive or passenger) counterclockwise until 18° C (60°F) is displayed.
2. Check for cold air at appropriate discharge air outlets. Conditions : Engine running and at normal operating temperature
Revision: April 20092010 QX56
Page 2345 of 4210
![INFINITI QX56 2010 Factory Service Manual INSPECTION AND ADJUSTMENTHAC-5
< BASIC INSPECTION > [AUTOMATIC AIR CONDITIONER]
C
D
E
F
G H
J
K L
M A
B
HAC
N
O P
If NG, listen for sound of air mix door motor operat ion. If OK, go to trouble diagnos INFINITI QX56 2010 Factory Service Manual INSPECTION AND ADJUSTMENTHAC-5
< BASIC INSPECTION > [AUTOMATIC AIR CONDITIONER]
C
D
E
F
G H
J
K L
M A
B
HAC
N
O P
If NG, listen for sound of air mix door motor operat ion. If OK, go to trouble diagnos](/manual-img/42/57032/w960_57032-2344.png)
INSPECTION AND ADJUSTMENTHAC-5
< BASIC INSPECTION > [AUTOMATIC AIR CONDITIONER]
C
D
E
F
G H
J
K L
M A
B
HAC
N
O P
If NG, listen for sound of air mix door motor operat ion. If OK, go to trouble diagnosis procedure for HAC-108,
"Component Function Check". If air mix door motor appears to be malfunctioning, go to HAC-31, "Air Mix Door
Motor (Driver) Component Function Check".
If OK, continue the check.
CHECKING TEMPERATURE INCREASE
1. Rotate temperature control dial clockwise (drive or passenger) until 32 °C (90° F) is displayed.
2. Check for hot air at appropriate discharge air outlets.
If NG, listen for sound of air mix door motor operat ion. If OK, go to trouble diagnosis procedure for HAC-116,
"Component Function Check". If air mix door motor appears to be malfunctioning, go to HAC-31, "Air Mix Door
Motor (Driver) Component Function Check".
If OK, continue with next check.
CHECK A/C SWITCH
1. Press A/C switch when AUTO switch is ON, or in manual mode.
2. A/C switch indicator will turn ON. • Confirm that the compressor clutch engages (sound or visual inspection).
NOTE:
If current mode setting is DEF or D/F, compre ssor clutch will already be engaged and cannot be turned off.
If NG, go to trouble diagnosis procedure for HAC-68, "
Magnet Clutch Diagnosis Procedure".
If OK, continue with next check.
CHECKING AUTO MODE
1. Press AUTO switch.
2. Display should indicate AUTO.
• If ambient temperature is warm, and selected temperat ure is cool, confirm that the compressor clutch
engages (sound or visual inspection). (Discharge air and blower speed will depend on ambient, in-vehi-
cle, and set temperatures.)
If NG, go to trouble diagnosis procedure for HAC-87, "
A/C Auto Amp Power and Ground Diagnosis Proce-
dure", then if necessary, trouble diagnosis procedure for HAC-68, "Magnet Clutch Diagnosis Procedure".
If all operational checks are OK (symptom cannot be duplicated), go to malfunction Simulation Tests in HAC-
3, "How to Perform Trouble Diagnosis For Quick And Accurate Repair" and perform tests as outlined to simu-
late driving conditions environment. If symptom appears. Refer to HAC-107, "
SymptomMatrixChart", and
perform applicable troubl e diagnosis procedures.
Operational Check (Rear)INFOID:0000000005147670
The purpose of the operational check is to confirm that the system operates properly.
CHECKING REAR BLOWER MOTOR
1. Turn the ignition switch ON.
2. Rotate rear air control (front) blower control dial to low speed.
3. Rotate the blower control dial clockwise and continue checking blower speed until all speeds are checked.
4. Leave blower on maximum speed.
5. Press the REAR CTRL switch from the rear air control (front).
6. Rotate rear air control (rear) blower control dial to low speed.
7. Rotate the blower control dial clockwise and continue checking blower speed until all speeds are checked.
8. Leave blower on maximum speed.
If NG, go to trouble diagnosis procedure for HAC-53, "
Rear Blower Motor Component Function Check".
If OK, continue with next check.
CHECKING REAR DISCHARGE AIR
Conditions : Engine running and at normal operating temperature
Revision: April 20092010 QX56
Page 2360 of 4210
![INFINITI QX56 2010 Factory Service Manual HAC-20
< FUNCTION DIAGNOSIS >[AUTOMATIC AIR CONDITIONER]
DIAGNOSIS SYSTEM (HVAC)
DIAGNOSIS SYSTEM (HVAC)
CONSULT-III Function (HVAC)INFOID:0000000005147681
CONSULT-III can display each diagnostic item INFINITI QX56 2010 Factory Service Manual HAC-20
< FUNCTION DIAGNOSIS >[AUTOMATIC AIR CONDITIONER]
DIAGNOSIS SYSTEM (HVAC)
DIAGNOSIS SYSTEM (HVAC)
CONSULT-III Function (HVAC)INFOID:0000000005147681
CONSULT-III can display each diagnostic item](/manual-img/42/57032/w960_57032-2359.png)
HAC-20
< FUNCTION DIAGNOSIS >[AUTOMATIC AIR CONDITIONER]
DIAGNOSIS SYSTEM (HVAC)
DIAGNOSIS SYSTEM (HVAC)
CONSULT-III Function (HVAC)INFOID:0000000005147681
CONSULT-III can display each diagnostic item using the diagnostic test modes shown following.
SELF-DIAGNOSIS
Display Item List
DATA MONITOR
Display Item List
Diagnostic mode
Description
SELF-DIAG RESULTS Displays A/C au to amp. self-diagnosis results.
DATA MONITOR Displays A/C auto amp. input/output data in real time.
CAN DIAG SUPPORT MNTR The result of transmit/receive diagnosis of CAN communication can be read. ECU PART NUMBER A/C auto amp. part number can be read.
DTC Description
Reference page
B2573 Battery voltage out of range CHG-8, "
Inspection Procedure"
B2578 In-vehicle sensor circuit out of range (low)
HAC-78, "In-Vehicle Sensor Diagnosis Procedure"B2579 In-vehicle sensor circuit out of range (high)
B257B Ambient sensor circuit short HAC-75, "
Ambient Sensor Diagnosis Procedure"B257C Ambient sensor circuit open
B257F Optical sensor (Driver) circuit open or short HAC-81, "
Optical Sensor Diagnosis Procedure".
B2580 Optical sensor (Passenger) circuit open or short
B2581 Intake sensor circuit short HAC-83, "
Intake Sensor Diagnosis Procedure"B2582 Intake sensor circuit open
U1000 CAN bus fault LAN-14, "
Trouble Diagnosis Flow Chart"
Monitor itemValue Contents
BATT VIA CAN "V" Displays battery voltage signal.
IGN VIA CAN "ON/OFF" Displays ignition switch signal.
DVR SUNLD SEN "w/m2" Displays optical sensor (driver) signal.
PAS SUNLD SEN "w/m2" Displays optical sensor (passenger) signal.
AMB TEMP SEN "° C" Displays ambient sensor signal.
EVAP TEMP SEN "° C" Displays intake sensor signal.
INCAR TMP SEN "° C" Displays in-vehicle sensor signal.
RR TEMPSET FR "V" Displays air mix door (front) set point signal.
RR TEMPSET RR "V" Displays air mix door (rear) set point signal.
MODE FDBCK "V" Displays mode door motor feedback signal.
DVR MIX FDBCK "V" Displays air mix door motor (driver) feedback signal.
PAS MIX FDBCK "V" Displays air mix door motor (passenger) feedback signal.
RR FDBCK "V" Displays air mix door motor (rear) feedback signal.
DEF FDBCK "V" Displays defroster door motor feedback signal.
Revision: April 20092010 QX56