2010 Hyundai H-100 Truck engine
[x] Cancel search: enginePage 127 of 207
3
WHAT TO DO IN AN EMERGENCY
5
195/70R15C-6PR 155R12C-8PR 195/70R15C-8PR FRONT
290kPa (42PSI)
- - -
!!
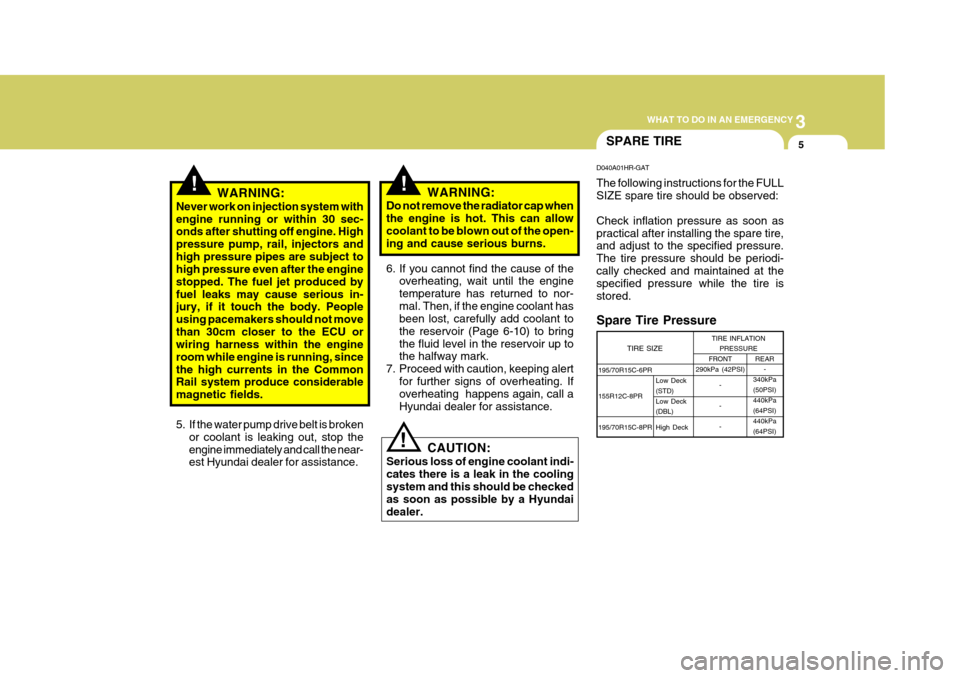
SPARE TIRE
WARNING:
Never work on injection system with engine running or within 30 sec- onds after shutting off engine. High pressure pump, rail, injectors andhigh pressure pipes are subject to high pressure even after the engine stopped. The fuel jet produced byfuel leaks may cause serious in- jury, if it touch the body. People using pacemakers should not movethan 30cm closer to the ECU or wiring harness within the engine room while engine is running, sincethe high currents in the Common Rail system produce considerable magnetic fields. WARNING:
Do not remove the radiator cap whenthe engine is hot. This can allowcoolant to be blown out of the open- ing and cause serious burns.
6. If you cannot find the cause of the overheating, wait until the engine temperature has returned to nor-mal. Then, if the engine coolant has been lost, carefully add coolant to the reservoir (Page 6-10) to bringthe fluid level in the reservoir up to the halfway mark.
7. Proceed with caution, keeping alert
for further signs of overheating. Ifoverheating happens again, call a Hyundai dealer for assistance.
!
5. If the water pump drive belt is broken
or coolant is leaking out, stop the engine immediately and call the near- est Hyundai dealer for assistance. D040A01HR-GAT The following instructions for the FULL SIZE spare tire should be observed: Check inflation pressure as soon as practical after installing the spare tire, and adjust to the specified pressure. The tire pressure should be periodi-cally checked and maintained at the specified pressure while the tire is stored.
Spare Tire PressureCAUTION:
Serious loss of engine coolant indi- cates there is a leak in the coolingsystem and this should be checked as soon as possible by a Hyundai dealer. TIRE SIZE
TIRE INFLATION
PRESSURE REAR-
340kPa (50PSI)440kPa(64PSI)440kPa (64PSI)
Low Deck (STD)Low Deck (DBL) High Deck
Page 133 of 207
3
WHAT TO DO IN AN EMERGENCY
11
After stopping the engine and applying the parking brake on a flat level sur-face, also use chocks to hold the wheels. Position the jack only at the specifiedpoints indicated in the illustration, and the use of the jack at other points could damage the vehicle body.
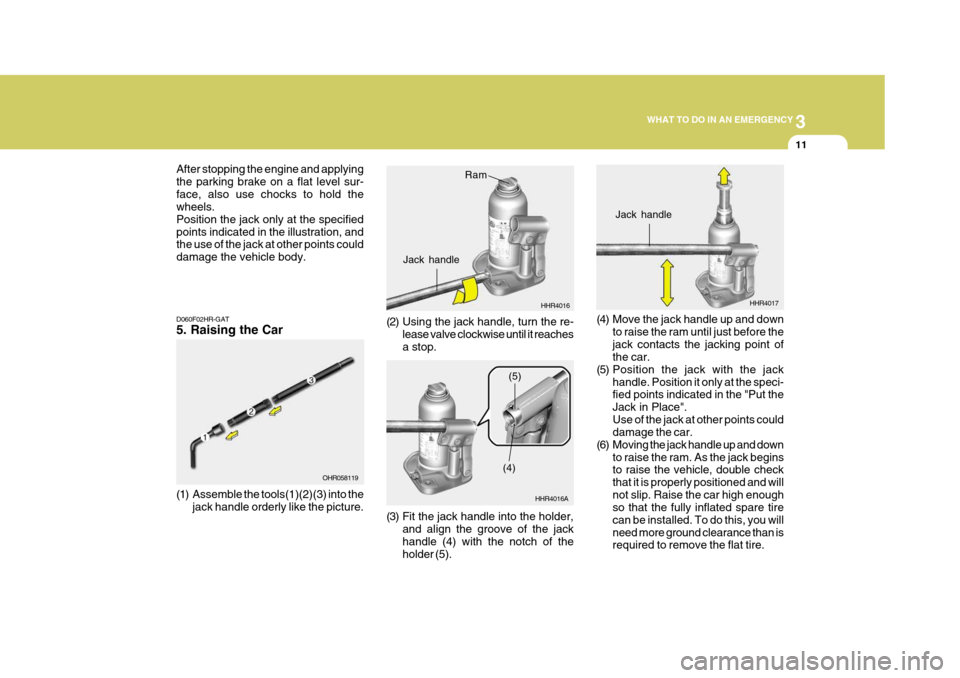
D060F02HR-GAT 5. Raising the Car
(1) Assemble the tools(1)(2)(3) into the jack handle orderly like the picture. OHR058119
HHR4016
Ram
Jack handle
(2) Using the jack handle, turn the re- lease valve clockwise until it reaches a stop.
(3) Fit the jack handle into the holder,and align the groove of the jack handle (4) with the notch of the holder (5). HHR4016A
(4)(5)
HHR4017
Jack handle
(4) Move the jack handle up and down to raise the ram until just before the jack contacts the jacking point of the car.
(5) Position the jack with the jack handle. Position it only at the speci-fied points indicated in the "Put the Jack in Place".Use of the jack at other points could damage the car.
(6) Moving the jack handle up and down to raise the ram. As the jack beginsto raise the vehicle, double check that it is properly positioned and will
not slip. Raise the car high enough so that the fully inflated spare tire can be installed. To do this, you willneed more ground clearance than is required to remove the flat tire.
Page 138 of 207
3 WHAT TO DO IN AN EMERGENCY
16
Tire Pressure Gauge (If Installed) You can easily check the tire pressure with a tire pressure gauge that is foundin OVM tool bag. Tires normally lose some air in day-to-day use, and you may have to add a few pounds of airperiodically and it is not usually a sign of a leaking tire, but of normal wear. Always check tire pressure when thetires are cold because tire pressure increases with temperature. To check the tire pressure, take the following steps;
1. Unscrew the inflation valve cap thatis located on the rim of the tire.
2. Press and hold the gauge against the tire valve. Some air will escape as you begin and more will escape if you don't press the gauge in firmly.
3. A firm non-leaking push will activate the gauge.
4. Read the tire pressure on the gauge
to know whether the tire pressure is low or high.
5. Adjust the tire pressures to the speci-
fied pressure. See page 8-3.
6. Reinstall the inflation valve cap.IF YOUR VEHICLE MUST BE TOWED
D080A02HR-GAT If your vehicle has to be towed, it should be done by your Hyundai dealeror a commercial tow truck service. This will help assure that your vehicle is not damaged in towing. Also, profes-sionals are generally aware of local laws governing towing. In any case, rather than risk damage to your car, itis suggested that you show this infor- mation to the tow truck operator. Be sure that a safety chain system is usedand that all local laws are observed. It is recommended that your vehicle be towed with a wheel lift and dollies orflatbed equipment with all the wheels off the ground.
! CAUTION:
o Your vehicle can be damaged if towed incorrectly!
o Be sure the transmission is in neutral.
o When the engine will not start, be
sure the steering is unlocked by placing the key in the "ACC" po- sition.
3. Stand approximately 2.5 m (8 ft)
away from the fire and squeeze the handle to discharge the extinguisher. If you release the handle, the dis- charge will stop.
4. Sweep the nozzle back and forth at the base of the fire. After the fireappears to be out, watch it carefullysince it may re-ignite.
Triangle Reflector Placed the triangle reflector on the road to warn oncoming vehicles during emergencies, such as when the ve- hicle is parked by the roadside due toany problems. First Aid Kit There are some items such as scis- sors, bandage and adhesive tape and etc. in the kit to give first aid to aninjured person.
Page 140 of 207
3 WHAT TO DO IN AN EMERGENCY
18IF YOU LOSE YOUR KEYS
D120A01A-AAT If you lose your keys, many Hyundai dealers can make you a new key if you have your key number. If you lock the keys inside your car andyou cannot obtain a new key, many Hyundai dealers can use special tools to open the door for you.
Nor should it be attempted if the wheels,drive train, axles, steering or brakesare damaged. Before towing, be sure the transmission is in neutral and the key in "ACC" (with the engine off) or inthe "ON" position (with the engine run- ning). A driver must be in the towed car to steer it and operate the brakes.
CAUTION:
If the car is being towed with all four wheels on the ground, it can be towed only from the front. Be sure that the transmission is in neutral. Do not tow at speeds greater than50 km/h (25 mph) and for more than 25 km (15 miles). Be sure the steering is unlocked byplacing the key in the "ACC" posi- tion. A driver must be in the towed vehicle to operate the steering andbrakes.
!
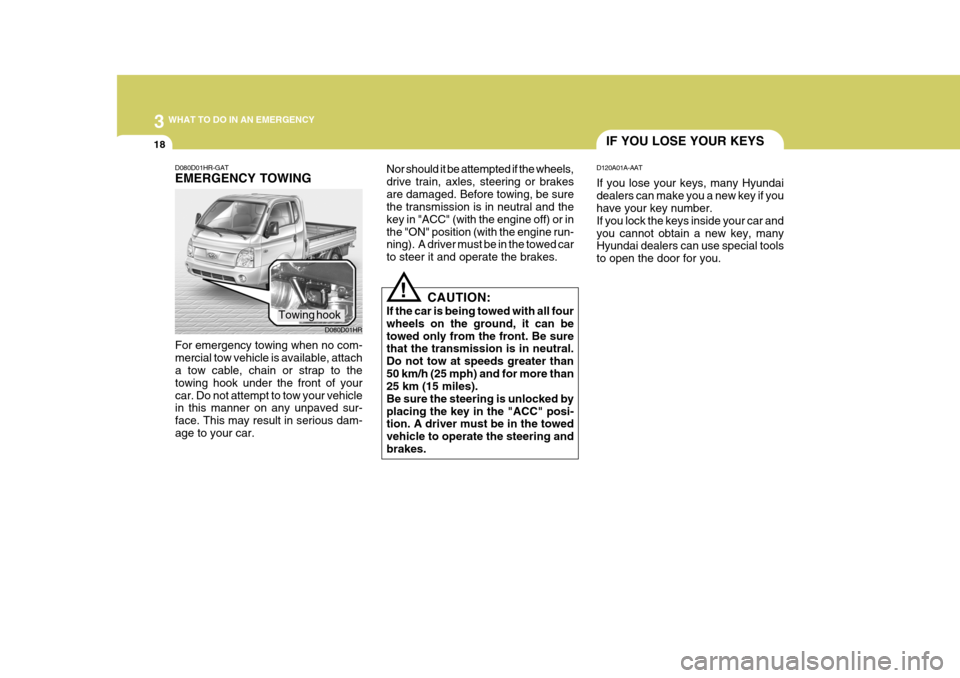
D080D01HR-GAT EMERGENCY TOWING
For emergency towing when no com- mercial tow vehicle is available, attach a tow cable, chain or strap to the towing hook under the front of yourcar. Do not attempt to tow your vehicle in this manner on any unpaved sur- face. This may result in serious dam-age to your car. D080D01HR
Towing hook
Page 144 of 207
44CORROSION PREVENTION AND APPEARANCE CARE
4WASHING AND WAXING
E030A04HR-GAT Washing Your Hyundai Never wash your car when the surface is hot from being in the sun. Alwayswash your car in the shade. Wash your car frequently. Dirt is abra- sive and can scratch the paint if it is notremoved. Air pollution or acid rain may damage the paint and trim through chemical action if pollutants are al-lowed to remain in contact with the surface. If you live near the ocean or in an area where road salts or dust controlchemicals are used, you should pay particular attention to the underside of the car. Start by rinsing the car toremove dust and loose dirt. In winter, or if you have driven through mud or muddy water, be sure to thoroughly clean theunderside as well. Use a hard direct stream of water to remove accumula- tions of mud or corrosive materials.Use a good quality car-washing solu- tion and follow the manufacturer's di- rections on the package. These areavailable at your Hyundai dealer or auto parts outlet. Don't use strong house- hold detergents, gasoline, strong sol-vents or abrasive cleaning powders as these may damage the finish. Use a clean sponge or cloth, rinse it frequently and don't damage the finishby rubbing too hard. For stubborn spots, dampen them frequently and remove them a little at a time.To clean whitewall tires, use a stiff brush or soapy steel-wool scouring pad. To clean plastic wheel covers, use aclean sponge or soft cloth and water. If you find any nicks or scratches in the paint, use touch-up paint to cover them to prevent corrosion. To protect the paintwork of the car against corrosion,you must clean your Hyundai (at least once a month). Give special attention to the removal of salt, mud and othersubstances on the underside of the splashboards of the car. Make sure that the outlets and the underside of thedoors are open. Paint damage can be caused by small accumulation of tar, industrial precipitation, tree resin, in-sects and bird droppings, when not removed immediately. If water alone is not strong enough to remove the accu-mulated dirt, use a mild car washing solution. Be sure to rinse the surface after washing to remove the solution.Never allow the solution to dry on the painted surfaces.
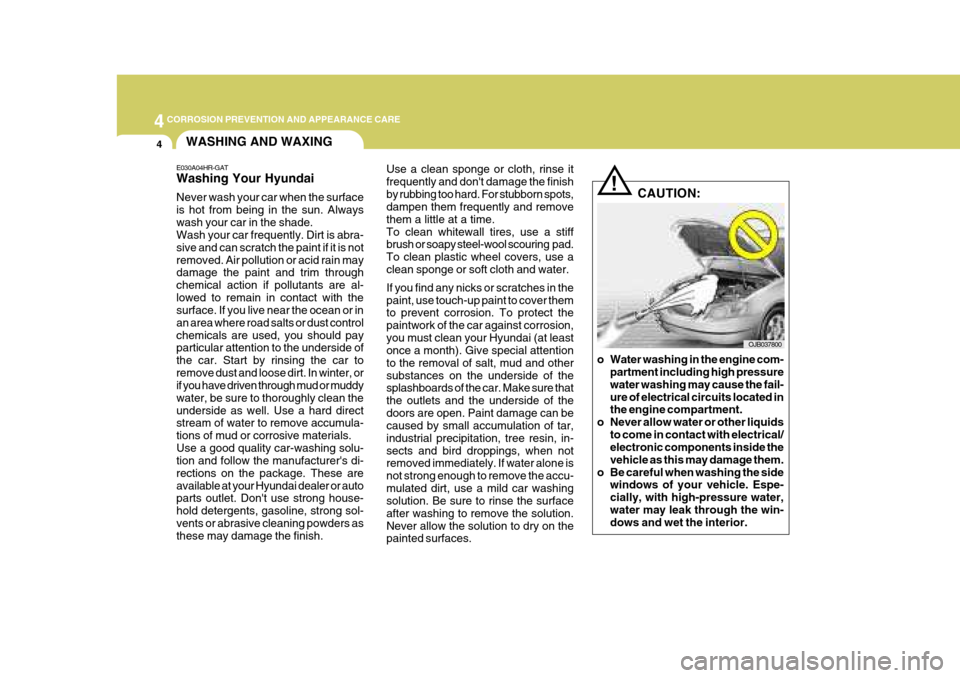
CAUTION:
!
o Water washing in the engine com- partment including high pressure water washing may cause the fail-ure of electrical circuits located in the engine compartment.
o Never allow water or other liquids to come in contact with electrical/electronic components inside the vehicle as this may damage them.
o Be careful when washing the side windows of your vehicle. Espe-cially, with high-pressure water,water may leak through the win- dows and wet the interior.
OJB037800
Page 148 of 207
5VEHICLE MAINTENANCE REQUIREMENTS
2MAINTENANCE INTERVALS
F010C01HR-GAT
Specified Scheduled Procedures
These are the procedures such as
inspections, adjustments and replace- ments that are listed in the mainte-nance charts starting on page 5-4. These procedures must be performed at the intervals shown in the mainte-nance schedule to assure that your warranty remains in effect. Although it is strongly recommended that they beperformed by the factory-trained or distributor-trained technicians at your Hyundai dealer, these procedures maybe performed at any qualified service facility. F010D01A-GAT
General Checks
These are the regular checks you should perform when you drive your Hyundai or you fill the fuel tank. A list of these items will be found on page6-5.
F010A01A-GAT Service Requirements To assure that you receive the great- est number of kilometers of satisfying operation from your Hyundai, certain maintenance procedures must beperformed. Although careful design and engineering have reduced these to a minimum, those that are requiredare of the utmost importance.It is your responsibility to have thesemaintenance procedures performed to comply with the terms of the war- ranties covering your new Hyundai.The Service Passport supplied with your new vehicle provides further in- formation about these warranties.
F010B01A-AAT
Maintenance Requirements
The maintenance required for your
Hyundai can be divided into three main areas:
o Specified scheduled procedures
o General checks
o Do-it-yourself maintenance It is suggested that genuine Hyundai
service parts be used for any requiredrepairs or replacements. Other parts of equivalent quality such as engine oil, engine coolant, manual transmission
oil, brake fluid and so on which are not supplied by Hyundai Motor Company or its distributor may be used withoutaffecting your warranty coverage but you should always be sure these are equivalent to the quality of the originalHyundai parts. Your Service Passport provides further information about your warranty coverage.
Page 150 of 207
5VEHICLE MAINTENANCE REQUIREMENTS
4
F030A01HR-GAT
Except European Community
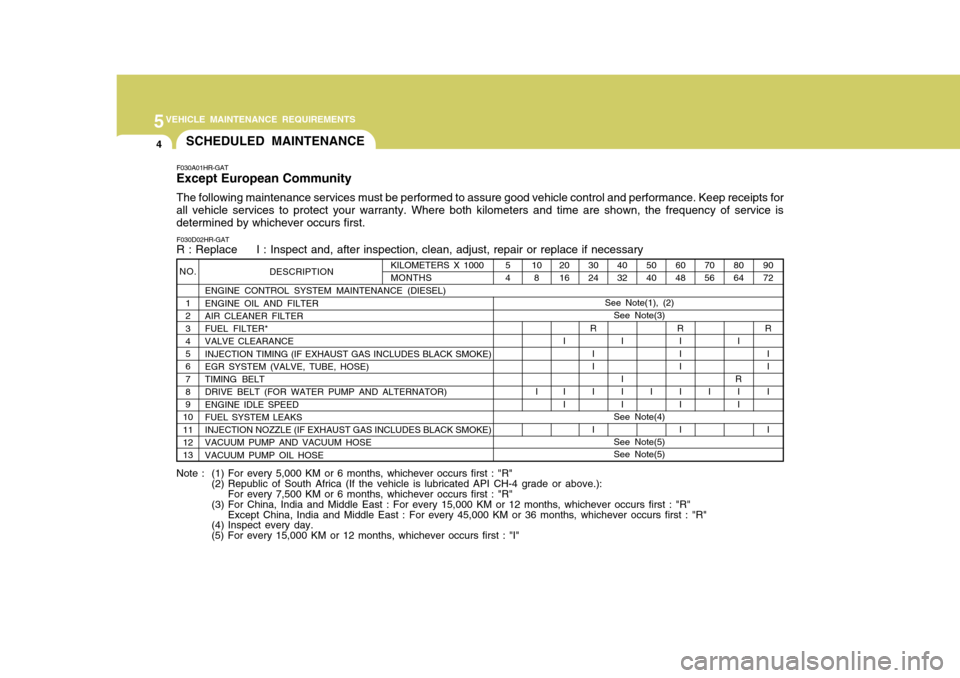
The following maintenance services must be performed to assure good vehicle control and performance. Keep receipts for
all vehicle services to protect your warranty. Where both kilometers and time are shown, the frequency of service is determined by whichever occurs first.
F030D02HR-GAT R : Replace I : Inspect and, after inspection, clean, adjust, repair or replace if necessary SCHEDULED MAINTENANCE
NO. 1 2 3 4 5 6 7 8 9
1011 12 13 DESCRIPTION
ENGINE CONTROL SYSTEM MAINTENANCE (DIESEL)ENGINE OIL AND FILTER AIR CLEANER FILTER FUEL FILTER* VALVE CLEARANCE INJECTION TIMING (IF EXHAUST GAS INCLUDES BLACK SMOKE) EGR SYSTEM (VALVE, TUBE, HOSE) TIMING BELT DRIVE BELT (FOR WATER PUMP AND ALTERNATOR) ENGINE IDLE SPEED FUEL SYSTEM LEAKS INJECTION NOZZLE (IF EXHAUST GAS INCLUDES BLACK SMOKE) VACUUM PUMP AND VACUUM HOSE VACUUM PUMP OIL HOSE
80 64
I
R I I 90 72
R II I I
70 56
I
6048
R I I I I I I
50 40
I
4032
I I I I
30 24
R II I I
20 16
I I I108
I
See Note(1), (2) See Note(3)
Note : (1) For every 5,000 KM or 6 months, whichever occurs first : "R" (2) Republic of South Africa (If the vehicle is lubricated API CH-4 grade or above.):For every 7,500 KM or 6 months, whichever occurs first : "R"
(3) For China, India and Middle East : For every 15,000 KM or 12 months, whichever occurs first : "R" Except China, India and Middle East : For every 45,000 KM or 36 months, whichever occurs first : "R"
(4) Inspect every day. (5) For every 15,000 KM or 12 months, whichever occurs first : "I"
5 4
See Note(4)
KILOMETERS X 1000 MONTHS
See Note(5)
See Note(5)
Page 151 of 207
5
VEHICLE MAINTENANCE REQUIREMENTS
5
50 40
I I I I I I I I I I
See Note (5)
KILOMETERS X 1000 MONTHS
NO.
1 2 3 4 5 6 7 8 9
1011 12 13 14 15 16 17 18 19 20 DESCRIPTION
GENERAL MAINTENANCE COOLANT MANUAL TRANSMISSION OIL REAR AXLE OIL CLUTCH / BRAKE PEDAL FREE-PLAY BRAKE OIL RESERVOIR BRAKE HYDRAULIC FLUID FRONT BRAKE PADS FRONT BRAKE CALIPERS / CYLINDERS / DISC REAR BRAKE DRUMS / LININGS / CYLINDERS PARKING BRAKE TIRE CONDITION / PRESSURE EXHAUST SYSTEM / MOUNTING STEERING JOINT / RACK / BOX OIL LEAKS SUSPENSION JOINT / SEALS FRONT WHEEL BEARING COOLANT HOSES BRAKE PIPE CORROSION CLIMATE CONTROL AIR FILTER AIR CONDITIONING REFRIGERANT POWER STEERING PUMP AND HOSES
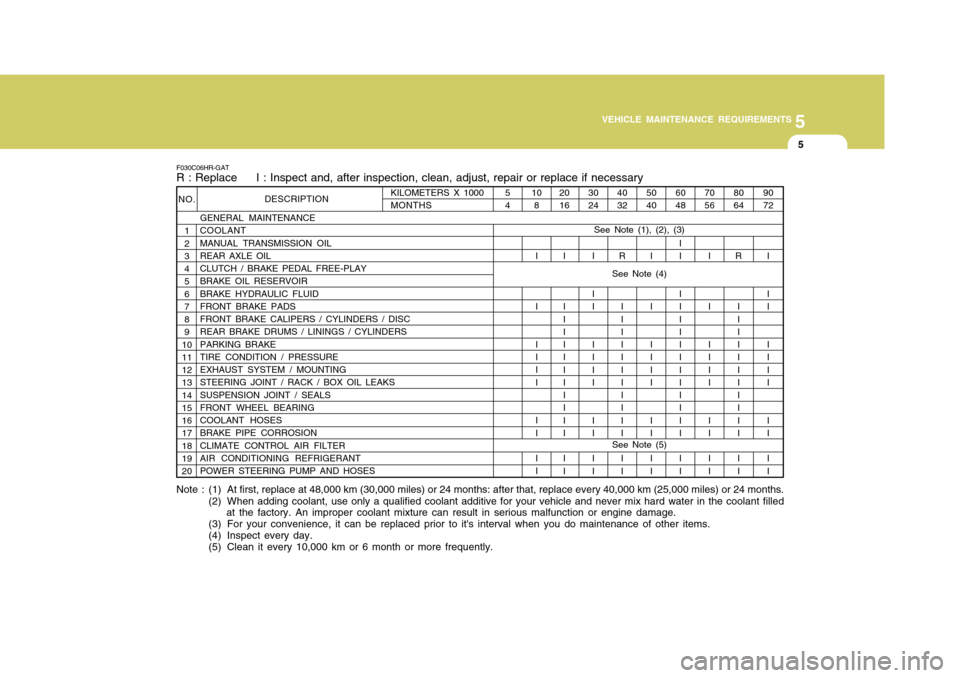
F030C06HR-GAT R : Replace I : Inspect and, after inspection, clean, adjust, repair or replace if necessary
80 64
R I I I I I I I I I I I I I 90 72
I I I I I I I I I I I
70 56
I I I I I I I I I I
60 48
II I I I I I I I I I I I I I I
40 32
R I I I I I I I I I I I I I
30 24
I I I I I I I I I I I
20 16
I I I I I I I I I I I I I I108
I I I I I I I I I I
54
See Note (1), (2), (3)
Note : (1) At first, replace at 48,000 km (30,000 miles) or 24 months: after that, replace every 40,000 km (25,000 miles) or 24 m onths.
(2) When adding coolant, use only a qualified coolant additive for your vehicle and never mix hard water in the coolant filled at the factory. An improper coolant mixture can result in serious malfunction or engine damage.
(3) For your convenience, it can be replaced prior to it's interval when you do maintenance of other items.
(4) Inspect every day.
(5) Clean it every 10,000 km or 6 month or more frequently.
See Note (4)