Page 128 of 207
3 WHAT TO DO IN AN EMERGENCY
6
D040B02HR-GAT Handling the Spare Tire 1. Assemble the tools(1)(2)(3) into the
spare tire carrier wrench orderly like the picture.
2. Insert the spare tire carrier wrench into the hole of the spare tire carrier,turn it counterclockwise, then the spare tire comes down. OHR058109
3. Disconnect the steel wire (4) from
the tire support hook (5) after thespare tire comes down completely.
4. To install the spare tire, build the spare tire as following and pull thetire support. OHR058110
(4)
D040B01HR5. Connect the steel wire (4) with the
support hook (5).
Rear wheel tire Front wheel tire
Wheel carrier guide Tire support
Rubber cushion
Steel wire
OHR058111
(4) D040B03HR
Rear wheel tire Tire support
Steel wire
Low Deck HighDeck
(5)
(5)
Page 129 of 207
3
WHAT TO DO IN AN EMERGENCY
7
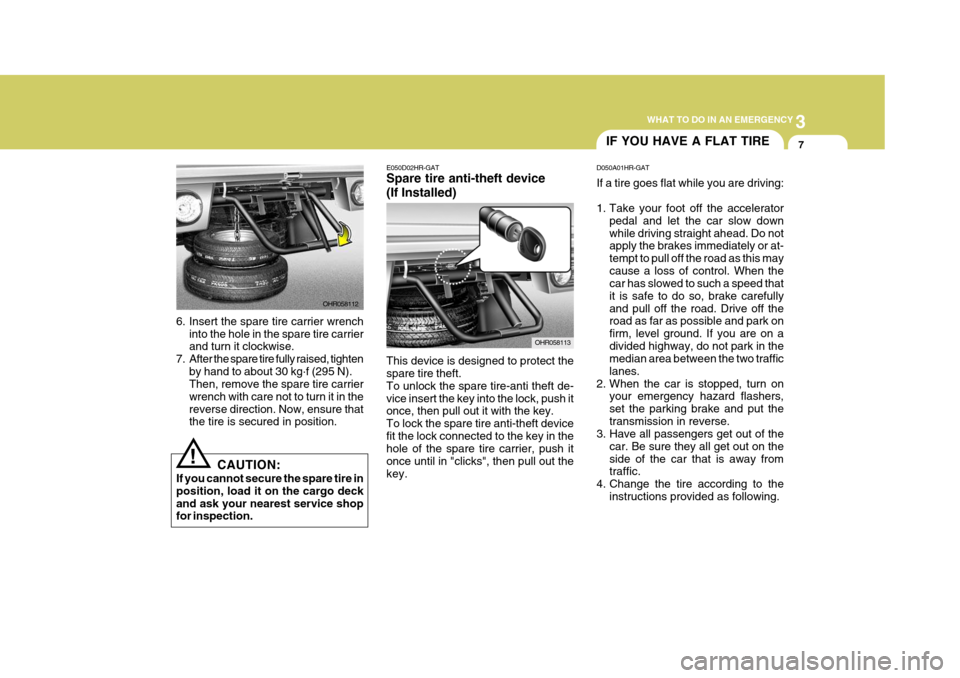
6. Insert the spare tire carrier wrench
into the hole in the spare tire carrier and turn it clockwise.
7. After the spare tire fully raised, tighten by hand to about 30 kg .
f (295 N).
Then, remove the spare tire carrier wrench with care not to turn it in thereverse direction. Now, ensure that the tire is secured in position.
! CAUTION:
If you cannot secure the spare tire in position, load it on the cargo deckand ask your nearest service shop for inspection. E050D02HR-GAT Spare tire anti-theft device (If Installed) This device is designed to protect the spare tire theft. To unlock the spare tire-anti theft de-vice insert the key into the lock, push it once, then pull out it with the key. To lock the spare tire anti-theft devicefit the lock connected to the key in the hole of the spare tire carrier, push it once until in "clicks", then pull out thekey.
OHR058113
OHR058112
IF YOU HAVE A FLAT TIRE
D050A01HR-GAT If a tire goes flat while you are driving:
1. Take your foot off the accelerator pedal and let the car slow down while driving straight ahead. Do not apply the brakes immediately or at- tempt to pull off the road as this maycause a loss of control. When the car has slowed to such a speed that it is safe to do so, brake carefullyand pull off the road. Drive off the road as far as possible and park on firm, level ground. If you are on adivided highway, do not park in the median area between the two traffic lanes.
2. When the car is stopped, turn on your emergency hazard flashers,set the parking brake and put thetransmission in reverse.
3. Have all passengers get out of the
car. Be sure they all get out on theside of the car that is away from traffic.
4. Change the tire according to the instructions provided as following.
Page 132 of 207
3 WHAT TO DO IN AN EMERGENCY
10
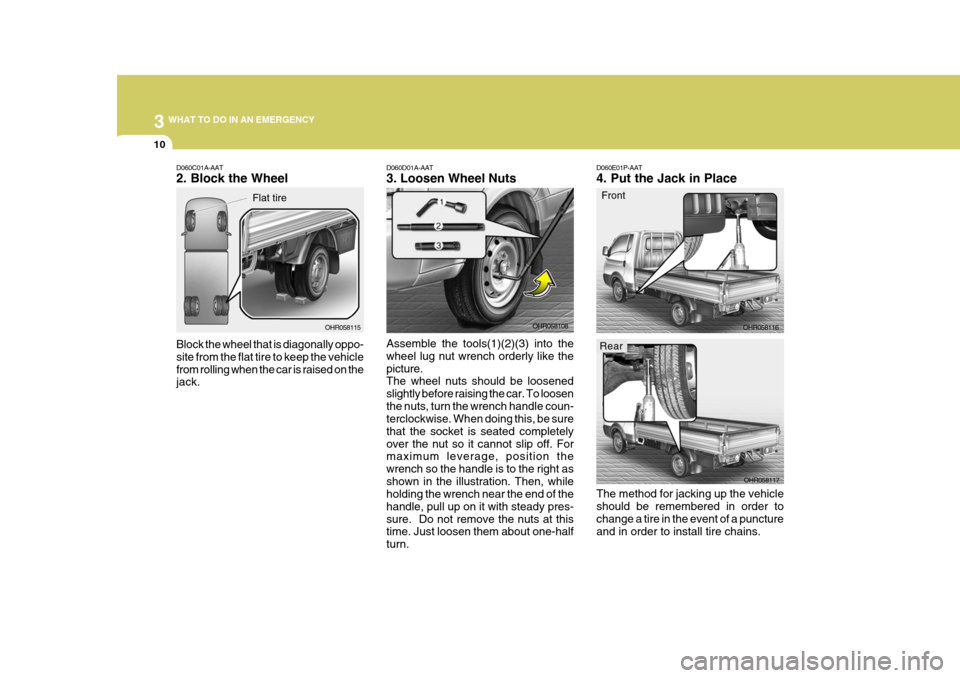
D060E01P-AAT 4. Put the Jack in Place
Front
The method for jacking up the vehicle should be remembered in order to change a tire in the event of a puncture and in order to install tire chains. OHR058116
OHR058117D060D01A-AAT 3. Loosen Wheel Nuts Assemble the tools(1)(2)(3) into the wheel lug nut wrench orderly like thepicture. The wheel nuts should be loosened slightly before raising the car. To loosenthe nuts, turn the wrench handle coun- terclockwise. When doing this, be sure that the socket is seated completelyover the nut so it cannot slip off. For maximum leverage, position the wrench so the handle is to the right asshown in the illustration. Then, while holding the wrench near the end of the handle, pull up on it with steady pres-sure. Do not remove the nuts at this time. Just loosen them about one-half turn. OHR058108D060C01A-AAT 2. Block the Wheel Block the wheel that is diagonally oppo- site from the flat tire to keep the vehiclefrom rolling when the car is raised on the jack.
OHR058115
Flat tire
Rear
Page 133 of 207
3
WHAT TO DO IN AN EMERGENCY
11
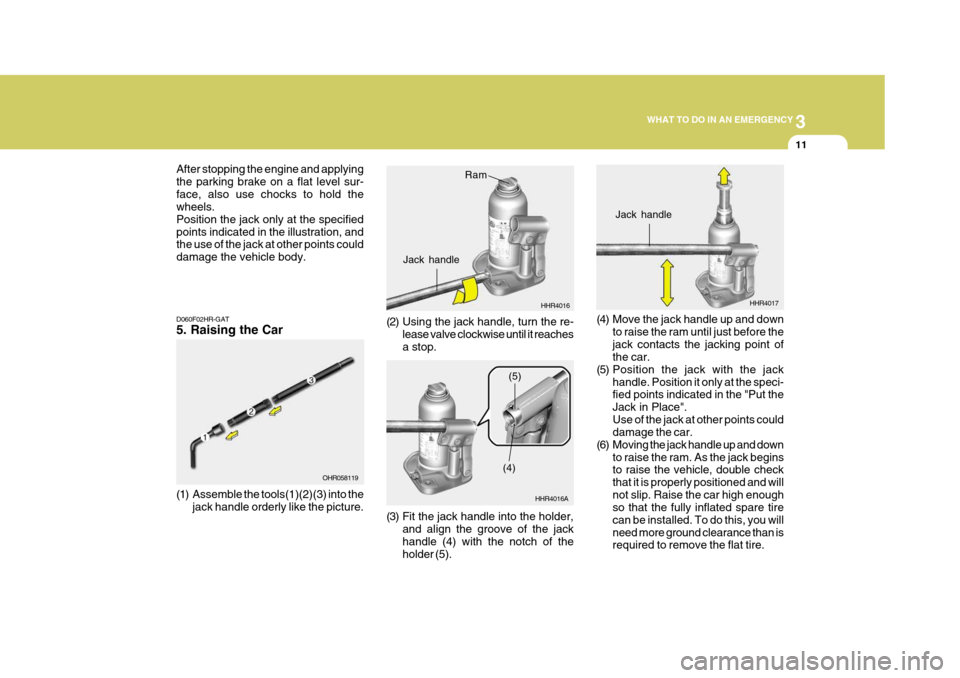
After stopping the engine and applying the parking brake on a flat level sur-face, also use chocks to hold the wheels. Position the jack only at the specifiedpoints indicated in the illustration, and the use of the jack at other points could damage the vehicle body.
D060F02HR-GAT 5. Raising the Car
(1) Assemble the tools(1)(2)(3) into the jack handle orderly like the picture. OHR058119
HHR4016
Ram
Jack handle
(2) Using the jack handle, turn the re- lease valve clockwise until it reaches a stop.
(3) Fit the jack handle into the holder,and align the groove of the jack handle (4) with the notch of the holder (5). HHR4016A
(4)(5)
HHR4017
Jack handle
(4) Move the jack handle up and down to raise the ram until just before the jack contacts the jacking point of the car.
(5) Position the jack with the jack handle. Position it only at the speci-fied points indicated in the "Put the Jack in Place".Use of the jack at other points could damage the car.
(6) Moving the jack handle up and down to raise the ram. As the jack beginsto raise the vehicle, double check that it is properly positioned and will
not slip. Raise the car high enough so that the fully inflated spare tire can be installed. To do this, you willneed more ground clearance than is required to remove the flat tire.
Page 134 of 207
3 WHAT TO DO IN AN EMERGENCY
12
D060F03HR
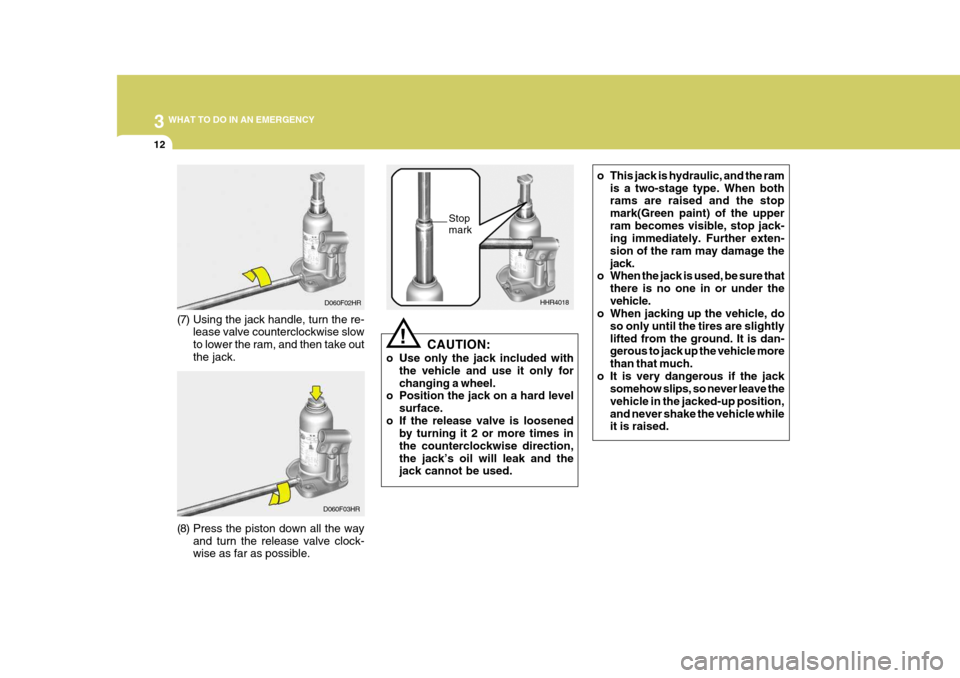
(8) Press the piston down all the way and turn the release valve clock- wise as far as possible. HHR4018
Stop mark
CAUTION:
o Use only the jack included with the vehicle and use it only for changing a wheel.
o Position the jack on a hard level
surface.
o If the release valve is loosened by turning it 2 or more times inthe counterclockwise direction,the jack’s oil will leak and the jack cannot be used.!
D060F02HR
(7) Using the jack handle, turn the re- lease valve counterclockwise slow to lower the ram, and then take outthe jack. o This jack is hydraulic, and the ram
is a two-stage type. When both rams are raised and the stop mark(Green paint) of the upperram becomes visible, stop jack- ing immediately. Further exten- sion of the ram may damage thejack.
o When the jack is used, be sure that
there is no one in or under thevehicle.
o When jacking up the vehicle, do
so only until the tires are slightlylifted from the ground. It is dan- gerous to jack up the vehicle more than that much.
o It is very dangerous if the jack somehow slips, so never leave thevehicle in the jacked-up position,and never shake the vehicle while it is raised.
Page 165 of 207
6
DO-IT-YOURSELF MAINTENANCE
7
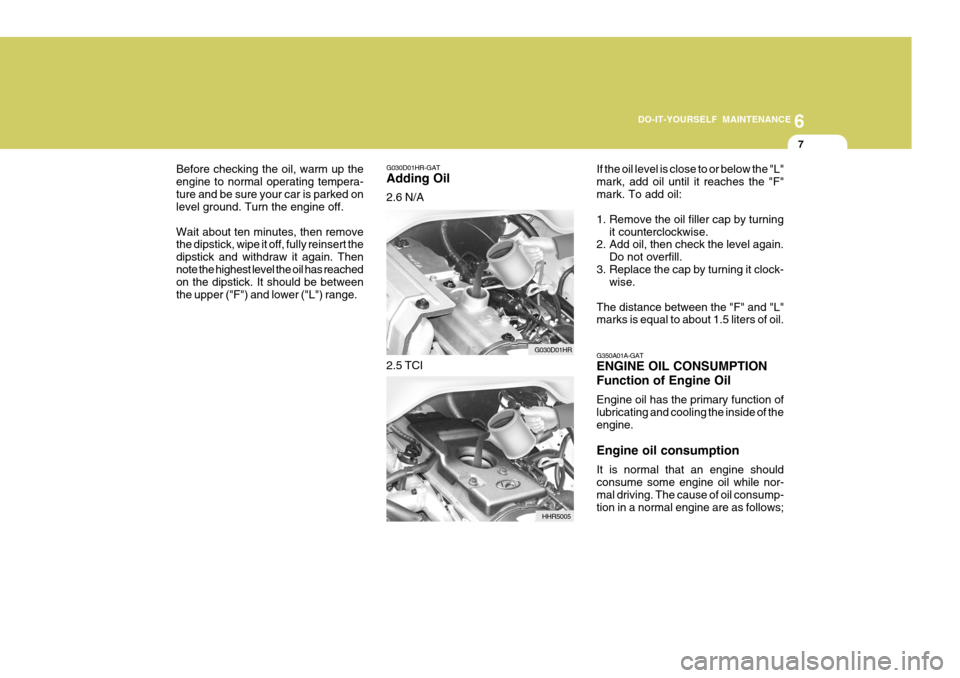
G030D01HR-GAT Adding Oil 2.6 N/A
Before checking the oil, warm up the engine to normal operating tempera-ture and be sure your car is parked on level ground. Turn the engine off. Wait about ten minutes, then remove the dipstick, wipe it off, fully reinsert the dipstick and withdraw it again. Thennote the highest level the oil has reached on the dipstick. It should be between the upper ("F") and lower ("L") range.
G030D01HR
2.5 TCI
HHR5005If the oil level is close to or below the "L"mark, add oil until it reaches the "F"mark. To add oil:
1. Remove the oil filler cap by turning
it counterclockwise.
2. Add oil, then check the level again.
Do not overfill.
3. Replace the cap by turning it clock- wise.
The distance between the "F" and "L" marks is equal to about 1.5 liters of oil. G350A01A-GAT ENGINE OIL CONSUMPTION Function of Engine Oil Engine oil has the primary function of
lubricating and cooling the inside of theengine. Engine oil consumption It is normal that an engine should consume some engine oil while nor- mal driving. The cause of oil consump- tion in a normal engine are as follows;
Page 166 of 207
6 DO-IT-YOURSELF MAINTENANCE
8
The engine oil and filter should be changed at those intervals specified inthe maintenance schedule in Section 5. If the car is being driven in severe conditions, more frequent oil and filterchanges are required. The procedure for changing the oil and filter is as follows:
1. Park the car on level ground and set
the parking brake. Start the engine and let it warm up until the needle on the coolant temperature gauge movesabove the lowest mark. Turn the engine off and place the gear selec- tor lever in reverse gear.
2. Lift up the front passenger's seat (Refer to "To Inspect the EngineCompartment Under the FrontPassenger's Seat" on page 1-13.) and remove the engine oil filler cap.
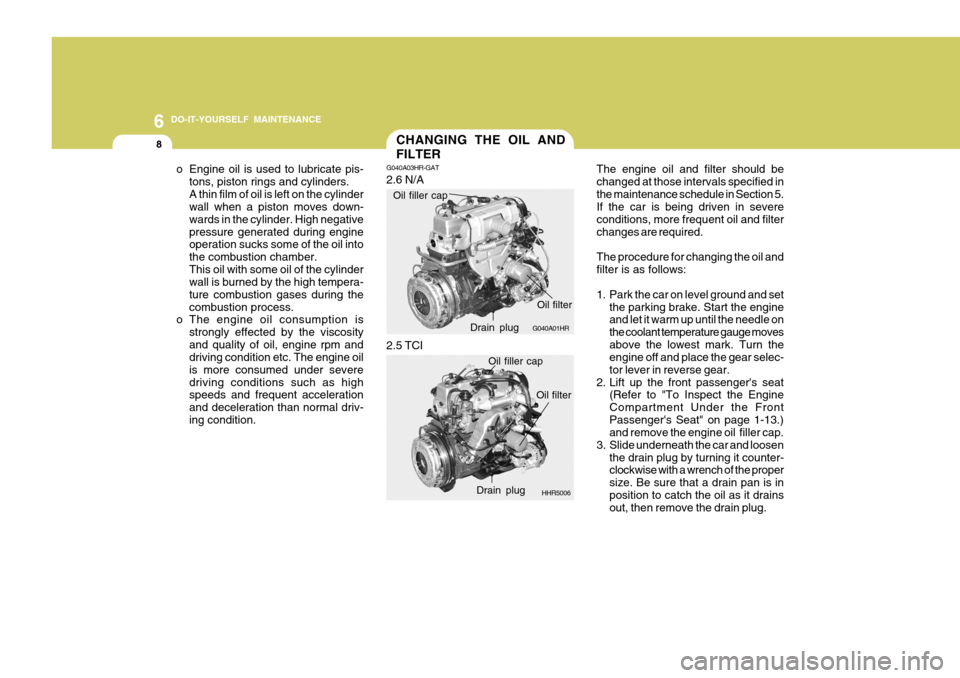
3. Slide underneath the car and loosen the drain plug by turning it counter-clockwise with a wrench of the proper size. Be sure that a drain pan is inposition to catch the oil as it drains out, then remove the drain plug.
CHANGING THE OIL AND FILTER
o Engine oil is used to lubricate pis- tons, piston rings and cylinders. A thin film of oil is left on the cylinder wall when a piston moves down- wards in the cylinder. High negativepressure generated during engine operation sucks some of the oil into the combustion chamber.This oil with some oil of the cylinder wall is burned by the high tempera-
ture combustion gases during thecombustion process.
o The engine oil consumption is
strongly effected by the viscosityand quality of oil, engine rpm and driving condition etc. The engine oil is more consumed under severedriving conditions such as high speeds and frequent acceleration and deceleration than normal driv-ing condition. G040A03HR-GAT 2.6 N/A
G040A01HR
Oil filler capDrain plugOil filter
2.5 TCI
HHR5006
Oil filler cap
Drain plug Oil filter
Page 167 of 207
6
DO-IT-YOURSELF MAINTENANCE
9
!WARNING:
Be very careful when draining the engine oil as it may be hot enough to burn you!
4. When the oil has stopped draining, replace the drain plug using a new gasket and retighten by turning it clockwise.
Tightening torque : 3.5 ~ 4.5 kgf.m
5. Remove the oil filter by turning it counterclockwise with a oil filter wrench of the proper size. A certainamount of oil will come out when you remove the filter. So be sure to have your drain pan in place underneathit.
6. Install a new oil filter in accordance
with the instructions on the carton oron the filter itself. Do not over-tighten.
Tightening torque: 2.3 ~ 2.5 kgf.m Be sure that the mounting surfaceon the engine is clean and that theold gasket is removed completely. Lubricate the new gasket on the filter with clean engine oil beforeinstallation.!
7. Remove the engine oil level dipstick.
8. Refill the crankcase with the recom- mended engine oil slowly. Refer to the specification in chapter 9 for engine oil capacity.
CAUTION:
Slowly pour the recommended oilby using a funnel. Do not overfill not to damage the engine.
9. Start the engine and check to be sure no oil is leaking from the drain plug or oil filter.
10. Shut off the engine and recheck the
oil level.
NOTE: Always dispose of used engine oil in an environmentally acceptable man-ner. It is suggested that it be placed in a sealed container and taken to a service station for reclamation. Donot pour the oil on the ground or put it into the household trash. WARNING:
Used motor oil may cause irritation or cancer of the skin if left in contact with the skin for prolonged periods of time. Wash your hands thoroughlywith soap and warm water as soon as possible after handling used oil.
!