2010 Hyundai H-100 Truck ECU
[x] Cancel search: ECUPage 124 of 207
3 WHAT TO DO IN AN EMERGENCY
2
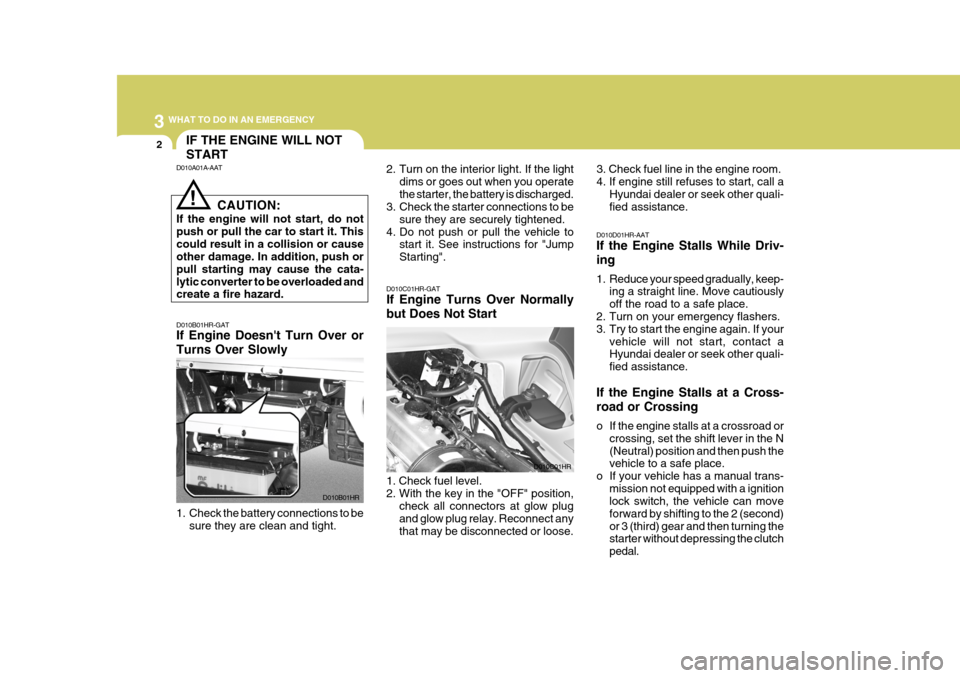
D010B01HR-GAT If Engine Doesn't Turn Over or Turns Over Slowly 2. Turn on the interior light. If the light
dims or goes out when you operate the starter, the battery is discharged.
3. Check the starter connections to be
sure they are securely tightened.
4. Do not push or pull the vehicle to start it. See instructions for "JumpStarting".
D010C01HR-GAT If Engine Turns Over Normally but Does Not Start 3. Check fuel line in the engine room. 4. If engine still refuses to start, call a
Hyundai dealer or seek other quali- fied assistance.
D010D01HR-AAT If the Engine Stalls While Driv- ing
1. Reduce your speed gradually, keep- ing a straight line. Move cautiously off the road to a safe place.
2. Turn on your emergency flashers.
3. Try to start the engine again. If your vehicle will not start, contact aHyundai dealer or seek other quali- fied assistance.
If the Engine Stalls at a Cross- road or Crossing
o If the engine stalls at a crossroad or crossing, set the shift lever in the N (Neutral) position and then push the vehicle to a safe place.
o If your vehicle has a manual trans- mission not equipped with a ignitionlock switch, the vehicle can move forward by shifting to the 2 (second)or 3 (third) gear and then turning the starter without depressing the clutch pedal.
D010A01A-AAT
!
D010B01HR D010C01HR
IF THE ENGINE WILL NOT START
CAUTION:
If the engine will not start, do not push or pull the car to start it. Thiscould result in a collision or cause other damage. In addition, push or pull starting may cause the cata-lytic converter to be overloaded and create a fire hazard.
1. Check the battery connections to be sure they are clean and tight. 1. Check fuel level. 2. With the key in the "OFF" position,
check all connectors at glow plugand glow plug relay. Reconnect anythat may be disconnected or loose.
Page 127 of 207
3
WHAT TO DO IN AN EMERGENCY
5
195/70R15C-6PR 155R12C-8PR 195/70R15C-8PR FRONT
290kPa (42PSI)
- - -
!!
SPARE TIRE
WARNING:
Never work on injection system with engine running or within 30 sec- onds after shutting off engine. High pressure pump, rail, injectors andhigh pressure pipes are subject to high pressure even after the engine stopped. The fuel jet produced byfuel leaks may cause serious in- jury, if it touch the body. People using pacemakers should not movethan 30cm closer to the ECU or wiring harness within the engine room while engine is running, sincethe high currents in the Common Rail system produce considerable magnetic fields. WARNING:
Do not remove the radiator cap whenthe engine is hot. This can allowcoolant to be blown out of the open- ing and cause serious burns.
6. If you cannot find the cause of the overheating, wait until the engine temperature has returned to nor-mal. Then, if the engine coolant has been lost, carefully add coolant to the reservoir (Page 6-10) to bringthe fluid level in the reservoir up to the halfway mark.
7. Proceed with caution, keeping alert
for further signs of overheating. Ifoverheating happens again, call a Hyundai dealer for assistance.
!
5. If the water pump drive belt is broken
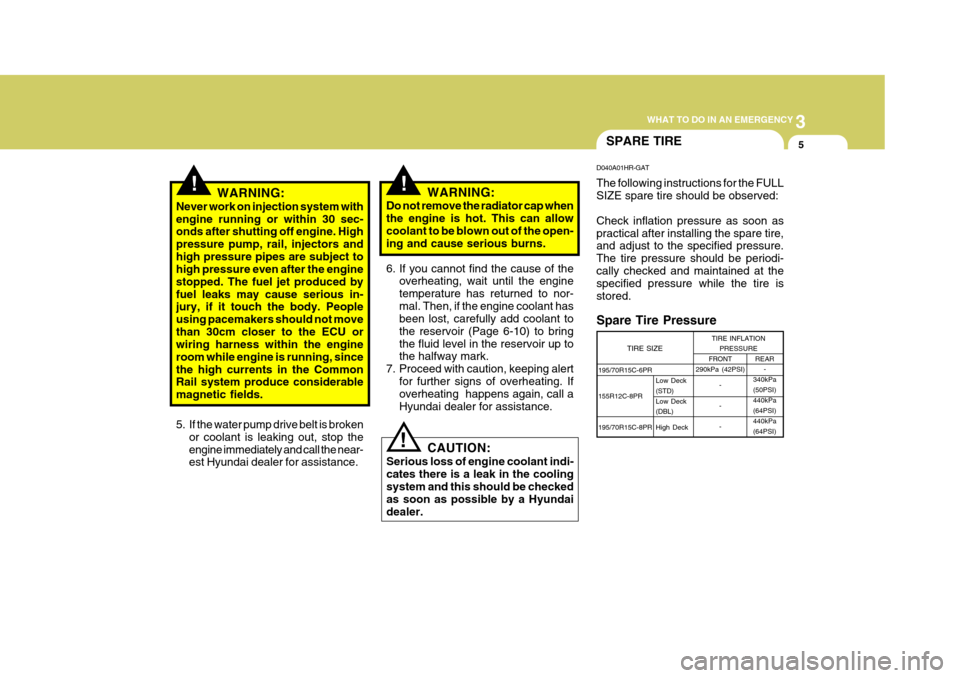
or coolant is leaking out, stop the engine immediately and call the near- est Hyundai dealer for assistance. D040A01HR-GAT The following instructions for the FULL SIZE spare tire should be observed: Check inflation pressure as soon as practical after installing the spare tire, and adjust to the specified pressure. The tire pressure should be periodi-cally checked and maintained at the specified pressure while the tire is stored.
Spare Tire PressureCAUTION:
Serious loss of engine coolant indi- cates there is a leak in the coolingsystem and this should be checked as soon as possible by a Hyundai dealer. TIRE SIZE
TIRE INFLATION
PRESSURE REAR-
340kPa (50PSI)440kPa(64PSI)440kPa (64PSI)
Low Deck (STD)Low Deck (DBL) High Deck
Page 129 of 207
3
WHAT TO DO IN AN EMERGENCY
7
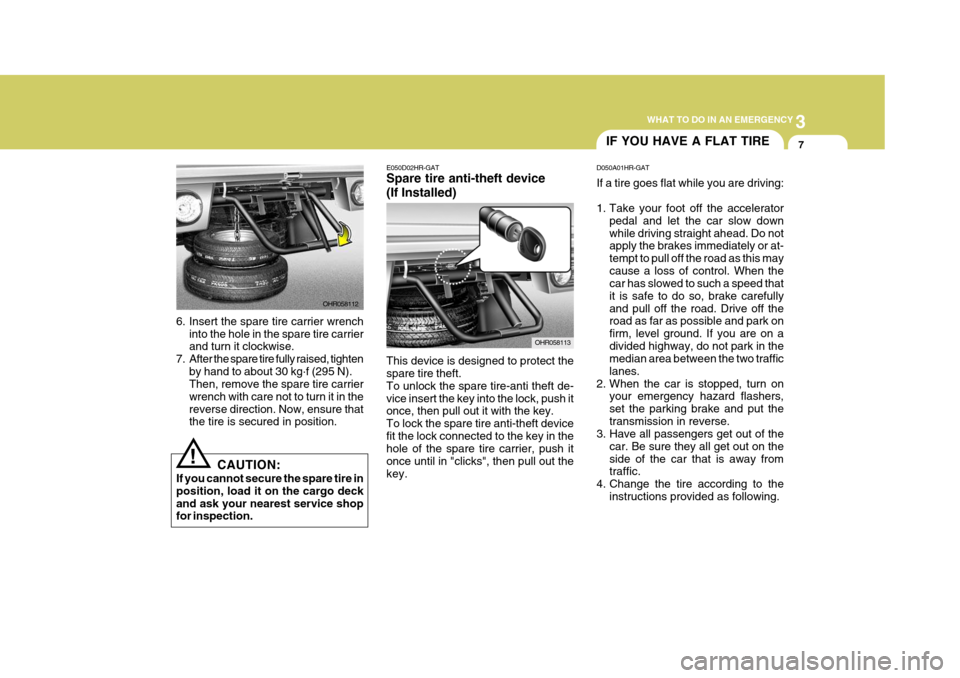
6. Insert the spare tire carrier wrench
into the hole in the spare tire carrier and turn it clockwise.
7. After the spare tire fully raised, tighten by hand to about 30 kg .
f (295 N).
Then, remove the spare tire carrier wrench with care not to turn it in thereverse direction. Now, ensure that the tire is secured in position.
! CAUTION:
If you cannot secure the spare tire in position, load it on the cargo deckand ask your nearest service shop for inspection. E050D02HR-GAT Spare tire anti-theft device (If Installed) This device is designed to protect the spare tire theft. To unlock the spare tire-anti theft de-vice insert the key into the lock, push it once, then pull out it with the key. To lock the spare tire anti-theft devicefit the lock connected to the key in the hole of the spare tire carrier, push it once until in "clicks", then pull out thekey.
OHR058113
OHR058112
IF YOU HAVE A FLAT TIRE
D050A01HR-GAT If a tire goes flat while you are driving:
1. Take your foot off the accelerator pedal and let the car slow down while driving straight ahead. Do not apply the brakes immediately or at- tempt to pull off the road as this maycause a loss of control. When the car has slowed to such a speed that it is safe to do so, brake carefullyand pull off the road. Drive off the road as far as possible and park on firm, level ground. If you are on adivided highway, do not park in the median area between the two traffic lanes.
2. When the car is stopped, turn on your emergency hazard flashers,set the parking brake and put thetransmission in reverse.
3. Have all passengers get out of the
car. Be sure they all get out on theside of the car that is away from traffic.
4. Change the tire according to the instructions provided as following.
Page 131 of 207
3
WHAT TO DO IN AN EMERGENCY
9
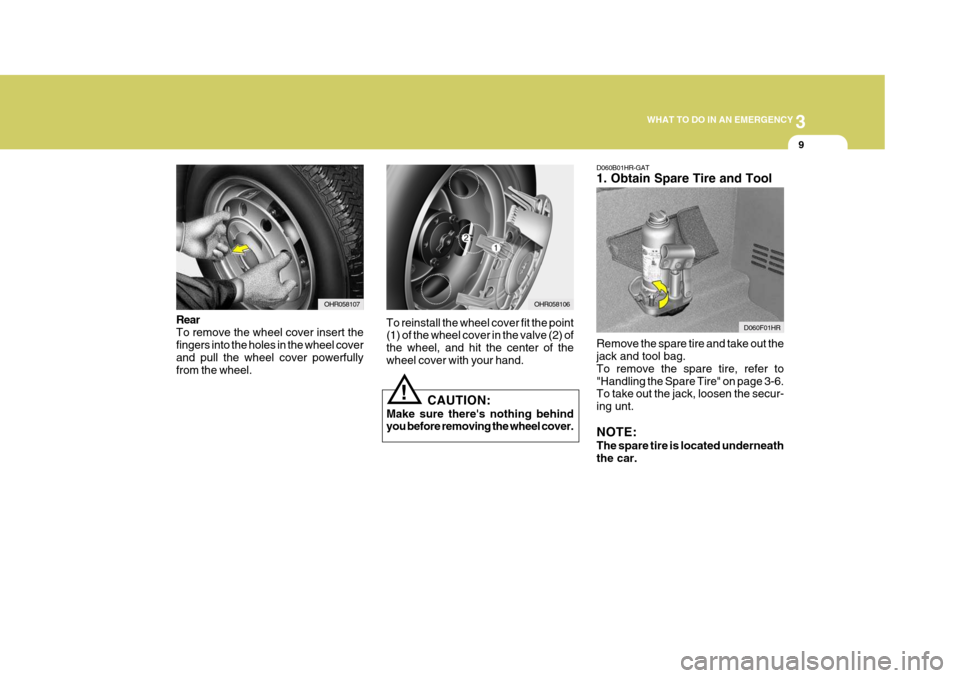
D060B01HR-GAT 1. Obtain Spare Tire and Tool Remove the spare tire and take out the jack and tool bag. To remove the spare tire, refer to"Handling the Spare Tire" on page 3-6. To take out the jack, loosen the secur- ing unt. NOTE: The spare tire is located underneath the car.
Rear To remove the wheel cover insert the fingers into the holes in the wheel cover and pull the wheel cover powerfullyfrom the wheel.
OHR058107
D060F01HR
To reinstall the wheel cover fit the point (1) of the wheel cover in the valve (2) of the wheel, and hit the center of the wheel cover with your hand.
OHR058106
CAUTION:
Make sure there's nothing behind you before removing the wheel cover.
!
Page 137 of 207
3
WHAT TO DO IN AN EMERGENCY
15EMERGENCY COMMODITY
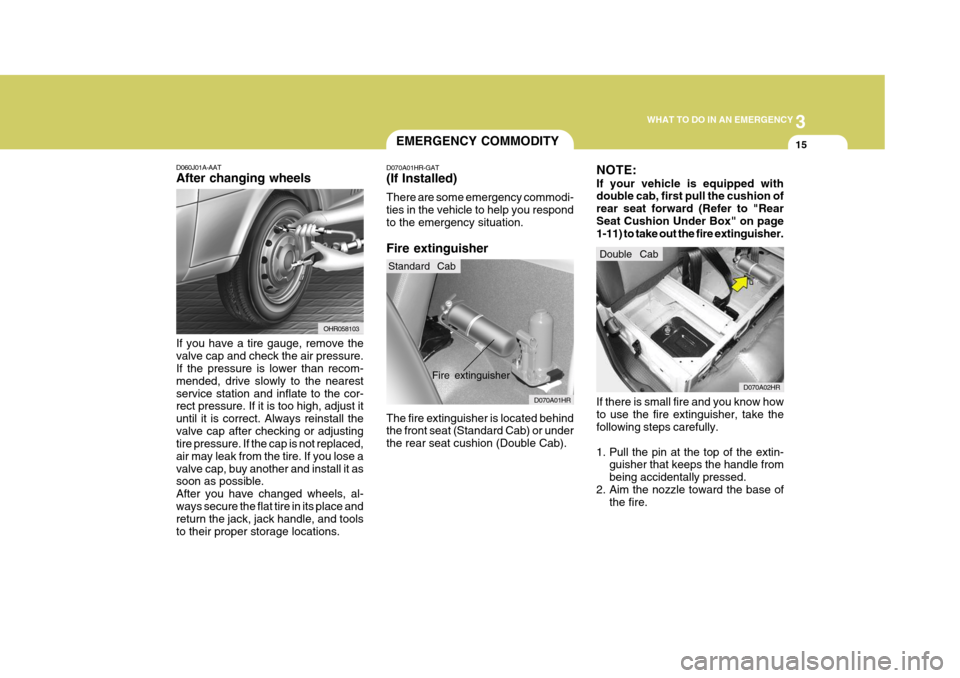
D060J01A-AAT After changing wheels If you have a tire gauge, remove the valve cap and check the air pressure. If the pressure is lower than recom- mended, drive slowly to the nearestservice station and inflate to the cor- rect pressure. If it is too high, adjust it until it is correct. Always reinstall thevalve cap after checking or adjusting tire pressure. If the cap is not replaced, air may leak from the tire. If you lose avalve cap, buy another and install it as soon as possible. After you have changed wheels, al-ways secure the flat tire in its place and return the jack, jack handle, and tools to their proper storage locations. OHR058103
NOTE: If your vehicle is equipped with double cab, first pull the cushion of rear seat forward (Refer to "RearSeat Cushion Under Box" on page 1-11) to take out the fire extinguisher.
D070A01HR-GAT (If Installed) There are some emergency commodi- ties in the vehicle to help you respondto the emergency situation. Fire extinguisher The fire extinguisher is located behind the front seat (Standard Cab) or under the rear seat cushion (Double Cab).
D070A01HR
Fire extinguisher
Standard Cab
D070A02HR
Double Cab
If there is small fire and you know how to use the fire extinguisher, take the following steps carefully.
1. Pull the pin at the top of the extin- guisher that keeps the handle from being accidentally pressed.
2. Aim the nozzle toward the base of the fire.
Page 155 of 207

5
VEHICLE MAINTENANCE REQUIREMENTS
9
!
EXPLANATION OF SCHEDULED MAINTENANCE ITEMS
F060M01A-AAT
o Engine Oil and Filter
The engine oil and filter should be
changed at those intervals specified in the maintenance schedule. If the ve- hicle is being driven in severe condi-tions, more frequent oil and filter changes are required.
F060N01HR-GAT
o Valve Clearances
An incorrect valve clearance will not
only result in rough engine operation, but will also cause excessive noiseand reduced engine output.
Inspect valve clearance and adjust as
required while the engine is hot.
See page 9-4 for the valve clearance
description. F060D01TB-GAT
o Fuel Lines, Fuel Hoses and
Connections
Check the fuel lines, fuel hoses and
connections for leakage and damage. Have a trained technician replace any damaged or leaking parts immediately. F060C01A-AAT
o Fuel Filter A clogged filter can limit the speed at which the vehicle may be driven, dam- age the emission system and cause hard starting. If an excessive amountof foreign matter accumulates in the fuel tank, the filter may require re- placement more frequently.After installing a new filter, run theengine for several minutes, and checkfor leaks at the connections. Fuel fil- ters should be installed by trained technicians.
WARNING:
Never work on injection system withengine running or within 30 sec- onds after shutting off engine. High pressure pump, rail, injectors andhigh pressure pipes are subject to high pressure even after the engine stopped. The fuel jet produced byfuel leaks may cause serious injury, if it touch the body. People using pacemakers should not move than30cm closer to the ECU or wiring harness within the engine room while engine is running, since thehigh currents in the Common Rail system produce considerable mag- netic fields.
Page 156 of 207
5VEHICLE MAINTENANCE REQUIREMENTS
10
F060F01A-AAT
o Vacuum and Crankcase
Ventilation Hoses
Inspect the surface of hoses for evi- dence of heat and/or mechanical dam- age. Hard and brittle rubber, cracking, tears, cuts, abrasions, and excessiveswelling indicate deterioration. Particu- lar attention should be paid to examin- ing those hose surfaces nearest tohigh heat sources, such as the ex- haust manifold. Inspect the hose routing to assure that the hoses do not come in contact with any heat source, sharp edges or mov- ing component which might cause heatdamage or mechanical wear. Inspect all hose connections, such as clamps and couplings, to make sure they aresecure, and that no leaks are present. Hoses should be replaced immedi- ately if there is any evidence of dete-rioration or damage. F060B01HR-GAT
o Drive Belts
Inspect all drive belts (water pump andalternator) for evidence of cuts, cracks, excessive wear or oiliness, and re- place if necessary. Drive belts shouldbe checked periodically for proper ten- sion and adjusted as necessary. F060E01A-GAT
o Timing Belt
Inspect all parts related with the timing
belt for damage and deformation. Re- place any damaged parts immediately.
F060H01A-AAT
o Air Cleaner Filter
A Genuine Hyundai air cleaner filter isrecommended when the filter is re-placed.
F060G01A-AAT
o Vapor Hose and Fuel Filler Cap
The vapor hose and fuel filler cap
should be inspected at those intervals specified in the maintenance sched- ule. Make sure that a new vapor hoseor fuel filler cap is correctly replaced.
F070B01A-GAT
o Cooling System
Check the cooling system part, suchas radiator, coolant reservoir, hoses and connections for leakage and dam- age. Replace any damaged parts. F070C01A-AAT
o Coolant
The coolant should be changed at the intervals specified in the mainte- nance schedule. F070D01HP-GAT
o Manual Transmission Oil
Inspect the manual transmission oil
according to the maintenance sched- ule. NOTE:
If the oil level is low, check for
possible leaks before adding oil. Do not overfill.
Page 169 of 207
6
DO-IT-YOURSELF MAINTENANCE
11
!
G050D01HR
G050D01HR-GAT To Change the Coolant The coolant should be changed at those intervals specified in the vehiclemaintenance schedule in Section 5.
CAUTION:
Engine coolant can damage the fin-ish of your car. If you spill enginecoolant on the car, wash it off thor- oughly with clean water.
!
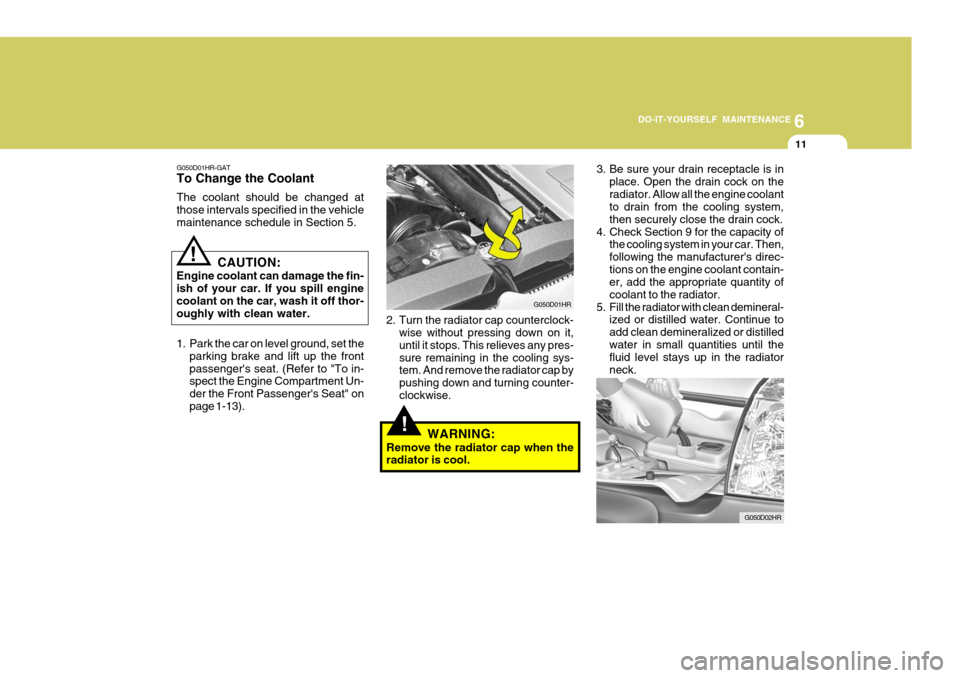
1. Park the car on level ground, set the parking brake and lift up the front passenger's seat. (Refer to "To in- spect the Engine Compartment Un- der the Front Passenger's Seat" onpage 1-13). 2. Turn the radiator cap counterclock-
wise without pressing down on it,until it stops. This relieves any pres-sure remaining in the cooling sys- tem. And remove the radiator cap by pushing down and turning counter-clockwise.
WARNING:
Remove the radiator cap when the radiator is cool. 3. Be sure your drain receptacle is in
place. Open the drain cock on the radiator. Allow all the engine coolant to drain from the cooling system, then securely close the drain cock.
4. Check Section 9 for the capacity of the cooling system in your car. Then,following the manufacturer's direc-tions on the engine coolant contain- er, add the appropriate quantity of coolant to the radiator.
5. Fill the radiator with clean demineral- ized or distilled water. Continue toadd clean demineralized or distilledwater in small quantities until the fluid level stays up in the radiator neck.
G050D02HR