Page 405 of 526
�µ
It is possible that the pressures
shown on the multi-inf ormation
display and the pressures you
manually measure are slightly
dif f erent.
If the dif f erence is signif icant or you
cannot make the low tire pressure/
TPMS indicator and message on the
multi-inf ormation display go out af ter
inf lating the tires to the specif ied
values, have your dealer check the
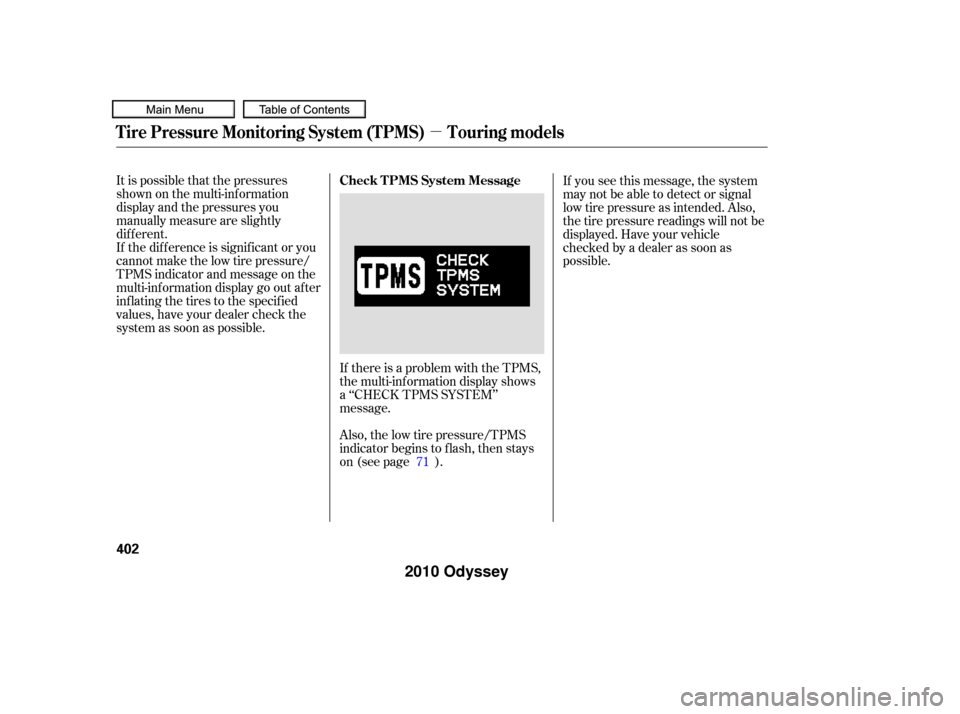
system as soon as possible.If you see this message, the system
may not be able to detect or signal
low tire pressure as intended. Also,
the tire pressure readings will not be
displayed. Have your vehicle
checked by a dealer as soon as
possible.
If there is a problem with the TPMS,
the multi-information display shows
a ‘‘CHECK TPMS SYSTEM’’
message.
Also, the low tire pressure/TPMS
indicator begins to f lash, then stays
on (see page ). 71
Tire Pressure Monitoring System (TPMS) Touring models
Check T PMS System Message
402
�����—�����—�
���y�
�����������
�y���
�(�����������y���������y
2010 Odyssey
Page 411 of 526
 or more be equipped with
its own electric or surge-type brakes. Trailer lights and equipment must
comply with f ed")
�´
�´
Honda recommends that any trailer
having a total weight of 1,000 lbs
(450 kg) or more be equipped with
its own electric or surge-type brakes. Trailer lights and equipment must
comply with f ederal, state, province,
and local regulations. Check the
requirements f or the areas where
you plan to tow, and use only
equipment designed f or your vehicle.
Your vehicle has a trailer lighting
connector behind the right side
panel in the cargo area. Ref er to the
drawing above f or the purpose of
each pin.
There are two common types of
trailer brakes: surge and electric.
Surge brakes are common f or boat
trailers, since the brakes will get wet.
If you choose electric brakes, be
sure they are electronically actuated.
Do not attempt to tap into your
vehicle’s hydraulic system. No
matter how successf ul it may seem,
any attempt to attach trailer brakes
to your vehicles hydraulic system
will lower braking ef f ectiveness and
create a potential hazard.
Seeyourtrailerdealerorrental
agency f or more inf ormation on
installing electric brakes.
Trailer Brakes
Trailer Lights
Towing a Trailer
408
GROUND
SMALL LIGHTSLEFT TURN SIGNAL
RIGHT TURN
SIGNAL SMALL LIGHTS
B HAC
B HAZARD
�����—�����—�
���y�
�����������
�y���
�(�����������y�����
���y
2010 Odyssey
Page 412 of 526

Since lighting and wiring vary by
trailer type and brand, you should
have a qualif ied technician install a
suitable connector between the
vehicle and the trailer. Improper
equipment or installation can cause
damage to your vehicle’s electrical
system and af f ect your vehicle
warranty.When towing a trailer, we
recommend that you carry a f ull-size
spare wheel and tire for your vehicle
and trailer. If you use the compact
sparetirethatcamewithyour
vehicle, it could adversely af f ect
vehicle handling. See page f or
proper tire size, page f or how to
store a f ull size wheel and tire, and
page f or inf ormation on
changing a f lat tire.
Remember to unhitch the trailer
bef ore changing a f lat. Ask your
trailer sales or rental agency where
and how to store the trailer’s spare
tire.Many states and Canadian
provinces/territories require special
outside mirrors when towing a trailer.
Even if they don’t, you should install
special mirrors if you cannot clearly
see behind you, or if the trailer
creates a blind spot.
Avoid towing a trailer during your
vehicle’s f irst 600 miles (1,000 km)
(see page ). Askyourtrailersalesorrental
agency if any other items are
recommended or required f or your
towing situation.
455
468
463
368Spare T iresA ddit ional T owing Equipment
Break-In Period
Towing a Trailer
Driving
409
�����—�����—�
���y�
�������������y���
�(�����������y�����
���y
2010 Odyssey
Page 413 of 526

When preparing to tow, and bef ore
driving away, be sure to check the
f ollowing:All items in or on the trailer are
properly secured and cannot shif t
while you drive.
Your vehicle tires and spare are
properly inf lated, and the trailer
tires and spare are inflated as
recommended by the trailer
maker.The added weight, length, and
height of a trailer will af f ect your
vehicle’s handling and perf ormance,
so driving with a trailer requires
some special driving skills and
techniques.
Foryoursafetyandthesafetyof
others,taketimetopracticedriving
maneuvers bef ore heading f or the
open road, and f ollow the guidelines
below.
Drive slower than normal in all
driving situations, and obey posted
speed limits f or vehicles with trailers.
Use the D position when towing a
trailer on level roads. Do not exceed
55 mph (88 km/h). At higher speeds,
the trailer may sway or affect vehicle
handling.
The vehicle has been properly
serviced, and the suspension,
cooling system, and lights are in
good operating condition.
The trailer has been properly
serviced and is in good condition.
All weights and loads are within
limits.
Thehitch,safetychains,andany
other attachments are secure.
The lights and brakes on your
vehicle and the trailer are working
properly.
You may want to fill the fuel tank
with premium f uel. Premium f uel
provides improved perf ormance.
Pre-T ow Checklist
Driving Saf ely With a T railer
T owing Speeds and Gears
Towing a Trailer
410
�����—�����—�
���y�
�������������y���
�(�����������y�����
���y
2010 Odyssey
Page 416 of 526

This section explains why it is
important to keep your vehicle well
maintained and how to f ollow basic
maintenance saf ety precautions.
This section also includes
instructions on how to read the
maintenance minder messages on
the inf ormation display or multi-
inf ormation display (depending on
models), and instructions f or simple
maintenance tasks you may want to
take care of yourself .
If you have the skills and tools to
perf orm more complex maintenance
tasks on your vehicle, you may want
to purchase the service manual. See
page f or inf ormation on how to
obtain a copy, or see your dealer.......................
Maintenance Saf ety .414
....................
Maintenance Minder . 415
..............................
Fluid Locations .425
........................
Adding Engine Oil .426
Changing the Engine Oil and ...........................................
Filter .428
..............................
Engine Coolant .430
....................
Windshield Washers .432
....
Automatic Transmission Fluid . 433
....................................
Brake Fluid .435
....................
Power Steering Fluid . 436
....................................
Timing Belt .436
.............................................
Lights .437
................
Cleaning the Seat Belts . 444
.....................................
Floor Mats .444
..................
Dust and Pollen Filter . 444
.................................
Wiper Blades .445
...........................................
Wheels .450
...............................................
Tires .450
...................
Checking the Battery . 458
.............................
Vehicle Storage .459
511
Maintenance
Maint enance
413
�����—�����—�
���y�
�������������y���
�(�����������y�����
���y
2010 Odyssey
Page 426 of 526

�µ
�µ
�µ
�µ
�µ
�µ
�Ì
U.S. Vehicles:
Youshouldcheckthefollowing
items at the specif ied intervals. If
you are unsure of how to perf orm
any check, turn to the appropriate
page listed. Lights Check the operation of
the headlights, parking lights,
taillights, high-mount brake light,
and license plate lights monthly.
See page .
Engine coolant level Check the
radiator reserve tank every time
you f ill the f uel tank. See page . Engine oil level Check every
time you fill the fuel tank. See
page .
Automatic transmission Check
the f luid level monthly. See page .
Brakes Check the f luid level
monthly. See page .
Tires Check the tire pressure
monthly. Examine the tread f or
wear and foreign objects. See page .
According to state and federal
regulations, f ailure to perf orm
maintenance on the items marked
with will not void your emissions
warranties. However, all
maintenance services should be
perf ormed in accordance with the
intervals indicated by the odometer/
trip meter display or the multi-
inf ormation display.
371
372
433 435 437
451
CONT INUED
Maintenance, replacement, or
repair of emissions control
devices and systems may be done
by any automotive repair
establishment or individual using
parts that are ‘‘certif ied’’ to EPA
standards. Owner’s Maintenance Checks
Maintenance Minder
Maint enance
423
�����—�����—�
���y�
�������������y���
�(�����������y���������y
2010 Odyssey
Page 440 of 526

Your vehicle has halogen headlight
bulbs, two on each side. When
replacing a bulb, handle it by its base
and protect the glass from contact
with your skin or hard objects. If you
touch the glass, clean it with
denaturedalcoholandacleancloth.The high beam headlight bulb and
the low beam headlight bulb are
replaced the same way.Open the hood. To change the
high beam headlight bulb on the
passenger’s side, remove the
power steering f luid reservoir
f rom its holder by pulling it
straight up.
Theheadlightswereproperlyaimed
when your vehicle was new. If you
regularly carry heavy items in the
cargo area or pull a trailer,
readjustment may be required.
Adjustmentsshouldbedonebyyour
dealer or other qualif ied technician.
1.
CONT INUED
Lights
Headlight A imingReplacing a Headlight Bulb
Maint enance
437
POWER
STEERING
FLUID
RESERVOIR
Passenger’s side
Halogen headlight bulbs get very hot
when lit. Oil, perspiration, or a scratch
on the glass can cause the bulb to
overheat and shatter.
�����—�����—�
���y�
�������������y���
�(�����������y���������y
2010 Odyssey
Page 441 of 526
Remove the electrical connector
f rom the bulb by pushing on the
tab and pulling the connector
down.
Remove the bulb by turning it one-
quarter turn counterclockwise.Open the hood. Remove the
socket f rom the headlight
assembly by turning it one-quarter
turn counterclockwise.
Pull the burned out bulb straight
out of its socket.
Push the new bulb straight into
the socket until it bottoms.
Push the electrical connector back
onto the bulb. Make sure it is on
all the way.
Turn on the headlights to test the
new bulb.
If you replaced the high beam
headlight bulb on the passenger’s
side, reinstall the power steering
f luid reservoir.
Insert the new bulb into the hole,
and turn it one-quarter turn clock-
wise to lock it in place. 5.
6.
7.
2.
3.
4. 2. 1.
Lights
Replacing a Front T urn Signal
Bulb
438
TAB
BULB
CONNECTOR BULB SOCKET
Driver’s side
�����—�����—�
���y�
���������
���y���
�(�����������y���������y
2010 Odyssey