Page 387 of 526

Youshoulddothefollowingchecks
and adjustments bef ore you drive
your vehicle.Make sure all windows, mirrors,
and outside lights are clean and
unobstructed. Remove f rost, snow,
or ice.
Check that the hood is f ully closed.
Check that any items you may be
carrying are stored properly or
f astened down securely. Check the seat adjustment (see
page ).
Check the adjustment of the
inside and outside mirrors (see
page ).
Check the steering wheel
adjustment (see page ).
Make sure the doors and the
tailgate are securely closed and
locked.
Visually check the tires. If a tire
looks low, use a gauge to check its
pressure (see page ). Fasten your seat belt. Check that
your passengers have f astened
their seat belts (see page ).
When you start the engine, check
the gauges and indicators in the
instrument panel, and the
messages on the inf ormation
display or multi-inf ormation
display (depending on models)
(seepages,,,and
).
3. 2.
1.
4. 5.
6.
7.
8. 9.
10. 15
65 66 77
87
169
190 141
451
Preparing to Drive
384
�����—�����—�
���y�
������
������y���
�(�����������y���������y
2010 Odyssey
Page 416 of 526

This section explains why it is
important to keep your vehicle well
maintained and how to f ollow basic
maintenance saf ety precautions.
This section also includes
instructions on how to read the
maintenance minder messages on
the inf ormation display or multi-
inf ormation display (depending on
models), and instructions f or simple
maintenance tasks you may want to
take care of yourself .
If you have the skills and tools to
perf orm more complex maintenance
tasks on your vehicle, you may want
to purchase the service manual. See
page f or inf ormation on how to
obtain a copy, or see your dealer.......................
Maintenance Saf ety .414
....................
Maintenance Minder . 415
..............................
Fluid Locations .425
........................
Adding Engine Oil .426
Changing the Engine Oil and ...........................................
Filter .428
..............................
Engine Coolant .430
....................
Windshield Washers .432
....
Automatic Transmission Fluid . 433
....................................
Brake Fluid .435
....................
Power Steering Fluid . 436
....................................
Timing Belt .436
.............................................
Lights .437
................
Cleaning the Seat Belts . 444
.....................................
Floor Mats .444
..................
Dust and Pollen Filter . 444
.................................
Wiper Blades .445
...........................................
Wheels .450
...............................................
Tires .450
...................
Checking the Battery . 458
.............................
Vehicle Storage .459
511
Maintenance
Maint enance
413
�����—�����—�
���y�
�������������y���
�(�����������y�����
���y
2010 Odyssey
Page 447 of 526

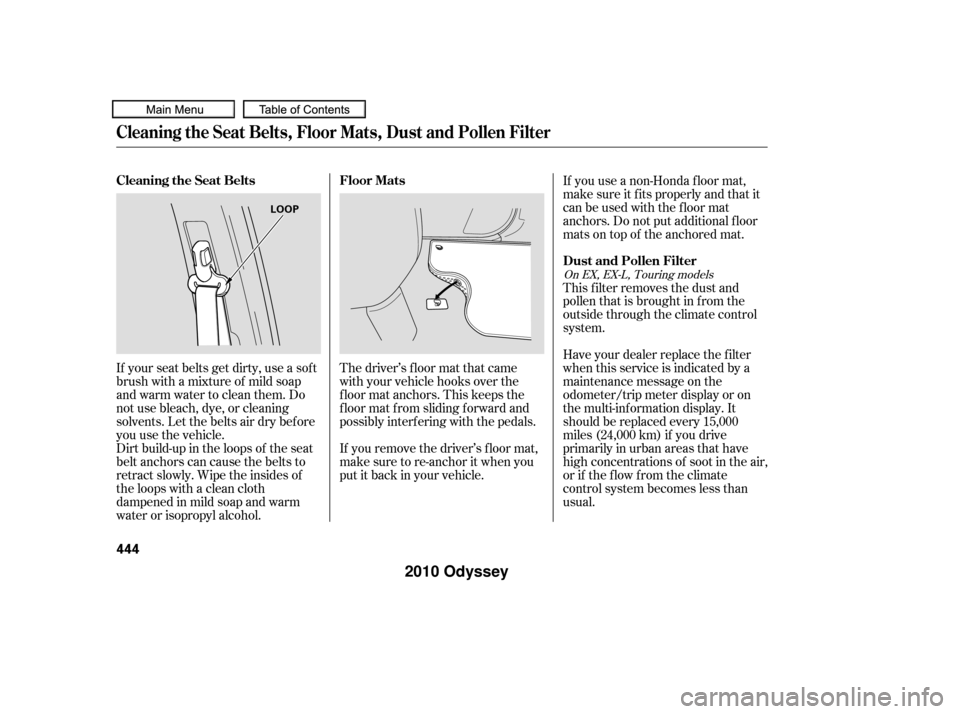
If your seat belts get dirty, use a sof t
brush with a mixture of mild soap
and warm water to clean them. Do
not use bleach, dye, or cleaning
solvents. Let the belts air dry bef ore
you use the vehicle.
Dirt build-up in the loops of the seat
belt anchors can cause the belts to
retract slowly. Wipe the insides of
the loops with a clean cloth
dampened in mild soap and warm
water or isopropyl alcohol.If you remove the driver’s f loor mat,
make sure to re-anchor it when you
putitbackinyourvehicle. The driver’s f loor mat that came
with your vehicle hooks over the
f loor mat anchors. This keeps the
f loor mat f rom sliding f orward and
possibly interf ering with the pedals.If you use a non-Honda f loor mat,
make sure it f its properly and that it
canbeusedwiththefloormat
anchors. Do not put additional f loor
mats on top of the anchored mat.
This f ilter removes the dust and
pollenthatisbroughtinfromthe
outside through the climate control
system.
Have your dealer replace the filter
when this service is indicated by a
maintenance message on the
odometer/trip meter display or on
the multi-information display. It
should be replaced every 15,000
miles (24,000 km) if you drive
primarily in urban areas that have
high concentrations of soot in the air,
or if the f low f rom the climate
control system becomes less than
usual.
On EX, EX-L, Touring models
Floor Mats
Cleaning the Seat Belts
Dust and Pollen Filter
Cleaning the Seat Belts, Floor Mats, Dust and Pollen Filter
444
LOOP
�����—�����—�
���y�
���������
�
�y���
�(�����������y���������y
2010 Odyssey
Page 467 of 526
Loosen the jack from its holder by
turning the end counterclockwise.Remove the bracket from the jack
storageareabyunscrewingthe
bracket mounting wing bolt.
Remove the vinyl storage bag.Move the seat belt out of the way
by hanging the latch plate on the
holder.
Fold down the third row seat (see
page ).
6.
7.
5.
4.
181
Changing a Flat Tire
464
VINYL BAG
JACK
COVER BRACKET MOUNTING
WING BOLT
HOLDER
BRACKET
�����—�����—�
���y�
������
������y���
�(�����������y���������y
2010 Odyssey
Page 468 of 526
The spare tire is stored behind the
sparetirecoveronthesidewallof
the cargo area on the driver’s side.Placethejackunderthejacking
point nearest the tire you need to
change. Turn the end bracket
clockwise until the top of the jack
contacts the jacking point. Make
sure the jacking point tab is
restinginthejacknotch.
Remove the cover by holding the
two handles on the spare tire
cover and pulling the cover out. If you are changing a rear tire,
close the sliding door.
Unscrew the tire mounting wing
bolt, and take the spare tire out of
its holder. Make sure you also turn of f the
sliding door main switch.
Loosen each wheel nut 1/2 turn
with the wheel nut wrench.
8.
9. 10.
12.
11.
CONT INUED
On EX, EX-L, Touring models
Changing a Flat Tire
T aking Care of t he Unexpect ed
465
SEAT BELT
COVER
TIRE MOUNTING
WING BOLT
SPACER CONE
WHEEL NUT WRENCHWHEEL NUTS
�����—�����—�
���y�
������
������y���
�(�����������y���������y
2010 Odyssey
Page 471 of 526
Install the bracket and the bracket
mountingwingboltonthe
attachment point as shown, and
tighten the bolt. Make sure the
bracket is securely tightened.Install the flat tire on the bracket
with the inside of the wheel facing
toward you. Install the tire
mounting wing bolt to the bracket
through one of the f ive wheel nut
holes as shown. Poke a hole in the
vinyl bag as needed. Secure the
f lat tire by tightening the tire
mounting wing bolt.
Return the third row seat to an
upright position.
YouwillfindaU-shapedcarpet
piece behind the seat bottom of
the third row seat. Pull up the U-
shaped carpet piece, f old it, and
tack the end under the carpet.
Remove the spacer, and unfasten
the plastic screw with a coin.
20.
21.
22.23.
Changing a Flat Tire
468
BRACKET
TIRE MOUNTING WING BOLT
SPACER
PLASTIC SCREW BRACKET MOUNTING WING BOLT
ATTACHMENT
POINT
�����—�����—�
���y�
�������������y���
�(�����������y���������y
2010 Odyssey
Page 473 of 526
You can store the f lat tire on the top
of the f olded third row seat.Pull up the U-shaped carpet piece,
f old it, and tack the end under the
carpet.
Remove the spacer, and unfasten
the plastic screw with a coin.
Remove the center cap before
storing the f lat tire.
Store the spacer, plastic screw and
center cap in a noticeable place. Place the flat tire face down on the
attachment point. Put the spacer
cone on the f lat tire as shown.
Poke holes in the vinyl bag. Secure
the flat tire into the attachment
point by tightening the tire
mounting wing bolt through the
center cap hole of the f lat tire
wheel.Follow step 22 through 26 on
pages and .
1.
2.
3. 4.5.
468 469
On EX, EX-L and Touring models
Changing a Flat Tire
St oring a Flat T ire on t he Folded
Third Row Seat
470
TIRE MOUNTING
WING BOLT
ATTACHING POINT SPACER
PLASTIC SCREW SPACER CONE
�����—�����—�
���y�
�������������y���
�(�����������y���������y
2010 Odyssey
Page 486 of 526

�µ �µ�Î�Î�Î
�Î �Î
�Î�Î �Î
�Î
No.
Circuits Protected
No. Amps. Circuits Protected No.
No.
CONT INUED
Circuits Protected
Circuits Protected
Amps.
Amps.
Amps.
1
2
3
4
5
6
7
8
9
10
11
12 Left Headlight Low
Rear Defroster Coil
Left Headlight High
Small Lights
Right Headlight High
Right Headlight Low
Back Up
FI ECU (PCM)
Condenser Fan
Not used
Cooling Fan
MG Clutch
1
2
3
4
5
6 40 A
40 A
40 A
20 A
20 A Not Used
Left Power Sliding Door
Right Power Sliding Door
Power Tailgate
Premium
AC Inverter 13
14
15
16
17
18
19
20
21
22
23
7
8
9
10
11 Horn, Stop
Rear Defroster
Back Up, ACC
Hazard
VSA Motor
VSA
Option 1
Option 2
Heater Motor
Passenger’s Fuse Box
Battery
IG1 Main
Power Window Main
Fog Light
ACM
AS power Seat Slide
AS power Seat Recline
Rear Entertainment System
10 A
30 A
10 A
15 A
10 A
10 A
7.5 A 15 A
30 A
30 A
7.5 A 20 A
30 A
40 A
15 A
30 A
30 A
30 A
40 A
40 A
70 A
120 A 50 A
50 A
40 A
20 A
10 A
20 A
20 A
7.5 A
For some types
:
Fuse Locations
T aking Care of t he Unexpect ed
483
PRIMARY UNDER-HOOD FUSE BOX
SECONDARY UNDER-HOOD FUSE BOX
�����—�����—�
���y�
�������������y���
�(�����������y���������y
2010 Odyssey