Page 243 of 450

Some versions of MP3, WMA, or
AAC f ormat may not be supported. If
an unsupported f ile is f ound, the
audio unit displays UNSUPPORTED,
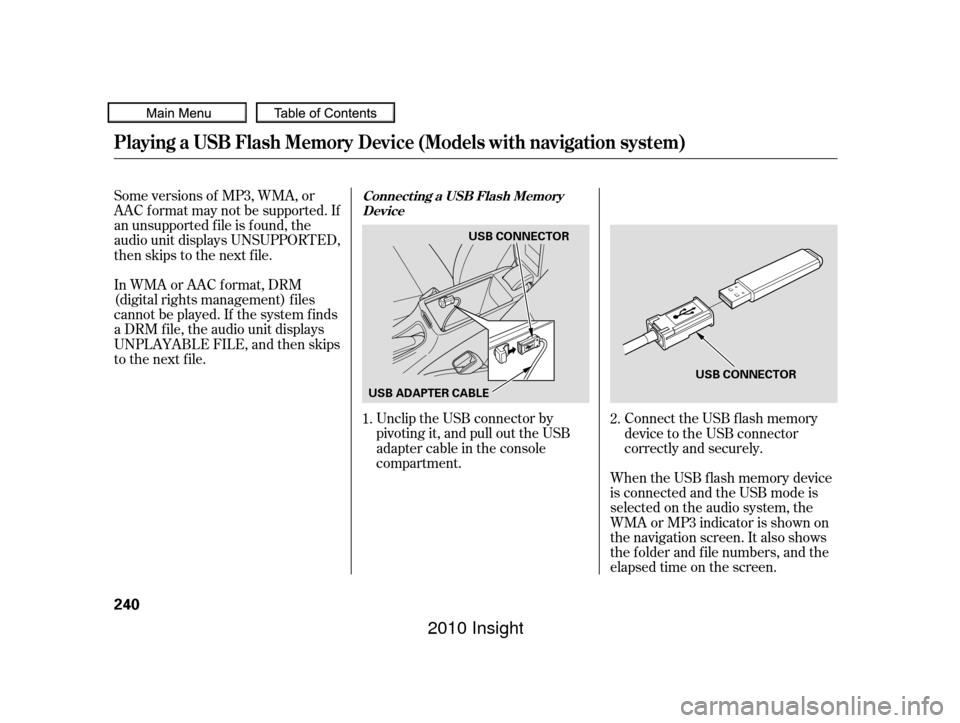
then skips to the next f ile.Unclip the USB connector by
pivoting it, and pull out the USB
adapter cable in the console
compartment.
In WMA or AAC format, DRM
(digital rights management) f iles
cannot be played. If the system f inds
a DRM f ile, the audio unit displays
UNPLAYABLE FILE, and then skips
to the next file.
Connect the USB f lash memory
device to the USB connector
correctly and securely.
When the USB f lash memory device
is connected and the USB mode is
selected on the audio system, the
WMAorMP3indicatorisshownon
the navigation screen. It also shows
the f older and f ile numbers, and the
elapsed time on the screen.
1.
2.
Playing a USB Flash Memory Device (Models with navigation system)
Connect ing a USB Flash Memory
Device
240
USB CONNECTOR
USB ADAPTER CABLE USB CONNECTOR
�����—�
���—�����y�
�
�������
���y���
�)�"���������y���������y
2010 Insight
Page 258 of 450

The alarm will also be activated if a
passenger inside the locked vehicle
turns the ignition switch on. Once the security system is set,
opening any door, the hatch, or the
hood without using the key or the
remote transmitter, will cause the
alarm to activate. It will also activate
if the radio is removed f rom the
dashboard or the wiring is cut.The security system will not set if
the hood, hatch, or any door is not
f ully closed. If the system will not set,
check the door and hatch open
indicator on the instrument panel
and multi-inf ormation display (see
page ) to see if the doors and
hatch are f ully closed. Since it is not
part of the monitor display, manually
check the hood.
Do not attempt to alter this system
or add other devices to it.
To see if the system is set
af ter you exit the vehicle, press the
LOCK button on the remote
transmitter within 5 seconds. If the
system is set, the horn will beep
once.
The security system sets
automatically 15 seconds after you
lock the doors, hood, and the hatch.
For the system to activate, you must
lock the doors and the hatch f rom
the outside with the key, driver’s
lock tab, door lock master switch, or
remote transmitter. The security
system indicator on the instrument
panel starts blinking immediately to
show you the system is setting itself . The security system helps to protect
your vehicle and valuables f rom thef t.
The horn sounds and a combination
of headlights, parking lights, side
marker lights and taillights f lash if
someone attempts to break into your
vehicle or remove the audio unit.
This alarm continues f or 2 minutes,
then the system resets. To reset an
activated system before the 2
minutes have elapsed, unlock the
driver’s door with the key or use the
remote transmitter. 12
Security System
Features
255
NOTE:SECURITY SYSTEM INDICATOR
�����—�
���—�����y�
�
�����������y���
�)�"���������y���������y
2010 Insight
Page 268 of 450

�Î
�Î
CONT INUED
BluetoothHandsFreeL ink
Features
265
‘‘Change Language’’‘‘Hands Free Help’’
‘‘System
Set up’’
‘‘Tutorial’’ ‘‘Clear’’
‘‘Auto Transfer’’ ‘‘Call Notification’’ ‘‘Security’’
‘‘Change Passcode’’
Hear a list of available commands and additional information describing each command
(See page 261)
Hear a tutorial for general rules on using the system (See page
261)
Apply a security passcode to the system that must be input at each key
cycle to access the system (See page
279)
Change your security passcode (See page 280)
Clear the system of all paired phones, phonebook entries and security
passcode (See page 281)
Set how you would like to be notified of an incoming call
(See page
280)
Press HFL
Talk button
Press and release the HFL Talk button each time you give a command. Set calls to automatically transfer from your phone to HFL when you
enter the vehicle (See page
280)
Change language from English to French (See page 282)
: Canadian models
�����—�
���—�����y�
���������
���y���
�)�"���������y���������y
2010 Insight
Page 282 of 450
This command group allows you to
change or customize HFL basic
settings.Press and release the HFL Talk
button bef ore a command.
Say ‘‘ .’’
Say‘‘ ’’aftertheprompts.
Follow the HFL prompts and say
the 4-digit passcode you want to
set.
Follow the HFL prompts to
conf irm the number. Once a passcode is set, you
will need to enter it to use HFL each
time you start the vehicle. If you
f orget the code, your dealer will have
toresetitforyou,oryouwillhaveto
clear the entire system (see page ).
1.
2.
3.
4. 281
CONT INUED
System Setup
System setup
Security
BluetoothHandsFreeL ink
T o set a 4-digit passcode t o lock t heHFL system f or security purposes:
Features
279
NOTE:
�����—�
���—�����y�
�������������y���
�)�"���������y���������y
2010 Insight
Page 283 of 450

�Î
�ÎIf you get into the vehicle while you
are on the phone, the call can be
automatically transferred to HFL
with the ignition switch in the
ACCESSORY (I) position.
Press and release the HFL Talk
button bef ore a command.
Say ‘‘ .’’
Say ‘‘ ’’ af ter the
prompts.
HFL will let you know if auto
transf er is on or of f , depending on
the previous setting. Follow the
HFL prompts to change the
setting.
Press and release the HFL Talk
button bef ore a command.
Say ‘‘ .’’
Say ‘‘ ’’ af ter the
prompts.
Follow the HFL prompts and say
the new 4-digit passcode.
Follow the HFL prompts to
conf irm the number. Press and release the HFL Talk
button bef ore a command.
Say ‘‘ .’’
Say ‘‘ ’’ af ter the
prompts.
Follow the HFL prompts and say
‘‘ ’’ or ‘‘ .’’ You
can also say ‘‘ ’’ f or no audible
incoming call notif ication.
The def ault setting is a ring tone. 2.
3.
4. 1.
2.
3.
1.
2.
3.
1.
: System setup
Auto transf er
System setup
Change passcode
System setup
Call notif ication
Ring tone Prompt Of f
BluetoothHandsFreeL ink
T o change your securit y pass code: T o select eit her a ring t one or a
prompt as t he incoming callnotification : To activate or deactivate the auto
transfer function:
280
�����—�
���—�����y�
�������������y���
�)�"���������y���������y
2010 Insight
Page 291 of 450
Insert the dipstick all the way back
into its hole. Wipe of f the dipstick with a clean
cloth or paper towel. Remove the dipstick (orange loop).
Wait a f ew minutes af ter turning the
engine of f bef ore you check the oil.
To close the hood, lif t it up slightly to
remove the support rod f rom the
hole. Put the support rod back into
its holding clip. Lower the hood to
about a f oot (30 cm) above the
f ender, then let it drop. Make sure it
is securely latched.
Holding the grip, pull the support
rod out of its clip. Insert the end
into the designated hole in the
hood. 2.
3. 1.
3. Oil Check
Service Station Procedures
288
DIPSTICK
SUPPORT ROD CLIP
GRIP
�����—�
���—�����y�
���������
���y���
�)�"���������y���������y
2010 Insight
Page 301 of 450

Store or secure all items that could
be thrown around and hurt
someone during a crash.
Be sure items placed on the f loor
behind the f ront seats cannot roll
under the seats and interf ere with
the driver’s ability to operate the
pedals, the operation of the seats,
or the operation of the sensors
under the seats.
Keep the glove box closed while
driving. If it is open, a passenger
could injure their knees during a
crash or sudden stop.Distribute cargo evenly on the
f loor of the hatch, placing the
heaviest items on the bottom and
as far forward as possible.
Trytosecuretheitemswithrope
or cord so they will not shif t while
you are driving.
Do not place items on the cargo
area cover (if equipped), or stack
objects higher than the top of the
back seat. They could block your
view and be thrown about the
vehicle during a crash or sudden
stop.
If you carry large items that
prevent you f rom closing the
hatch, exhaust gas can enter the
passenger area. To avoid the
possibility of
, f ollow the instructions
on page . If youfoldtherearseatsdown,tie
down items that could be thrown
about the vehicle during a crash or
sudden stop. Keep all cargo below
the bottom of the windows. If it is
higher, it could interf ere with
proper operation of the side
curtain airbags.
Refer to page for folding rear
seats.
56 142
Carrying Items in the Passenger
Compartment
Carrying Cargo in the Cargo A rea
carbon monoxide
poisoning
Carrying Cargo
298
�����—�
���—�����y�
�������������y���
�)�"���������y���������y
2010 Insight
Page 305 of 450

Make sure all windows, mirrors,
and outside lights are clean and
unobstructed. Remove f rost, snow,
or ice.Check that any items you may be
carrying are stored properly or
f astened down securely.
Check the seat adjustment (see
page ).
Check the adjustment of the
inside and outside mirrors (see
page ).
Check the steering wheel
adjustment (see page ).
Make sure the doors are securely
closed and locked.Fasten your seat belt. Check that
your passengers have f astened
their seat belts (see page ).
Youshoulddothefollowingchecks
and adjustments bef ore you drive
your vehicle.
Visually check the tires. If a tire
looks low, use a gauge to check its
pressure (see page ). Check that the hood and hatch are
f ully closed. When you start the engine, check
the gauges and indicators in the
instrument panel, and the
messages on the multi-inf ormation
display (see pages , and
).
1.
2.
3.
8. 7. 6.9.
4.
5.
375 61 72
75 17
138
144 12510.
Preparing to Drive
302
�����—�
���—�����y�
�������������y���
�)�"���������y���������y
2010 Insight