2010 HONDA FIT ignition
[x] Cancel search: ignitionPage 263 of 351
To change the information display
from the engine oil life display to the
odometer, the trip meter or average
fuel mileage, press and release the
select/reset knob.
When the engine oil life is 0 percent
or negative mileage, the maintenance
minder indicator (
) remains on
even if you change the information display.
Immediately have the service
performed, and make sure to reset
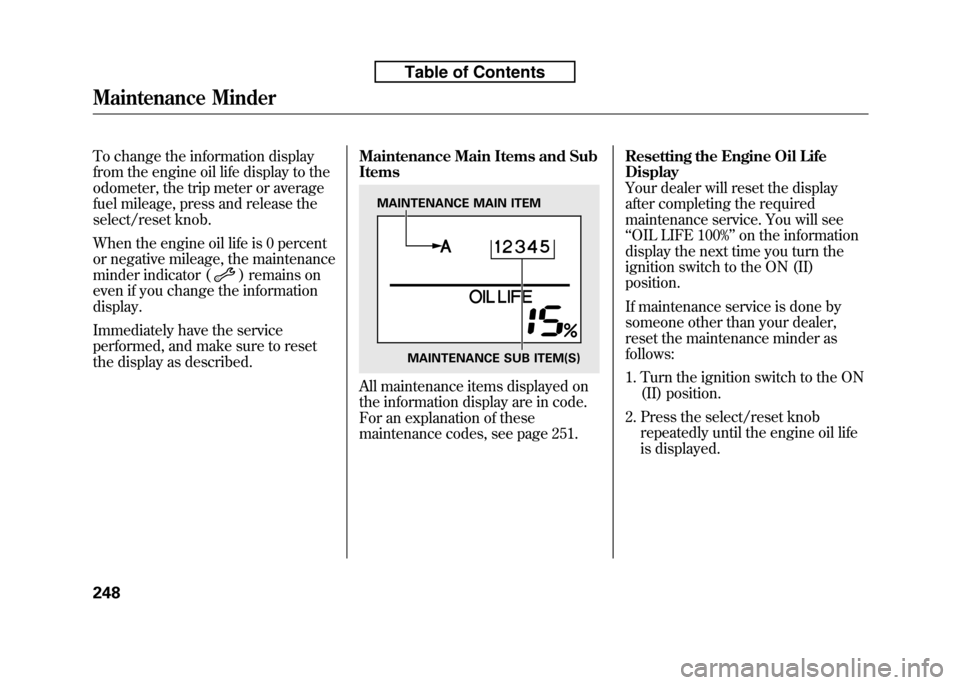
the display as described. Maintenance Main Items and SubItems
All maintenance items displayed on
the information display are in code.
For an explanation of these
maintenance codes, see page 251.Resetting the Engine Oil LifeDisplay
Your dealer will reset the display
after completing the required
maintenance service. You will see‘‘
OIL LIFE 100% ’’on the information
display the next time you turn the
ignition switch to the ON (II)position.
If maintenance service is done by
someone other than your dealer,
reset the maintenance minder asfollows:
1. Turn the ignition switch to the ON (II) position.
2. Press the select/reset knob repeatedly until the engine oil life
is displayed.
MAINTENANCE MAIN ITEM
MAINTENANCE SUB ITEM(S)
Maintenance Minder
248
Table of Contents
Page 295 of 351

WARNING:Battery posts,
terminals, and related accessories
contain lead and lead compounds.
Wash your hands after handling.
If you need to connect the battery to
a charger, disconnect both cables to
prevent damaging your vehicle's
electrical system. Always disconnect
the negative ( -) cable first, and
reconnect it last.
On vehicles without navigation system
If your vehicle's battery is
disconnected, or goes dead, the time
setting is lost. To reset the time, see
page 192.
If your vehicle's battery is
disconnected, or goes dead, the
audio system may disable itself. The
next time you turn on the radio, you
will see ‘‘ENTER CODE ’’in the
frequency display. Use the preset
buttons to enter the code (see page191).
The battery gives off explosive
hydrogen gas during normaloperation.
A spark or flame can cause the
battery to explode with enough
force to kill or seriously hurtyou.
Wear protective clothing and a
face shield, or have a skilled
technician do the batterymaintenance.
On vehicles with navigation system
The navigation system will also
disable itself. The next time you turn
on the ignition switch, the system
will require you to enter ‘‘ENTER
CODE ’’before it can be used. Refer
to the navigation system manual.
Checking the Battery
280
Table of Contents
Page 300 of 351
Except all Canadian models withautomatic transmission
If you have a flat tire while driving,
stop in a safe place to change it.
Drive slowly along the shoulder until
you get to an exit or an area to stop
that is far away from the traffic lanes.The vehicle can easily roll off
the jack, seriously injuring
anyone underneath.
Follow the directions for
changing a tire exactly, and
never get under the vehicle
when it is supported only by thejack.
1. Park the vehicle on firm, level, and non-slippery ground. Put the
transmission in Park (automatic)
or reverse (manual). Apply the
parking brake.
2. Turn on the hazard warning lights, and turn the ignition switch to the
LOCK (0) position. Have all
passengers get out of the vehicle
while you change the tire.
3. Lift the rear center head restraint.
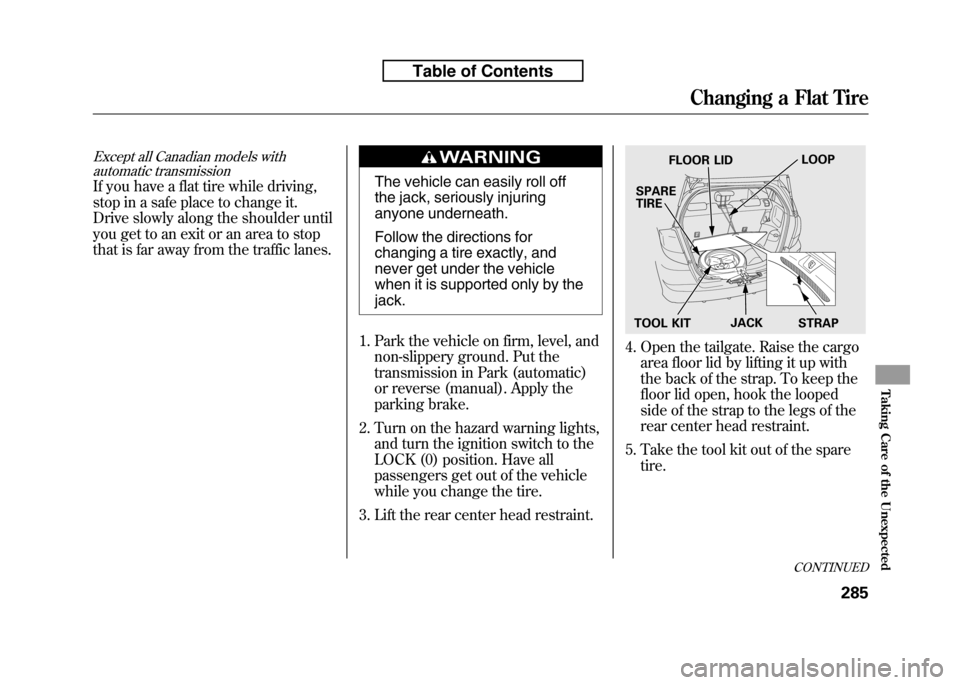
4. Open the tailgate. Raise the cargo area floor lid by lifting it up with
the back of the strap. To keep the
floor lid open, hook the looped
side of the strap to the legs of the
rear center head restraint.
5. Take the tool kit out of the spare tire.
FLOOR LID LOOP
SPARE TIRE
TOOL KIT JACK
STRAP
CONTINUED
Changing a Flat Tire
285
Taking Care of the Unexpected
Table of Contents
Page 308 of 351
If the date has not expired, shake
the bottle thoroughly and proceed
to step 5.
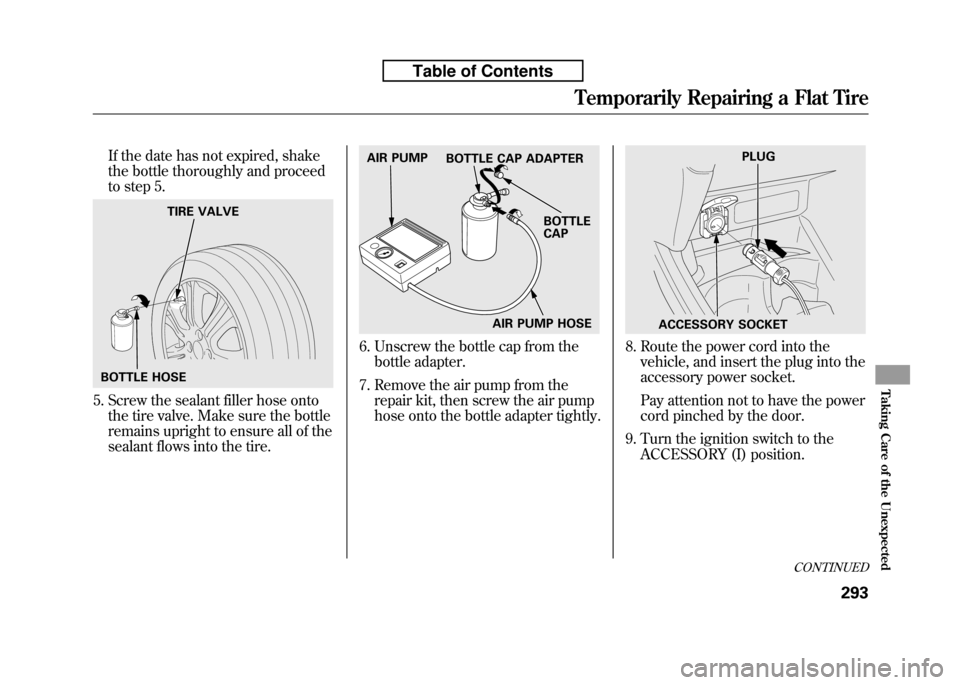
5. Screw the sealant filler hose ontothe tire valve. Make sure the bottle
remains upright to ensure all of the
sealant flows into the tire.
6. Unscrew the bottle cap from the
bottle adapter.
7. Remove the air pump from the repair kit, then screw the air pump
hose onto the bottle adapter tightly.8. Route the power cord into the
vehicle, and insert the plug into the
accessory power socket.
Pay attention not to have the power
cord pinched by the door.
9. Turn the ignition switch to the ACCESSORY (I) position.
BOTTLE HOSE TIRE VALVE
AIR PUMP HOSE
AIR PUMP
BOTTLE CAP ADAPTER
BOTTLE CAP
PLUG
ACCESSORY SOCKET
CONTINUED
Temporarily Repairing a Flat Tire
293
Taking Care of the Unexpected
Table of Contents
Page 309 of 351
In freezing temperatures, turn the
engine on and leave it running
while the flat tire is being serviced.
Prolonged exposure to the cold
may cause the vehicle's battery to
weaken. Under cold conditions,
safely start the vehicle's engine and
keep the engine running at idle
when operating the air pump.
Running the engine with the
vehicle in an enclosed or even
partly enclosed area can cause
a rapid build-up of toxic carbonmonoxide.
Breathing this colorless,
odorless gas can cause
unconsciousness and even
death. Only run the engine to
power the air pump with the
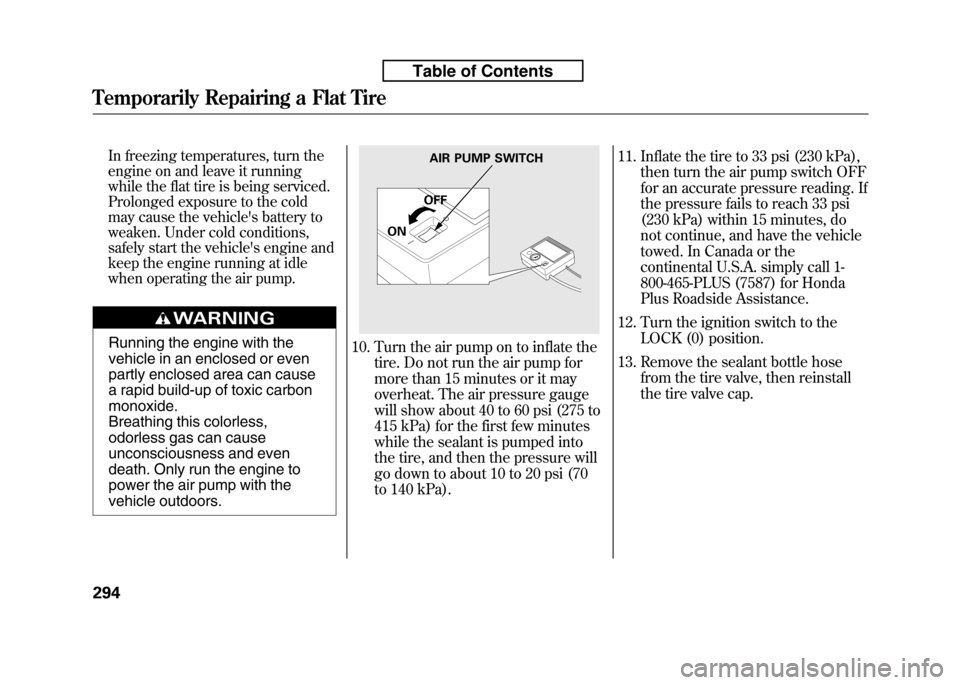
vehicle outdoors.10. Turn the air pump on to inflate thetire. Do not run the air pump for
more than 15 minutes or it may
overheat. The air pressure gauge
will show about 40 to 60 psi (275 to
415 kPa) for the first few minutes
while the sealant is pumped into
the tire, and then the pressure will
go down to about 10 to 20 psi (70
to 140 kPa). 11. Inflate the tire to 33 psi (230 kPa),
then turn the air pump switch OFF
for an accurate pressure reading. If
the pressure fails to reach 33 psi
(230 kPa) within 15 minutes, do
not continue, and have the vehicle
towed. In Canada or the
continental U.S.A. simply call 1-
800-465-PLUS (7587) for Honda
Plus Roadside Assistance.
12. Turn the ignition switch to the LOCK (0) position.
13. Remove the sealant bottle hose from the tire valve, then reinstall
the tire valve cap.
AIR PUMP SWITCH
OFF
ON
Temporarily Repairing a Flat Tire
294
Table of Contents
Page 312 of 351

If the pressure is lower than 32 psi
(220 kPa) and higher than 19 psi
(130 kPa), use the air pump to
bring air to the desired level as
described in step 11. Then drive to
the nearest service station at no
more than 50 mph (80 km/h).
If the pressure is below 19 psi, do
not continue. Have the vehicle
towed (see page 311).
In any case, be sure to have the
damaged tire permanently repaired
as soon as possible.
Remember to return the tire sealant
bottle to your Honda service center
for proper disposal. If the Engine Won't Start
Diagnosing why the engine won't
start falls into two areas, depending
on what you hear when you turn the
ignition switch to the START (III)position:
● You hear nothing, or almost
nothing. The engine's starter
motor does not operate at all, or
operates very slowly.
● You can hear the starter motor
operating normally, or the starter
motor sounds like it is spinning
faster than normal, but the engine
does not start up and run. Nothing Happens or the Starter
Motor Operates Very Slowly
When you turn the ignition switch to
the START (III) position, you do not
hear the normal noise of the engine
trying to start. You may hear a
clicking sound, a series of clicks, or
nothing at all.
Check these things:
● Check the transmission interlock.
If you have a manual transmission,
the clutch pedal must be pushed
all the way to the floor or the
starter will not operate. With an
automatic transmission, it must be
in Park or neutral.
● Turn the ignition switch to the ON
(II) position. Turn on the
headlights, and check their
brightness. If the headlights are
very dim or do not come on at all,
the battery is discharged. See
Jump Starting on page 299.
CONTINUED
Temporarily Repairing a Flat Tire, If the Engine Won't Start
297
Taking Care of the Unexpected
Table of Contents
Page 313 of 351

●Turn the ignition switch to the
START (III) position. If the
headlights do not dim, check the
condition of the fuses. If the fuses
are OK, there is probably
something wrong with the
electrical circuit for the ignition
switch or starter motor. You will
need a qualified technician to
determine the problem. See
Emergency Towing on page 311.
If the headlights dim noticeably or go
out when you try to start the engine,
either the battery is discharged or
the connections are corroded. Check
the condition of the battery and
terminal connections (see page 279).
You can then try jump starting the
vehicle from a booster battery (see
page 299). The Starter Operates Normally
In this case, the starter motor's speed
sounds normal, or even faster than
normal, when you turn the ignition
switch to the START (III) position,
but the engine does not run.
● Are you using a properly coded
key? An improperly coded key will
cause the immobilizer system
indicator in the instrument panel
to blink rapidly (see page 79).
● Are you using the proper starting
procedure? Refer to Starting the
Engine on page 216. ●
Do you have fuel? Check the fuel
gauge; the low fuel indicator may
not be working.
● There may be an electrical
problem, such as no power to the
fuel pump. Check all the fuses (see
page 306).
If you find nothing wrong, you will
need a qualified technician to find the
problem. See Emergency Towing on
page 311.
If the Engine Won't Start
298
Table of Contents
Page 319 of 351
If this indicator comes on
while driving, it means one
of the engine's emissions control
systems may have a problem. Even
though you may feel no difference in
your vehicle's performance, it can
reduce your fuel economy and cause
increased emissions. Continued
operation may cause serious damage.
If you have recently refueled your
vehicle, the indicator coming on
could be due to a loose or missing
fuel fill cap. You will also see a‘‘ CHECK FUEL CAP ’’message on
the information display. Tighten the
cap until it clicks at least once.
Tightening the cap will not turn the
indicator off immediately; it can take
several days of normal driving. If the indicator comes on repeatedly,
even though it may go off as you
continue driving, have your vehicle
checked by a dealer as soon aspossible.
If you keep driving with the malfunction
indicator lamp on, you can damage
your vehicle's emissions controls and
engine. Those repairs may not be
covered by your vehicle's warranties.
If your vehicle has an automatic
transmission, the malfunction
indicator lamp may also come on
with the
‘‘D ’’indicator. Readiness Codes
Your vehicle has certain
‘‘readiness
codes ’’that are part of the on-board
diagnostics for the emissions
systems. In some states, part of the
emissions testing is to make sure
these codes are set. If they are not
set, the test cannot be completed.
If the battery in your vehicle has
been disconnected or gone dead,
these codes are erased. It can take
several days of driving under various
conditions to set the codes again.
To check if they are set, turn the
ignition switch to the ON (II)
position, without starting the engine.
The malfunction indicator lamp will
come on for 20 seconds. If it then
goes off, the readiness codes are set.
If it blinks five times, the readiness
codes are not set. If possible, do not
take your vehicle for an emissions
test until the readiness codes are set.
Refer to Emissions Testing for
more information (see page 329).
Malfunction Indicator Lamp
304
Table of Contents