2010 HONDA FIT ignition
[x] Cancel search: ignitionPage 171 of 351

Removing a Disc
To remove a disc from the audio unit,
fold back the screen by pressing the
OPEN button (see page 150). Press
the disc eject button (
) to remove
the disc. If you eject the disc, but do
not remove it from the slot, the
system will automatically reload it
after 10 seconds and put it in pause
mode. To begin playing, press the
CD/AUX button.
To return the screen to the upright
position, press the CLOSE button.
You cannot close the screen if a disc
is partially inserted into its slot.
You can also eject the disc when the
ignition switch is off. Protecting Discs
For information on how to handle
and protect discs, see page 186.
Playing a Disc (Models with navigation system)
156
Table of Contents
Page 174 of 351

To Play a PC card
You operate the PC card player with
the same controls used for the radio
and the in-dash disc player. To load
or play a card, the ignition switch
must be in the ACCESSORY (I) or
ON (II) position.
The PC card player reads and plays
cards in MP3 or WMA formats.
Depending on the format, the screen
will indicate‘‘MP3 ’’or ‘‘WMA ’’when
a card is playing. The card limit of
the player is 255 folders and 999
tracks. If the card has a complex
structure, it takes some time for the
system to begin playing it.
Based on PCMCIA 2.1/JEIDA 4.2,
the recommended PC cards for the
PC card reader are: CompactFlash
Flash ATA
SD memory card Always use the recommended
memory card with the appropriate
adapter (if an adapter is needed).
Some memory cards will not work in
this unit. NOTE:
● When you insert a PC card into the
slot, make sure you put it in
straight. If you cannot insert it,
remove it, and insert again.
● Do not keep PC cards in the
vehicle. Direct sunlight and high
heat will damage them.
● To avoid damaging the card
reader, do not insert hard disc
drive cards into the PC card slot.
● You cannot close the screen (move
it to the upright position) until the
PC card is inserted all the way into
its slot or removed. ●
Never insert foreign objects into
the PC card slot.
The specifications for compatible
MP3 files are: – Sampling frequency:
32/44.1/48 kHz (MPEG1)
24/22.05/16 kHz (MPEG2)
– Bit rate:
32/40/48/56/64/80/96/112/128/
160/192/224/256/320 kbps(MPEG1)
8/16/24/32/40/48/56/64/80/96/
112/128/160 kbps (MPEG2)
– Compatible with variable bit rate
and multi-session
– Maximum layers
(including ROOT): 8 layers
CONTINUED
Playing a PC card (Models with navigation system)
159
Features
Table of Contents
Page 184 of 351

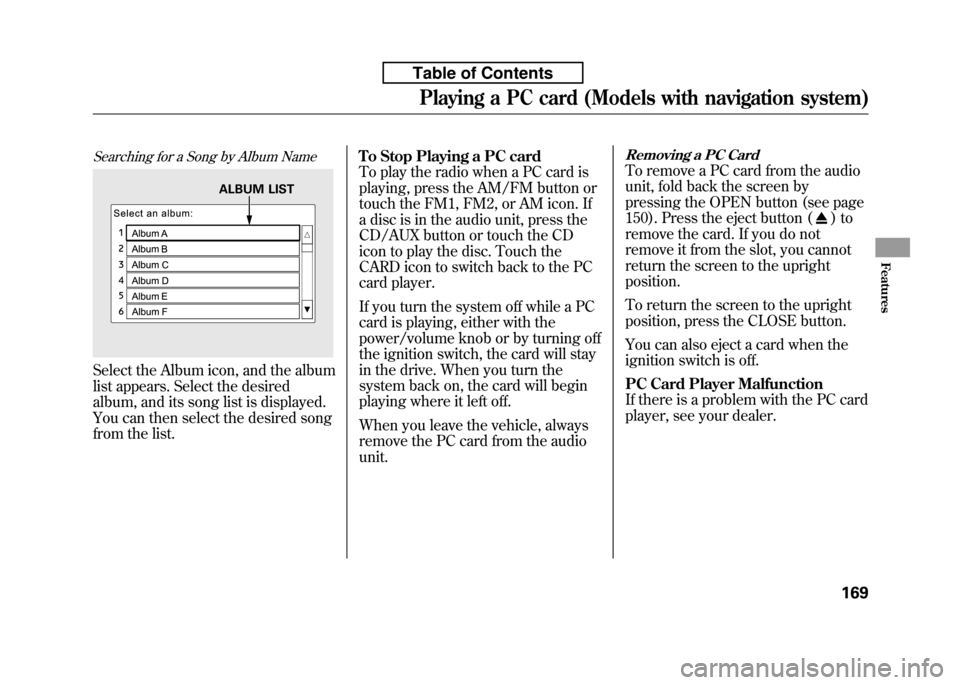
Searching for a Song by Album Name
Select the Album icon, and the album
list appears. Select the desired
album, and its song list is displayed.
You can then select the desired song
from the list.To Stop Playing a PC card
To play the radio when a PC card is
playing, press the AM/FM button or
touch the FM1, FM2, or AM icon. If
a disc is in the audio unit, press the
CD/AUX button or touch the CD
icon to play the disc. Touch the
CARD icon to switch back to the PC
card player.
If you turn the system off while a PC
card is playing, either with the
power/volume knob or by turning off
the ignition switch, the card will stay
in the drive. When you turn the
system back on, the card will begin
playing where it left off.
When you leave the vehicle, always
remove the PC card from the audiounit.
Removing a PC Card
To remove a PC card from the audio
unit, fold back the screen by
pressing the OPEN button (see page
150). Press the eject button (
)to
remove the card. If you do not
remove it from the slot, you cannot
return the screen to the uprightposition.
To return the screen to the upright
position, press the CLOSE button.
You can also eject a card when the
ignition switch is off.
PC Card Player Malfunction
If there is a problem with the PC card
player, see your dealer.
ALBUM LIST
Playing a PC card (Models with navigation system)
169
Features
Table of Contents
Page 186 of 351

To Play an iPodꭂ
This audio system can operate the
audio files on the iPodꭂwith the
same controls used for the in-dash
disc player. To play an iPod, connect
it to the USB adapter cable in the
upper glove box by using your dock
connector, then press the CD/AUX
button. The ignition switch must be
in the ACCESSORY (I) or ON (II)
position. The iPod will also be
recharged with the ignition switch in
these positions.
The audio system reads and plays
sound files to be playable on the
iPod. The system cannot operate an
iPod as a mass storage device. The
system will only play songs stored on
the iPod with iTunes.
iPod and iTunes are registered
trademarks owned by Apple Inc.
Voice Control System
You can select the AUX mode by
using the navigation system voice
control buttons, but cannot operate
the play mode functions.
iPods compatible with your audio
system using the USB adapter cableare:
Model Software
iPod classic Ver. 1.0 or more
iPod with video
(iPod 5th generation) Ver. 1.2 or more
iPod nano Ver. 1.2 or more
iPod nano 2nd generation Ver. 1.1.2 or more
iPod nano 3rdgeneration Ver. 1.0 or more
iPod touch Ver. 1.1.1 or more
Use only compatible iPods with the
latest software. iPods that are not
compatible will not work in this audiounit. NOTE:
● Do not connect your iPod using aHUB.
● Do not keep the iPod in the
vehicle. Direct sunlight and high
heat will damage it.
● Do not use an extension cable
between the USB adapter cable
equipped with your vehicle and
your dock connector.
● We recommend backing up your
data before playing it.
In AAC format, DRM (digital rights
management) files cannot be played.
If the system finds a DRM file, the
audio unit displays UNPLAYABLE,
and then skips to the next file.
CONTINUED
Playing an iPod®(Models with navigation system)
171
Features
Table of Contents
Page 193 of 351

To Play a USB Flash Memory Device
This audio system can operate the
audio files on a USB flash memory
device with the same controls used
for the in-dash disc player. To play a
USB flash memory device, connect it
to the USB adapter cable in the
upper glove box, then press the CD/
AUX button. The ignition switch
must be in the ACCESSORY (I) or
ON (II) position.
The audio system reads and plays
the audio files on the USB flash
memory device in MP3, WMA orAAC
ꭧformats. Depending on the
format, the display shows MP3,
WMA or AAC when a USB flash
memory device is playing. The USB
flash memory device limit is up to
700 folders or up to 65535 files. ꭧ : Only AAC format files recorded
with iTunes are playable on this
audio unit. The recommended USB flash
memory devices are 256 Mbyte or
higher, and formatted with the FAT
file system. Some digital audio
players may be compatible as well.
Some USB flash memory device
(such as devices with security
lockout features, etc.) will not work
in this audio unit. NOTE:
● Do not use a device such as a card
reader or hard drive as the device
or your files may be damaged.
● Do not connect your USB flash
memory device using a HUB.
● Do not use an extension cable to
the USB adapter cable equipped
with your vehicle.
● Do not keep the USB flash
memory device in the vehicle.
Direct sunlight and high heat will
damage it. ●
We recommend backing up your
data before playing a USB flash
memory device.
● Depending on the type and
number of files, it may take some
time before they begin to play.
● Depending on the software the
files were made with, it may not be
possible to play some files, or
display some text data.
Voice Control System
You can select the AUX mode by
using the navigation system voice
control buttons, but cannot operate
the play mode functions.
The specifications for compatible
MP3 files are:
– Sampling frequency:
32/44.1/48 kHz (MPEG1)
16/22.05/24 kHz (MPEG2)
Playing a USB Flash Memory Device (Models with navigation system)
178
Table of Contents
Page 208 of 351

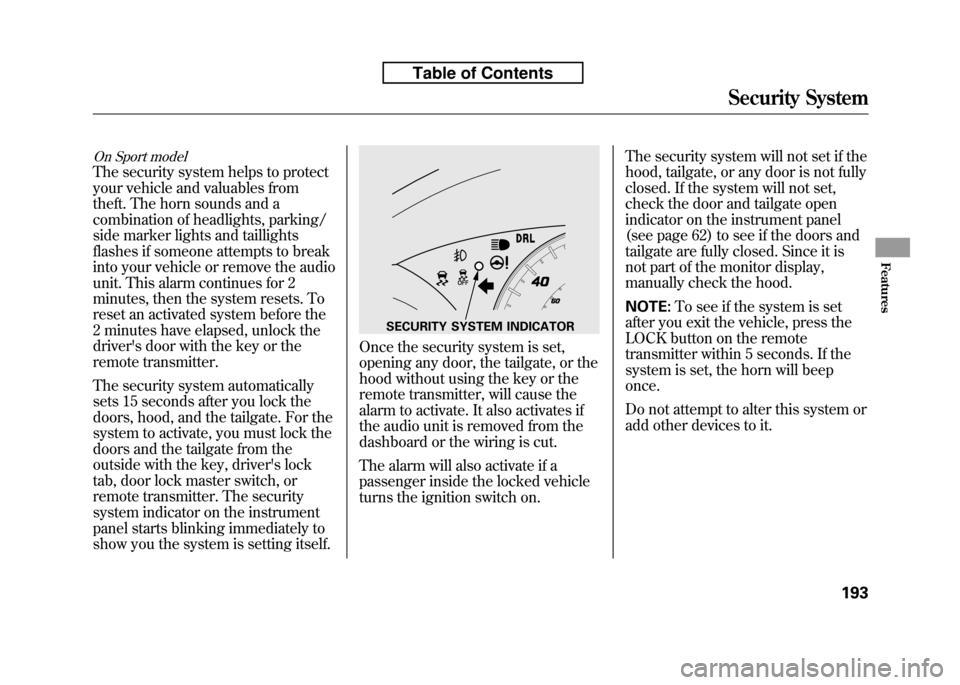
On Sport model
The security system helps to protect
your vehicle and valuables from
theft. The horn sounds and a
combination of headlights, parking/
side marker lights and taillights
flashes if someone attempts to break
into your vehicle or remove the audio
unit. This alarm continues for 2
minutes, then the system resets. To
reset an activated system before the
2 minutes have elapsed, unlock the
driver's door with the key or the
remote transmitter.
The security system automatically
sets 15 seconds after you lock the
doors, hood, and the tailgate. For the
system to activate, you must lock the
doors and the tailgate from the
outside with the key, driver's lock
tab, door lock master switch, or
remote transmitter. The security
system indicator on the instrument
panel starts blinking immediately to
show you the system is setting itself.
Once the security system is set,
opening any door, the tailgate, or the
hood without using the key or the
remote transmitter, will cause the
alarm to activate. It also activates if
the audio unit is removed from the
dashboard or the wiring is cut.
The alarm will also activate if a
passenger inside the locked vehicle
turns the ignition switch on.The security system will not set if the
hood, tailgate, or any door is not fully
closed. If the system will not set,
check the door and tailgate open
indicator on the instrument panel
(see page 62) to see if the doors and
tailgate are fully closed. Since it is
not part of the monitor display,
manually check the hood. NOTE:
To see if the system is set
after you exit the vehicle, press the
LOCK button on the remote
transmitter within 5 seconds. If the
system is set, the horn will beeponce.
Do not attempt to alter this system or
add other devices to it.
SECURITY SYSTEM INDICATOR
Security System
193
Features
Table of Contents
Page 231 of 351

1. Apply the parking brake.
2. In cold weather, turn off allelectrical accessories to reduce the
drain on the battery.
3.
Manual transmission:
Press the clutch pedal down all the
way. The START (III) position
does not function unless the clutch
pedal is pressed.
Automatic transmission:
Make sure the shift lever is in
Park. Press on the brake pedal. 4. Without touching the accelerator
pedal, turn the ignition key to the
START (III) position. Do not hold
the key in the START (III) position
for more than 15 seconds at a time.
If the engine does not start right
away, pause for at least 10 seconds
before trying again.The immobilizer system protects your
vehicle from theft. If an improperly-
coded key (or other device) is used, the
engine's fuel system is disabled. For
more information, see page 79.
5. If the engine does not start within
15 seconds, or starts but stalls
right away, repeat step 4 with the
accelerator pedal pressed halfway
down. If the engine starts, release
pressure on the accelerator pedal
so the engine does not race. 6. If the engine fails to start, press
the accelerator pedal all the way
down, and hold it there while
starting to clear flooding. If the
engine still does not start, return to
step 5.
The engine is harder to start in cold
weather. Also, the thinner air found at
altitudes above 8,000 feet (2,400
meters) adds to this problem.
Starting the Engine
216
Table of Contents
Page 234 of 351

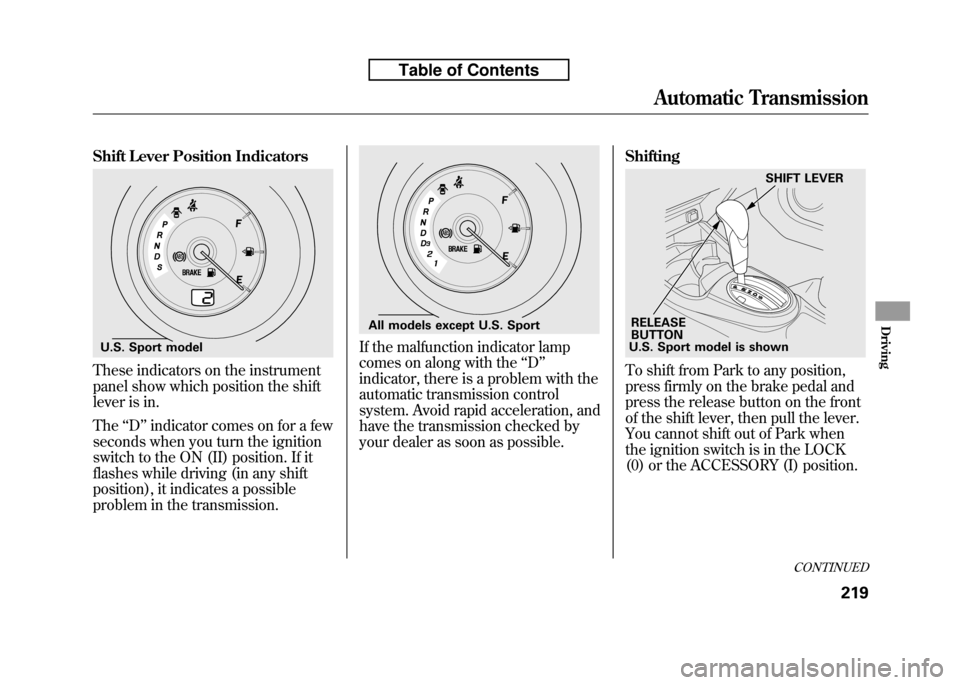
Shift Lever Position Indicators
These indicators on the instrument
panel show which position the shift
lever is in. The‘‘D ’’indicator comes on for a few
seconds when you turn the ignition
switch to the ON (II) position. If it
flashes while driving (in any shift
position), it indicates a possible
problem in the transmission.
If the malfunction indicator lamp
comes on along with the ‘‘D ’’
indicator, there is a problem with the
automatic transmission control
system. Avoid rapid acceleration, and
have the transmission checked by
your dealer as soon as possible. Shifting
To shift from Park to any position,
press firmly on the brake pedal and
press the release button on the front
of the shift lever, then pull the lever.
You cannot shift out of Park when
the ignition switch is in the LOCK
(0) or the ACCESSORY (I) position.
U.S. Sport model
All models except U.S. Sport
U.S. Sport model is shown
RELEASE
BUTTON SHIFT LEVER
CONTINUED
Automatic Transmission
219
Driving
Table of Contents