Page 75 of 351
ꭧ: If equipped
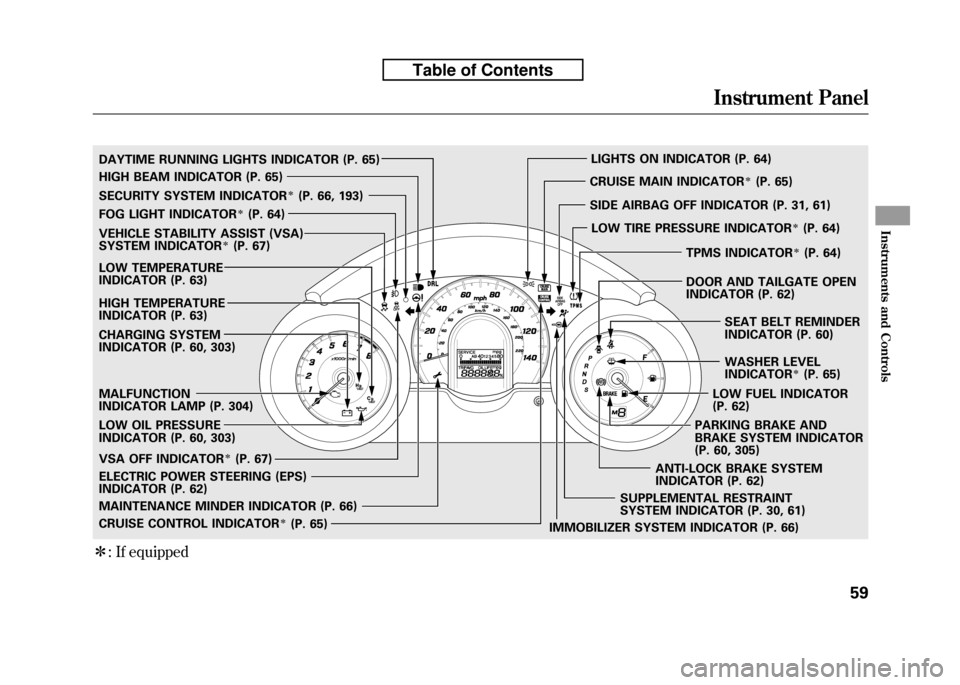
SECURITY SYSTEM INDICATORꭧ(P. 66, 193)
WASHER LEVEL
INDICATOR
ꭧ(P. 65)
MALFUNCTION
INDICATOR LAMP (P. 304)
CHARGING SYSTEM
INDICATOR (P. 60, 303)
LOW OIL PRESSURE
INDICATOR (P. 60, 303)
IMMOBILIZER SYSTEM INDICATOR (P. 66)
FOG LIGHT INDICATOR
ꭧ(P. 64)
LIGHTS ON INDICATOR (P. 64)
SUPPLEMENTAL RESTRAINT
SYSTEM INDICATOR (P. 30, 61)
MAINTENANCE MINDER INDICATOR (P. 66) CRUISE MAIN INDICATOR
ꭧ(P. 65)
CRUISE CONTROL INDICATOR
ꭧ(P. 65)
LOW TEMPERATURE
INDICATOR (P. 63)
ELECTRIC POWER STEERING (EPS)
INDICATOR (P. 62)
HIGH BEAM INDICATOR (P. 65)
LOW FUEL INDICATOR
(P. 62)
TPMS INDICATOR
ꭧ(P. 64)
SEAT BELT REMINDER
INDICATOR (P. 60)
PARKING BRAKE AND
BRAKE SYSTEM INDICATOR
(P. 60, 305)
DAYTIME RUNNING LIGHTS INDICATOR (P. 65)
HIGH TEMPERATURE
INDICATOR (P. 63)
VEHICLE STABILITY ASSIST (VSA)
SYSTEM INDICATORꭧ(P. 67)
VSA OFF INDICATOR
ꭧ(P. 67) SIDE AIRBAG OFF INDICATOR (P. 31, 61)
LOW TIRE PRESSURE INDICATOR
ꭧ(P. 64)
ANTI-LOCK BRAKE SYSTEM
INDICATOR (P. 62) DOOR AND TAILGATE OPEN
INDICATOR (P. 62)
Instrument Panel
59
Instruments and Controls
Table of Contents
Page 82 of 351
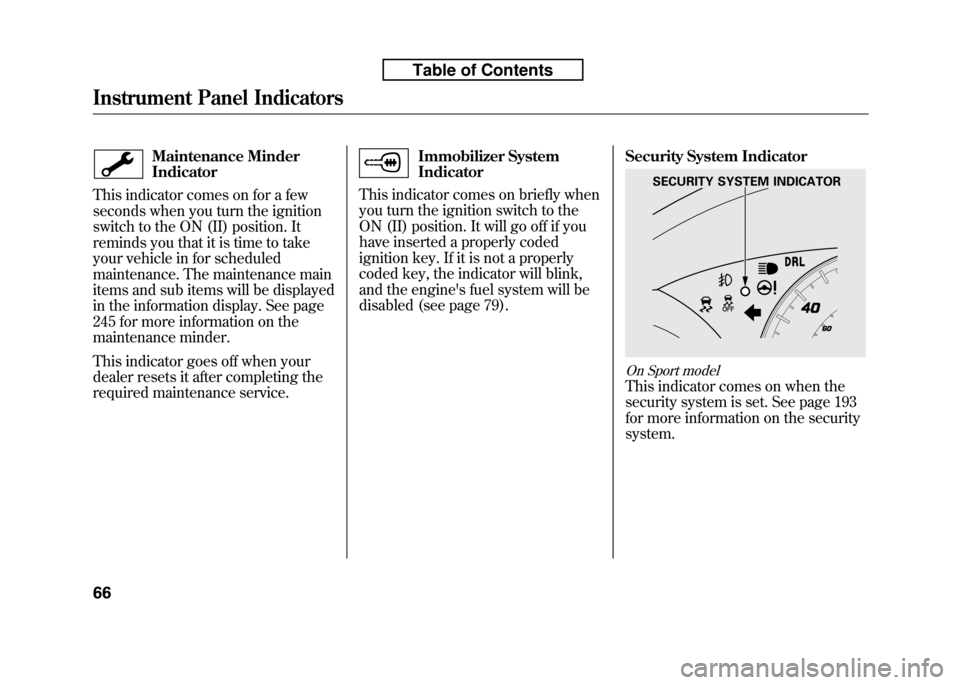
Maintenance Minder Indicator
This indicator comes on for a few
seconds when you turn the ignition
switch to the ON (II) position. It
reminds you that it is time to take
your vehicle in for scheduled
maintenance. The maintenance main
items and sub items will be displayed
in the information display. See page
245 for more information on the
maintenance minder.
This indicator goes off when your
dealer resets it after completing the
required maintenance service.Immobilizer System Indicator
This indicator comes on briefly when
you turn the ignition switch to the
ON (II) position. It will go off if you
have inserted a properly coded
ignition key. If it is not a properly
coded key, the indicator will blink,
and the engine's fuel system will be
disabled (see page 79). Security System Indicator
On Sport model
This indicator comes on when the
security system is set. See page 193
for more information on the securitysystem.
SECURITY SYSTEM INDICATOR
Instrument Panel Indicators
66
Table of Contents
Page 93 of 351
Make sure the rear window is clear
and you have good visibility before
starting to drive.
The defogger wires on the inside of
the rear window can be accidentally
damaged. When cleaning the glass,
always wipe side-to-side.
If equipped
Pushing this button also turns the
mirror heaters on or off. For more
information, see page 102.Steering Wheel Adjustments
Make any steering wheel adjustment
before you start driving.
Adjusting the steering wheel
position while driving may
cause you to lose control of the
vehicle and be seriously injured
in a crash.
Adjust the steering wheel only
when the vehicle is stopped.
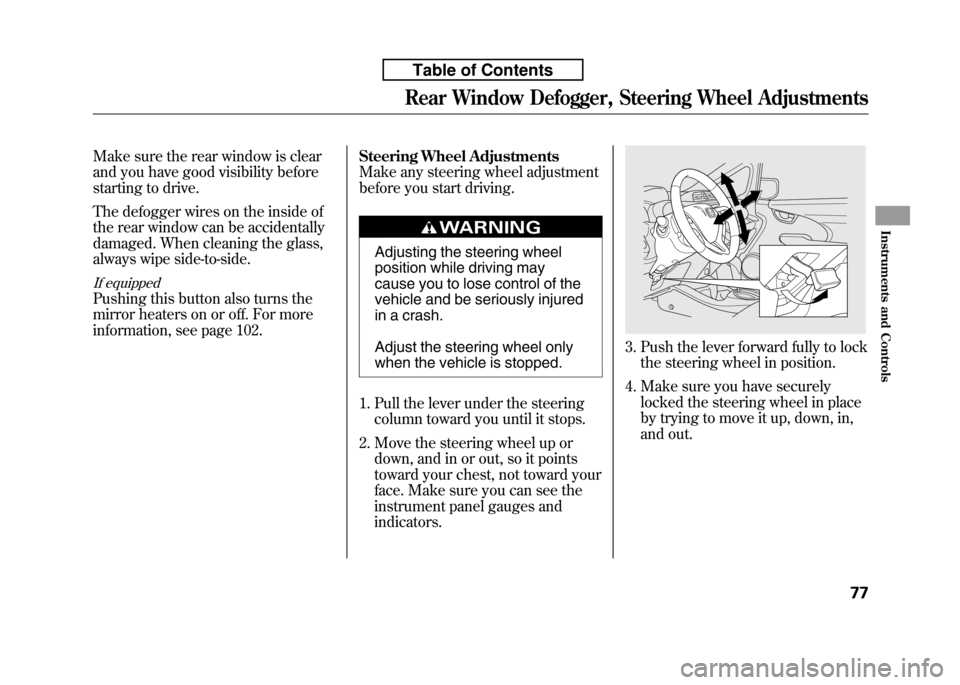
1. Pull the lever under the steering column toward you until it stops.
2. Move the steering wheel up or down, and in or out, so it points
toward your chest, not toward your
face. Make sure you can see the
instrument panel gauges andindicators.
3. Push the lever forward fully to lockthe steering wheel in position.
4. Make sure you have securely locked the steering wheel in place
by trying to move it up, down, in,
and out.
Rear Window Defogger, Steering Wheel Adjustments
77
Instruments and Controls
Table of Contents
Page 106 of 351
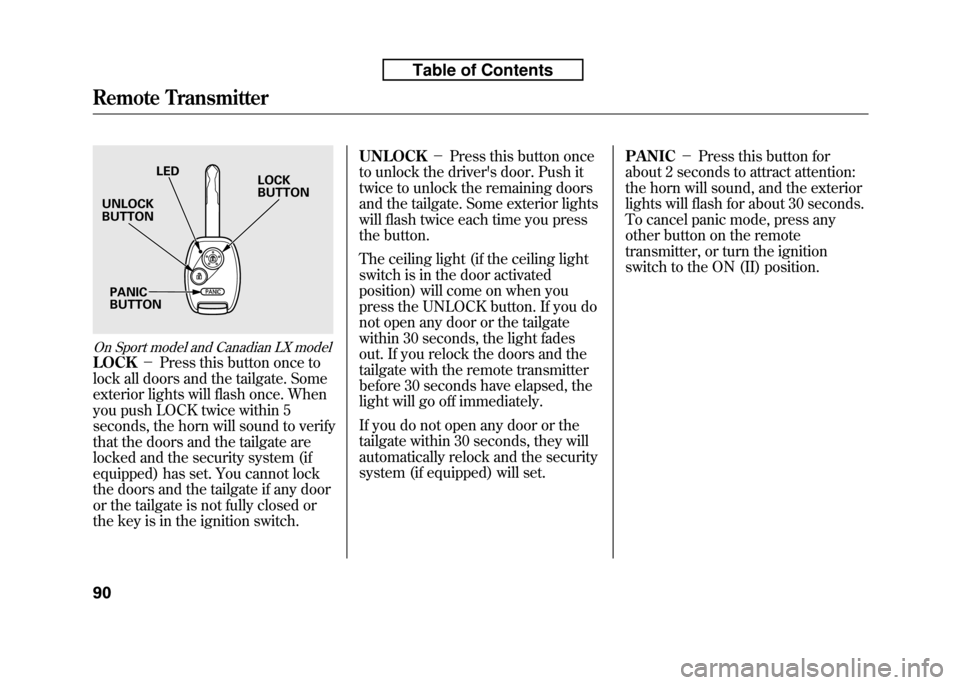
On Sport model and Canadian LX model
LOCK-Press this button once to
lock all doors and the tailgate. Some
exterior lights will flash once. When
you push LOCK twice within 5
seconds, the horn will sound to verify
that the doors and the tailgate are
locked and the security system (if
equipped) has set. You cannot lock
the doors and the tailgate if any door
or the tailgate is not fully closed or
the key is in the ignition switch. UNLOCK
-Press this button once
to unlock the driver's door. Push it
twice to unlock the remaining doors
and the tailgate. Some exterior lights
will flash twice each time you press
the button.
The ceiling light (if the ceiling light
switch is in the door activated
position) will come on when you
press the UNLOCK button. If you do
not open any door or the tailgate
within 30 seconds, the light fades
out. If you relock the doors and the
tailgate with the remote transmitter
before 30 seconds have elapsed, the
light will go off immediately.
If you do not open any door or the
tailgate within 30 seconds, they will
automatically relock and the security
system (if equipped) will set. PANIC
-Press this button for
about 2 seconds to attract attention:
the horn will sound, and the exterior
lights will flash for about 30 seconds.
To cancel panic mode, press any
other button on the remote
transmitter, or turn the ignition
switch to the ON (II) position.
LED
UNLOCK BUTTON
PANICBUTTON LOCKBUTTON
Remote Transmitter
90
Table of Contents
Page 112 of 351
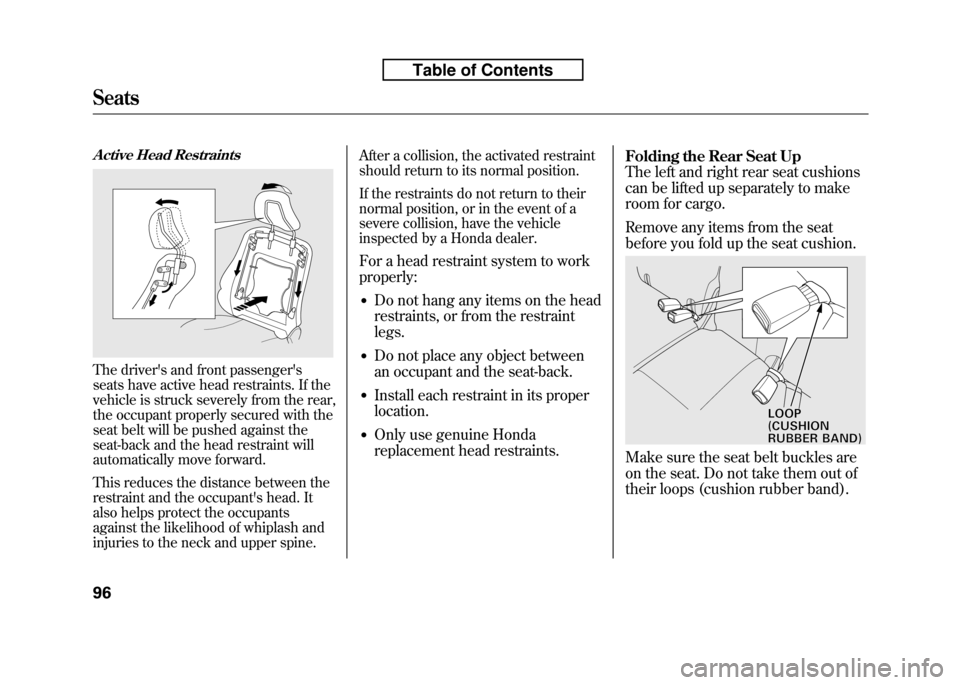
Active Head Restraints
The driver's and front passenger's
seats have active head restraints. If the
vehicle is struck severely from the rear,
the occupant properly secured with the
seat belt will be pushed against the
seat-back and the head restraint will
automatically move forward.
This reduces the distance between the
restraint and the occupant's head. It
also helps protect the occupants
against the likelihood of whiplash and
injuries to the neck and upper spine.After a collision, the activated restraint
should return to its normal position.
If the restraints do not return to their
normal position, or in the event of a
severe collision, have the vehicle
inspected by a Honda dealer.
For a head restraint system to work properly: ● Do not hang any items on the head
restraints, or from the restraintlegs.
● Do not place any object between
an occupant and the seat-back.
● Install each restraint in its properlocation.
● Only use genuine Honda
replacement head restraints. Folding the Rear Seat Up
The left and right rear seat cushions
can be lifted up separately to make
room for cargo.
Remove any items from the seat
before you fold up the seat cushion.
Make sure the seat belt buckles are
on the seat. Do not take them out of
their loops (cushion rubber band).
LOOP(CUSHIONRUBBERBAND)
Seats
96
Table of Contents
Page 114 of 351
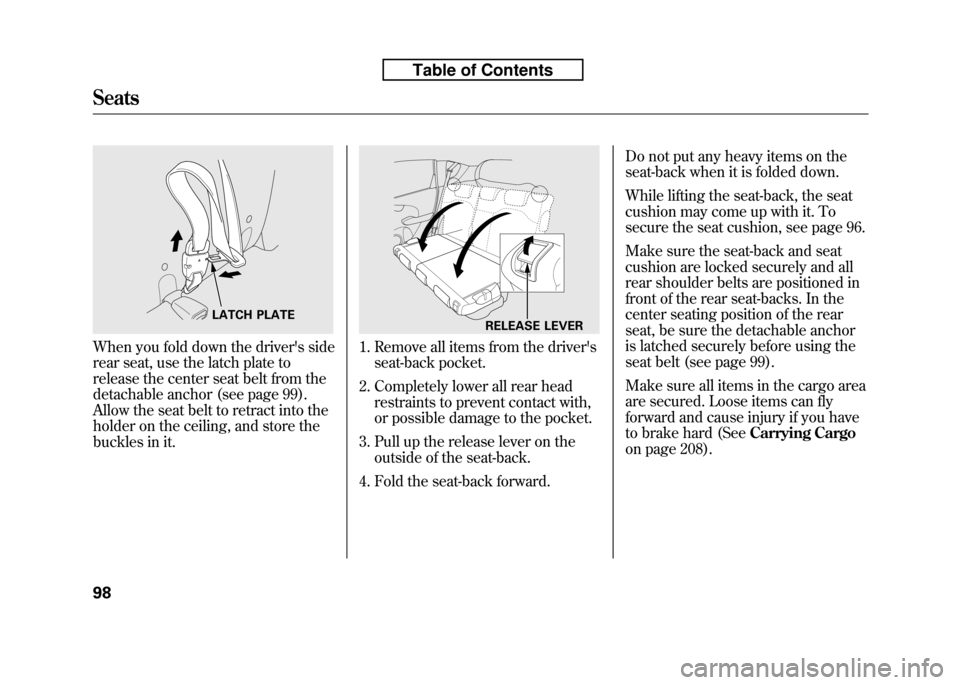
When you fold down the driver's side
rear seat, use the latch plate to
release the center seat belt from the
detachable anchor (see page 99).
Allow the seat belt to retract into the
holder on the ceiling, and store the
buckles in it.1. Remove all items from the driver'sseat-back pocket.
2. Completely lower all rear head restraints to prevent contact with,
or possible damage to the pocket.
3. Pull up the release lever on the outside of the seat-back.
4. Fold the seat-back forward. Do not put any heavy items on the
seat-back when it is folded down.
While lifting the seat-back, the seat
cushion may come up with it. To
secure the seat cushion, see page 96.
Make sure the seat-back and seat
cushion are locked securely and all
rear shoulder belts are positioned in
front of the rear seat-backs. In the
center seating position of the rear
seat, be sure the detachable anchor
is latched securely before using the
seat belt (see page 99).
Make sure all items in the cargo area
are secured. Loose items can fly
forward and cause injury if you have
to brake hard (See
Carrying Cargo
on page 208).
LATCH PLATERELEASE LEVER
Seats
98
Table of Contents
Page 115 of 351
Detachable Anchor
The seat belt in the rear center seat
is equipped with a detachableanchor.
This allows the center seat belt to be
unlatched when the driver's side rear
seat is folded.
Using a seat belt with the
detachable anchor unlatched
increases the chance of serious
injury or death in a crash.
Before using the seat belt,
make sure the detachable
anchor is correctly latched.
Pull out the small latch plate and the
latch plate from each holding slot in
the ceiling, and pull out the seat belt
to extend it.Line up the triangle marks on the
small latch plate and anchor buckle
when reattaching the belt andbuckle.
Tug on the seat belt to verify that the
detachable anchor is securely
latched. Make sure the seat belt is
not twisted.
SMALL LATCH PLATE
LATCH PLATE
SMALL LATCH PLATE
TRIANGLE MARKS
ANCHOR BUCKLE
CONTINUED
Seats
99
Instruments and Controls
Table of Contents
Page 124 of 351

The heating and air conditioning
system in your vehicle provides a
comfortable driving environment in
all weather conditions.
The standard audio system has many
features. This section describes
those features and how to use them.
Your vehicle has an anti-theft audio
system that requires a code number
to enable it.
The security system helps to
discourage vandalism and theft of
your vehicle.Vents, Heating, and A/C.............
110
Playing the FM/AM Radio (Models without navigationsystem) ...............................
115
Playing a Disc (Models without navigation system) ..................
122
Disc Player Error Messages (Models without navigationsystem) ...............................
128
Playing an iPod
®(Models without
navigation system) ..................
129
iPod
®Error Messages (Models
without navigation system) .....
135
Playing a USB Flash Memory Device (Models without
navigation system) ..............
136
USB Flash Memory Device Error
Messages (Models withoutnavigation system) ..............
142
Playing the AM/FM Radio
(Models with navigation
system) ...............................
143
Playing a Disc (Models with
navigation system) ..................
149Disc Player Error Messages
(Models with navigation
system) ...............................
157
Playing a PC card (Models with
navigation system) ..................
158
Playing an iPod
®(Models with
navigation system) ..................
170
iPod
®Error Messages (Models
with navigation system) ..........
176
Playing a USB Flash Memory
Device (Models withnavigation system) ..............
177
USB Flash Memory Device Error Messages (Models withnavigation system) ..............
183
FM/AM Radio Reception ............
184
Protecting Your Discs .................
186
Remote Audio Controls ...............
189
Auxiliary Input Jack ....................
190
Radio Theft Protection ................
191
Setting the Clock .........................
192
Security System ..........................
193
Cruise Control ............................
194
Features
109
Features