Page 283 of 351

If you remove the driver's floor mat,
make sure to re-anchor it when you
put it back in your vehicle.
If you use a non-Honda floor mats,
make sure they fit properly and that
they can be anchored securely. Do
not put additional floor mats on top of
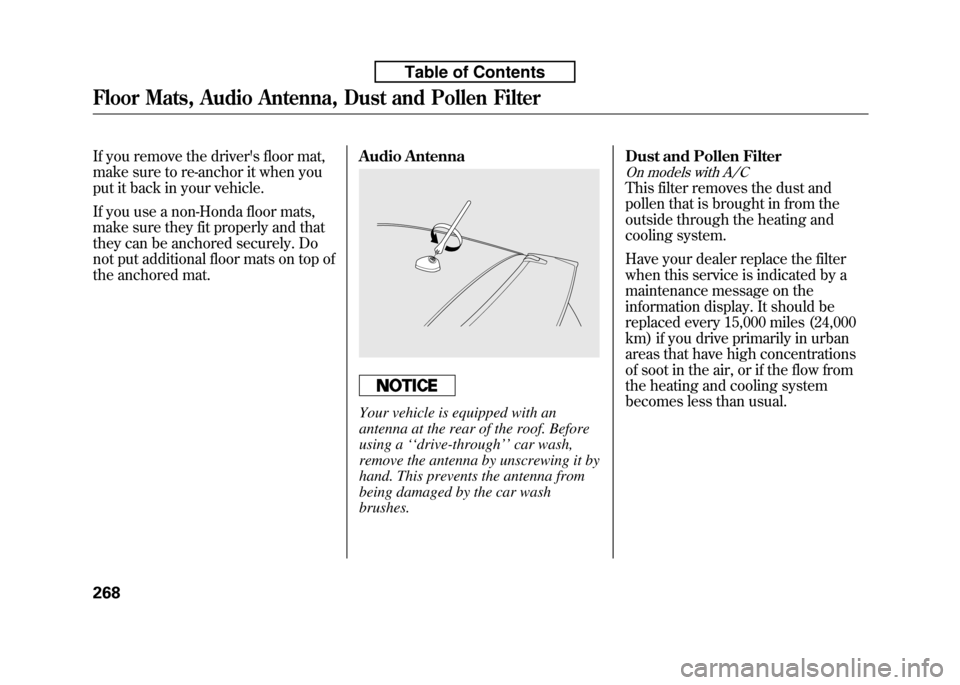
the anchored mat.Audio Antenna
Your vehicle is equipped with an
antenna at the rear of the roof. Before
using a
‘‘drive-through ’’car wash,
remove the antenna by unscrewing it by
hand. This prevents the antenna from
being damaged by the car wash brushes. Dust and Pollen Filter
On models with A/C
This filter removes the dust and
pollen that is brought in from the
outside through the heating and
cooling system.
Have your dealer replace the filter
when this service is indicated by a
maintenance message on the
information display. It should be
replaced every 15,000 miles (24,000
km) if you drive primarily in urban
areas that have high concentrations
of soot in the air, or if the flow from
the heating and cooling system
becomes less than usual.
Floor Mats, Audio Antenna, Dust and Pollen Filter
268
Table of Contents
Page 287 of 351
3. Slide the blade out of the holder.4. Examine the new wiper blades. Ifthey have no plastic or metal
reinforcement along the back
edge, remove the metal
reinforcement strips from the old
wiper blade, and install them in the
slots along the edge of the newblade.5. Slide the new blade into theholder. Make sure it is engaged in
the slot along its full length.
Insert both ends of the blade into
the holder. Make sure they aresecure.
6. Install the wiper blade assembly onto the wiper arm. Make sure it
locks in place.
7. Lower the wiper arm against the windshield.
BLADE
REINFORCEMENT
Wiper Blades
272
Table of Contents
Page 293 of 351

Winter Driving
Tires marked‘‘M + S’’ or ‘‘All
Season ’’on the sidewall have an all-
weather tread design suitable for
most winter driving conditions.
For the best performance in snowy
or icy conditions, you should install
snow tires or tire chains. They may
be required by local laws under
certain conditions.
Snow Tires
If you mount snow tires on your
vehicle, make sure they are radial
tires of the same size and load range
as the original tires. Mount snow
tires on all four wheels. The traction
provided by snow tires on dry roads
may be lower than your original tires.
Check with the tire dealer for
maximum speed recommendations.
Tire Chains
Mount tire chains on your tires when
required by driving conditions or
local laws. Install them only on the
front tires.
Because your vehicle has limited tire
clearance, Honda strongly
recommends using the chains listed
below, made by Security Chain
Company (SCC).
All models except Sport
SC1026
Sport model
SC1030
When installing cables, follow the
manufacturer's instructions, and
mount them as tight as you can.
Make sure they are not contacting
the brake lines or suspension. Drive
slowly with them installed. If you
hear them coming into contact with
the body or chassis, stop and
investigate. Remove them as soon as
you begin driving on cleared roads.
Traction devices that are the wrong size
or improperly installed can damage
your vehicle's brake lines, suspension,
body, and wheels. Stop driving if they
are hitting any part of the vehicle.
Using the wrong chains, or not
properly installing chains, can
damage the brake lines and
cause a crash in which you can
be seriously injured or killed.
Follow all instructions in this
owner's manual regarding the
selection and use of tire chains.
Tires
278
Table of Contents
Page 303 of 351
14. Put on the spare tire. Put thewheel nuts back on finger-tight,
then tighten them in a crisscross
pattern with the wheel nut wrench
until the wheel is firmly against the
hub. Do not try to tighten the
wheel nuts fully.
15. Lower the vehicle to the ground, and remove the jack.
16. Tighten the wheel nuts securely in the same crisscross pattern. Have
the wheel nut torque checked at
the nearest automotive servicefacility.
Tighten the wheel nuts to:
80 lbf·ft (108 N·m, 11 kgf·m)
17.
On Sport model and Canadian LX model with manual transmission:
Remove the center cap before
storing the flat tire.
18. Remove the strap loop from the
legs of the head restraint and
lower the cargo area floor lid.
19. Pull the floor lid toward you and remove the tabs.
20. Pull the floor lid out.
TAB
FLOOR LID
Changing a Flat Tire
288
Table of Contents
Page 304 of 351
21. Place the flat tire face down in thespare tire well.
22. Secure the flat tire by screwing the wing bolt back into its hole. 23. Store the jack. Place the tool kit in
the center of the flat tire.
Loose items can fly around the
interior in a crash and could
seriously injure the occupants.
Store the wheel, jack, and tools
securely before driving. 24. Place the floor lid in the cargo
area.
25. Store the wheel cover or center cap in the cargo area. Make sure it
will not get scratched or damaged.
26. Close the tailgate. 27.
On U.S. models
Your vehicle's original tire has a
tire pressure monitoring system
sensor. To replace a tire, refer to
Changing a Tire with TPMS (see
page 237).
For normal tire For spare tire
CONTINUED
Changing a Flat Tire
289
Taking Care of the Unexpected
Table of Contents
Page 310 of 351
14. Push the deflate button on the airpump until the air pressure gauge
shows 0 psi.15. Remove the wheel label from the repair kit, wipe any dirt off the
wheel with a clean cloth, and
attach the label to the center of thewheel.
The label may adhere poorly when
cold. Clean the surface and
securely attach the label.16. Remove the front pillar label fromthe repair kit and place it as shown above.
17. Remove the power plug from the accessory power socket.
18. Return all items except the air pump to the repair kit, and store
the kit in the cargo floor box. Keep
the air pump handy as you may
need it soon.
AIR PRESSURE GAUGE
DEFLATE BUTTON
WHEEL LABEL
LABEL
CONTINUED
Temporarily Repairing a Flat Tire
295
Taking Care of the Unexpected
Table of Contents
Page 328 of 351
3. Screw the towing hook into thebolt hole behind the bumper, then
tighten the hook securely with theextension.
To avoid damage to your vehicle, use
the towing hook for straight, flat
ground towing only. Do not tow at an
angle. The tow hook should not be used
to tow the vehicle onto a flat bed. Do
not use it as a tie down.
If Your Vehicle Gets Stuck
313
Taking Care of the Unexpected
Table of Contents