Page 226 of 351

Carrying Cargo in the Passenger Compartment● Store or secure all items that could
be thrown around and hurt
someone during a crash.
● Be sure items placed on the floor
behind the front seats cannot roll
under the seats and interfere with
the driver's ability to operate the
pedals, the proper operation of the
seats, or proper operation of the
sensors under the seats.
● Keep the upper and lower glove
boxes closed while driving. If it is
open, a passenger could injure
their knees during a crash or
sudden stop. ●
If you fold the rear seats up or
down, tie down items that could be
thrown about the vehicle during a
crash or sudden stop. Also, keep
all cargo below the bottom of the
windows. If it is higher, it could
interfere with the proper operation
of the side curtain airbags. Carrying Cargo in the Cargo Area
● Distribute cargo evenly on the
floor of the cargo area, placing the
heaviest items on the bottom and
as far forward as possible. Tie
down items that could be thrown
about the vehicle during a crash or
sudden stop.
● Do not stack items higher than the
back of the rear seats. They can
block your view and be thrown
around the vehicle during a crash.
● If you carry large items that
prevent you from closing the
tailgate, exhaust gas can enter the
passenger area. To avoid the
possibility of carbon monoxide
poisoning, follow the instructions
on page 53.
CONTINUED
Carrying Cargo
211
Before Driving
Table of Contents
Page 227 of 351
Cargo Hooks
The two or four hooks on the floor
can be used to install a net for
securing items.
Your vehicle also has cargo hooks on
side panel in the cargo area.
They are designed to hold light
items. Heavy objects may damage
the hook. Make sure any items put
on each hook weigh less than 2.2 lbs
(1 kg).HOOK
ꭧ : If equipped HOOK
ꭧ
Carrying Cargo
212
Table of Contents
Page 230 of 351
You should do the following checks
and adjustments before you drive
your vehicle.
1. Make sure all windows, mirrors,and outside lights are clean and
unobstructed. Remove frost, snow,
or ice.
2. Check that the hood is fully closed.
3. Visually check the tires. If a tire looks low, use a gauge to check its
pressure (see page 273).
4. Check that any items you may be carrying are stored properly or
fastened down securely. 5. Check the seat adjustment (see
page 93).
6. Check the adjustment of the inside and outside mirrors (see page101).
7. Check the steering wheel adjustment (see page 77).
8. Make sure the doors and the tailgate are securely closed andlocked.
9. Fasten your seat belt. Check that your passengers have fastened
their seat belts (see page 14).
10. When you start the engine, check the gauges and indicators in the
instrument panel (see page 59).
Preparing to Drive
215
Driving
Table of Contents
Page 244 of 351

Always use the parking brake when
you park your vehicle. Make sure the
parking brake is set firmly, or your
vehicle may roll if it is parked on anincline.
If your vehicle has an automatic
transmission, set the parking brake
before you put the transmission in
Park. This keeps the vehicle from
moving and putting pressure on the
parking mechanism in thetransmission.Parking Tips
● Make sure the windows areclosed.
● Turn off the lights.
● Place any packages, valuables, etc.
in the cargo area or take them withyou.
● Lock the doors and the tailgate.
On Sport model
Check the indicator on the
instrument panel to verify that the
security system is set.
● Never park over dry leaves, tall
grass, or other flammable
materials. The hot three way
catalytic converter could cause
these materials to catch on fire. ●
If the vehicle is facing uphill, turn
the front wheels away from the
curb. If your vehicle has a manual
transmission, put it in first gear
and set the parking brake.
● If the vehicle is facing downhill,
turn the front wheels toward the
curb. If your vehicle has a manual
transmission, put it in reverse gear
and set the parking brake.
● Make sure the parking brake is
fully released before driving away.
Driving with the parking brake
partially set can overheat or
damage the rear brakes.
Parking
229
Driving
Table of Contents
Page 268 of 351

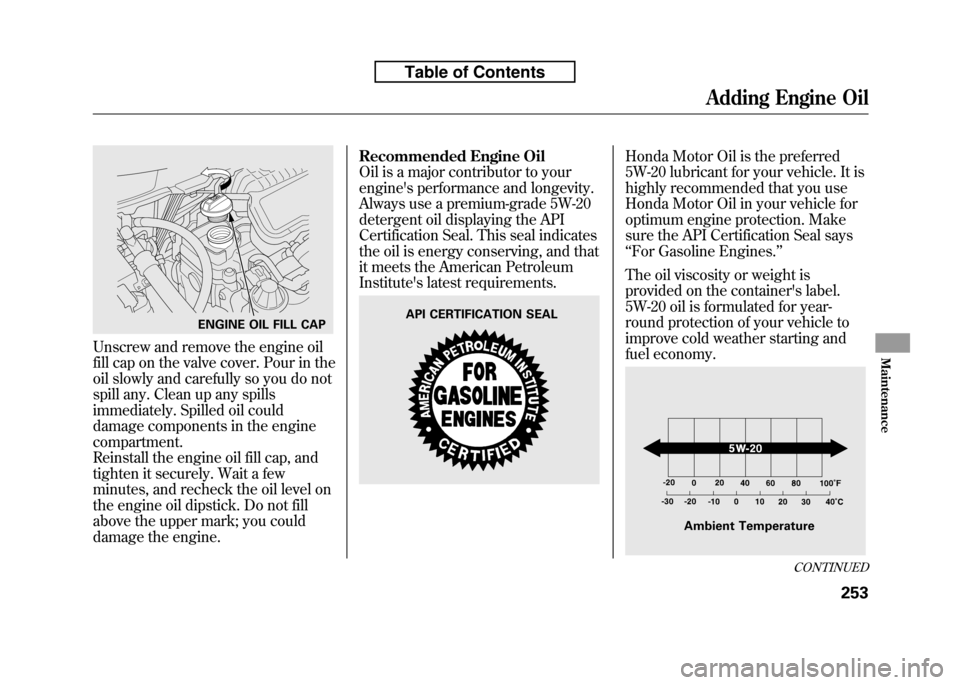
Unscrew and remove the engine oil
fill cap on the valve cover. Pour in the
oil slowly and carefully so you do not
spill any. Clean up any spills
immediately. Spilled oil could
damage components in the enginecompartment.
Reinstall the engine oil fill cap, and
tighten it securely. Wait a few
minutes, and recheck the oil level on
the engine oil dipstick. Do not fill
above the upper mark; you could
damage the engine.Recommended Engine Oil
Oil is a major contributor to your
engine's performance and longevity.
Always use a premium-grade 5W-20
detergent oil displaying the API
Certification Seal. This seal indicates
the oil is energy conserving, and that
it meets the American Petroleum
Institute's latest requirements.
Honda Motor Oil is the preferred
5W-20 lubricant for your vehicle. It is
highly recommended that you use
Honda Motor Oil in your vehicle for
optimum engine protection. Make
sure the API Certification Seal says‘‘
For Gasoline Engines. ’’
The oil viscosity or weight is
provided on the container's label.
5W-20 oil is formulated for year-
round protection of your vehicle to
improve cold weather starting and
fuel economy.
ENGINE OIL FILL CAPAPI CERTIFICATION SEAL
Ambient Temperature
CONTINUED
Adding Engine Oil
253
Maintenance
Table of Contents
Page 274 of 351

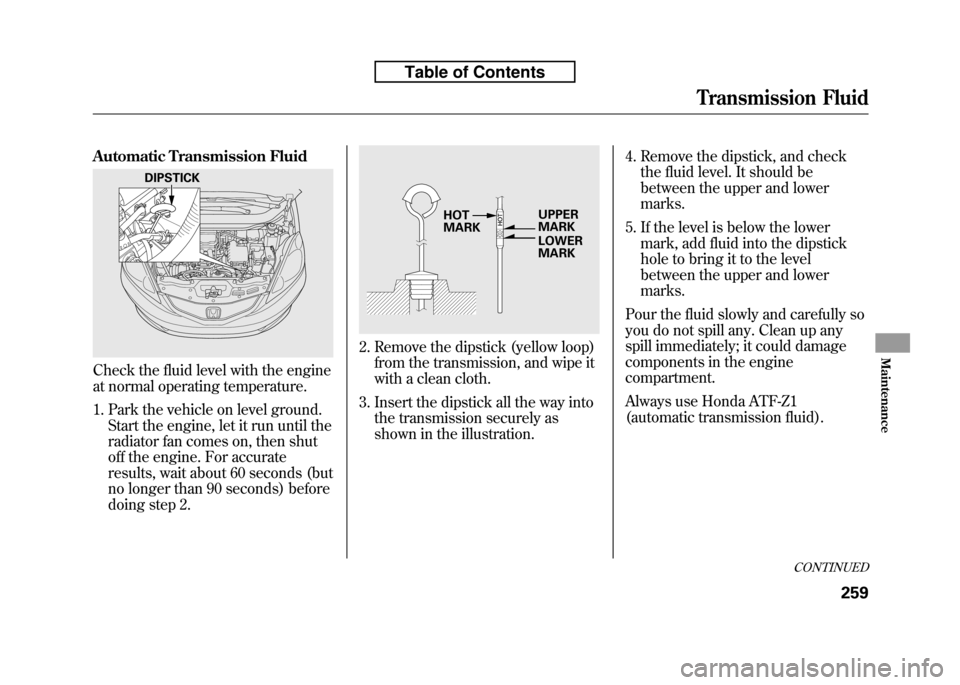
Automatic Transmission Fluid
Check the fluid level with the engine
at normal operating temperature.
1. Park the vehicle on level ground.Start the engine, let it run until the
radiator fan comes on, then shut
off the engine. For accurate
results, wait about 60 seconds (but
no longer than 90 seconds) before
doing step 2.
2. Remove the dipstick (yellow loop)from the transmission, and wipe it
with a clean cloth.
3. Insert the dipstick all the way into the transmission securely as
shown in the illustration. 4. Remove the dipstick, and check
the fluid level. It should be
between the upper and lowermarks.
5. If the level is below the lower mark, add fluid into the dipstick
hole to bring it to the level
between the upper and lowermarks.
Pour the fluid slowly and carefully so
you do not spill any. Clean up any
spill immediately; it could damage
components in the engine
compartment.
Always use Honda ATF-Z1
(automatic transmission fluid).
DIPSTICK
UPPER MARK
LOWER
MARK
HOTMARK
CONTINUED
Transmission Fluid
259
Maintenance
Table of Contents
Page 275 of 351

Use only Honda Genuine ATF-Z1
(automatic transmission fluid). Do not
mix with other transmission fluids.
Using transmission fluid other than
Honda Genuine ATF-Z1 may cause
deterioration in transmission operation
and durability, and could result in
damage to the transmission.
Damage resulting from the use of
transmission fluid other than Honda
Genuine ATF-Z1 is not covered by the
Honda new vehicle warranty.
6. Insert the dipstick all the way backinto the transmission securely as
shown in the illustration.
If you are not sure how to add fluid,
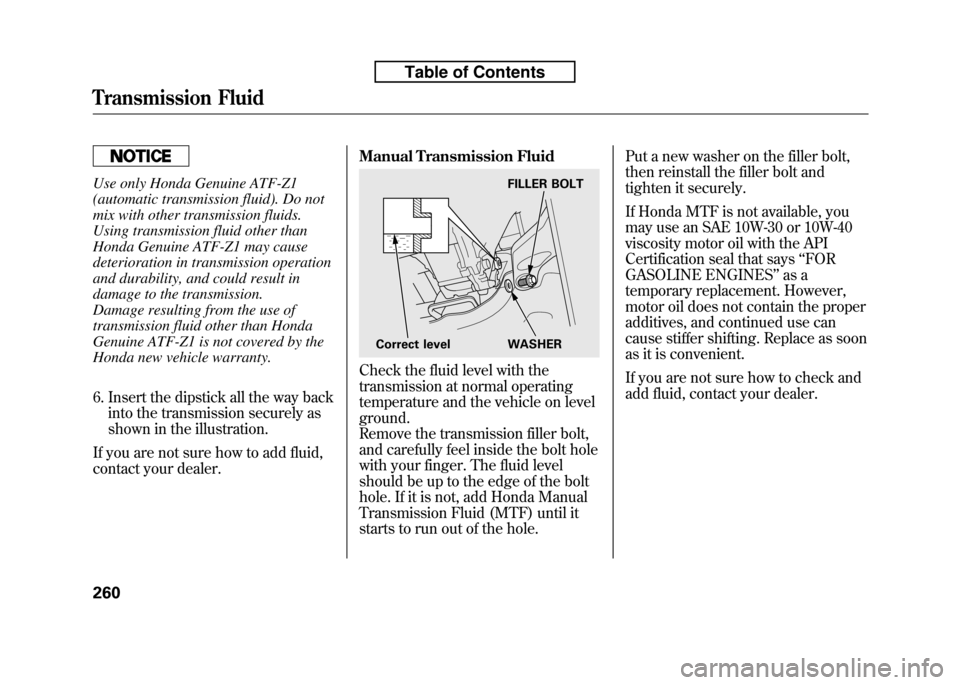
contact your dealer. Manual Transmission Fluid
Check the fluid level with the
transmission at normal operating
temperature and the vehicle on levelground.
Remove the transmission filler bolt,
and carefully feel inside the bolt hole
with your finger. The fluid level
should be up to the edge of the bolt
hole. If it is not, add Honda Manual
Transmission Fluid (MTF) until it
starts to run out of the hole.Put a new washer on the filler bolt,
then reinstall the filler bolt and
tighten it securely.
If Honda MTF is not available, you
may use an SAE 10W-30 or 10W-40
viscosity motor oil with the API
Certification seal that says
‘‘FOR
GASOLINE ENGINES ’’as a
temporary replacement. However,
motor oil does not contain the proper
additives, and continued use can
cause stiffer shifting. Replace as soon
as it is convenient.
If you are not sure how to check and
add fluid, contact your dealer.
FILLER BOLT
Correct level WASHER
Transmission Fluid
260
Table of Contents
Page 278 of 351

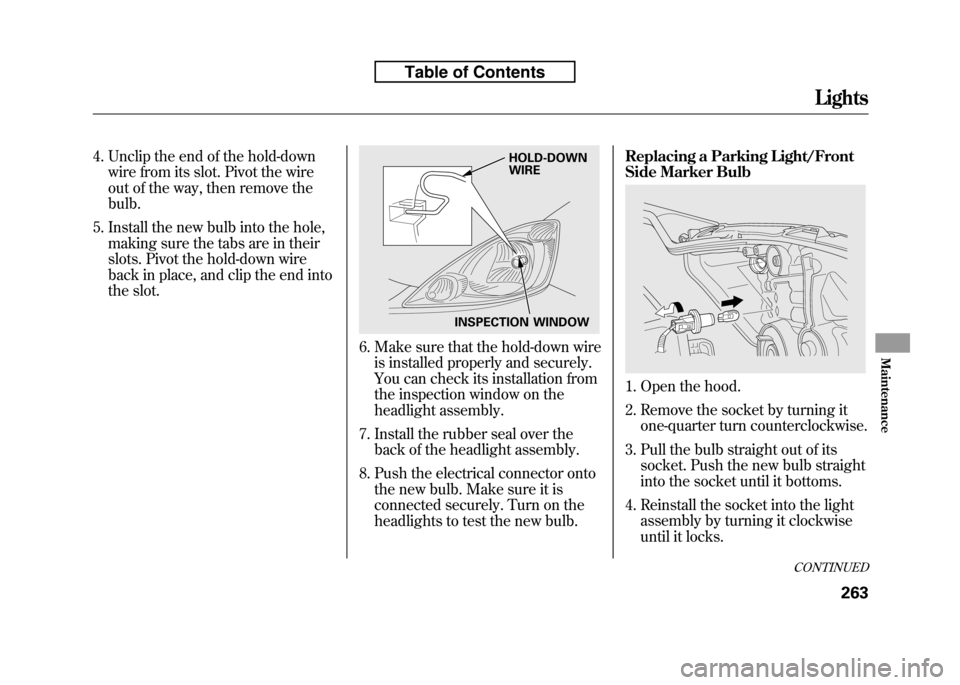
4. Unclip the end of the hold-downwire from its slot. Pivot the wire
out of the way, then remove thebulb.
5. Install the new bulb into the hole, making sure the tabs are in their
slots. Pivot the hold-down wire
back in place, and clip the end into
the slot.
6. Make sure that the hold-down wireis installed properly and securely.
You can check its installation from
the inspection window on the
headlight assembly.
7. Install the rubber seal over the back of the headlight assembly.
8. Push the electrical connector onto the new bulb. Make sure it is
connected securely. Turn on the
headlights to test the new bulb. Replacing a Parking Light/Front
Side Marker Bulb
1. Open the hood.
2. Remove the socket by turning it
one-quarter turn counterclockwise.
3. Pull the bulb straight out of its socket. Push the new bulb straight
into the socket until it bottoms.
4. Reinstall the socket into the light assembly by turning it clockwise
until it locks.
INSPECTION WINDOW HOLD-DOWN WIRE
CONTINUED
Lights
263
Maintenance
Table of Contents