2010 HONDA FIT warning
[x] Cancel search: warningPage 22 of 351

You'll find many safety
recommendations throughout this
section, and throughout this manual.
The recommendations on this page are
the ones we consider to be the most important.
Always Wear Your Seat Belt
A seat belt is your best protection in all
types of collisions. Airbags are designed
to supplement seat belts, not replace
them. So even though your vehicle is
equipped with airbags, make sure you
and your passengers always wear your
seat belts, and wear them properly (see
page 14).
Restrain All Children
Children age 12 and under should ride
properly restrained in a back seat, not
the front seat. Infants and small children
should be restrained in a child seat.
Larger children should use a booster
seat and a lap/shoulder belt until they
can use the belt properly without a
booster seat (see pages 34-52). Be Aware of Airbag Hazards
While airbags can save lives, they can
cause serious or fatal injuries to
occupants who sit too close to them, or
are not properly restrained. Infants,
young children, and short adults are at
the greatest risk. Be sure to follow all
instructions and warnings in this manual.
Don't Drink and Drive
Alcohol and driving don't mix. Even one
drink can reduce your ability to respond
to changing conditions, and your
reaction time gets worse with every
additional drink. So don't drink and
drive, and don't let your friends drink
and drive, either.
Pay Appropriate Attention to the
Task of Driving Safely
Engaging in mobile phone conversation
or other activities that keep you from
paying close attention to the road, other
vehicles and pedestrians could lead to
crash. Remenber, situations can change
quickly, and only you can decide when it
is safe to divert attention away from driving. Control Your Speed
Excessive speed is a major factor in
crash injuries and deaths. Generally, the
higher the speed, the greater the risk,
but serious injuries can also occur at
lower speeds. Never drive faster than is
safe for current conditions, regardless of
the maximum speed posted.
Keep Your Vehicle in Safe Condition
Having a tire blowout or a mechanical
failure can be extremely hazardous. To
reduce the possibility of such problems,
check your tire pressures and condition
frequently, and perform all regularly
scheduled maintenance (see page 245).
Important Safety Precautions
6
Table of Contents
Page 52 of 351

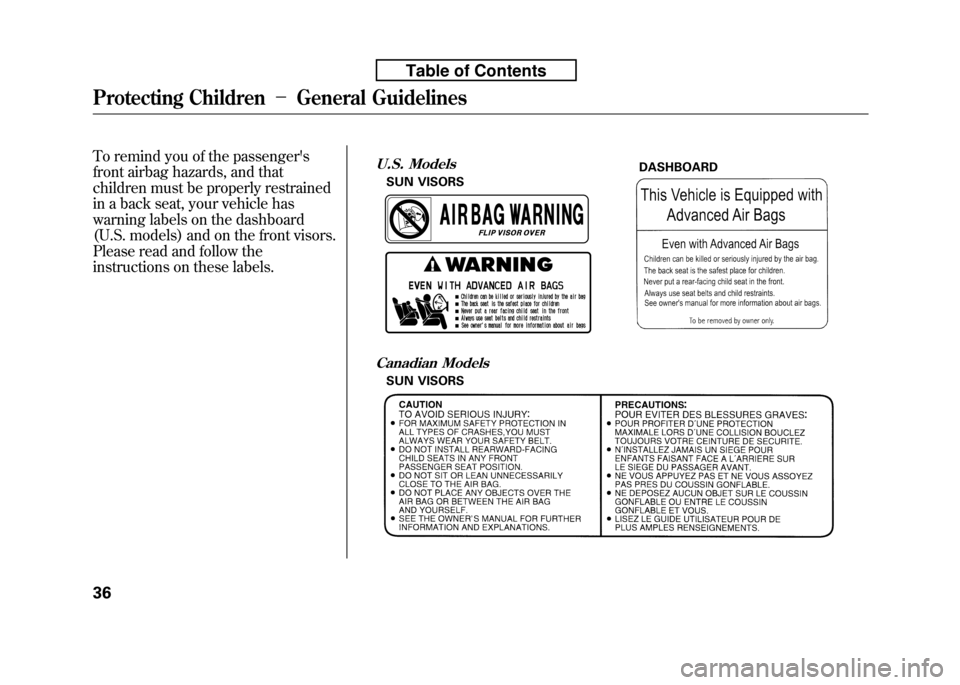
To remind you of the passenger's
front airbag hazards, and that
children must be properly restrained
in a back seat, your vehicle has
warning labels on the dashboard
(U.S. models) and on the front visors.
Please read and follow the
instructions on these labels.U.S. ModelsDASHBOARD
SUN VISORS
Canadian Models
SUN VISORS
Protecting Children -General Guidelines
36
Table of Contents
Page 73 of 351

This section gives information about
the controls and displays that
contribute to the daily operation of
your vehicle. All the essential
controls are within easy reach.Control Locations..........................
58
Instrument Panel ..........................
59
Instrument Panel Indicators ..........
60
Gauges ..........................................
68
Trip Meter ................................
69
Instant Fuel Economy ...............
70
Average Fuel Economy .............
70
Odometer ..................................
70
Fuel Gauge ...............................
70
Check Fuel Cap Indicator .........
70
Maintenance Minder ................
71
Controls Near the Steering
Wheel .......................................
72
Windshield Wipers and Washers ................................
73
Windshield Wipers ...................
73
Rear Window Wiper and
Washer .................................
73
Turn Signal and Headlights ..........
74
Headlights ....................................
75
Instrument Panel Brightness ........
76
Hazard Warning Button ................
76
Rear Window Defogger .................
76
Steering Wheel Adjustments .........
77Keys and Locks
............................. 78
Immobilizer System ......................
79
Ignition Switch ..............................
80
Door Locks ...................................
81
Power Door Locks ....................
81
Childproof Door Locks ..............
82
Auto Door Locking/ Unlocking .............................
83
Auto Door Locking ...................
83
Auto Door Unlocking ................
85
Tailgate .........................................
88
Remote Transmitter ......................
90
Seats .............................................
93
Power Windows ..........................
100
Mirrors .......................................
101
Parking Brake .............................
102
Interior Convenience Items .........
104
Lower Glove Box ....................
105
Upper Glove Box .....................
105
Beverage Holders ...................
106
Seat Under Box .......................
106
Accessory Power Socket .........
106
Sun Visor ................................
106
Interior Lights .............................
107
Instruments and Controls
57
Instruments and Controls
Page 79 of 351

High Temperature Indicator
This indicator monitors the
temperature of the engine coolant. It
normally comes on when you turn the
ignition switch to the ON (II) position
and goes off after a few seconds. In
normal driving conditions, this
indicator should not blink or stay on. In
severe driving conditions, such as very
hot weather or a long period of uphill
driving, this indicator may blink. This
means the engine coolant temperature
is high. If the indicator begins to blink
while you are driving, be sure to slow
down to prevent overheating. If the
indicator stays on, pull safely to the
side of the road and turn off the engine.
See page 301 for instructions and
precautions on checking the engine's
cooling system.
Do not drive the vehicle while the
indicator is on or the engine may bedamaged.Low Temperature Indicator
This indicator monitors the
temperature of the engine coolant. If
there is no problem, this indicator
comes on when the engine is cold. If
it comes on when the engine is warm
(normal operating temperature),
have the vehicle inspected by your
dealer as soon as possible.Turn Signal and
Hazard WarningIndicators
The left or right turn signal indicator
blinks when you signal a lane change
or turn. If an indicator does not blink
or blinks rapidly, it usually means
one of the turn signal bulbs is burned
out (see page 264). Replace the bulb
as soon as possible, since other
drivers cannot see that you aresignaling.
When you press the hazard warning
button, both turn signal indicators
and all turn signals on the outside of
the vehicle flash.
CONTINUED
Instrument Panel Indicators
63
Instruments and Controls
Table of Contents
Page 86 of 351

Instant Fuel Economy
This shows your instant fuel
economy in mpg (U.S.) or l/100 km(Canada).
Average Fuel Economy
This shows your vehicle's average
fuel economy in mpg (U.S.) or 1/100
km (Canada) since you last reset the
trip meter.
When you reset a trip meter, the
average fuel economiy for that trip
meter also resets.Odometer
The odometer shows the total
distance your vehicle has been
driven. It measures miles in U.S.
models and kilometers in Canadian
models. It is illegal under U.S.
federal law and Canadian provincial/
territorial regulations to disconnect,
reset, or alter the odometer with the
intent to change the number of miles
or kilometers indicated.
Fuel Gauge
This shows how much fuel you have.
It may show slightly more or less
than the actual amount. The needle
returns to the bottom after you turn
off the ignition.
Avoid driving with an extremely low
fuel level. Running out of fuel could
cause the engine to misfire, damaging
the catalytic converter.Check Fuel Cap Indicator
If the fuel fill cap is loose or missing,a
‘‘CHECK FUEL CAP ’’message
appears on the information display
after you start the engine. The
message changes from CHECK, to
FUEL, to CAP repeatedly.
Turn the engine off and confirm the
fuel fill cap is installed. If it is, loosen
the cap, then retighten it until it
clicks at least once. You can cycle the
message off of the display by
pressing the select/reset knob
repeatedly, but this message will be
displayed each time the engine is
started. It will take several days of
normal driving for the vehicle to turn
the warning off.
Gauges
70
Table of Contents
Page 88 of 351

ꭧ1: To use the horn, press the center pad of the steering wheel.
ꭧ 2: If equipped.
ꭧ 3: Only on vehicles equipped with navigation system. Refer to the navigation system manual.
PADDLE SHIFTER (DOWNSHIFT)ꭧ2
(P. 224)
HEADLIGHTS/
TURN SIGNAL/
FOG LIGHTS
ꭧ2
(P. 74)
NAVIGATION SYSTEM
VOICE CONTROL BUTTONS
ꭧ3
STEERING WHEEL
ADJUSTMENTS
(P. 77) CRUISE CONTROLBUTTONSꭧ
2
(P. 194) AUXILIARY INPUT JACK
(P. 190)
ACCESSORY POWER SOCKET
(P. 106) PASSENGER AIRBAG OFFINDICATOR
(P. 31)
REAR WINDOW
DEFOGGER/HEATED
MIRROR BUTTON
ꭧ
2
(P. 76/102)
WINDSHIELD
WIPERS/WASHERS
(P. 73)
HAZARD WARNING BUTTON
(P. 76)
PADDLE SHIFTER (UPSHIFT)
ꭧ
2
(P. 224)
INSTRUMENT PANEL
BRIGHTNESS
(P. 76)
REMOTE AUDIO
CONTROL BUTTONS
ꭧ 2
(P. 189)
VEHICLE STABILITY
ASSIST (VSA) SYSTEM
OFF SWITCH
ꭧ 2
(P. 234)
Vehicle with navigation system is shown. HORN
ꭧ
1
Controls Near the Steering Wheel
72
Table of Contents
Page 92 of 351

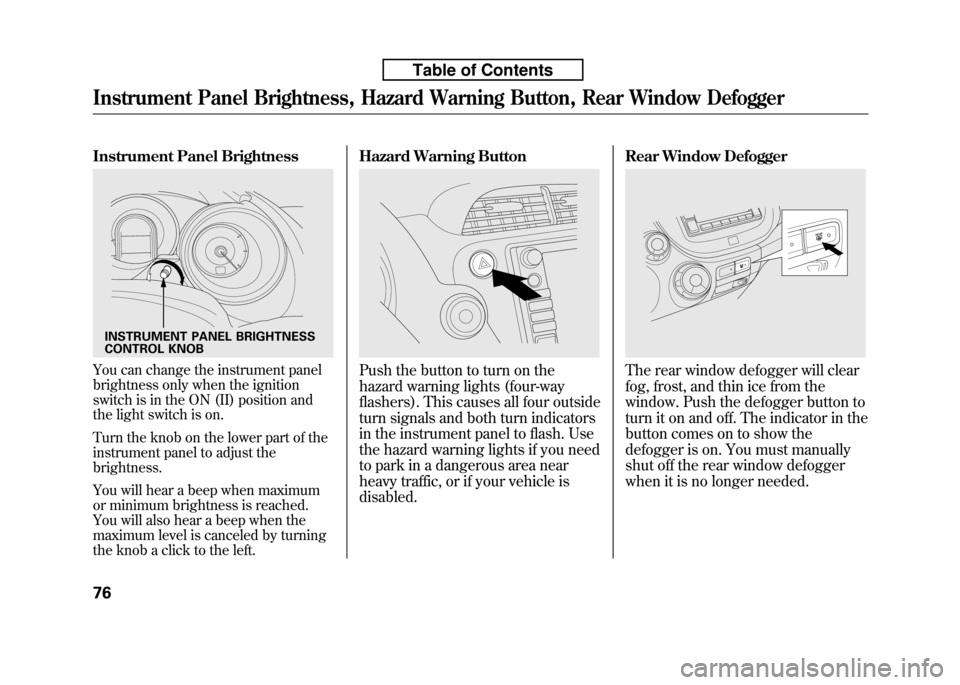
Instrument Panel Brightness
You can change the instrument panel
brightness only when the ignition
switch is in the ON (II) position and
the light switch is on.
Turn the knob on the lower part of the
instrument panel to adjust thebrightness.
You will hear a beep when maximum
or minimum brightness is reached.
You will also hear a beep when the
maximum level is canceled by turning
the knob a click to the left.Hazard Warning ButtonPush the button to turn on the
hazard warning lights (four-way
flashers). This causes all four outside
turn signals and both turn indicators
in the instrument panel to flash. Use
the hazard warning lights if you need
to park in a dangerous area near
heavy traffic, or if your vehicle isdisabled.
Rear Window DefoggerThe rear window defogger will clear
fog, frost, and thin ice from the
window. Push the defogger button to
turn it on and off. The indicator in the
button comes on to show the
defogger is on. You must manually
shut off the rear window defogger
when it is no longer needed.
INSTRUMENT PANEL BRIGHTNESS
CONTROL KNOB
Instrument Panel Brightness, Hazard Warning Button, Rear Window Defogger
76
Table of Contents
Page 109 of 351

Front Seat Adjustments
See pages 11-12 for important safety
information and warnings about how to properly position the seats and seat-
backs.
Make all seat adjustments before you
start driving.
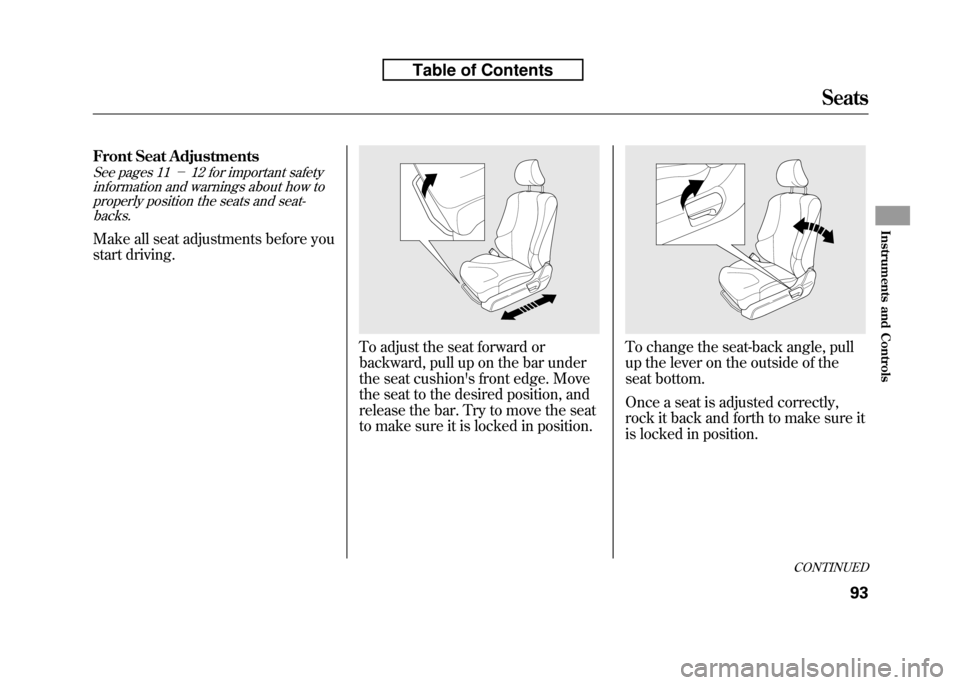
To adjust the seat forward or
backward, pull up on the bar under
the seat cushion's front edge. Move
the seat to the desired position, and
release the bar. Try to move the seat
to make sure it is locked in position.To change the seat-back angle, pull
up the lever on the outside of the
seat bottom.
Once a seat is adjusted correctly,
rock it back and forth to make sure it
is locked in position.
CONTINUED
Seats
93
Instruments and Controls
Table of Contents