2010 HONDA FIT spare wheel
[x] Cancel search: spare wheelPage 9 of 351

Service Intervals.........................245
Service Manual (U.S. only) ........335
Service Station Procedures ........199
Setting the Clock ........................192
Shifting the Automatic Transmission .......................... 219
Shift Lever Position Indicators ...219
Shift Lock Release ......................223
Side Airbags ................................. 28
How the Side Airbag Off
Indicator Works ...................31
How Your Side Airbags Work ..28
Side Curtain Airbags ....................30
How Your Side Curtain Airbags Work .................................... 30
Side Marker Lights, Bulb Replacement in .......................263
Signaling Turns ............................ 63
Snow Tires ................................. 278
Spare Tire .................................. 284
Inflating ........................... 273, 284
Specifications .......................... 320
Spark Plugs ................................ 318
Specifications ............................. 318
Speed Control ............................ 194
Speed Limiter ......................218, 222Speedometer
................................ 68
SRS, Additional Information .........22
Additional Safety Precautions ...33
Airbag Service .......................... 32
Airbag System Components .....22
How the Side Airbag Off Indicator Works ...................31
How the SRS Indicator Works ..30
How Your Front Airbags Work .................................... 25
How Your Side Airbags Work ..28
How Your Side Curtain Airbags
Work .................................... 30
SRS Indicator ......................... 30, 61
START (Ignition Key Position) .....80
Starting the Engine ....................216
In Cold Weather at High Altitude ................................ 216
With a Dead Battery ................299
State Emissions Testing .............329
Steam Coming from Engine .......301
Steering Wheel
Adjustments ............................. 77
Anti-theft Column Lock ............80
Buttons ........................... 189, 194
Storing Your Vehicle ..................281Sun Visor
................................... 106
Supplemental Restraint
System .............................. 9, 22
Servicing .................................. 32
SRS Indicator ...................... 30, 61
System Components ................22
Synthetic Oil .............................. 254
T
Tachometer .................................. 68
Tailgate ........................................ 88
Open Indicator ......................... 62
Opening the ............................. 88
Taillights, Changing Bulbs in .....266
Taking Care of the
Unexpected ............................ 283
CONTINUED
Index
IX
INDEX
Page 10 of 351

Technical DescriptionsDOT Tire Quality Grading (U.S.
Vehicles) ............................. 321
Emissions Control Systems .....326
Three Way Catalytic Converter ............................ 328
Tire Labeling ........................... 323
Tire Pressure Monitoring System (TPMS) -Required Federal
Explanation ...................... 324
Temperature Indicator .................63
Temporarily Repairing a Flat
Tire ........................................ 291
Tensioners, Seat Belts ..................20
Tether Anchorage Points .............47
Theft Protection, Radio ..............191
Three Way Catalytic Converter ............................... 328
Tilt/Telescopic Steering Wheel ...77
Time, Setting the ........................192
Tire Chains ................................ 278
Tire, How to Change a Flat ........285
Tire Information .........................323
Tire Labeling .............................. 323
Tire Pressure Monitoring System (TPMS) ........................... 235, 324Tires
.......................................... 273
Air Pressure ............................ 274
Chains ..................................... 278
Checking Wear .......................275
Compact Spare ........................284
DOT Tire Quality Grading (U.S. Vehicles) ............................. 321
Inflation ................................... 273
Inspection ............................... 275
Labeling .................................. 323
Low Tire Pressure
Indicator ........................ 64, 235
Maintenance ........................... 276
Pressure Monitoring System ...235
Replacing ................................ 276
Rotating .................................. 276
Snow ....................................... 278
Specifications .......................... 320
Tools, Tire Changing .................285
Towing
A Trailer .................................. 238
Emergency Wrecker ...............311
TPMS (Tire Pressure Monitoring
System) .............................. 235
Indicator ............................ 64, 236Required Federal
Explanation ......................... 324
Transmission Checking Fluid Level, Automatic ............................ 259
Checking Fluid Level, Manual ................................ 260
Fluid Selection ................259, 260
Identification Number .............316
Shifting the Automatic .............219
Shifting the Manual .................217
Treadwear .................................. 321
Trip Meter ................................... 69
Turn Signals ................................. 63
U
Unexpected, Taking Care of the .......................................... 283
Uniform Tire Quality Grading
(U.S. only) .............................. 321
Unleaded Gasoline .....................198
Upper Glove Box ........................105
USB Flash Memory Device Error Messages ........................ 142, 183
Index
X
Page 11 of 351

Used Oil, How to Dispose of......255
V
Vehicle Capacity Load ................209
Vehicle Dimensions ...................318
Vehicle Identification Number ...316
Vehicle Stability Assist (VSA
®),
aka Electronic Stability
Control (ESC), System
VSA OFF Indicator ..................233
Vehicle Stability Assist (VSA) System ................................ 233
VSA OFF Indicator ...................67
VSA OFF Switch .....................234
VSA System Indicator ..............67
Vehicle Storage .......................... 281
Ventilation .................................. 112
VIN ............................................ 316
Viscosity, Oil .............................. 253
W
WARNING, Explanation of ...........iii
Warning Labels, Location of .........54Warranty Coverages (U.S.
only) ....................................... 333
Washer, Windshield Checking the Fluid Level ........258
Fluid Level Indicator (Canada only) ..................................... 65
Operation ................................. 73
Wheels Adjusting the Steering ..............77
Alignment and Balance ...........276
Compact Spare ........................284
Wrench, Nut ........................... 285
Windows Auto Reverse ........................... 101
Operating the Power ...............100
Rear, Defogger ......................... 76
Windshield Cleaning ................................... 73
Defroster ................................. 113
Washers ............................ 73, 258
Wipers, Windshield
Changing Blades .....................269
Operation ................................. 73
Rear Windshield Wiper and Washer ................................. 73
Worn Tires ................................. 275Wrecker, Emergency Towing
....311
Index
XI
INDEX
Page 252 of 351

Changing a Tire with TPMS
If you have a flat tire, the low tire
pressure indicator will come on.
Replace the flat tire with the compact
spare tire (see page 284).
Each wheel (except the compact
spare tire wheel) is equipped with a
tire pressure sensor mounted inside
the tire behind the valve stem. You
must use TPMS specific wheels. It is
recommended that you always have
your tires serviced by your dealer or
qualified technician.
After you replace the flat tire with the
compact spare tire, the low tire
pressure indicator stays on. This is
normal; the system is not monitoring
the spare tire pressure. Manually
check the spare tire pressure to be
sure it is correct. After several miles
(kilometers) driving with the
compact spare tire, the TPMS
indicator comes on and the low tire
pressure indicator goes off.The low tire pressure indicator or the
TPMS indicator will go off, after
several miles (kilometers) driving,
when you replace the spare tire with
the specified regular tire equipped
with the tire pressure monitorsensor.
Never use a puncture-repairing agent
in a flat tire. If used, you will have to
replace the tire pressure sensor.
Have the flat tire repaired by your
dealer as soon as possible.As required by the FCC: This device
complies with Part 15 of the FCC rules.
Operation is subject to the following twoconditions: (1) This device may notcause harmful interference, and (2) thisdevice must accept any interference
received, including interference that may cause undesired operation.
Changes or modifications not expresslyapproved by the party responsible forcompliance could void the user'sauthority to operate the equipment.
This device complies with IndustryCanada Standard RSS-210. Operation is
subject to the following two conditions: (1) this device may not causeinterference, and (2) this device must
accept any interference that may causeundesired operation of the device.
Tire Pressure Monitoring System (TPMS)
237
Driving
Table of Contents
Page 299 of 351

Except all Canadian models withautomatic transmission
Use the compact spare tire as a
temporary replacement only. Get
your regular tire repaired or
replaced, and put it back on your
vehicle as soon as you can.
Check the inflation pressure of the
compact spare tire every time you
check the other tires. It should be
inflated to:
60 psi (420 kPa, 4.2 kgf/cm
2) Follow these precautions:
● Never exceed 50 mph (80 km/h).
● This tire gives a harsher ride and
less traction on some road
surfaces. Use greater caution while driving.
● Do not mount tire chains on the
compact spare tire.
● Do not use your compact spare tire
on another vehicle unless it is the
same make and model.
● On vehicles with the TPMS
system, the low tire pressure
indicator comes on and stays on
after you replace the flat tire with
the compact spare tire. After
several miles (kilometers) driving
with the compact spare tire, the
TPMS indicator comes on and the
low tire pressure indicator goesoff.Replace the tire when you can see
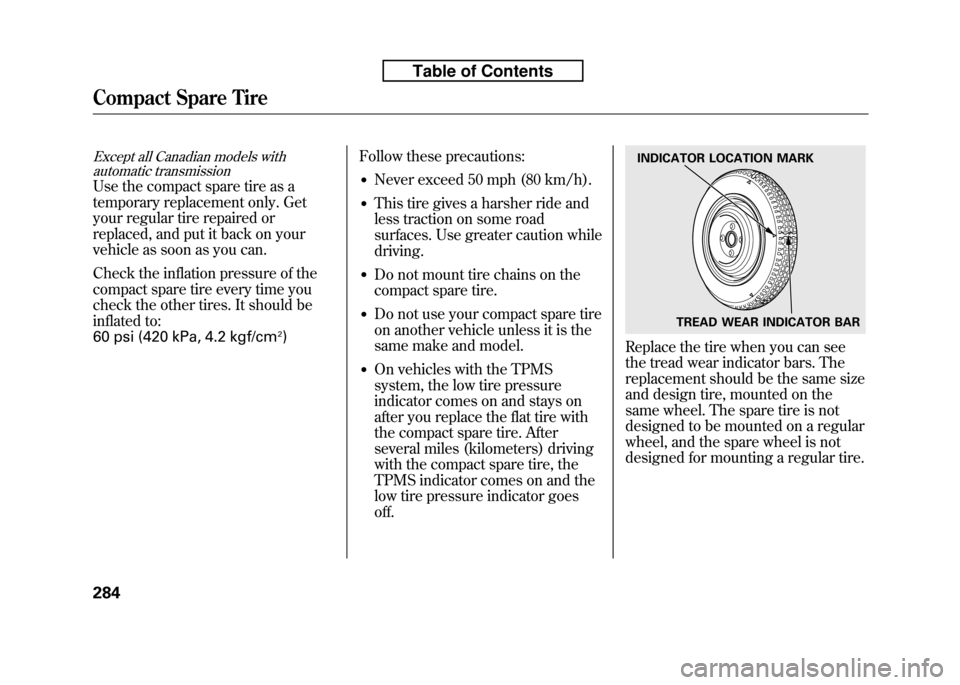
the tread wear indicator bars. The
replacement should be the same size
and design tire, mounted on the
same wheel. The spare tire is not
designed to be mounted on a regular
wheel, and the spare wheel is not
designed for mounting a regular tire.
INDICATOR LOCATION MARK
TREAD WEAR INDICATOR BAR
Compact Spare Tire
284
Table of Contents
Page 301 of 351

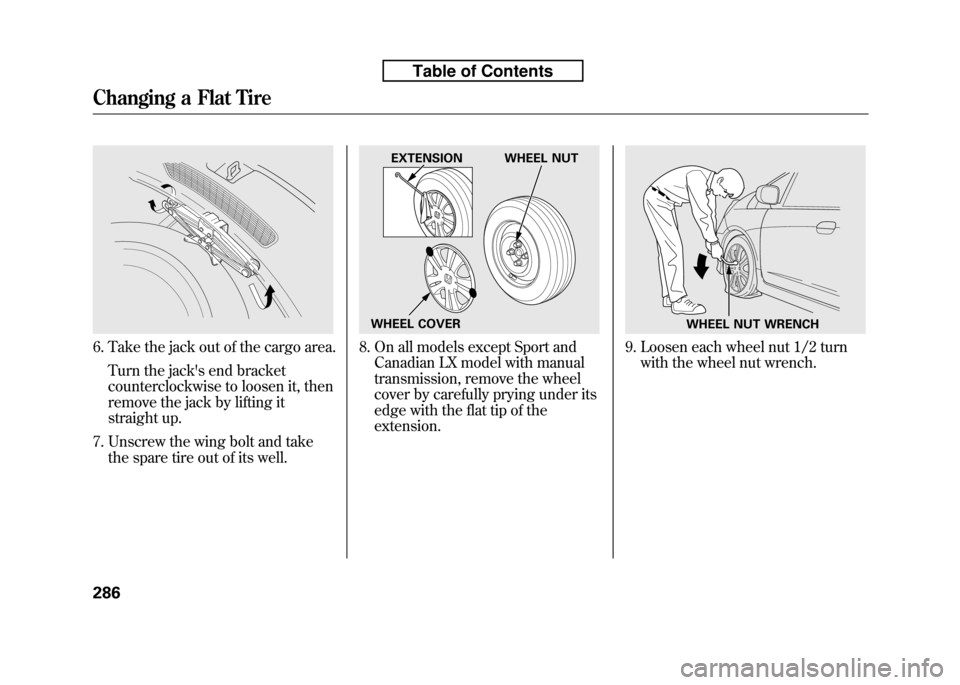
6. Take the jack out of the cargo area.Turn the jack's end bracket
counterclockwise to loosen it, then
remove the jack by lifting it
straight up.
7. Unscrew the wing bolt and take the spare tire out of its well.8. On all models except Sport andCanadian LX model with manual
transmission, remove the wheel
cover by carefully prying under its
edge with the flat tip of theextension.9. Loosen each wheel nut 1/2 turnwith the wheel nut wrench.
EXTENSION WHEEL NUT
WHEEL COVER
WHEEL NUT WRENCH
Changing a Flat Tire
286
Table of Contents
Page 302 of 351

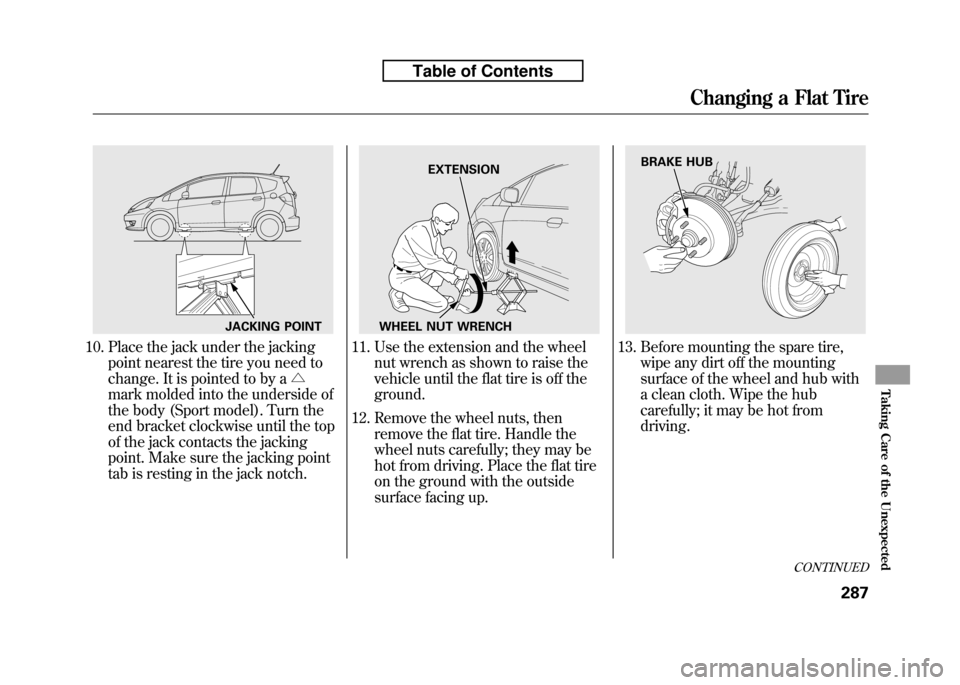
10. Place the jack under the jackingpoint nearest the tire you need to
change. It is pointed to by a △
mark molded into the underside of
the body (Sport model). Turn the
end bracket clockwise until the top
of the jack contacts the jacking
point. Make sure the jacking point
tab is resting in the jack notch.11. Use the extension and the wheel nut wrench as shown to raise the
vehicle until the flat tire is off theground.
12. Remove the wheel nuts, then remove the flat tire. Handle the
wheel nuts carefully; they may be
hot from driving. Place the flat tire
on the ground with the outside
surface facing up.13. Before mounting the spare tire,wipe any dirt off the mounting
surface of the wheel and hub with
a clean cloth. Wipe the hub
carefully; it may be hot fromdriving.
JACKING POINT
EXTENSION
WHEEL NUT WRENCHBRAKE HUB
CONTINUED
Changing a Flat Tire
287
Taking Care of the Unexpected
Table of Contents
Page 303 of 351

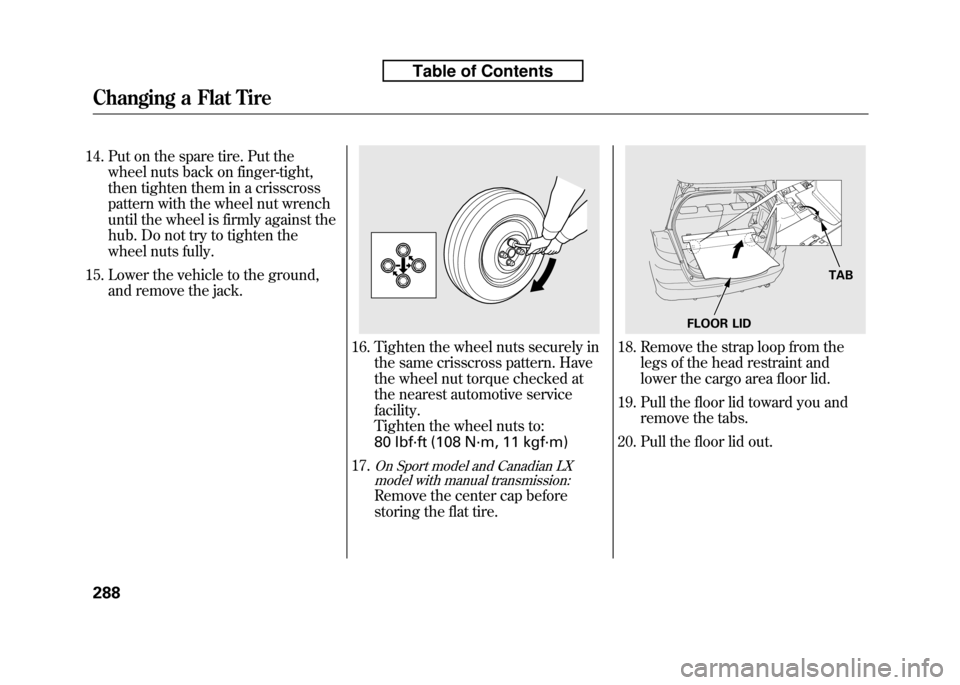
14. Put on the spare tire. Put thewheel nuts back on finger-tight,
then tighten them in a crisscross
pattern with the wheel nut wrench
until the wheel is firmly against the
hub. Do not try to tighten the
wheel nuts fully.
15. Lower the vehicle to the ground, and remove the jack.
16. Tighten the wheel nuts securely in the same crisscross pattern. Have
the wheel nut torque checked at
the nearest automotive servicefacility.
Tighten the wheel nuts to:
80 lbf·ft (108 N·m, 11 kgf·m)
17.
On Sport model and Canadian LX model with manual transmission:
Remove the center cap before
storing the flat tire.
18. Remove the strap loop from the
legs of the head restraint and
lower the cargo area floor lid.
19. Pull the floor lid toward you and remove the tabs.
20. Pull the floor lid out.
TAB
FLOOR LID
Changing a Flat Tire
288
Table of Contents